ESP8266 (ESP-WROOM-02) に温度湿度気圧センサー(BME280)を繋いでAmbientに連携して可視化してみました。
※最終的に、このセンサー&ESP8266は自宅ガレージの環境監視に使う予定
パーツについて
BME280は温度・湿度・気圧が高精度に測定できるセンサーです。
¥600~¥1,500ぐらいです。
安くて似ているBMP280というセンサーは温度・気圧のみで湿度が測定できないので注意。紛らわしい。
ESP8266はNodeMcu Lua ESP8266 CH340という開発ボードを使っています。
中国から届くのに時間がかかりますが、¥480と激安です。
回路について
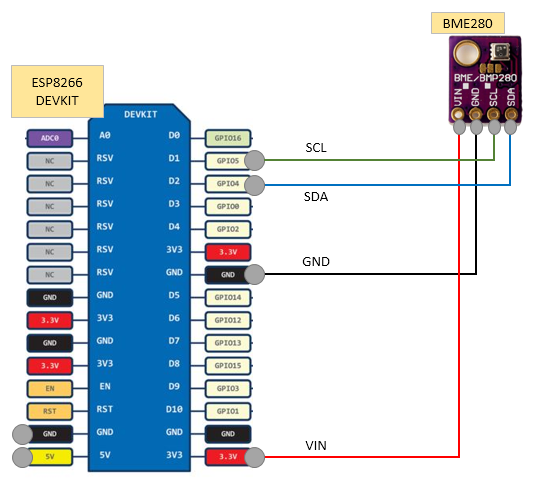
BME280はI2Cという規格で接続できるセンサーです。
この規格であれば、ESP8266から比較的簡単に利用できるようです。
Amazonでも色々なI2Cデバイスが売られているので眺めているだけでも夢が広がります。
接続は、
SCLにGPIO5、SDAにGPIO4を繋いで、
後は電源とGNDを繋ぐだけです。
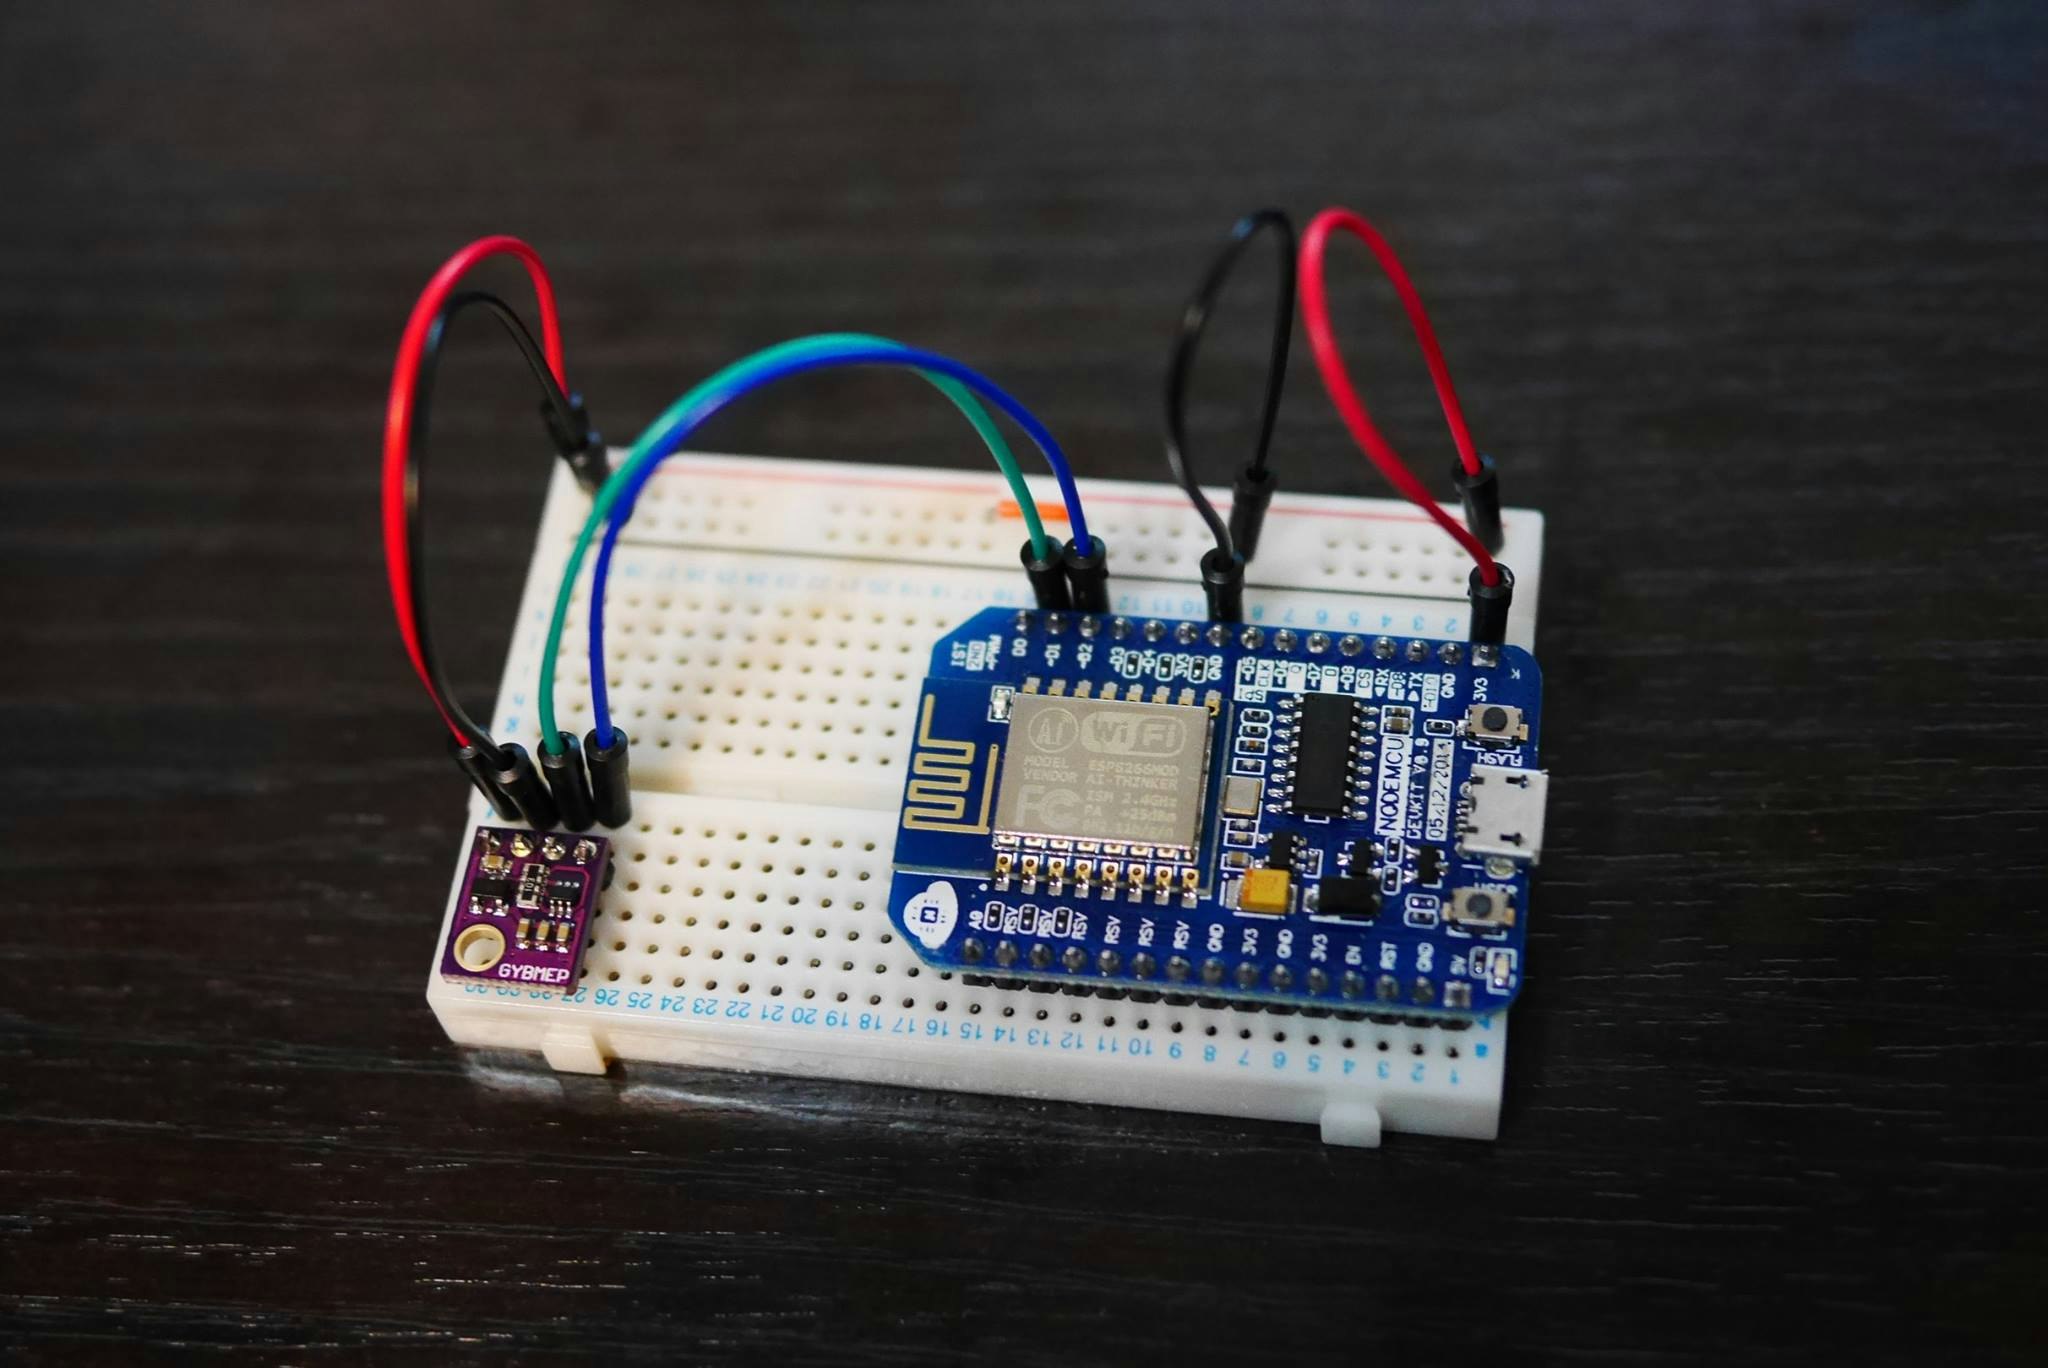
ピンヘッダ逆さに付けちゃったかも(T~T) ↑ L字のピンヘッダの方がいいかもしれませんね。
回路図 っぽいもの
ソースコード
BME280とAmbientはライブラリが公開されていたので利用しました
# include <Wire.h>
# include <ESP8266WiFi.h>

# include "BME280_MOD-1022.h"
# include "Ambient.h"

extern "C" {
# include "user_interface.h"
}

# define PERIOD 300

//----------------------------------------------

const char* ssid = "wifiのAPのSSIDを入れる";
const char* password = "wifiのパスワードを入れる";

unsigned int channelId = AmbientのチャネルIDを入れる;
const char* writeKey = "Ambientのライトキーを入れる";

WiFiClient client;
Ambient ambient;

//----------------------------------------------

float temperature = 0.0;
float humidity    = 0.0;
float pressure    = 0.0;

void printFormattedFloat(float val) {
  char buffer[10];

  dtostrf(val, 4, 2, buffer);
  Serial.print(buffer);
}

void setup() {
  wifi_set_sleep_type(LIGHT_SLEEP_T);

  // I2Cの通信を開始
  // SDA: GPIO4
  // SCL: GPIO5
  Wire.begin(4, 5);
  Serial.println("I2C start.");

  // シリアル通信を開始
  Serial.begin(115200);
  Serial.println("Serial start.");

  // BME280を初期化
  BME280.readCompensationParams();

  // オーバーサンプリングの回数を設定
  BME280.writeOversamplingTemperature(os1x);
  BME280.writeOversamplingHumidity(os1x);
  BME280.writeOversamplingPressure(os1x);
  Serial.println("BME280 start.");

  // wifi初期化
  WiFi.begin(ssid, password);
  Serial.println("WiFi start.");

  // Wait for connection
  while (WiFi.status() != WL_CONNECTED) {
    delay(500);
    Serial.print(".");
  }
  Serial.println("");
  Serial.print("Connected to ");
  Serial.println(ssid);
  Serial.print("IP address: ");
  Serial.println(WiFi.localIP());

  // チャネルIDとライトキーを指定してAmbientの初期化
  ambient.begin(channelId, writeKey, &client);
  Serial.println("Ambient start.");

}

void loop() {
  // BME280を1度だけ測定を行うモードに設定し計測が終わるまで待機
  BME280.writeMode(smForced);
  while (BME280.isMeasuring()) {
    delay(1);
  }

  // BME280から測定値を読み取る
  BME280.readMeasurements();
  temperature = BME280.getTemperature();
  humidity = BME280.getHumidity();
  pressure = BME280.getPressure();

  // 読み取った値をシリアルにプリント
  Serial.print("Temperature: ");
  printFormattedFloat(temperature);
  Serial.println("");

  Serial.print("Humidity: ");
  printFormattedFloat(humidity);
  Serial.println("");

  Serial.print("Pressure: ");
  printFormattedFloat(pressure);
  Serial.println("");
  Serial.println("");

  // Ambientに連携
  ambient.set(1, temperature);
  ambient.set(2, humidity);
  ambient.set(3, pressure);
  ambient.send();

  delay(PERIOD * 1000);
}
- ライブラリを利用する場合は、hファイルとcppファイルをino(スケッチ)と同じディレクトリに置けばOKです
- 置いたライブラリは
#include <xxxx.h>ではなく#include "xxxx.h"で読み込みましょう
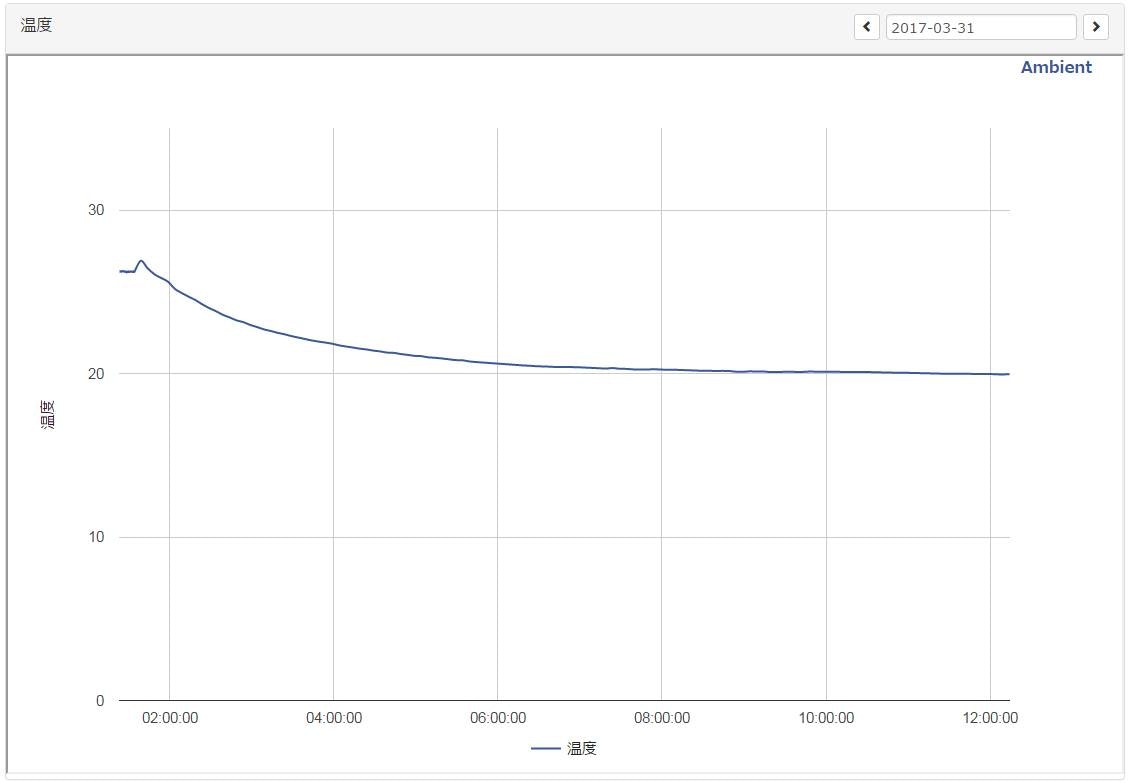
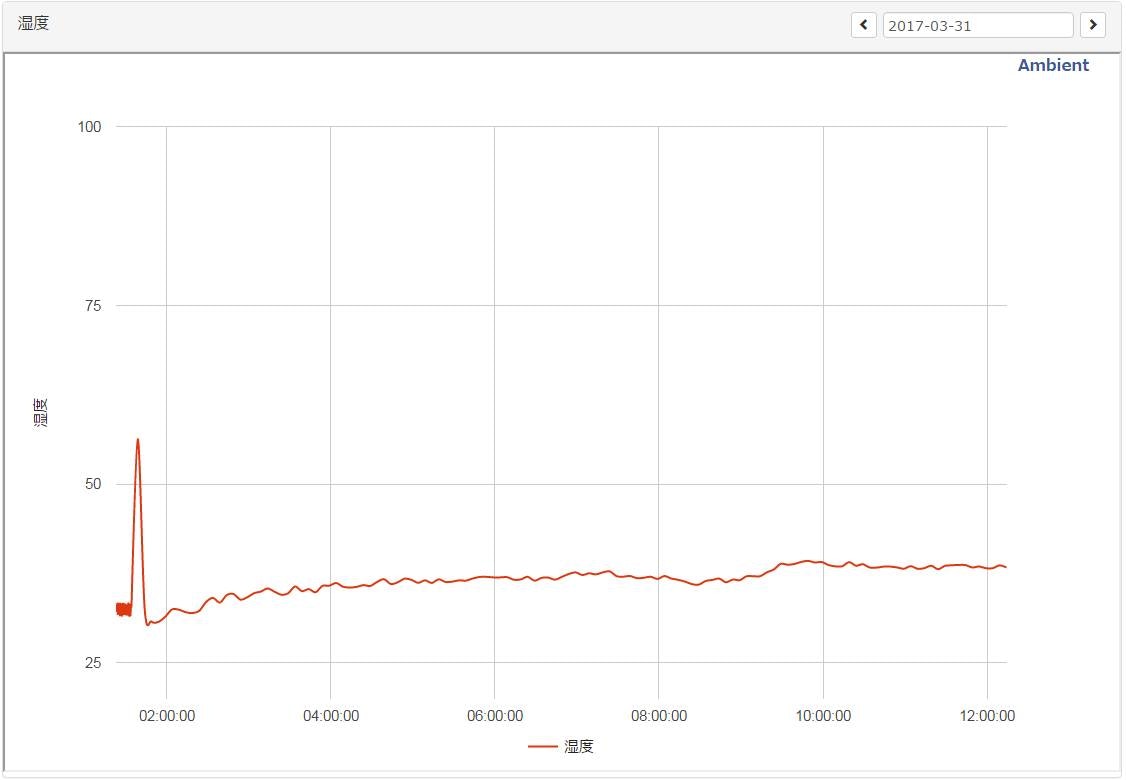
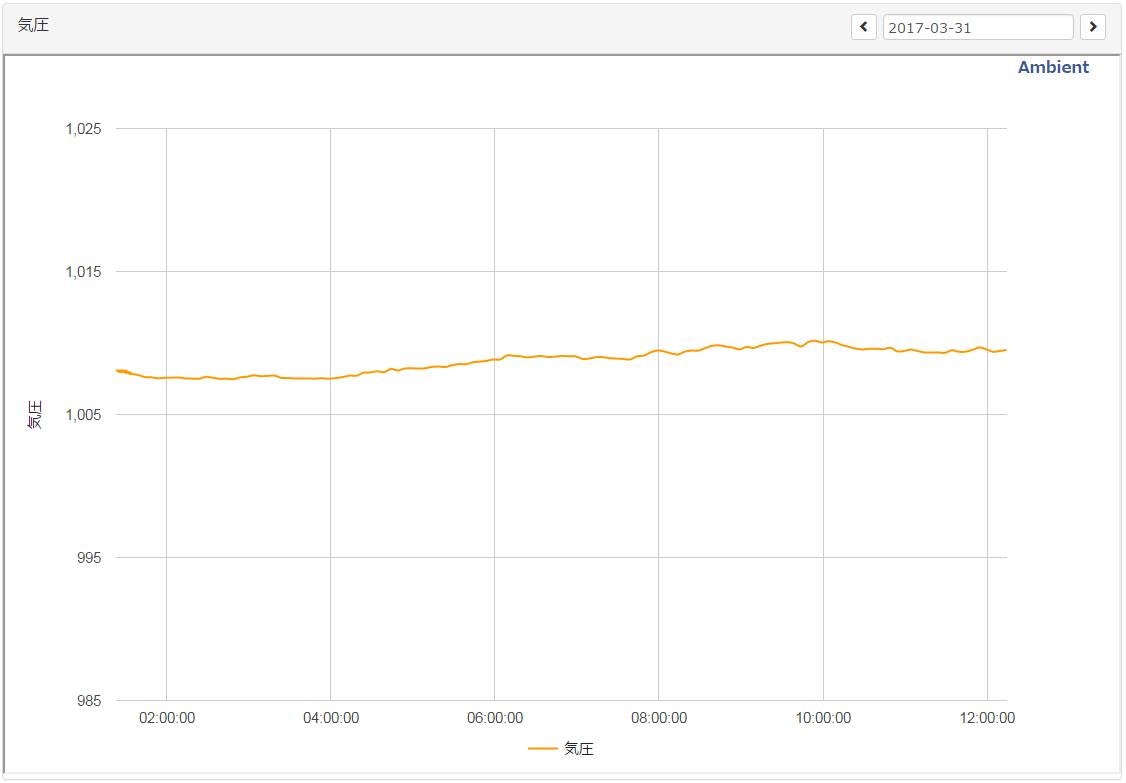
グラフ
Ambientに連携するとこの様にグラフ化してくれます。
グラフの種類も「折れ線グラフ」「棒グラフ」「散布図」等から選べます。
温度
湿度
気圧
参考URL
Arduino ESP8266で温度・湿度を測定し、Ambientに送ってグラフ化する
https://ambidata.io/docs/esp8266/
BME280のライブラリ
https://github.com/embeddedadventures/BME280
Ambientのライブラリ
https://github.com/TakehikoShimojima/Ambient_ESP8266_lib
I2C
https://ja.wikipedia.org/wiki/I2C
I2C バス仕様およびユーザーマニュアル
http://www.nxp.com/documents/user_manual/UM10204_JA.pdf