前準備
- 自己認証局
- ssl証明書の作成(今回はオレオレ証明書)
- SSLの有効化(httpd)
自己認証局とオレオレ証明書の発行(参考リンク先をなぞってるだけ)
# yum install -y openssl mod_ssl
# openssl req -new -x509 -keyout ca.key -out ca.crt -days 30 -sha256
Generating a 2048 bit RSA private key
.........................+++
....................................................+++
writing new private key to 'ca.key'
Enter PEM pass phrase:
Verifying - Enter PEM pass phrase:
-----
You are about to be asked to enter information that will be incorporated
into your certificate request.
What you are about to enter is what is called a Distinguished Name or a DN.
There are quite a few fields but you can leave some blank
For some fields there will be a default value,
If you enter '.', the field will be left blank.
-----
Country Name (2 letter code) [XX]:JP
State or Province Name (full name) []:Osaka
Locality Name (eg, city) [Default City]:Osaka
Organization Name (eg, company) [Default Company Ltd]:Test.co.,Ltd
Organizational Unit Name (eg, section) []:
Common Name (eg, your name or your server's hostname) []:CA mine
Email Address []:

# cd /etc/pki/tls/private/
# openssl genrsa -out site.key 2048
Generating RSA private key, 2048 bit long modulus
.......+++
........................................+++
e is 65537 (0x10001)

# cd /etc/pki/certs/
# openssl req -new -sha256 -key /etc/pki/tls/private/site.key -out oreore.csr
You are about to be asked to enter information that will be incorporated
into your certificate request.
What you are about to enter is what is called a Distinguished Name or a DN.
There are quite a few fields but you can leave some blank
For some fields there will be a default value,
If you enter '.', the field will be left blank.
-----
Country Name (2 letter code) [XX]:JP
State or Province Name (full name) []:Osaka
Locality Name (eg, city) [Default City]:Osaka
Organization Name (eg, company) [Default Company Ltd]:Test.co.,Ltd
Organizational Unit Name (eg, section) []:
Common Name (eg, your name or your server's hostname) []:www.ore.jp
Email Address []:

Please enter the following 'extra' attributes
to be sent with your certificate request
A challenge password []:
An optional company name []:


;;===== ファイルが存在しない場合にやる
# touch /etc/pki/CA/index.txt
# echo '1000' > /etc/pki/CA/serial
;;==== ファイルが有る場合はやらない


# openssl ca -md sha256 -cert /etc/pki/CA/certs/ca.crt -keyfile /etc/pki/CA/certs/ca.key -out oreore.crt -infiles oreore.csr
Using configuration from /etc/pki/tls/openssl.cnf
Enter pass phrase for /etc/pki/CA/certs/ca.key:
Check that the request matches the signature
Signature ok
Certificate Details:
        Serial Number: 4096 (0x1000)
        Validity
            Not Before: Jul 31 13:47:06 2015 GMT
            Not After : Jul 30 13:47:06 2016 GMT
        Subject:
            countryName               = JP
            stateOrProvinceName       = Osaka
            organizationName          = Test.co.,Ltd
            commonName                = test
        X509v3 extensions:
            X509v3 Basic Constraints:
                CA:FALSE
            Netscape Comment:
                OpenSSL Generated Certificate
            X509v3 Subject Key Identifier:
                4A:BB:05:F5:DA:1A:57:B7:BE:78:88:0A:84:37:35:BD:55:01:54:93
            X509v3 Authority Key Identifier:
                keyid:11:D5:6A:6B:BC:BB:CF:01:71:38:00:57:E6:36:38:D1:BF:9A:2F:B5

Certificate is to be certified until Jul 30 13:47:06 2016 GMT (365 days)
Sign the certificate? [y/n]:y


1 out of 1 certificate requests certified, commit? [y/n]y
Write out database with 1 new entries
Data Base Updated
httpd側の設定
- /etc/httpd/conf.d/ssl.conf
#   Server Certificate:
# Point SSLCertificateFile at a PEM encoded certificate.  If
# the certificate is encrypted, then you will be prompted for a
# pass phrase.  Note that a kill -HUP will prompt again.  A new
# certificate can be generated using the genkey(1) command.
# SSLCertificateFile /etc/pki/tls/certs/localhost.crt    ; ココを
SSLCertificateFile /etc/pki/tls/certs/oreore.crt         ; こうする

#   Server Private Key:
#   If the key is not combined with the certificate, use this
#   directive to point at the key file.  Keep in mind that if
#   you've both a RSA and a DSA private key you can configure
#   both in parallel (to also allow the use of DSA ciphers, etc.)
# SSLCertificateKeyFile /etc/pki/tls/private/localhost.key ; ココを
SSLCertificateKeyFile /etc/pki/tls/private/site.key        ; こうする
- httpdの再起動
# /etc/init.d/httpd restart
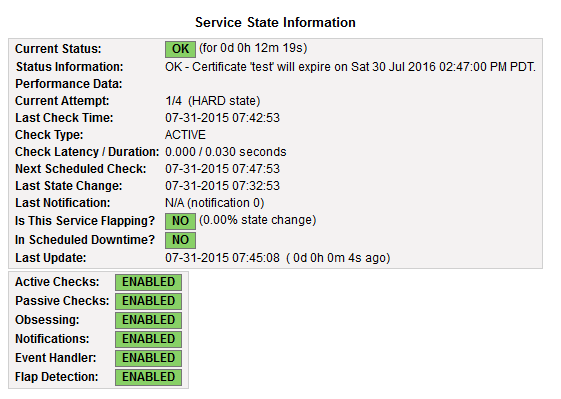
Nagiosの監視設定
- 使うもの
- check_http
Usage:
 check_http -H <vhost> | -I <IP-address> [-u <uri>] [-p <port>]
       [-J <client certificate file>] [-K <private key>]
       [-w <warn time>] [-c <critical time>] [-t <timeout>] [-L] [-E] [-a auth]
       [-b proxy_auth] [-f <ok|warning|critcal|follow|sticky|stickyport>]
       [-e <expect>] [-d string] [-s string] [-l] [-r <regex> | -R <case-insensitive regex>]
       [-P string] [-m <min_pg_size>:<max_pg_size>] [-4|-6] [-N] [-M <age>]
       [-A string] [-k string] [-S <version>] [--sni] [-C <warn_age>[,<crit_age>]]
       [-T <content-type>] [-j method]

ex) check_http -I 192.168.1.1 -C 30,15
    -> 192.168.1.1の証明書の有効期限が
      > 30  : OK
      >= 15 : WARNING
      < 15  : CRITICAL
- command.cfg
# 'check_ssl_expire_time' command definition by 'check_http' command used.
define command {
        command_name    check_ssl_expire_time
        command_line    $USER1$/check_http -I $HOSTADDRESS$ -C $ARG1$
}
- locahost.cfg(実際の監視対象)
### ssl expire check ###
define service {
      use                               local-service
      host_name                         localhost
      service_description               ssl expires
      check_command                     check_ssl_expire_time!30,15
}
