はじめに
2021年10月27日に、GitHubActionsでOpenID Connect(OIDC)をサポートするようになったと公式に発表がありました。
これまでは、GitHubActionsから各種クラウドへアクセスするためには、永続的なCredential情報をGitHub側に持たせる必要があったため、漏洩した際のリスクが懸念されていました。OIDCをサポートしたことにより、クラウドプロバイダとGitHub間でシームレスな認証が可能となりました。
本記事では、GitHubActionsからTerraformを実行し、AWSリソースへアクセスする際の各種設定および検証結果についてまとめたいと思います。
※OIDCの仕組みについては本記事の対象外とします。理解したい方は以下の記事がとても参考になりました。
準備
- Terraform実行用のGitHubActionsワークフローの作成
- Hashicorpが提供するサンプルがあるので、こちらをGitHubリポジトリに作成しておきます。このワークフローは、mainブランチへのpushイベントを契機として、リポジトリのルートディレクトリ配下でterraformの各種コマンドを実行します。
- tfファイルの作成
- 検証用として、AWSのデフォルトVPCの情報を取得するmain.tfを用意しておきます。
terraform {
  required_providers {
    aws = {
      source  = "hashicorp/aws"
      version = "3.63.0"
    }
  }
}

provider "aws" {
  region = "ap-northeast-1"
}

data "aws_vpc" "default" {
  default = true
}

output "default_vpc_cidr_block" {
  value = data.aws_vpc.default.cidr_block
}
設定手順
AWSとGitHubActionsのそれぞれで以下の設定を順に実施していきます。
AWS側の設定
Cloudformationテンプレートの作成
AWS側にIAMプロバイダとIAMロールを作成します。configure-aws-credentialsリポジトリに、Cloudformationテンプレートのサンプルが公開されているため、これを利用してリソースを作成します。IAMロールに付与するポリシーは、今回VPCの情報のみを取得するので AmazonVPCReadOnlyAccess を設定しています。
Parameters:
  GitHubOrg:
    Type: String
  RepositoryName:
    Type: String
  OIDCProviderArn:
    Description: Arn for the GitHub OIDC Provider.
    Default: ""
    Type: String

Conditions:
  CreateOIDCProvider: !Equals
    - !Ref OIDCProviderArn
    - ""

Resources:
  Role:
    Type: AWS::IAM::Role
    Properties:
      AssumeRolePolicyDocument:
        Statement:
          - Effect: Allow
            Action: sts:AssumeRoleWithWebIdentity
            Principal:
              Federated: !If
                - CreateOIDCProvider
                - !Ref GithubOidc
                - !Ref OIDCProviderArn
            Condition:
              StringLike:
                token.actions.githubusercontent.com:sub: !Sub repo:${GitHubOrg}/${RepositoryName}:*
      # ロールに紐づけるIAMポリシーを設定
+     ManagedPolicyArns:
+       - arn:aws:iam::aws:policy/AmazonVPCReadOnlyAccess
  GithubOidc:
    Type: AWS::IAM::OIDCProvider
    Condition: CreateOIDCProvider
    Properties:
      Url: https://token.actions.githubusercontent.com
      ClientIdList:
        - sts.amazonaws.com
      ThumbprintList:
        - a031c46782e6e6c662c2c87c76da9aa62ccabd8e

Outputs:
  Role:
    Value: !GetAtt Role.Arn
GitHubActions側の設定
GitHubActionsでOIDC連携させるためには、OIDCトークンの取得権限付与、およびアクセストークン取得処理をワークフローに記述する必要があります。
id-tokenの権限を設定
permissionsキーを指定することで、GITHUB_TOKENのデフォルトの権限を変更することができます。以下のように記述することによってOIDCのIDトークンが取得できるようになります。
permissions:
  id-token: write
アクセストークン取得処理追加
aws-actions/configure-aws-credentialsアクションを使うことで、GitHub OIDCプロバイダーからJWTを受信し、AWSにアクセストークンをリクエストします。アクションの引数には、以下の2つの引数を指定します。
-
role-to-assume: Cloudformationで作成されたIAMロールのARN -
aws-region: AWSリージョン名
その他のオプション引数を指定した際の動作については、こちらを確認してください。
- name: configure aws credentials
  uses: aws-actions/configure-aws-credentials@v1
  with:
    role-to-assume: arn:aws:iam::123456789012:role/OIDCTest-Role-XXXXXXXXXXXXX
    aws-region: ap-northeast-1
configure-aws-credentialsは、2021-11-23のv1.6.0リリースに伴い、v1タグが付与されました。GitHubの公式ドキュメントでは、ブランチ指定(@master)での使用が明記されていますが、タグ指定(@v1)も可能となっています。ブランチ指定の場合、今後予期しないバージョンアップなどで変更が入ることもあるので、タグ指定をするのが良いかなと思います。
Terraformサンプルワークフローの修正
GitHubActionsワークフローの作成で作成したワークフローに上記2点を追加します。修正したワークフローが以下になります。
Terraform実行用GitHubActionsワークフロー
# This workflow installs the latest version of Terraform CLI and configures the Terraform CLI configuration file
# with an API token for Terraform Cloud (app.terraform.io). On pull request events, this workflow will run
# `terraform init`, `terraform fmt`, and `terraform plan` (speculative plan via Terraform Cloud). On push events
# to the main branch, `terraform apply` will be executed.
#
# Documentation for `hashicorp/setup-terraform` is located here: https://github.com/hashicorp/setup-terraform
#
# To use this workflow, you will need to complete the following setup steps.
#
# 1. Create a `main.tf` file in the root of this repository with the `remote` backend and one or more resources defined.
#   Example `main.tf`:
#     # The configuration for the `remote` backend.
#     terraform {
#       backend "remote" {
#         # The name of your Terraform Cloud organization.
#         organization = "example-organization"
#
#         # The name of the Terraform Cloud workspace to store Terraform state files in.
#         workspaces {
#           name = "example-workspace"
#         }
#       }
#     }
#
#     # An example resource that does nothing.
#     resource "null_resource" "example" {
#       triggers = {
#         value = "A example resource that does nothing!"
#       }
#     }
#
#
# 2. Generate a Terraform Cloud user API token and store it as a GitHub secret (e.g. TF_API_TOKEN) on this repository.
#   Documentation:
#     - https://www.terraform.io/docs/cloud/users-teams-organizations/api-tokens.html
#     - https://help.github.com/en/actions/configuring-and-managing-workflows/creating-and-storing-encrypted-secrets
#
# 3. Reference the GitHub secret in step using the `hashicorp/setup-terraform` GitHub Action.
#   Example:
#     - name: Setup Terraform
#       uses: hashicorp/setup-terraform@v1
#       with:
#         cli_config_credentials_token: ${{ secrets.TF_API_TOKEN }}

name: 'Terraform'

on:
  push:
    branches:
    - main

jobs:
  terraform:
    name: 'Terraform'
    runs-on: ubuntu-latest
    environment: production

    # id-tokenの書き込み権限を追加
+   permissions:
+     id-token: write

    # Use the Bash shell regardless whether the GitHub Actions runner is ubuntu-latest, macos-latest, or windows-latest
    defaults:
      run:
        shell: bash

    steps:
    # Checkout the repository to the GitHub Actions runner
    - name: Checkout
      uses: actions/checkout@v2

    # Install the latest version of Terraform CLI and configure the Terraform CLI configuration file with a Terraform Cloud user API token
    - name: Setup Terraform
      uses: hashicorp/setup-terraform@v1
      with:
        cli_config_credentials_token: ${{ secrets.TF_API_TOKEN }}

    # アクセストークン取得処理追加
+   - name: configure aws credentials # 処理ステップ名
+     uses: aws-actions/configure-aws-credentials@v1 # パブリックアクションの指定
+     with:
+       role-to-assume: arn:aws:iam::123456789012:role/OIDCTest-Role-XXXXXXXXXXXXX # IAMロールのARNを指定
+       aws-region: ap-northeast-1 # リージョン名を指定

    # Initialize a new or existing Terraform working directory by creating initial files, loading any remote state, downloading modules, etc.
    - name: Terraform Init
      run: terraform init

    # Checks that all Terraform configuration files adhere to a canonical format
    - name: Terraform Format
      run: terraform fmt -check

    # Generates an execution plan for Terraform
    - name: Terraform Plan
      run: terraform plan

      # On push to main, build or change infrastructure according to Terraform configuration files
      # Note: It is recommended to set up a required "strict" status check in your repository for "Terraform Cloud". See the documentation on "strict" required status checks for more information: https://help.github.com/en/github/administering-a-repository/types-of-required-status-checks
    - name: Terraform Apply
      if: github.ref == 'refs/heads/main' && github.event_name == 'push'
      run: terraform apply -auto-approve
Terraform実行
準備したmain.tfをGitHubリポジトリのmainブランチにpushします。これにより、作成したGitHubActionsワークフローが実行されます。
実行結果
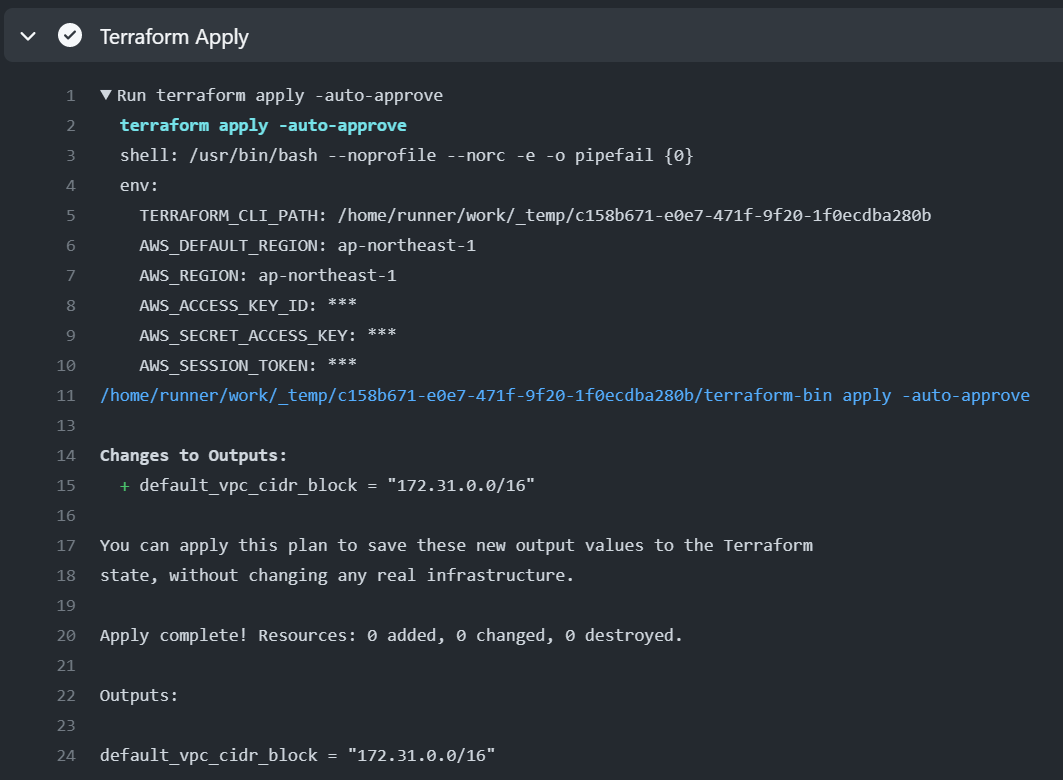
Terraform Applyステップのみを抜粋していますが、環境変数に、AWS_ACCESS_KEY_ID、AWS_SECRET_ACCESS_KEY、AWS_SESSION_TOKENがセットされていることと、デフォルトVPCのCIDRブロックの情報を取得して正常に出力されていることがわかります。
まとめ
本記事では、OIDC連携処理を追加したTerraform実行用のGitHubActionsワークフローを作成してみました。TerraformによるAWSへのリソース作成環境をご検討されている方の参考になれば幸いです。
