概要
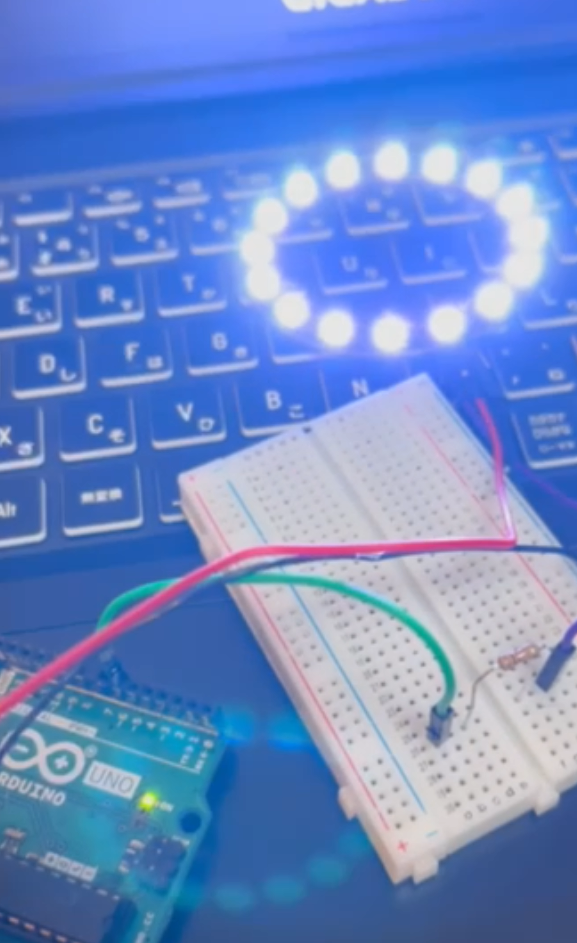
アイアンマンのアークリアクターのようなものが作りたくてリング状のLEDを探してたところNeoPixel なるものがあったのでArduinoでアイアンマンのアークリアクターのように光るように実装しました。
目次
実行環境
- Windows OS PC
- Arduino IDE
- NeoPixel ws2812b 16素子タイプ
↓これと同じ種類のNeoPixelを千石で購入しました。
https://eleshop.jp/shop/g/gJ1H311/?srsltid=AfmBOoqrEuSVWNdiHl3rXJbf24vSgxJx28xUjr_paLn0qgOz5wbBH688 - 抵抗 10kΩ
NeoPixelをArduinoで使用する場合の接続例
ArduinoでNeoPixelを使用するにあたって以下のサイトを参考にしました。
https://www.marutsu.co.jp/pc/static/large_order/WS2812B_0124?srsltid=AfmBOooFLz6-bT2ulVaOjO6KqFeYUQzO68GFqPvw8GluUPo9MwM-pBm8
NeoPixel WS2812Bのリングモジュールには以下の4つのピンがあります。
• 5V: 電源ピン(5V)。Arduino UnoやRaspberry Piの5Vピンに接続します。
• GND: グランドピン(GND)。Arduino UnoやRaspberry PiのGNDに接続します。
• DI (Data In): データ入力ピン。ArduinoやRaspberry Piから制御信号を送るピンに接続します。
• DO (Data Out): データ出力ピン。次のLEDリングや他のデバイスを接続する場合に使用します。今回は使用しません。
今回はNeoPixcelを以下のようにArduinoのピンに接続します。
• 5V → Arduino Unoの5Vピンに接続
• GND → Arduino UnoのGNDピンに接続
• DI → Arduino Unoのデジタルピン(例: D6)に10kΩの抵抗を挟んで接続
• DO → 未接続(次のLEDに繋げる場合はここに接続)
抵抗に関して、LEDの故障を防ぐために抵抗を挟んでLEDに流れる電流を制限します。今回はAdruinoのD6ピンとNeoPixelのDIピンの間に抵抗を置きます。

環境構築
今回はArduino IDEで
NeoPixelを使用するためのIDEでの環境構築方法について説明します。
- ライブラリのインストール方法
- まずは左上のメニューバーにある「ツール」を選択し「ライブラリを管理」を選びます。
- そこから「neopixel」と入力すると「Adafruit NeoPixcel」のライブラリが表示されます。
- ここのインストールボタンを押して、ライブラリをインストールします。

- サンプルプログラムの実行
コード
以下のコードは、スケッチ例にあったsimple.inoのコードです。
// NeoPixel Ring simple sketch (c) 2013 Shae Erisson
// Released under the GPLv3 license to match the rest of the
// Adafruit NeoPixel library

#include <Adafruit_NeoPixel.h>
#ifdef __AVR__
 #include <avr/power.h> // Required for 16 MHz Adafruit Trinket
#endif

// Which pin on the Arduino is connected to the NeoPixels?
#define PIN        6 // On Trinket or Gemma, suggest changing this to 1

// How many NeoPixels are attached to the Arduino?
#define NUMPIXELS 16 // Popular NeoPixel ring size

// When setting up the NeoPixel library, we tell it how many pixels,
// and which pin to use to send signals. Note that for older NeoPixel
// strips you might need to change the third parameter -- see the
// strandtest example for more information on possible values.
Adafruit_NeoPixel pixels(NUMPIXELS, PIN, NEO_GRB + NEO_KHZ800);

#define DELAYVAL 500 // Time (in milliseconds) to pause between pixels

void setup() {
  // These lines are specifically to support the Adafruit Trinket 5V 16 MHz.
  // Any other board, you can remove this part (but no harm leaving it):
#if defined(__AVR_ATtiny85__) && (F_CPU == 16000000)
  clock_prescale_set(clock_div_1);
#endif
  // END of Trinket-specific code.

  pixels.begin(); // INITIALIZE NeoPixel strip object (REQUIRED)
}

void loop() {
  pixels.clear(); // Set all pixel colors to 'off'

  // The first NeoPixel in a strand is #0, second is 1, all the way up
  // to the count of pixels minus one.
  for(int i=0; i<NUMPIXELS; i++) { // For each pixel...

    // pixels.Color() takes RGB values, from 0,0,0 up to 255,255,255
    // Here we're using a moderately bright green color:
    pixels.setPixelColor(i, pixels.Color(0, 150, 0));

    pixels.show();   // Send the updated pixel colors to the hardware.

    delay(DELAYVAL); // Pause before next pass through loop
  }
}
コードの解説
自分でArduinoに実装する際に気を付けるべき点について紹介します。
- ピンの設定
どのピンをArduino Unoに接続するかを定義しています。今回はArduinoのD6に接続します。
#define PIN 6
- NeoPixelの素子の数の決定
NeoPixelのLEDをいくつArduinoで制御するか、接続するかを定義しています。
#define NUMPIXELS 16
コードの改良
先ほどのサンプルプログラムを改良します。リング状のNeoPixcelLEDを使ってアイアンマンのアークリアクターを再現したいと思います。1つの素子が一定時間光ります。一定時間を過ぎると光っていた素子を暗くし、隣の素子を明るくします。その動作を一周するたびに素子の光る時間を短くします。すると周期が短くなり、周期が一定を超えると、全ての素子が光るというものになっています。
#include <Adafruit_NeoPixel.h>

#define PIN 6           // Pin connected to DI of the LED ring
#define NUMPIXELS 16    // Number of LEDs in the ring

Adafruit_NeoPixel pixels(NUMPIXELS, PIN, NEO_GRB + NEO_KHZ800);

int brightness = 10;    // Starting brightness level
int delayTime = 200;    // Starting delay for the slow rotation
int step = 5;           // Brightness increment step
int maxBrightness = 255;// Maximum brightness level

void setup() {
  pixels.begin();
  pixels.show();        // Initialize all pixels to off
}

void loop() {
  // Step 1: Slow rotation with low brightness
  for (int i = 0; i < NUMPIXELS; i++) {
    // Set all pixels off before lighting the new one
    pixels.clear();
    pixels.setPixelColor(i, pixels.Color(brightness, brightness, brightness));  // Light the current pixel
    pixels.show();
    delay(delayTime);

    // Gradually increase brightness and speed
    if (brightness < maxBrightness) {
      brightness += step;
      delayTime = max(10, delayTime - 5);  // Decrease delay to speed up rotation
    }
  }

  // Step 2: Rapid rotation with maximum brightness
  if (brightness >= maxBrightness) {
    for (int i = 0; i < NUMPIXELS; i++) {
      pixels.clear();
      pixels.setPixelColor(i, pixels.Color(maxBrightness, maxBrightness, maxBrightness));
      pixels.show();
      delay(10); // Fast rotation at maximum brightness
    }

    // Step 3: Light up all LEDs like the arc reactor
    pixels.fill(pixels.Color(maxBrightness, maxBrightness, maxBrightness));
    pixels.show();
    delay(1000);  // Keep all LEDs on for 1 second

    // Reset for the next cycle
    brightness = 10;     // Reset brightness
    delayTime = 200;     // Reset rotation delay
  }
}
実行結果
https://youtube.com/shorts/keCtBOkmkYk?feature=share

おわりに
せっかくリング状のLEDを買ったので、3Dプリンターでアイアンマンのアークリアクターの外形をを作りたいと思います。
