はじめに
Ansibleは、レッドハットが開発するオープンソースの構成管理ツールです。
サーバを立ち上げる際、あらかじめ用意した設定ファイルに従って、ソフトウェアのインストールや設定を自動的に実行する事が出来ます。
特徴
- python製
- Yaml形式で処理を記述
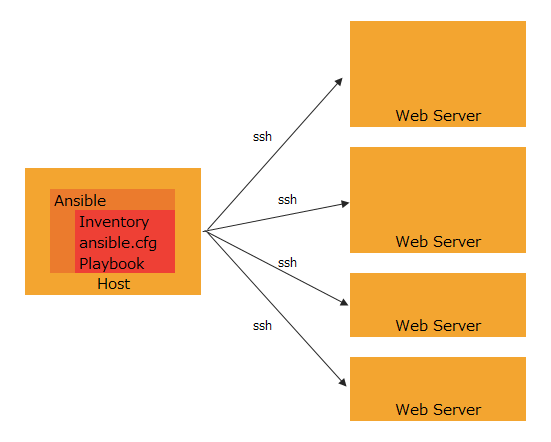
- エージェントレス(ターゲットにssh経由で構築を行う)
- 冪等性(「ある操作を何度実行しても常に結果が同じになる」性質)
- 再利用性(role単位でノウハウが蓄積できる)
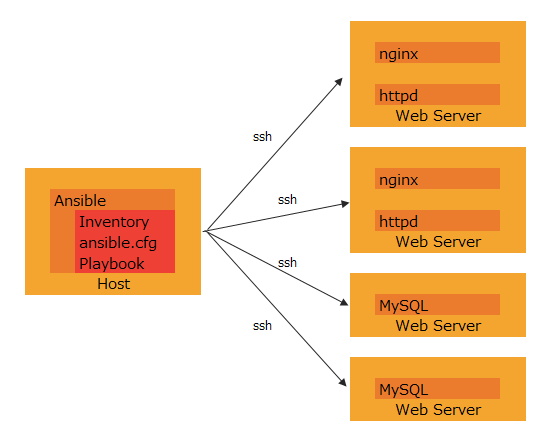
動作イメージ
よく使う用語
-
playbookターゲットの状態=実行する内容を定義したもの -
roles適切な範囲で幾つかのtaskを集めたモジュール
ハンズオン
目的
Vagrantで作成したGuestOS上で、自分自身に向けてAnsibleを実行することにより、httpd,phpの環境の構築を行う。
環境構築
- VirtualBoxをインストールする
- Vagrantをインストールする。
Vagrantfileの作成
# 作業フォルダへ移動
$ cd /path/to/work/dir

# Vagrantfile作成
$ vagrant init bento/centos-6
A `Vagrantfile` has been placed in this directory. You are now
ready to `vagrant up` your first virtual environment! Please read
the comments in the Vagrantfile as well as documentation on
`vagrantup.com` for more information on using Vagrant.
Vagrantfile
[省略]

Vagrant.configure("2") do |config|

[省略]

  # Create a forwarded port mapping which allows access to a specific port
  # within the machine from a port on the host machine. In the example below,
  # accessing "localhost:8080" will access port 80 on the guest machine.
  # NOTE: This will enable public access to the opened port
  # config.vm.network "forwarded_port", guest: 80, host: 8080
# ここから追記
  config.vm.network "forwarded_port", guest: 80, host: 8080
# ここまで追記

[省略]

  # Share an additional folder to the guest VM. The first argument is
  # the path on the host to the actual folder. The second argument is
  # the path on the guest to mount the folder. And the optional third
  # argument is a set of non-required options.
  # config.vm.synced_folder "../data", "/vagrant_data"

# ここから追記
  config.vm.define "handson_vbox" do |m|
    # ...
  end
# ここまで追記

[省略]

  # Enable provisioning with a shell script. Additional provisioners such as
  # Puppet, Chef, Ansible, Salt, and Docker are also available. Please see the
  # documentation for more information about their specific syntax and use.
  # config.vm.provision "shell", inline: <<-SHELL
  #   apt-get update
  #   apt-get install -y apache2
  # SHELL

# ここから追記
  config.vm.provision "ansible_local" do |ansible|
    ansible.playbook = "ansible/site.yml"
    ansible.groups = {
      "handson" => ["handson_vbox"]
    }
  end
# ここまで追記

end
Ansible用ファイルの作成
Ansible のベストプラクティスに従い、各ディレクトリとファイルを作成する
[プロジェクトのルートディレクトリ]
  ├─ Vagrantfile
  └─ ansible/
      ├─ site.yml
      ├─ handson.yml
      └─ roles/
         └─ httpd/
             └─ tasks/
                 └─ main.yml
ansible/site.yml
---
# handsonグループの構成を読み込む
- import_playbook: handson.yml
ansible/handson.yml
---
# handsonグループのサーバの構成を定義する
- name: Handson Servers
# ターゲット
  hosts:
    - handson
# rootで実行するか
  become: yes
# 実行するrole
  roles:
    - httpd
ansible/roles/httpd/tasks/main.yml
---
# yum で httpd をインストールする
- name: Install
  yum:
    name: httpd
# サービスを起動+自動機能設定
- name: Service is running and enabled
  service:
    name: httpd
# サービス起動
    state: started
# サービス自動起動
    enabled: yes
仮想マシンの作成
$ vagrant up
ブラウザでhttp://localhost:8080にアクセスし、
apacheの初期ページが表示されることを確認する。
roleの追加
php roleの追加
[プロジェクトのルートディレクトリ]
  ├─ Vagrantfile
  └─ ansible/
      ├─ site.yml
      ├─ handson.yml
      └─ roles/
         ├─ httpd/
         │   └─ tasks/
         │        └─ main.yml
         └─ php/
             ├─ meta/
             │   └─ main.yml
             ├─ vars/
             │   └─ main.yml
             ├─ tasks/
             │   └─ main.yml
             ├─ handlers/
             │   └─ main.yml
             └─ templates/
                 └─ etc/
                     └─ php.d/
                         └─ log.ini.j2
ansible/roles/php/meta/main.yml
---
# 依存関係定義
dependencies:
# このroleはhttpd roleより後に実行する
  - role: httpd
ansible/roles/php/vars/main.yml
---
# 変数定義
# yumでインストールするミドルウェア
php_yum_items:
  - php
  - php-mbstring
  - php-mysql

# ログファイル出力先
php_log_file_path: /var/log/php_errors.log

# サーバに配置するテンプレートのファイルパス(glob可)
php_conf_templates:
  - ../templates/etc/*.ini.j2
  - ../templates/etc/php.d/*.ini.j2
ansible/roles/php/tasks/main.yml
---
# selinux設定用ミドルウェアをインストール
- name: Install Util
  yum:
    name: libselinux-python

# selinuxを無効化
- name: Disable
  selinux:
    policy: targeted
    state: permissive

# yum で php_yum_items のリストで定義されたミドルウェアをインストールする
- name: Install
  yum:
    name: "{{ item }}"
  with_items: "{{ php_yum_items }}"

# php_log_file_pathで定義されたファイルを生成する
- name: Create Log File
  file:
    path: "{{ php_log_file_path }}"
    state: touch
    owner: apache
    group: apache
    mode: 0777

# php_conf_templatesのリストで定義されたテンプレートをサーバに配置する
- name: Send conf templates
  template:
    src: "{{ item }}"
    dest: "{{ item | dirname | regex_replace('^.*\\.\\./templates','') }}/{{ item | basename | regex_replace('\\.j2$','') }}"
    backup: yes
  with_fileglob: "{{ php_conf_templates }}"
# httpdを再起動する
  notify:
    - restart httpd
ansible/roles/php/handlers/main.yml
---
# ハンドラ定義
- name: restart httpd
# httpdを再起動する
  service:
    name: httpd
    state: restarted
ansible/roles/php/templates/etc/php.d/log.ini.j2
; ログ出力先をphp_log_file_pathに設定する
error_log = {{ php_log_file_path }}
ansible/handson.yml
---
# handsonグループのサーバの構成を定義する
- name: Handson Servers
# ターゲット
  hosts:
    - handson
# rootで実行するか
  become: yes
# 実行するrole
  roles:
    - httpd
# roleを追加
    - php
# プロビジョン再実行
$ vagrant provision

# GuestOSへログイン
$ vagrant ssh

# PHPバージョンの確認
$ php -v
PHP 5.3.3 (cli) (built: Mar 22 2017 12:27:09)
Copyright (c) 1997-2010 The PHP Group
Zend Engine v2.3.0, Copyright (c) 1998-2010 Zend Technologies

# GuestOSからログアウト
$ exit

# GuestOSの破棄
$ vagrant destroy
まとめ
role単位でノウハウ(php,mysql,nginx...)を蓄積していけば、様々な環境が簡単に構築できそうです。
また、今回はGuestOSから自分自身に向けてansibleを実行しましたが、ssh接続可能な環境(aws,vps...)であればどこへ向けてでもansibleが実行できます。


