前回 は、VPSにPterodattylを導入してやりましたが、今回は自宅サーバー(VPS内でも可能)にWebパネルとWingsを立てる方法を書いておきます。
Pterodactylとは?
非常に使いやすいゲームサーバー管理ツールです。(ほかにもphpmyadminなど)
洗練されたダッシュボードで拡張機能を導入できるのでカスタマイズし放題です。(改造するため難しい)
前提条件として
- ドメインを1個持っている
- サーバーを持っている
- SSHが可能(キーボードで一つ一つコマンドを送信するの大変なので。)
- CloudFlareでドメインを管理可能にしてある
今回参考にさせてもらったサイト・動画
実際にインストール
SSHでサーバーに接続
USERとIPは各自合わせてください。
ssh USER@IP
管理者権限になる
sudo su
システムを最新の状態にする。
apt update && apt upgrade -y
依存関係のインストール
apt -y install software-properties-common curl apt-transport-https ca-certificates gnupg
LC_ALL=C.UTF-8
add-apt-repository -y ppa:ondrej/php
curl -fsSL https://packages.redis.io/gpg | sudo gpg --dearmor -o /usr/share/keyrings/redis-archive-keyring.gpg
echo "deb [signed-by=/usr/share/keyrings/redis-archive-keyring.gpg] https://packages.redis.io/deb $(lsb_release -cs) main" | sudo tee /etc/apt/sources.list.d/redis.list
curl -sS https://downloads.mariadb.com/MariaDB/mariadb_repo_setup | sudo bash
apt update
apt -y install php8.3 php8.3-{common,cli,gd,mysql,mbstring,bcmath,xml,fpm,curl,zip} mariadb-server nginx tar unzip git redis-server
Composerのインストール
curl -sS https://getcomposer.org/installer | sudo php -- --install-dir=/usr/local/bin --filename=composer
ファイルのダウンロード
mkdir -p /var/www/pterodactyl
cd /var/www/pterodactyl
Panel 用の新しいディレクトリを作成してそのディレクトリに移動したら、Panel ファイルをダウンロードする必要があります。これ は、事前にパッケージ化されたコンテンツをダウンロードするのと同じくらい簡単です。ダウンロードしたら、アーカイブを解凍する必要があります 次に、 と ディレクトリに正しいアクセス許可を設定します。これらのディレクトリ ファイルを保存するだけでなく、読み込み時間を短縮するために高速なキャッシュを利用できるようにします。curlstorage/bootstrap/cache/ (pterodactyl.io 日本語訳)
curl -Lo panel.tar.gz https://github.com/pterodactyl/panel/releases/latest/download/panel.tar.gz
tar -xzvf panel.tar.gz
chmod -R 755 storage/* bootstrap/cache/
取付
- MariaDBのセットアップ
mariadb -u root -p
警告
下のコード内 YouRPasswordddddd はあなたが考えた強いパスワードを入れてください。
※このパスワードは後ほど使います。
CREATE USER 'pterodactyl'@'127.0.0.1' IDENTIFIED BY 'YouRPasswordddddd';
CREATE DATABASE panel;
GRANT ALL PRIVILEGES ON panel.* TO 'pterodactyl'@'127.0.0.1' WITH GRANT OPTION;
exit
cp .env.example .env
COMPOSER_ALLOW_SUPERUSER=1 composer install --no-dev --optimize-autoloader
php artisan key:generate --force
危険
暗号化キー (ファイル内のAPP_KEY) をバックアップします。これは、安全に保管する必要があるすべてのデータ(APIキーなど)の暗号化キーとして使用されます。 サーバーだけでなく、安全な場所に保管してください。データを失うと、データベースのバックアップがあっても、暗号化されたすべてのデータは回復不能になります。
環境設定を自分でします。
情報
環境設定は質問形式で設定を行います。
質問に答え、次の質問に移行するときはエンターを押します。
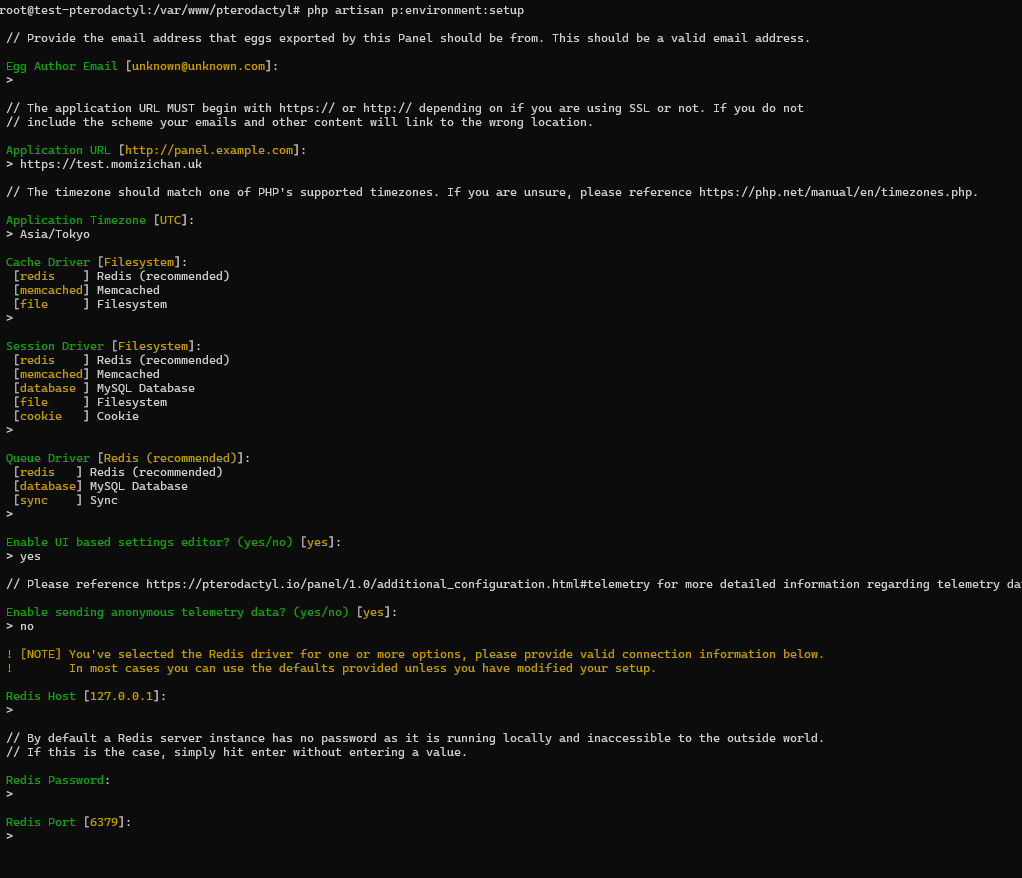
php artisan p:environment:setup
入力内容はしたの画像を見て合わせてください(何も入力されていないのはエンター押す)

php artisan p:environment:database
Database Password は先ほど設定したMariaDBのパスワードです。
パスワードを入力しようとすると何も入力されていないようにも見えているのですが、それはちゃんと入力されています。
データベースのセットアップ
php artisan migrate --seed --force
↑文字がたくさんでてきます。おもしろいし、かっこいいです。
最初のユーザーを追加:
php artisan p:user:make
権限の設定
chown -R www-data:www-data /var/www/pterodactyl/*
キューリスナー
crontabの設定
sudo crontab -eを実行後、1と入力後、エンターを押してテキストエディタに移動します。

テキストエディタの一番したの行に、
* * * * * php /var/www/pterodactyl/artisan schedule:run >> /dev/null 2>&1
を入力後、テキストを保存して終了します。
キューワーカーの作成
nano /etc/systemd/system/pteroq.service
これを入力:
# Pterodactyl Queue Worker File
# ----------------------------------

[Unit]
Description=Pterodactyl Queue Worker
After=redis-server.service

[Service]
# On some systems the user and group might be different.
# Some systems use `apache` or `nginx` as the user and group.
User=www-data
Group=www-data
Restart=always
ExecStart=/usr/bin/php /var/www/pterodactyl/artisan queue:work --queue=high,standard,low --sleep=3 --tries=3
StartLimitInterval=180
StartLimitBurst=30
RestartSec=5s

[Install]
WantedBy=multi-user.target
RedisサーバーとPteroqを起動、有効化
sudo systemctl enable --now redis-server
sudo systemctl enable --now pteroq.service
自己TLS証明書を発行します。
mkdir -p /etc/certs/
cd /etc/certs/
openssl req -new -newkey rsa:4096 -days 3650 -nodes -x509 -subj "/C=NA/ST=NA/L=NA/O=NA/CN=Generic SSL Certificate" -keyout privkey.pem -out fullchain.pem
Webサーバーの設定
まず、デフォルトのNGNX構成を削除します。
rm /etc/nginx/sites-enabled/default
新しい構成ファイルを設定します。
nano /etc/nginx/sites-available/pterodactyl.conf
テキストエディタが開いたら、これを入力:
警告
YourServerLocalIP はあなたのサーバーのローカルIPを入力してください。
IPアドレスの調べ方:ip aを入力後、enp3sやens18のinet部分に書いてある192.168.x.xxxがIPです。
server {
    # Replace the example <domain> with your domain name or IP address
    listen 80;
    server_name YourServerLocalIP;
    return 301 https://$server_name$request_uri;
}

server {
    # Replace the example <domain> with your domain name or IP address
    listen 443 ssl http2;
    server_name YourServerLocalIP;

    root /var/www/pterodactyl/public;
    index index.php;

    access_log /var/log/nginx/pterodactyl.app-access.log;
    error_log  /var/log/nginx/pterodactyl.app-error.log error;

    # allow larger file uploads and longer script runtimes
    client_max_body_size 100m;
    client_body_timeout 120s;

    sendfile off;

    # SSL Configuration - Replace the example <domain> with your domain
    ssl_certificate /etc/certs/fullchain.pem;
    ssl_certificate_key /etc/certs/privkey.pem;
    ssl_session_cache shared:SSL:10m;
    ssl_protocols TLSv1.2 TLSv1.3;
    ssl_ciphers "ECDHE-ECDSA-AES128-GCM-SHA256:ECDHE-RSA-AES128-GCM-SHA256:ECDHE-ECDSA-AES256-GCM-SHA384:ECDHE-RSA-AES256-GCM-SHA384:ECDHE-ECDSA-CHACHA20-POLY1305:ECDHE-RSA-CHACHA20-POLY1305:DHE-RSA-AES128-GCM-SHA256:DHE-RSA-AES256-GCM-SHA384";
    ssl_prefer_server_ciphers on;

    # See https://hstspreload.org/ before uncommenting the line below.
    # add_header Strict-Transport-Security "max-age=15768000; preload;";
    add_header X-Content-Type-Options nosniff;
    add_header X-XSS-Protection "1; mode=block";
    add_header X-Robots-Tag none;
    add_header Content-Security-Policy "frame-ancestors 'self'";
    add_header X-Frame-Options DENY;
    add_header Referrer-Policy same-origin;

    location / {
        try_files $uri $uri/ /index.php?$query_string;
    }

    location ~ \.php$ {
        fastcgi_split_path_info ^(.+\.php)(/.+)$;
        fastcgi_pass unix:/run/php/php8.3-fpm.sock;
        fastcgi_index index.php;
        include fastcgi_params;
        fastcgi_param PHP_VALUE "upload_max_filesize = 100M \n post_max_size=100M";
        fastcgi_param SCRIPT_FILENAME $document_root$fastcgi_script_name;
        fastcgi_param HTTP_PROXY "";
        fastcgi_intercept_errors off;
        fastcgi_buffer_size 16k;
        fastcgi_buffers 4 16k;
        fastcgi_connect_timeout 300;
        fastcgi_send_timeout 300;
        fastcgi_read_timeout 300;
        include /etc/nginx/fastcgi_params;
    }

    location ~ /\.ht {
        deny all;
    }
}
設定の有効化
sudo ln -s /etc/nginx/sites-available/pterodactyl.conf /etc/nginx/sites-enabled/pterodactyl.conf
sudo ln -s /etc/nginx/sites-available/pterodactyl.conf /etc/nginx/sites-enabled/pterodactyl.conf
Wingsの取付
Dockerのインストール
curl -sSL https://get.docker.com/ | CHANNEL=stable bash
起動時にDockerを起動する。
sudo systemctl enable --now docker
Grub設定の変更
システムの内部を変更します。間違えないでください。
nano /etc/default/grubを実行し、grubの設定を変更します。
GRUB_CMDLINE_LINUX_DEFAULT="maybe-ubiquity"をテキスト内から探し出し、GRUB_CMDLINE_LINUX_DEFAULTの中に swapaccount=1を追加。前に何かある場合はスペースで入力。
警告
下の行をコピーしないでください。手入力してください。OS固有のパラメータが追加されています。
GRUB_CMDLINE_LINUX_DEFAULT="maybe-ubiquity swapaccount=1"
入力したら、保存して終了します。
Grubをアップデートします。
sudo update-grub
sudo reboot
※システムが再起動されます。
Wingsのインストール
sudo mkdir -p /etc/pterodactyl
curl -L -o /usr/local/bin/wings "https://github.com/pterodactyl/wings/releases/latest/download/wings_linux_$([[ "$(uname -m)" == "x86_64" ]] && echo "amd64" || echo "arm64")"
sudo chmod u+x /usr/local/bin/wings
CloudFlared & CloudFlare tunnelのセットアップ
CloudFlareから、ZeroTrust→Networks→Tunnels→Create Tunnel→CloudFlared→TunnelName:example→Docker
その下のdocker runを少し変える。
docker run -d --restart unless-stopped ...あとのトークンなど
そして少し変えたコマンドを実行。
CloudFlareに戻って、Connectorsに何かが追加されたらOK。
Nextを押す。
Public Hostnameの設定。
最初のほうにパネルのURLを設定したはずです。それを入力します。
下の、Additional application settingsから、TLS→No TLS Verifyを有効化するのをお忘れなく。
一度、トンネルの一覧に戻りました。
次は、Node用のドメインを設定します。
先ほど作ったトンネルをクリック→Editを押す。
Public Hostnameを押す。→Add a hostname

Save hostnameを押す。(Node用もNo TLS Verifyを有効化してください。 )
Panelで設定を終了する。
panelのURLを開くと、ログインフォームが開きます、ログインしてください。
ロケーションを作成後、Nodesに行き、Create Newを押す。
画像のようにする。

Create nodeを押す。
コンフィグレーションタブをクリック→Configuration Fileを編集する。
Configuration FileのSSL部分を変更します。下のようにしてください。
  ssl:
    enabled: true
    cert: /etc/certs/fullchain.pem
    key: /etc/certs/privkey.pem
編集したファイルを/etc/pterodactylに置きます。
nano /etc/pterodactyl/config.yml
ペーストして終了。
スターティングWings
Wingsを起動するには、以下のコマンドを実行するだけで、デバッグモードで起動します。エラーなく実行されていることを確認したら、 CTRL+Cを使用してプロセスを終了し、以下の手順に従ってデーモン化します。サーバーのインターネット接続によっては、Wingsを初めてプルして起動するのに数分かかる場合があります。
sudo wings --debug
デーモン化
nano /etc/systemd/system/wings.service/
[Unit]
Description=Pterodactyl Wings Daemon
After=docker.service
Requires=docker.service
PartOf=docker.service

[Service]
User=root
WorkingDirectory=/etc/pterodactyl
LimitNOFILE=4096
PIDFile=/var/run/wings/daemon.pid
ExecStart=/usr/local/bin/wings
Restart=on-failure
StartLimitInterval=180
StartLimitBurst=30
RestartSec=5s

[Install]
WantedBy=multi-user.target
Wingsを起動
sudo systemctl enable --now wings


