背景
Web APIにアクセスするPythonのクライアントライブラリを作成したいです。
今までは手動でクライアントライブラリをコーディングしていましたが、Web APIの変更に追従できなくなってきたので、クライアントライブラリを自動で生成することを考えました。
Web APIの仕様は、OpenAPI Specification v3で記載されたyamlファイルで公開されています。そして、OpenAPI Specificationからクライアントブラリを生成するOpenAPI Generationというツールが世の中には存在します。
そこで今回、OpenAPI Generationを使って、Web APIにアクセスするPythonのクライアントライブラリを作成しました。
本記事では、OpenAPI Generaotrを使ってPythonのクライアントライブラリを作成するにあたって、実施したことや調べたことを記載します。
環境
- OpenAPI Specification v3
- OpenAPI Generator v4.0.0
- Python3.6, Python3.7
OpenAPI Specificationとは?
REST APIを記述するための言語です。以下、「OAS」と略します。
The OpenAPI Specification (OAS) defines a standard, programming language-agnostic interface description for REST APIs,
OpenAPI Specification v3のサンプル
Qiita API v2の以下のAPIをOAS3で記述してみます。
※QiitaはOASで記載されたファイルを公開していません。以下のファイルは非公式です。
openapi: "3.0.0"
info:
  version: 0.1.0
  title: Qiita API
servers:
  - url: https://qiita.com/api/v2
paths:
  /items/{item_id}/comments:
    post:
      tags:
        - comments
      summary: 記事に対してコメントを投稿します。
      operationId: createComment
      parameters:
        - name: item_id
          in: path
          required: true
          description: 記事の一意なID
          schema:
            type: string
      requestBody:
        required: true
        content:
          application/json:
            schema:
              type: object
              properties:
                body:
                  type: string
                  description: コメントの内容を表すMarkdown形式の文字列
                  example: "# Example"
      responses:
        201:
          description: コメント
          content:
            application/json:
              schema:
                $ref: "#/components/schemas/Comment"
  /tags:
    get:
      tags:
      - tags
      summary: タグ一覧を作成日時の降順で返します。
      operationId: getTagList
      parameters:
        - name: page
          in: query
          description: ページ番号 (1から100まで)
          example: "1"
          schema:
            type: string
        - name: per_page
          in: query
          description: 1ページあたりに含まれる要素数 (1から100まで)
          example: "20"
          schema:
            type: string
        - name: sort
          in: query
          description: 並び順 (countで記事数順、nameで名前順)
          example: "count"
          schema:
            type: string
            enum:
            - count
            - name
      responses:
        200:
          description: タグ一覧
          content:
            application/json:
              schema:
                type: array
                items:
                  $ref: "#/components/schemas/Tag"
components:
  schemas:
    Tag:
      properties:
        followers_count:
          description: このタグをフォローしているユーザの数
          example: 100
          type: integer
        icon_url:
          description: このタグに設定されたアイコン画像のURL
          example: "https://s3-ap-northeast-1.amazonaws.com/qiita-tag-image/9de6a11d330f5694820082438f88ccf4a1b289b2/medium.jpg"
          type: string
        id:
          description: タグを特定するための一意な名前
          example: "qiita"
          type: string
        items_count:
          description: このタグが付けられた記事の数
          example: 200
          type: integer
    Comment:
      properties:
        body:
          description: コメントの内容を表すMarkdown形式の文字列
          type: string
          example: "# Example"
        created_at:
          description: データが作成された日時
          example: "2000-01-01T00:00:00+00:00"
          type: string
          format: date-time
        id:
          description: コメントの一意なID
          example: "3391f50c35f953abfc4f"
          type: string
        rendered_body:
          description: コメントの内容を表すHTML形式の文字列
          example: "<h1>Example</h1>"
          type: string
        updated_at:
          description: データが最後に更新された日時
          example: "2000-01-01T00:00:00+00:00"
          type: string
          format: date-time
        user:
          description: Qiita上のユーザを表します。
          type: object
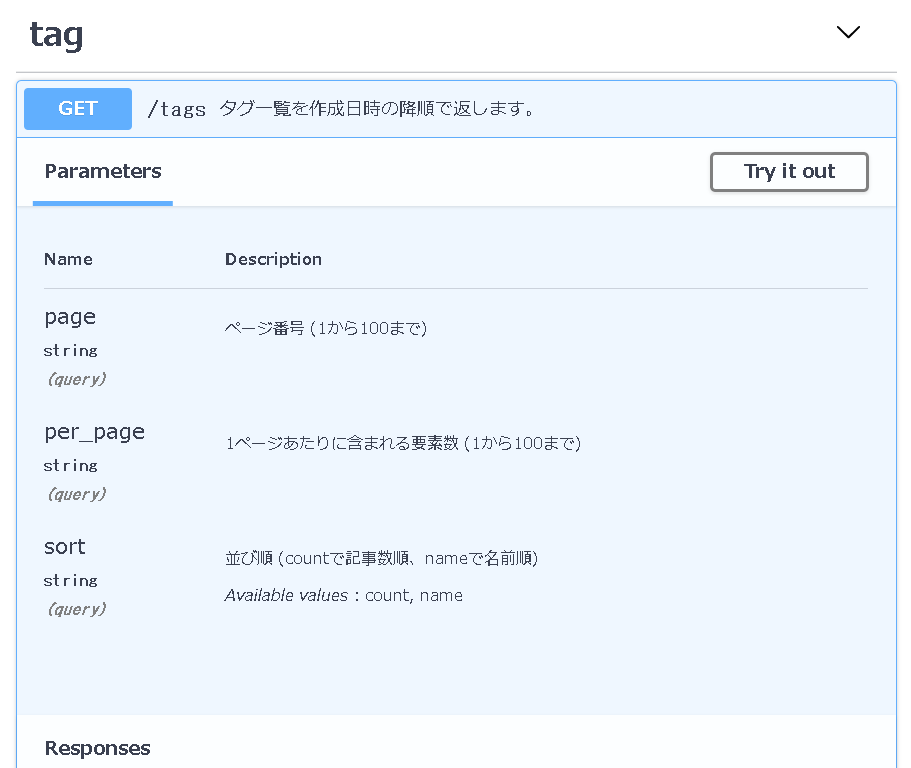
Swagger Editorで可視化
Swagger Editorで可視化すると、下図のように表示されます。
OAS3の構成

OAS3の詳細な仕様は以下に載っています。
https://github.com/OAI/OpenAPI-Specification/blob/master/versions/3.0.2.md
OpenAPI Generatorとは?
OASからAPIのクライアントライブラリやサーバのスタブ、ドキュメントなどを生成します。
OpenAPI Generator allows generation of API client libraries (SDK generation), server stubs, documentation and configuration automatically given an OpenAPI Spec (both 2.0 and 3.0 are supported).
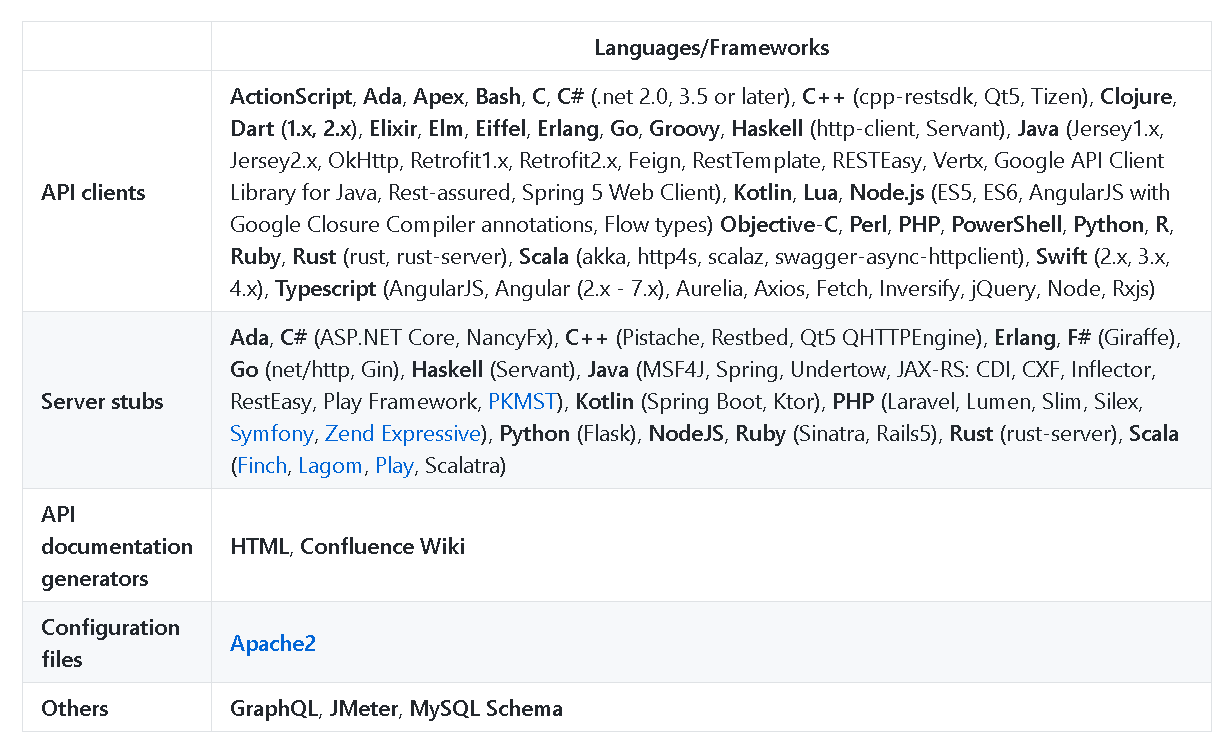
対応している言語/フレームワーク
OpenAPI Generatorの実行方法
以下のツールを利用して、openapi-generate-cliコマンドをインストール/実行できます。
- npm
- Homebrew
- Docker
- jar
カスタマイズせずにPythonのクライアントライブラリを生成
以下のコマンドを実行すれば、outディレクトリにPythonのクライアントライブラリが生成されます。
$ docker run --rm -u `id -u`:`id -g` -v ${PWD}:/local openapitools/openapi-generator-cli \
 generate \
 --input-spec /local/qiita.yaml \
 --generator-name python \
 --output /local/out
docker runの-uオプションは、dockerがrootで書きこまないようにするために付けました。
https://qiita.com/yohm/items/047b2e68d008ebb0f001
生成されたファイルの一覧
ライブラリ用のpythonファイルだけでなく、ドキュメントやテストコード、設定ファイルなど、ライブラリに必要なファイル一式が生成されます。
$ tree -a
.
├── docs
│   ├── Comment.md
│   ├── CommentsApi.md
│   ├── InlineObject.md
│   ├── Tag.md
│   └── TagsApi.md
├── .gitignore
├── git_push.sh
├── openapi_client
│   ├── api
│   │   ├── comments_api.py
│   │   ├── __init__.py
│   │   └── tags_api.py
│   ├── api_client.py
│   ├── configuration.py
│   ├── exceptions.py
│   ├── __init__.py
│   ├── models
│   │   ├── comment.py
│   │   ├── __init__.py
│   │   ├── inline_object.py
│   │   └── tag.py
│   └── rest.py
├── .openapi-generator
│   └── VERSION
├── .openapi-generator-ignore
├── README.md
├── requirements.txt
├── setup.py
├── test
│   ├── __init__.py
│   ├── test_comment.py
│   ├── test_comments_api.py
│   ├── test_inline_object.py
│   ├── test_tag.py
│   └── test_tags_api.py
├── test-requirements.txt
├── tox.ini
└── .travis.yml
生成されたクライアントライブラリを実行する
生成されたドキュメントにはサンプルコードも記載されています。
これを参考にして、クライアントライブラリを実行してみます。
なお、コメントを投稿するにはQiitaのアクセストークンを取得する必要があります。
詳細は以下のサイトを参照してください。
https://qiita.com/api/v2/docs#%E8%AA%8D%E8%A8%BC%E8%AA%8D%E5%8F%AF
import openapi_client
from openapi_client.rest import ApiException
from pprint import pprint

access_token = "XXXXXXXXXXXXXXXXXXXXXXXXXXXXXXXXXXX"
api_client = openapi_client.ApiClient(header_name="Authorization", header_value="Bearer " + access_token)

# タグの一覧を取得する
tags_api_instance = openapi_client.TagsApi(api_client)
tag_list = tags_api_instance.get_tag_list(per_page=15)
pprint(tag_list)
# [{'followers_count': 0, 'icon_url': None, 'id': 'Broadcas', #'items_count': 6},
# ...

# Qiitaの記事(本記事)にコメントを投稿する
comments_api_instance = openapi_client.CommentsApi(api_client)
item_id = "dfb929316a1335a161c0"
comment_body = "test comment"
inline_object = openapi_client.InlineObject(body=comment_body)

comment = comments_api_instance.create_comment(item_id, inline_object)
pprint(comment)
# {'body': 'test comment\n',
# 'created_at': datetime.datetime(2019, 5, 27, 2, 25, 31, tzinfo=tzoffset(None, 32400)),
# 'id': '7544edd7f2a1eb278822',
# 'rendered_body': '<p>test comment</p>\n',
# 'updated_at': datetime.datetime(2019, 5, 27, 2, 25, 31, tzinfo=tzoffset(None, 32400)),
# ...
タグの一覧を取得できました。そして、記事にコメントを投稿することもできました。
apiモジュール
apiモジュールには、OASのtagsに指定したタグごと、pythonファイルが生成されます。各クラスには、APIに対応したメソッドが宣言されています。
    def create_comment(self, item_id, inline_object, **kwargs):  # noqa: E501
        """記事に対してコメントを投稿します。  # noqa: E501

        This method makes a synchronous HTTP request by default. To make an
        asynchronous HTTP request, please pass async_req=True
        >>> thread = api.create_comment(item_id, inline_object, async_req=True)
        >>> result = thread.get()

        :param async_req bool
        :param str item_id: 記事の一意なID (required)
        :param InlineObject inline_object: (required)
        :return: Comment
                 If the method is called asynchronously,
                 returns the request thread.
        """
    def get_tag_list(self, **kwargs):  # noqa: E501
        """タグ一覧を作成日時の降順で返します。  # noqa: E501

        This method makes a synchronous HTTP request by default. To make an
        asynchronous HTTP request, please pass async_req=True
        >>> thread = api.get_tag_list(async_req=True)
        >>> result = thread.get()

        :param async_req bool
        :param str page: ページ番号 (1から100まで)
        :param str per_page: 1ページあたりに含まれる要素数 (1から100まで)
        :param str sort: 並び順 (countで記事数順、nameで名前順)
        :return: list[Tag]
                 If the method is called asynchronously,
                 returns the request thread.
        """
以下のような特徴があります。
- メソッド名は、OASの
operationIdをスネークケースに変換した名前 - メソッドの引数について
- path parameterは1つずつ引数に渡す
- query parameterは1つずつ引数に渡す
- request bodyはrequest body用のクラス(
InlineObject)のインスタンス、またはdictを引数に渡す -
async_req=Trueを渡すと、非同期に実行できる。
- 引数
request_bodyの型には、OASのrequestBodyのスキーマに対応したクラスが利用される。components.schemasのスキーマを参照していない場合、InlineObjectというクラスが利用される。 - 戻り値の型には、OASの
responses.contentのスキーマに対応したクラスが利用される。components.schemasのスキーマを参照していない場合、InlineReponseというクラスが利用される。
# request_bodyに InlineObjectでなくdictを渡せる
comments_api_instance.create_comment(item_id, {"body":comment_body))

# 非同期処理
thread = tags_api_instance.get_tag_list(async_req=True)
print(type(thread)
#  multiprocessing.pool.ApplyResult
result = thread.get()
# [{'followers_count': 0, 'icon_url': None, 'id': 'Broadcas', #'items_count': 6},
# ...
modelsモジュール
modelsモジュールには、OASのcomponents.schemasに定義したschemaごとにpythonファイルが生成されます。ファイル内のクラスは、以下のように定義されています。
class Comment(object):
   """
   Attributes:
     openapi_types (dict): The key is attribute name
                           and the value is attribute type.
     attribute_map (dict): The key is attribute name
                           and the value is json key in definition.
   """
   openapi_types = {
       'body': 'str',
       'created_at': 'datetime',
       'id': 'str',
       'rendered_body': 'str',
       'updated_at': 'datetime',
       'user': 'object'
   }

   attribute_map = {
       'body': 'body',
       'created_at': 'created_at',
       'id': 'id',
       'rendered_body': 'rendered_body',
       'updated_at': 'updated_at',
       'user': 'user'
   }

   def __init__(self, body=None, created_at=None, id=None, rendered_body=None, updated_at=None, user=None):  # noqa: E501
       """Comment - a model defined in OpenAPI"""  # noqa: E501
- OASのschemaのpropertyが、属性として定義される(
@propertyで宣言)。 - OASの
format: date-timeはdatetime.datetimeオブジェクトに変換される。 -
to_dictメソッドでdictに変換できる
tag = tag_list[0]
print(type(tag))
# ⇒ openapi_client.models.tag.Tag

print(tag.followers_count)
# ⇒ 0

print(type(tag.to_dict()))
# ⇒ dict
クライアントライブラリ全体の特徴
カスタマイズしてPythonのクライアントライブラリを生成
OpenAPI Generatorで自分好みのPythonクライアントライブラリを生成します。
カスタマイズしていないクライアントライブラリでは、以下の点がイケていないと思いました。
- 型ヒントが使われていない(Python2, Python3.4をサポートしているため)
- query parameterが多いと、メソッド引数が増える。query_parameterを
dictなどでまとめてメソッドに渡せない。
上記を改善するため、カスタマイズせずに生成したクライアントライブラリに、以下の変更を加えていきます。
- APIに対応したメソッドを一つのクラスにまとめる。OASの
tagsごとにファイル/クラスを分けない。- OASの
tagsを意識しなくても、APIを利用できるようにするため
- OASの
- メソッド引数の
request_bodyと、メソッドの戻り値には、modelsモジュールのクラスを利用せせず、dictにする。- OASのスキーマに定義されていない
propertyも利用できるようにするため。たとえば、サーバ側の挙動とqiita.yamlの内容に差がある場合を想定している。
- OASのスキーマに定義されていない
-
query_paramsはdictでメソッドに渡す。- メソッド引数が増えすぎないようにするため
- できるだけ型ヒントを使う。
以下のような使い方を想定しています。
### Qiita APIすべてが定義されたクラスのインスタンスを生成
api_instance = QiitaApi(access_token)

### タグの一覧を取得する
query_params = {"per_page":15, "sort": "name"}
tag_list = api_instance.get_tag_list(query_params=query_params)

### タグ1個の型はdict
print(type(tag_list[0]))
# ⇒ dict


### Qiitaの記事(本記事)にコメントを投稿する
item_id = "dfb929316a1335a161c0"
comment_body = "test comment"
request_body = {"body": comment_body}

comment = api_instance.create_comment(item_id, request_body=request_body)
WebAPIに対応したメソッドget_tag_list、create_commentの定義は以下になります。
メソッドの中でURLとHTTPメソッドを定義していて、それらの情報をself._request_wrapperメソッドに渡しています。self._request_wrapperメソッドは手動で書いたものです。self._request_wrapperメソッド内でHTTP通信を行っています。
class QiitaApi:
    def get_tag_list(self, query_params: Optional[Dict[str, Any]] = None) -> List[Dict[str, Any]]:
        url_path = f'/tags'
        http_method = 'GET'
        keyword_params: Dict[str, Any] = {
            'query_params': query_params
        }
        return self._request_wrapper(http_method, url_path, **keyword_params)


    def create_comment(self, item_id: str, request_body: Dict[str, Any]) -> Dict[str, Any]:
        url_path = f'/items/{item_id}/comments:'
        http_method = 'GET'

        keyword_params: Dict[str, Any] = {
            'request_body': request_body
        }
        return self._request_wrapper(http_method, url_path, **keyword_params)
Pythonのデフォルトテンプレートをダウンロードする
OpenAPI Generatorは、テンプレートファイルを修正してカスタマイズできます。詳細は https://openapi-generator.tech/docs/templating を参照してください。
まずはPythonのデフォルトテンプレートをダウンロードします。ダウンロードしたディレクトリの中には、mustacheという拡張子のファイルが存在します。このファイルは、mustacheというフォーマットで記載されています。
mustacheファイルと、生成されるpythonファイルとの対応関係
テンプレートディレクトリ内のmustacheファイルで、カスタマイズに重要なのは以下のファイルです。
| mustacheファイル | pythonファイル |
|---|---|
| api_client.mustache | openapi_client/api_client.py |
| api.mustache | openapi_client/api/{tag}_api.py |
| model.mustache | openapi_client/models/{schema}.py |
mustacheファイルとpythonファイルとの対応関係は、ファイル名やファイルの中身から推測できます。javaが読めるなら、org.openapitools.codegen.languages.PythonClientCodegen.javaから辿って対応関係を調べることもできます。
今回作成するクライアントライブラリでは、api.mustacheのみを使います。
mustacheファイルとは?
api.mustacheをカスタマイズする前に、mustacheについて簡単に説明します。
mustacheは「ロジックがないテンプレート(Logic-less)」です。「ロジックがない」とは、if/elseやloopなどの制御構造がないことです。制御構造はありませんが、タグを使ってif/else, loopに相当することは実現できます。変数の宣言などはありません。
Mustache is described as a "logic-less" system because it lacks any explicit control flow statements, like if and else conditionals or for loops; however, both looping and conditional evaluation can be achieved using section tags processing lists and lambdas.
https://en.wikipedia.org/wiki/Mustache_(template_system) 引用
mustache記法の例
mustache記法の例を見てみましょう。
以下のコードは、operationごとに(operationでループして)operationIdを表示しています。
{{#operation}}
{{operationId}}
{{/operation}}
以下のコードは、requiredがtrueならば、(required)と表示しています。
{{#required}} (required){{/required}}
どちらも{{#xxx}}という表記を使っています。{{#xxx}}という表記は、xxxがBooleanならif分岐、xxxがarrayならfor-eachを表しています。
したがって、{{#xxx}}という表記を見たとき、if分岐なのか、for-eachなのかを判断するには、変数名から予測するしかありません。非常に読みづらいです。。。
mustache記法の詳細は、以下を参照してください。
https://qiita.com/sengok/items/1d958348215647a5eaf0
Handlebarsのサポート
OpenAPIG Generator v4.0.0から、実験的な?Handlebarsがサポートされました。
Built-in templates are written in Mustache and processed by jmustache. Beginning with version 4.0.0, we support experimental Handlebars and user-defined template engines via plugins.
https://openapi-generator.tech/docs/templating#modifying-templates 引用
Handlebarsはmustacheと互換性のあるテンプレートエンジンです。
Handlebars provides the power necessary to let you build semantic templates effectively with no frustration.
Handlebars is largely compatible with Mustache templates. In most cases it is possible to swap out Mustache with Handlebars and continue using your current templates.
mustacheに関する参考サイト
api.mustacheの中身を理解する
api.mustacheをカスタマイズするために、デフォルトのapi.mustacheの中身を理解します。
デフォルトのapi.mustacheは以下のコードです(一部コメントなど省いています)。
{{#operations}}
class {{classname}}(object):

    def __init__(self, api_client=None):
        if api_client is None:
            api_client = ApiClient()
        self.api_client = api_client
{{#operation}}

    def {{operationId}}(self, {{#sortParamsByRequiredFlag}}{{#allParams}}{{#required}}{{paramName}}, {{/required}}{{/allParams}}{{/sortParamsByRequiredFlag}}**kwargs):  # noqa: E501
        """{{#summary}}{{{.}}}{{/summary}}{{^summary}}{{operationId}}{{/summary}}  # noqa: E501

        ### 処理を省略

{{/operation}}
{{/operations}}
デバッグオプションを使って、api.mustacheの変数の意味を調べる
openapi-generate-cliコマンドに-DdebugOperationsオプションを付けると、operation (api)の構造がJSONで出力されます。
https://openapi-generator.tech/docs/templating#operations 参照
$ docker run --rm -u `id -u`:`id -g` -v ${PWD}:/local openapitools/openapi-generator-cli \
 generate \
 --input-spec /local/qiita.yaml \
 --generator-name python \
 --output /local/out \
 -DdebugOperations > debug-operations.txt
以下は、出力結果の一部です。jsonのkeyがapi.mustacheで使える変数名になります。
api.mustacheの変数名と、デバッグオプションで出力された値を比較して、api.mustacheの内容を理解します。1
  "operations" : {
    "classname" : "TagsApi",
    "operation" : [ {
      "responseHeaders" : [ ],
      "hasAuthMethods" : false,
      "hasConsumes" : false,
      "hasProduces" : true,
      "hasParams" : true,
      "hasOptionalParams" : true,
      "hasRequiredParams" : false,
      "returnTypeIsPrimitive" : false,
      "returnSimpleType" : false,
      "subresourceOperation" : false,
      "isMapContainer" : false,
      "isListContainer" : true,
      "isMultipart" : false,
      "hasMore" : false,
      "isResponseBinary" : false,
      "isResponseFile" : false,
      "hasReference" : true,
      "isRestfulIndex" : false,
      "isRestfulShow" : false,
      "isRestfulCreate" : false,
      "isRestfulUpdate" : false,
      "isRestfulDestroy" : false,
      "isRestful" : false,
      "isDeprecated" : false,
      "isCallbackRequest" : false,
      "path" : "/tags",
      "operationId" : "get_tag_list",
      "returnType" : "list[Tag]",
      "httpMethod" : "GET",
      "returnBaseType" : "Tag",
      "returnContainer" : "array",
      "summary" : "タグ一覧を作成日時の降順で返します。",
      "baseName" : "tags",
      "produces" : [ {
        "mediaType" : "application/json"
      } ],
api.mustacheの内容
(mustacheファイルを見なくても、生成されたクライアントライブラリからある程度推測はできますが、)api.mustacheは以下のようなコードが生成されていることが分かりました。
-
operationsごとにタグに対応したクラスを定義する -
operationごとにAPIに対応したメソッドを定義する -
sortParamsByRequiredFlagがTrueならば、allParamsの必須項目(required)をメソッド引数にする。 -
allParamsはpathParams、queryParmasを含む
sortParamsByRequiredFlagの意味は、以下の通りです。
Sort method arguments to place required parameters before optional parameters.
api.mustacheをカスタマイズする
api.mustacheを以下の通り修正しました。
{{#operations}}
{{#operation}}

    def {{operationId}}(self, {{#sortParamsByRequiredFlag}}{{#pathParams}}{{paramName}}: {{dataType}}, {{/pathParams}}{{/sortParamsByRequiredFlag}}{{#hasQueryParams}}query_params: Optional[Dict[str, Any]] = None, {{/hasQueryParams}}{{#hasBodyParam}}request_body: Optional[Any] = None{{/hasBodyParam}}) -> Any:  # noqa: E501
        """
        {{#summary}}{{{.}}}{{/summary}}{{^summary}}{{operationId}}{{/summary}}  # noqa: E501
        """

        url_path = f'{{{path}}}'
        http_method = '{{httpMethod}}'
        keyword_params: Dict[str, Any] = {
{{#hasQueryParams}}
            'query_params': query_params,
{{/hasQueryParams}}
{{#hasBodyParam}}
            'request_body': request_body,
{{/hasBodyParam}}
        }
        return self._request_wrapper(http_method, url_path, **keyword_params)

{{/operation}}
{{/operations}}
openapi-generate-cliコマンドのオプション
openapi-generate-cliコマンドを実行するときに、以下のオプションを指定します。
-
--template-dir:テンプレートディレクトリとしてapi.mustacheが格納されているディレクトリを指定する -
-Dapis:*_api.pyのみ生成する -
-DapiTests=false:テストコードは生成しない -
-DapiDocs=false:ドキュメントは生成しない
https://openapi-generator.tech/docs/customization#selective-generation 参照
$ docker run --rm -u `id -u`:`id -g` -v ${PWD}:/local openapitools/openapi-generator-cli \
 generate \
 --input-spec /local/qiita.yaml \
 --generator-name python \
 --output /local/out \
 --template-dir /local/template \
 -Dapis -DapiTests=false -DapiDocs=false
生成された*_api.py
型ヒント以外は、期待した通り*_api.pyが生成されました。
型ヒントは細かく設定する方法が分からず、以下の状態になっています。
-
query_params、request_bodyは常にOptionalという型 - 戻りの型は常にAny
    def create_comment(self, item_id: str, request_body: Optional[Any] = None) -> Any:  # noqa: E501
        """
        記事に対してコメントを投稿します。  # noqa: E501
        """

        url_path = f'/items/{item_id}/comments'
        http_method = 'POST'
        keyword_params: Dict[str, Any] = {
            'request_body': request_body,
        }
        return self._request_wrapper(http_method, url_path, **keyword_params)
    def get_tag_list(self, query_params: Optional[Dict[str, Any]] = None, ) -> Any:  # noqa: E501
        """
        タグ一覧を作成日時の降順で返します。  # noqa: E501
        """

        url_path = f'/tags'
        http_method = 'GET'
        keyword_params: Dict[str, Any] = {
            'query_params': query_params,
        }
        return self._request_wrapper(http_method, url_path, **keyword_params)
*_api.pyを一つのファイルにまとめる
今回はcatコマンドを使って、複数の*_api.pyをgenerated_api.pyというファイルにまとめました。
generated_api_template.pyはgenerate_api.pyのヘッダ部分(クラス宣言部分)です。
class AbstractQiitaApi:
    def __init__(self):
        pass
cat generated_api_template.py out/openapi_client/api/*_api.py > ../generated_api.py
Generation Gap Patternに従ったクラス設計にする
自動生成されたファイルgenerated_api.pyと、手動で生成したファイルをapi.py分けます。
そして、手動生成のQiitaApiは、自動生成のAbstractQiitaApiを継承するようにします。
そうすれば自動生成の処理を変更したいとき、generated_api.pyを変更せずに、オーバライドで対応できます。
class QiitaApi(AbstractQiitaApi):
    pass
まとめ
OpenAPI Generatorを使って、OASからからPythonのクライアントライブラリを自動生成することができました。これで、WebAPIの変更に対して、簡単に追従できるようになりました。
補足
ログギングレベルを変更する
openapi-generator-cliはlogbackでロギングを行っています(logback.xml)。
-Dlog.level=debugオプションで、debugレベルのログを出力できます。
# javaコマンド
$ java -Dlog.level=debug -jar openapi-generator-cli.jar generate \
 -g python -i pestore.yaml

# Docker
$ docker run --rm -v ${PWD}:/local -e JAVA_OPTS="-Dlog.level=debug" \
    openapitools/openapi-generator-cli generate \
    -i petstore.yaml \
    -g python
ハマりどころ
oneOf
以下のようにoneOfを使うと、Pet.dataのdatatypeはOneOfobjectFishBirdになります。しかし、OneOfobjectFishBirdというクラスは生成されません。
  schemas:
    Pet:
      properties:
        name:
          type: string
        data:
          oneOf:
            - $ref: "#/components/schemas/Fish"
            - $ref: "#/components/schemas/Bird"
    Fish:
      properties:
        width:
          type: integer
    Bird:
      properties:
        weight:
          type: integer
なお、以下のようなschemaに対してoneOfを使うと、PetDataの属性はweightとwidthになります。これは、FishとBirdの属性を合わせたものになります。
    PetData:
      oneOf:
        - $ref: "#/components/schemas/Fish"
        - $ref: "#/components/schemas/Bird"
その他実施したこと
- 非推奨APIの場合
warnings.warn("deprecated", DeprecationWarning)を実行するようにした。 - 生成しないファイルは
.openapi-generator-ignoreで制御した。
参考サイト
- OpenAPI.tool :OpenAPIのツールをまとめたサイト
- https://speakerdeck.com/akihito_nakano/gunmaweb34 :OpenAPI Generator開発者である中野さんのスライド
- openapi-generator をカスタマイズする方法
- Swagger Codegenの電子書籍 :OpenApi Generatorの前身であるSwagger Codegenの電子書籍
- OpenAPI GeneratorでRESTful APIの定義書から色々自動生成する
-
2019/06時点では、変数の意味が載っているドキュメントはありませんでした。 ↩