Overview
まえまえから、二段階認証を実装してみたいと思っていたのですが、良いライブラリが存在していることもあり思いのほか簡単に実装できました。
GoogleAuth (二段階認証のサーバサイド用ライブラリ)
GoogleAuthはRFC6238で定義されている、Time-based One-time Password(TOTP)を作成してくれるサーバサイド向けのJavaライブラリです。
上記のライブラリを使ってサーバサイドを実装してやれば、Googleが提供しているGoogle Authenticatorなどのアプリで発行したワンタイムトークンを使って、ユーザに認証させることができます。
iOS版 Google Authenticator
Android版 Google Authenticator
Google AuthenticatorもTOTPの仕様でワンタイムトークンをつくっているので利用できるというわけです。
※なお、ユーザがGoogle Authenticatorをインストールした端末をなくしたケースは本記事では考慮してません。本番で導入する場合はそういったケースの運用も想定しておく必要があります。
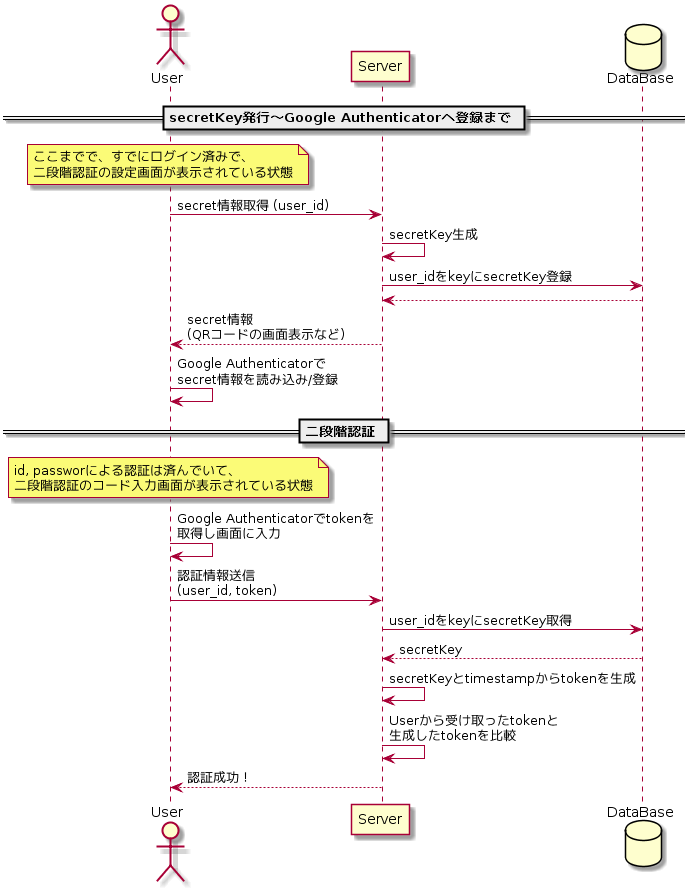
二段階認証のおおまかな流れ
だいたい以下のような流れになるかと思います。
サンプルコード
上記のシーケンス図でいうところの、Server部分の実装コードになります。
言語はJavaを使用しています。
user情報の保存処理はDBではなくSingletonのMapを使ってごまかしてます。
サンプルコード解説
サンプルコードの解説というか、ほぼライブラリ(GoogleAuth)の使い方の話になります。
SecretKeyの発行 & 保存
下記のコードで"user_id"用のSecretKeyを発行し、データベースなどに保存することができます。
GoogleAuthenticator gAuth = new GoogleAuthenticator();
GoogleAuthenticatorKey key = gAuth.createCredentials("user_id");
なお、上記のコードを実行する前に以下の準備を行っておく必要があります。
ICredentialRepositoryの実装クラスを準備
上記のcreateCredentialsを実行すると、GoogleAuthはICredentialRepositoryの実装クラスのsaveUserCredentialsメソッドを呼び出してsecretKeyの保存処理を実行します。
※呼び出されるICredentialRepositoryの実装クラスの指定方法はJava ServiceLoader用の準備を参照
public class MyCredentialRepository implements ICredentialRepository {
    // ...
    @Override
    public void saveUserCredentials(String userId, String secretKey, int validationCode, List<Integer> scratchCodes) {
        // userIdをkeyにしてsecretKeyを保存する処理を記述
    }
}
ちなみに、scratchCodesはユーザが端末をなくした場合などに使用させるためのコードで、デフォルトで5つ発行されるようです。
https://github.com/wstrange/GoogleAuth#scratch-codes
validationCodeはどのような用途を想定しているのかよく理解できませんでした(scratchCodesと同じような用途?)。もしご存知の方いれば是非ご教授ください![]()
サンプルコードではやってませんが、これらの値の処理も必要に応じて実装するのが良いかと思います。
Java ServiceLoader用の準備
GoogleAuthは、createCredentialsが実行された際に、Java ServiceLoader APIを使用してICredentialRepositoryの実装クラスを取得し、secretKeyを保存します。
src/resource配下など、クラスパスが通っている場所に、META-INF/servicesフォルダを作成しcom.warrenstrange.googleauth.ICredentialRepositoryというテキストファイルを作成してください。
作成したファイル内に、以下のようにICredentialRepositoryの実装クラス名を記述しておくと、GoogleAuthがこのクラスを使ってくれるようになります。
io.github.yuizho.twofactorauth.MyCredentialRepository
Secret情報の返却
生成したsecretKeyを含むSecret情報を、Google Authenticatorへ読み込ませる際は、以下のようなフォーマットのURIを生成し、QRコードへ変換します。
otpauth://totp/<userId>?secret=<secretKey>&issuer=<applicationName>

e.g. otpauth://totp/test_user?secret=ZYWAZKOQLG3YHBSZ&issuer=two-factor-auth-sample
URIのフォーマットの詳細は以下を参照してください。
https://github.com/google/google-authenticator/wiki/Key-Uri-Format
トークンの検証
下記のような感じで"user_id"用のsecretKeyを保存先から取得し、トークンを生成した上で、渡されたトークン(Google Authenticatorで取得したもの)と一致しているかチェックできます。
GoogleAuthenticator gAuth = new GoogleAuthenticator();
boolean isCodeValid = gAuth.authorizeUser("user_id", token);
このとき、GoogleAuthはsecretKeyを保存したときと同じようにICredentialRepositoryの実装クラスのgetSecretKeyメソッドを呼び出してsecretKeyの取得処理をおこないます。
※呼び出されるICredentialRepositoryの実装クラスの指定方法はJava ServiceLoader用の準備を参照
public class MyCredentialRepository implements ICredentialRepository {
    // ...
    @Override
    public String getSecretKey(String userId) {
        // userIdをキーにテーブルからsecretKeyを取得し、返却する処理を実装
    }
}
あとは、GoogleAuthが取得したsecretkeyと現在のtimestampをもとにトークンを生成し、GoogleAuthenticator#authorizeUserの第二引数に渡されたトークンと比較してくれます。
まとめ
というわけで、比較的簡単に二段階認証の実装を行うことができました。
今回はサーバサイドのライブラリにGoogleAuthを使用していますが、もちろんライブラリを使わずに自分で実装することも可能です。
その場合は以下のRFCなどを参照しながらトークンTOTPの生成処理を実装すればいけると思います(サンプルコードもあります)。
https://tools.ietf.org/html/rfc6238
