本記事では,PyQUBOとnetworkxを使って「巡回セールスマン問題」を解く方法を紹介します.
QUBOとは?
QUBOは,Quadratic Unconstrained Binary Optimization (制約なし二値変数2次最適化)の頭文字をとって名付けられた用語です.
QUBO変数は0と1の値をとるバイナリ変数で,$\ \pm1,$の値をとるスピン変数$\ \sigma_i,$と次のような結びつきを持ちます.
\begin{equation*}
x_i=\frac{\sigma_i+1}{2}\qquad \sigma_i\in\{+1, -1\}
\end{equation*}
この$,0,1,$の二値をとる変数を用いて,組み合わせ最適化の問題を解くツールが「pyqubo」です.最適化の対象となるQUBOの目的関数は次のようになります.
\begin{align*}
&\mathcal{H}(\boldsymbol{x})=\sum_{i<j}x_iQ_{ij}x_j=\boldsymbol{x}^\mathrm{T}\hat{Q}\boldsymbol{x}
\end{align*}
この目的関数はQUBOハミルトニアンと呼ばれ,$,\hat{Q},$はQUBO変数の係数行列を表します.例えば,
\begin{align*}
\mathcal{H}(\boldsymbol{x})=(3x_1+2x_2)^2=9x_1^2+12x_1x_2+4x_2^2
\end{align*}
という設定のハミルトニアンであれば,このときのQUBO行列は
 と上三角行列で表現されます.pyquboを用いると,ハミルトニアンを展開した際の係数抽出は次のように自動で行うことができます.
>>> from pyqubo import Binary
>>> x1, x2 = Binary("x1"), Binary("x2")
>>> H = (3 * x1 + 2 * x2) ** 2
>>> qubo, offset = H.compile().to_qubo()
>>> print(qubo)
{('x1', 'x2'): 12.0, ('x1', 'x1'): 9.0, ('x2', 'x2'): 4.0}
定式化
巡回セールスマン問題を以下に定義します.
地点$,i-j,$間を結ぶ経路に経路長$,\ell_{i,j},$を割り当て,セールスマンが訪問する経路長の総和が最も小さくなる巡回経路の組を求める.
ただし,次の制約条件を満たすものとする.
- 各時刻ステップで1つの地点のみ訪問可能.
- 各地点は1回ずつ訪問.
時刻$\ t,$に地点$\ i,$を訪問する場合を$,x_{i,t}=1,$で,訪問しない場合を$,x_{i,t}=0,$で表すQUBO変数を定義した時,目的関数は以下のようになります.

本問題では,$N$箇所の地点を巡回して戻ってくる場合を考えるので$,x_{i,N+1}=x_{i,1}$となります.
制約条件
巡回セールスマン問題での制約条件は次の2つでした.
- 各時刻ステップで1箇所の地点に存在する.
- すべての地点を1回ずつ訪問する.
制約条件からもわかるように,QUBO変数$,x_{i,t},$は地点と時刻を指定する2つのインデックスをもつので,次のように碁盤の面で表現することができます.

上図では,わかりやすさのため時刻$\ t,$に地点$,i,$を訪問することを色付きの丸で示していますが,実際は0と1のビットで訪問の有無を表すため,色付きの丸を1,それ以外を0と読み替えてください.
すると,制約条件はそれぞれ次のように解釈できます.
-
各時刻ステップで1箇所の地点に存在する
⇒ 各時刻で地点軸に沿ってビットの和をとると1になる. -
すべての地点を1回ずつ訪問する.
⇒ 各地点で時刻軸に沿ってビットの和をとると1になる.
よって,以下のような制約条件の式になります.

この制約条件を満たすときにエネルギーが0となるように,ハミルトニアンをそれぞれ構成します.
\begin{equation*}
\mathcal{H}_{\text{bind-1}}=\sum_{t=1}^N\left(1-\sum_{i=1}^Nx_{i,t}\right)^2,\quad
\mathcal{H}_{\text{bind-2}}=\sum_{i=1}^N\left(1-\sum_{t=1}^Nx_{i,t}\right)^2
\end{equation*}
目的関数
ある時間ステップにおける地点$\ i,$と次のステップでの地点$\ j,$間の移動は$\ x_{i,t}x_{j,t+1},$の積の形で表現されます.よって経路長の総和を表す目的関数は
\begin{align*}
\mathcal{H}_{\text{obj}}=\sum_{i=1}^N\sum_{j=1}^N\sum_{t=1}^N\ell_{i,j}x_{i,t}x_{i,t+1}
\end{align*}
と与えられます.
次に,このハミルトニアンを少しだけ簡素化することを考えます.
$\ x_{i,t},$を要素に持つ行列を$\ \mathrm{X},$とし,$\ y_{i,t}=x_{i,t+1},$を要素にもつ行列を$,\mathrm{Y},$とすると,
\begin{align*}
\mathcal{H}_{\text{obj}}&=\sum_{i,j}\ell_{i,j}\sum_tx_{i,t}y_{j,t}=\sum_{i,j}\ell_{i,j}\sum_t\bigl(\mathrm{X}\bigr)_{i,t}\bigl(\mathrm{Y}^\mathrm{T}\bigr)_{t,j}\\[10pt]
&=\sum_{i,j}\left[L\circ\left(\mathrm{X}\cdot\mathrm{Y}^\mathrm{T}\right)\right]_{i,j}
\end{align*}
と行列の積でシンプルに表現できます.$\ L,$は$,\ell_{i,j},$を要素に持つ行列です.
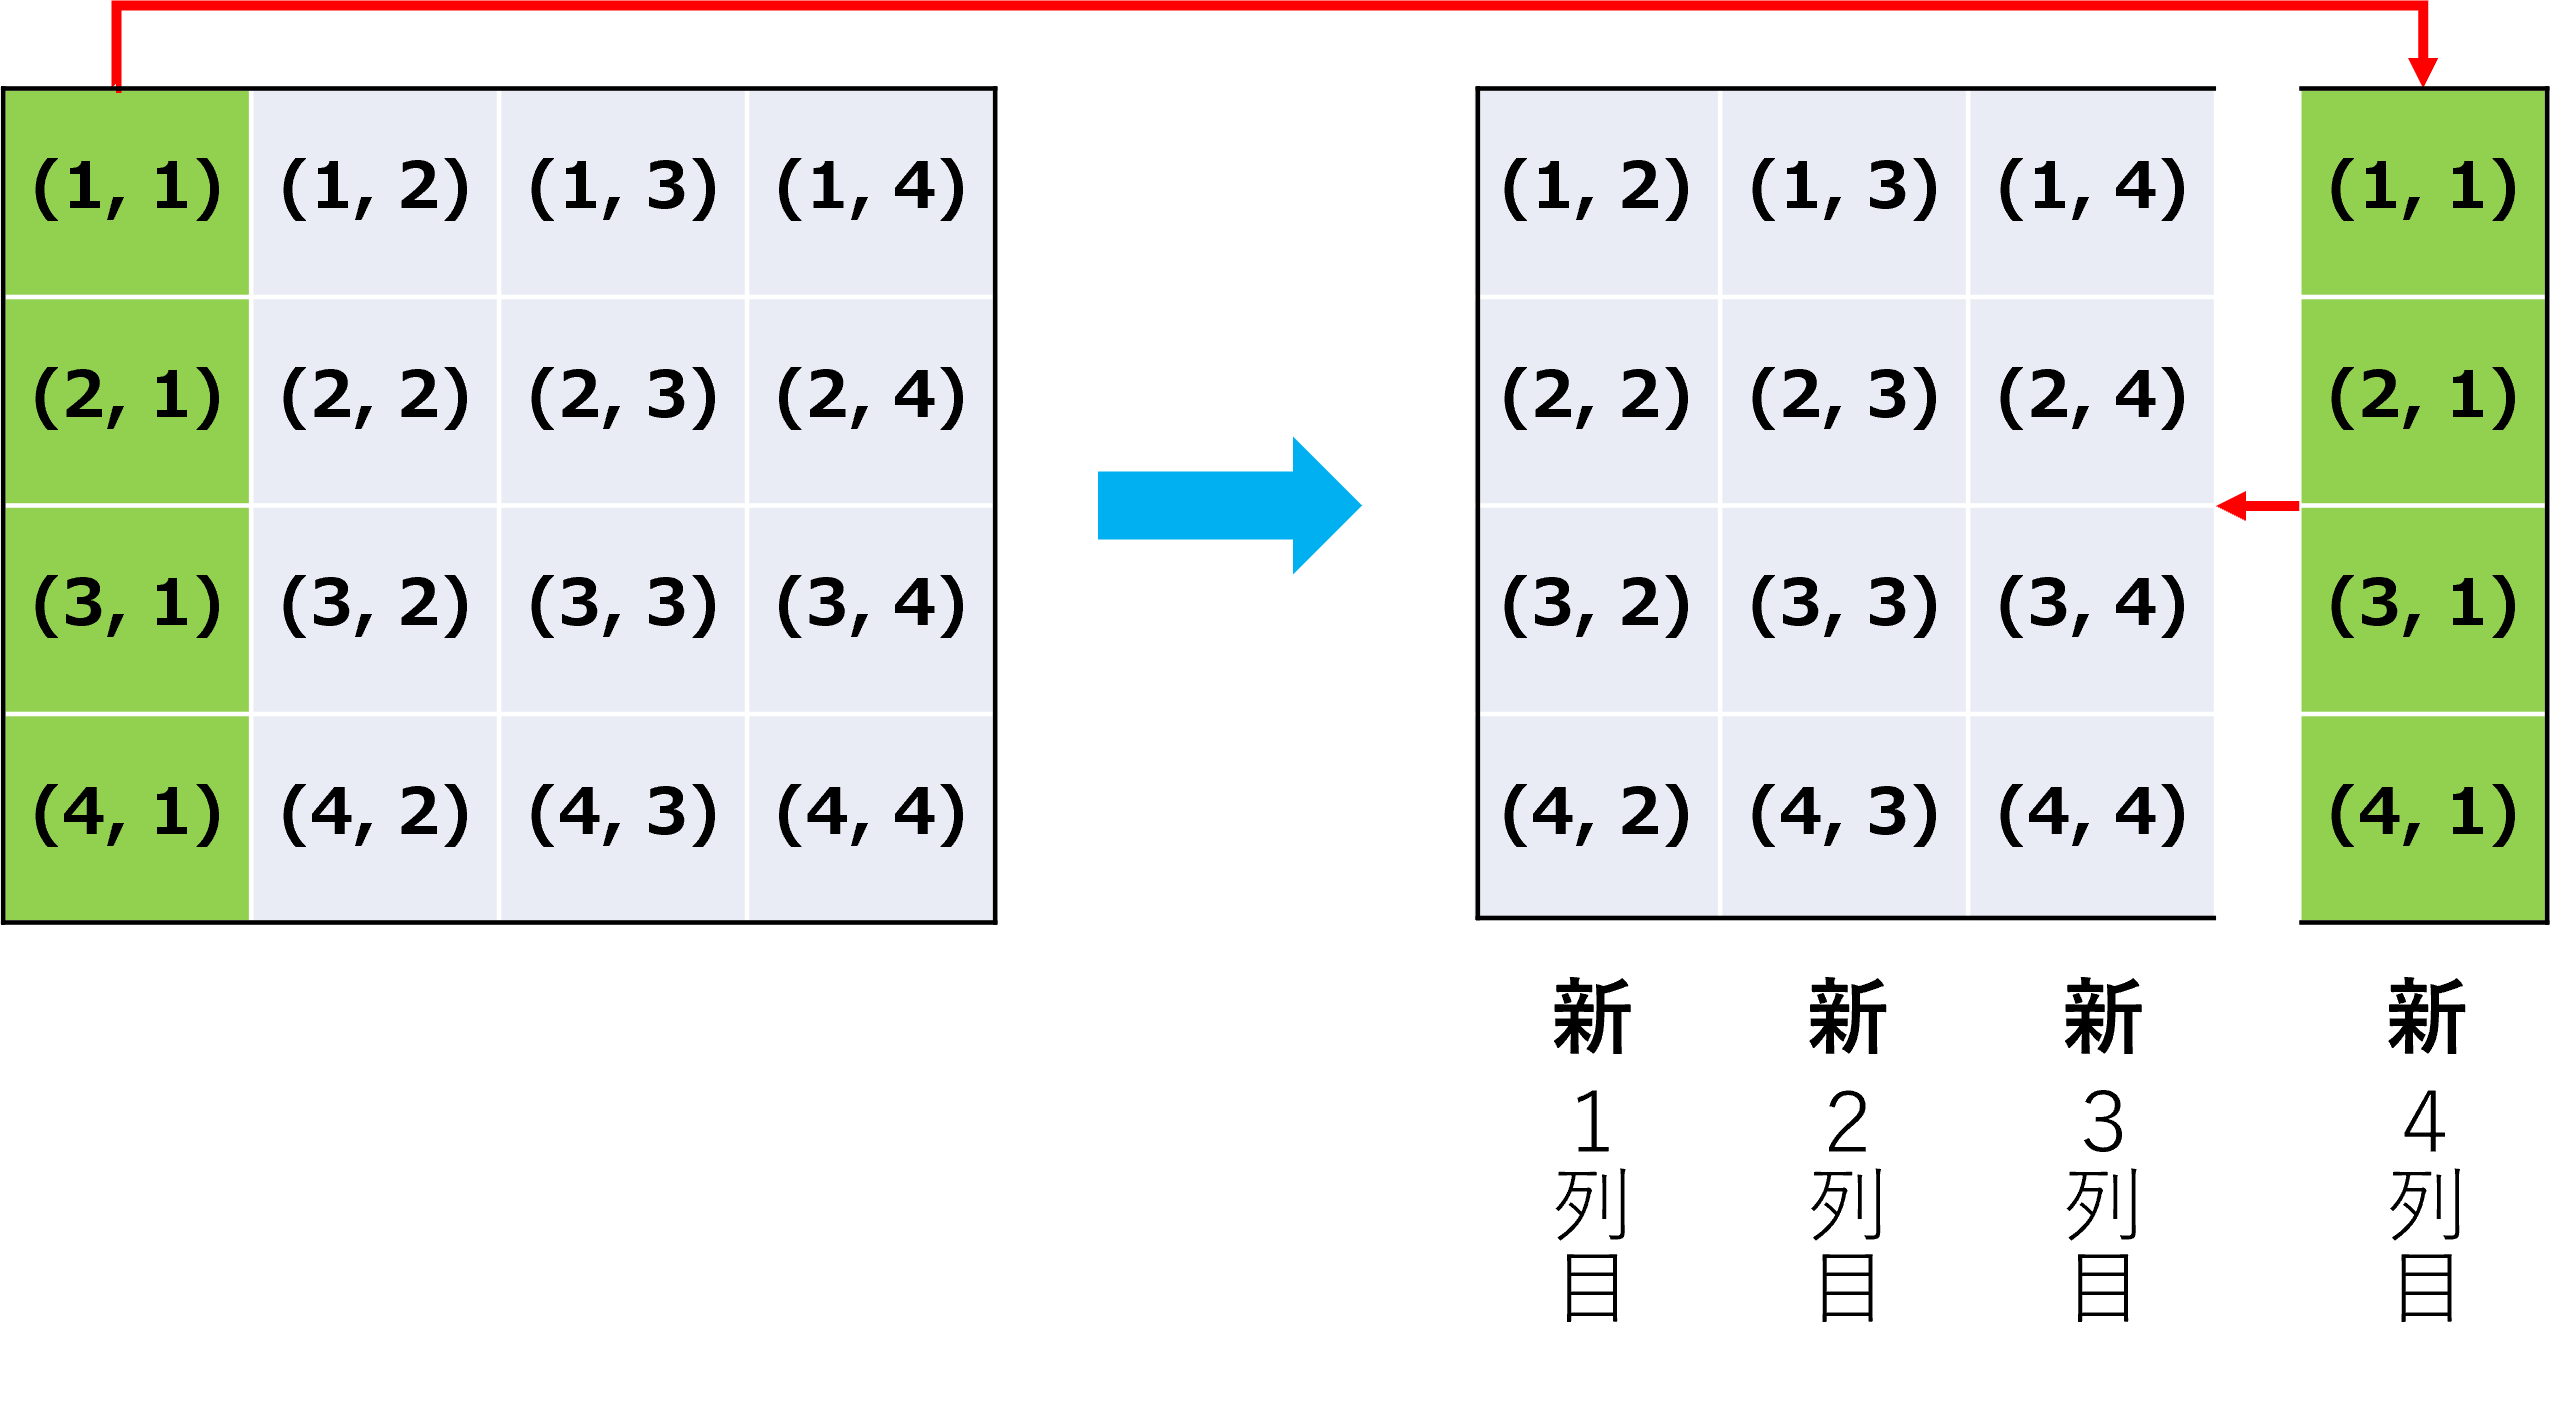
途中で導入した$\ y_{i,t}=x_{i,t+1},$を要素にもつ行列$,\mathrm{Y},$は,プログラム上で時刻のインデックスを一つずらせば構築できます.具体的には図のように$,\mathrm{X},$の最初の列を最終列の右側に結合すると実装できます.

実装
必要ライブラリ
アニーリングマシンは「pyqubo」を用い,グラフ構造の可視化には「networkx」を使います.
import neal
import numpy as np
import networkx as nx
import matplotlib.pyplot as plt
from pyqubo import Array, Placeholder
from scipy.spatial.distance import cdist
グラフ構造の構築
まず,各地点(ノード)の位置をグラフに設定します.networkxの「spring_layout」はノード同士が互いに反発しあうように自動で配置を算出してくれる関数です.
「cdist」はノードの位置を入力すると,各ノード間の距離を算出します.この距離行列の情報をもとにグラフを構築し,「set_node_attributes」関数でノードの位置座標を属性として付与します.
def construct_graph(n_pos:int):
    """ construct complete graph """
    pos = nx.spring_layout(nx.complete_graph(n_pos))
    coordinates = np.array(list(pos.values()))
    G = nx.Graph(cdist(coordinates, coordinates))
    nx.set_node_attributes(G, pos, "pos")
    return G
ハミルトニアンの構築
クラス関数「Array.create」は配列型のQUBO変数$\ \mathrm{X},$を生成します.変数型にBINARYを選ぶことで,配列の各要素が0と1の二値をとるように設定されます.
配列$,\mathrm{Y},$の部分では,「np.concatenate」で$\ \mathrm{X},$の0列目を最終列の右に結合し,「np.delete」で0列目を削除することで,時刻インデックスを一つずらした行列を作成しています.
「Placeholder」はハミルトニアン中にある制約項の係数に対応します.
def create_hamiltonian(G:nx.Graph):
    """ create QUBO model from graph structure """

    # generate QUBO variable
    n_pos = G.number_of_nodes()
    X = np.array(Array.create("X", shape = (n_pos, n_pos), vartype = "BINARY"))

    # construct `Y` matrix
    Xtmp = np.concatenate([X, X[:, 0].reshape(-1, 1)], axis = 1)
    Y = np.delete(Xtmp, 0, 1)

    # Distance matrix
    L = np.array(nx.adjacency_matrix(G).todense())

    # return hamiltonian
    Hbind1 = np.sum((1 - X.sum(axis = 0)) ** 2)
    Hbind2 = np.sum((1 - X.sum(axis = 1)) ** 2)
    Hobj = np.sum(X.dot(Y.T) * L)
    H = Hobj + Placeholder("a1") * Hbind1 + Placeholder("a2") * Hbind2

    return H.compile()
解のデコード関数
最後に,アニーラーから返ってきた応答(サンプリングの解)をグラフ構造に変換する関数です.solutionの部分では,エネルギーが最も小さくなる解を取り出し,解を配列$,\mathrm{X},$の形に復元しています.
circuitの部分では,構成した配列から,どのノードを何番目に通るかを算出しています.
def decode(response, Gorigin:nx.Graph):
    """ return output graph generated from response """

    # derive circuit
    solution = min(response.record, key = lambda x: x[1])[0]
    X = solution.reshape((num_pos, num_pos))
    circuit = np.argmax(X, axis = 0).tolist()
    circuit.append(circuit[0])

    # generate output graph structure
    Gout = nx.Graph()
    Gout.add_edges_from(list(zip(circuit, circuit[1:])))
    positions = nx.get_node_attributes(Gorigin, "pos")
    nx.set_node_attributes(Gout, positions, "pos")

    return Gout
ソースコード全体
以上の関数にグラフを描画する関数とメイン呼び出し部を加えたソースコードの全体像を示します.
「to_qubo」関数を利用してQUBOを生成する際に,キーワード引数「feed_dict」で制約項の係数を調整することで,制約条件を破りにくくなります.
import neal
import numpy as np
import networkx as nx
import matplotlib.pyplot as plt
from pyqubo import Array, Placeholder
from scipy.spatial.distance import cdist


def construct_graph(n_pos:int):
    """ construct complete graph """
    pos = nx.spring_layout(nx.complete_graph(n_pos))
    coordinates = np.array(list(pos.values()))
    G = nx.Graph(cdist(coordinates, coordinates))
    nx.set_node_attributes(G, pos, "pos")
    return G


def create_hamiltonian(G:nx.Graph):
    """ create QUBO model from graph structure """

    # generate QUBO variable
    n_pos = G.number_of_nodes()
    X = np.array(Array.create("X", shape = (n_pos, n_pos), vartype = "BINARY"))

    # construct `Y` matrix
    Xtmp = np.concatenate([X, X[:, 0].reshape(-1, 1)], axis = 1)
    Y = np.delete(Xtmp, 0, 1)

    # Distance matrix
    L = np.array(nx.adjacency_matrix(G).todense())

    # return hamiltonian
    Hbind1 = np.sum((1 - X.sum(axis = 0)) ** 2)
    Hbind2 = np.sum((1 - X.sum(axis = 1)) ** 2)
    Hobj = np.sum(X.dot(Y.T) * L)
    H = Hobj + Placeholder("a1") * Hbind1 + Placeholder("a2") * Hbind2

    return H.compile()


def decode(response, Gorigin:nx.Graph):
    """ return output graph generated from response """

    # derive circuit
    solution = min(response.record, key = lambda x: x[1])[0]
    X = solution.reshape((num_pos, num_pos))
    circuit = np.argmax(X, axis = 0).tolist()
    circuit.append(circuit[0])

    # generate output graph structure
    Gout = nx.Graph()
    Gout.add_edges_from(list(zip(circuit, circuit[1:])))
    positions = nx.get_node_attributes(Gorigin, "pos")
    nx.set_node_attributes(Gout, positions, "pos")

    return Gout


def draw_graph(G:nx.Graph, **config):
    """ drawing graph """
    plt.figure(figsize = (5, 4.5))
    nx.draw(G, nx.get_node_attributes(G, "pos"), **config)
    plt.show()


# configuration for drawing graph
config = {"with_labels":True, "node_size":500, "edge_color":"r", "width":1.5,
          "node_color":"k", "font_color":"w", "font_weight":"bold"}

# construct complete graph
num_pos = 8
G = construct_graph(num_pos)
draw_graph(G, **config)

# sampling
model = create_hamiltonian(G)
qubo, offset = model.to_qubo(feed_dict = {"a1":500, "a2":500})
response = neal.SimulatedAnnealingSampler().sample_qubo(qubo, num_reads = 1000)


# output graph
Gout = decode(response, G)
draw_graph(Gout, **config)
結果
8地点の完全グラフ構造で,アニーリングによる最適化を行った結果を示します.
|完全グラフ|アニーリング適用後|
|:-:|:-:|:-:|
| |
| |
|
いい感じに最短巡回経路探索ができています!「num_pos」で地点数を変化させることができるので,いろいろ試して遊んでみてください!
まとめ
本記事ではPyQUBOのシミュレーティッド・アニーリングサンプラーとnetworkxのグラフ描画機能を用いて,巡回セールスマン問題を解きました.
参照
補足
QUBOハミルトニアンは,古典アニーリングのアルゴリズムに関する記事で紹介したイジングハミルトニアンと等価です.証明は以下のようになります.まず,QUBOハミルトニアンに変数変換を与えて,
\begin{align*}
\mathcal{H}(\boldsymbol{x})&=\sum_iQ_{ii}x_i+\sum_{i\neq j}x_iQ_{ij}x_j \\[10pt]
&=\sum_iQ_{ii}\frac{\sigma_i+1}{2}+\frac{1}{4}\sum_{i,j}(\sigma_i+1)Q_{ij}(\sigma_j+1)\\[10pt]
&=\sum_i\biggl[\frac{Q_{ii}}{2}+\frac{1}{2}\sum_{j\in\partial(i)}Q_{ij}\biggr]\sigma_i+\sum_{i,j}\frac{Q_{ij}}{4}\sigma_i\sigma_j+\mathrm{const.}
\end{align*}
となります.スピン変数に関して係数をそれぞれ,
\begin{align*}
\ h_i=-\biggl[\frac{Q_{ii}}{2}+\frac{1}{2}\sum_{j\in\partial(i)}Q_{ij}\biggr]\qquad J_{ij}=-\frac{Q_{ij}}{4}
\end{align*}
と置換すればイジングハミルトニアンが得られます.
\begin{align*}
\mathcal{H}=-\sum_ih_i\sigma_i-\sum_{i,j}J_{ij}\sigma_i\sigma_j
\end{align*}