はじめに
個人的なメモや、友人への情報共有を兼ねて書いたものです。
記事を書いている時点では動作していますが、今後もこの通りに設定したからといって動作するかは分かりません。
ちなみに、ほとんどこの記事(VSCode + MinGW-64 で C++ のコードをビルド&デバッグするまで)を勝手にパクって書いています。
規約的に駄目とかそういうのがあればすぐに消します。
jsonファイルの記述にのみ個人的に変えたほうが良いと思うところがあったのでその部分のみ変えています。
すること
- コンパイラ(MinGW-W64)のインストール
- VSCodeのインストール
- 拡張機能のインストール
- jsonファイルの作成
MinGWのインストール
ここは元記事を参考にしています。
まず、https://sourceforge.net/projects/mingw-w64/files/Toolchains%20targetting%20Win32/Personal%20Builds/mingw-builds/installer/mingw-w64-install.exe からインストーラをダウンロードします。
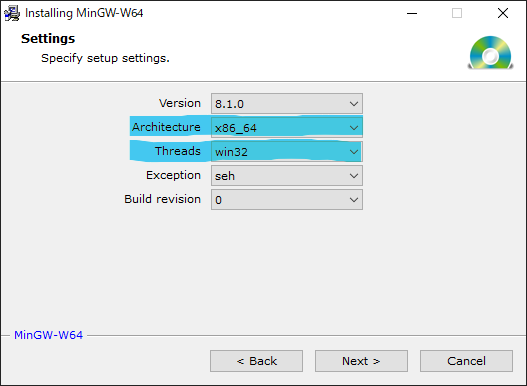
ArchitectureとThreadのみ変更してNext。

適当な位置にフォルダを作ってNext。
空白文字や全角文字をフォルダパスに含んでも大丈夫かどうか試してないので、一応そういうのを含まない場所を指定することをオススメします。

処理が終わるまで待てばインストールは完了です。
インストーラーが動かない場合は以下から対応する7zファイルを持ってきて、Cドライブ直下に解凍してください(フォルダ名が長くなるので適当に短縮することをおすすめします)。
https://sourceforge.net/projects/mingw-w64/files/

ここまで完了するとC:\mingw-w64\mingw64(※指定したパスによって変わります)になんか色々たくさんのフォルダが配置されてるんじゃないかなと思います。
Visual Studio Codeのインストール
https://code.visualstudio.com/ からインストールしてください。コンテキストメニュー周りとか、path周りとかはお好みでどうぞって感じなので説明は割愛します。
インストールが完了したら、このあたりで一度Windowsを再起動しておくことをおすすめします。
拡張機能のインストール
- C/C++ (Microsoftが出してるやつ、必須)
- Japanese Language Pack for Visual Studio Code (お好みで)
以上の2つを入れておくと良いと思います。
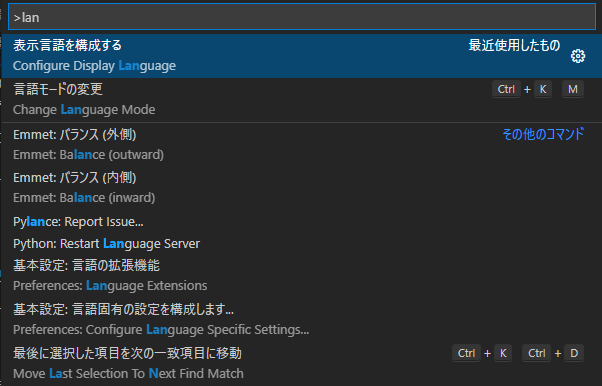
日本語パックのほうはインストールした後、Ctrl+Shift+Pでコマンドパレットを開きLanguageと入力してください。
するとConfigure Display Languageという項目が出てくるので、jaに設定し、Visual Studio Codeを再起動すれば有効化されます。

jsonファイルの作成
まず、適当な作業用のフォルダを作成し、VSCodeで開いておいてください。
そして、.vscodeという名前のフォルダをその中に作り、さらにその中に3つのjsonファイルを作成してください。
- c_cpp_properties.json
{
    "configurations": [
        {
            "name": "Win32",
            "includePath": [
                "${workspaceFolder}/**"
            ],
            "defines": [
                "_DEBUG",
                "UNICODE",
                "_UNICODE"
            ],
            "compilerPath": "C:/mingw-w64/mingw64/bin/gcc.exe",
            "cStandard": "gnu17",
            "cppStandard": "gnu++14",
            "intelliSenseMode": "gcc-x64"
        },
        {
            "name": "gcc_exe",
            "includePath": [
                "${workspaceFolder}/**",
                "C:/mingw-w64/mingw64/**"
            ],
            "defines": [
                "_DEBUG",
                "UNICODE",
                "_UNICODE"
            ],
            "compilerPath": "C:/mingw-w64/mingw64/bin/gcc.exe",
            "cStandard": "gnu17",
            "cppStandard": "gnu++14",
            "intelliSenseMode": "gcc-x64"
        }
    ],
    "version": 4
}
- launch.json
{
    "version": "0.2.0",
    "configurations": [
        {
            "name": "gcc.exe - アクティブ ファイルのビルドとデバッグ",
            "type": "cppdbg",
            "request": "launch",
            "program": "${fileDirname}/${fileBasenameNoExtension}.exe",
            "args": [],
            "stopAtEntry": false,
            "cwd": "${workspaceFolder}",
            "environment": [],
            "externalConsole": false,
            "MIMode": "gdb",
            "miDebuggerPath": "C:/mingw-w64/mingw64/bin/gdb.exe",
            "setupCommands": [
                {
                    "description": "gdb の再フォーマットを有効にする",
                    "text": "-enable-pretty-printing",
                    "ignoreFailures": true
                }
            ],
            "preLaunchTask": "C/C++: gcc.exe build active file"
        }
    ]
}
- tasks.json
{
    "version": "2.0.0",
    "tasks": [
        {
            "type": "cppbuild",
            "label": "C/C++: gcc.exe build active file",
            "command": "C:/mingw-w64/mingw64/bin/gcc.exe",
            "args": [
                "-g",
                "${file}",
                "-o",
                "${fileDirname}/${fileBasenameNoExtension}.exe"
            ],
            "options": {
                "cwd": "C:/mingw-w64/mingw64/bin"
            },
            "problemMatcher": [
                "$gcc"
            ],
            "group": {
                "kind": "build",
                "isDefault": true
            },
            "detail": "compiler: C:/mingw-w64/mingw64/bin/gcc.exe"
        }
    ]
}
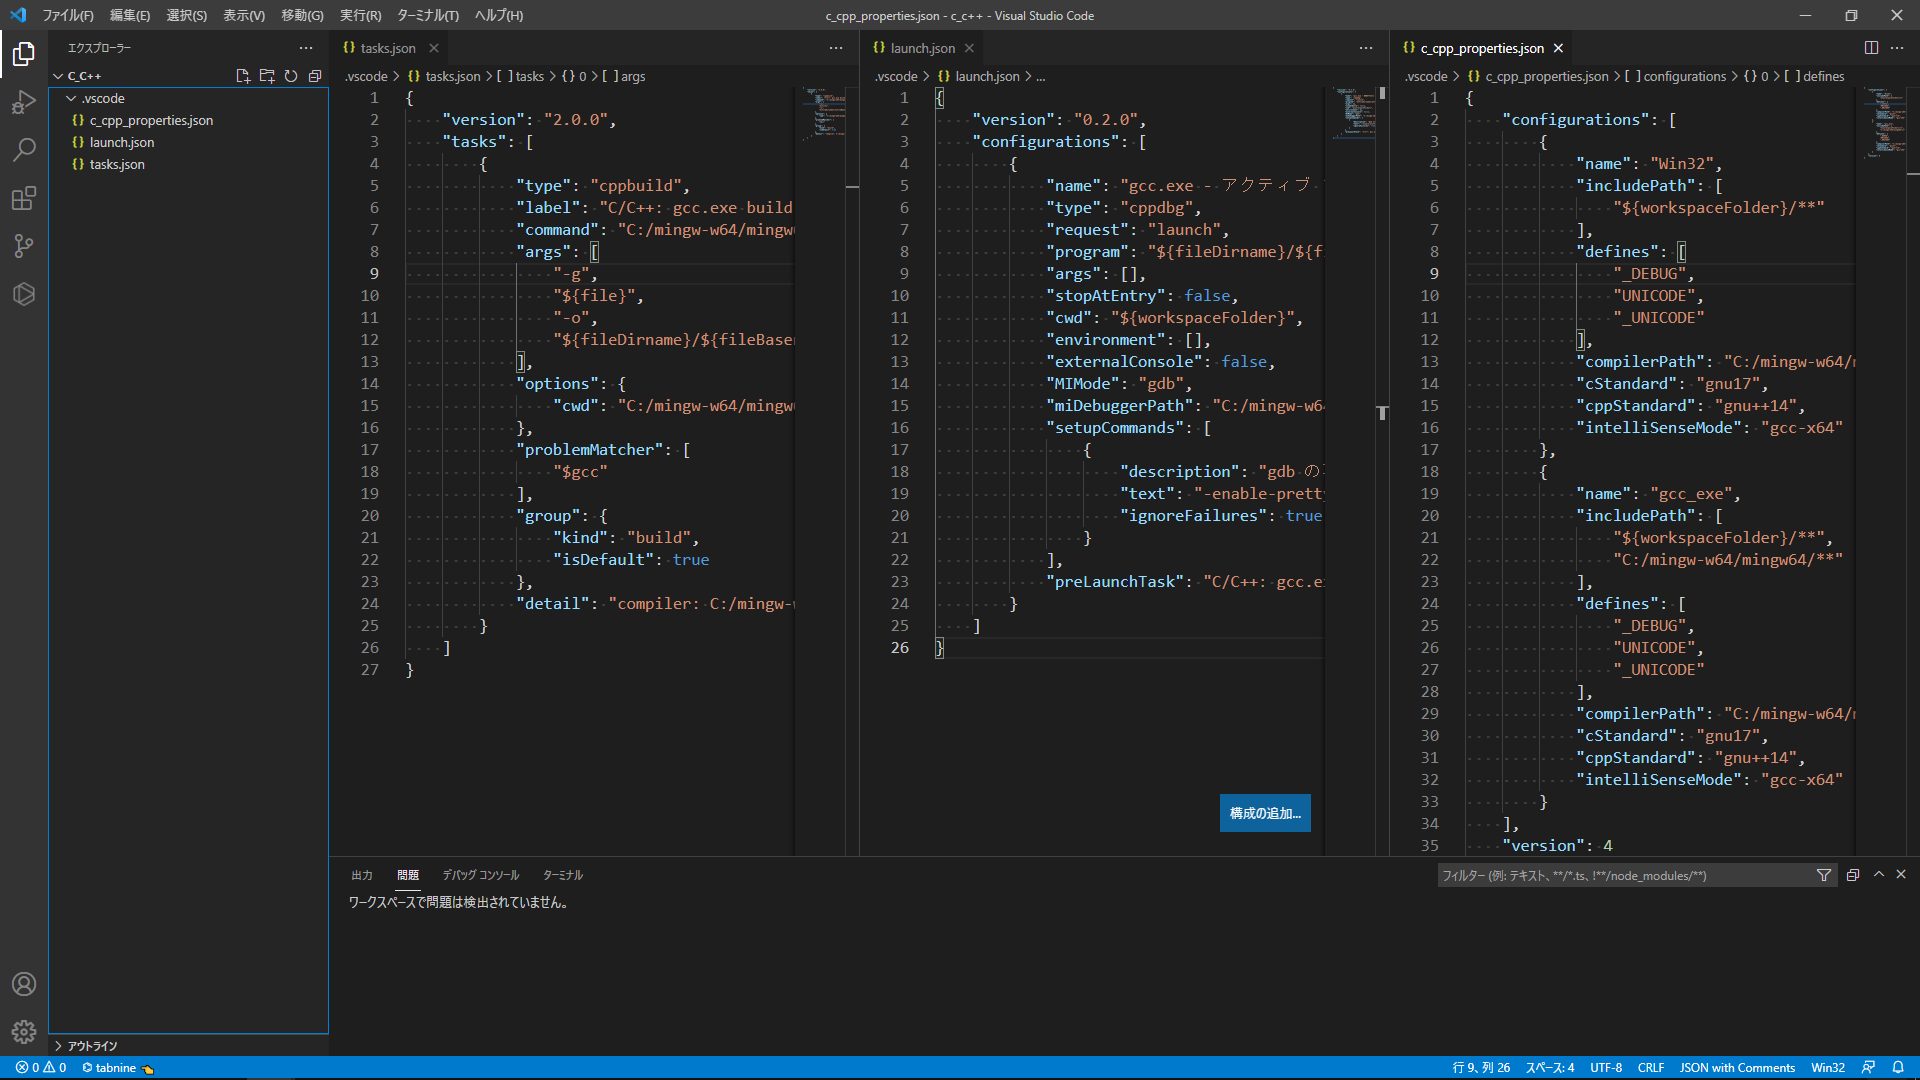
ここまでの作業が完了したとき、VSCodeからは概ねこのように見えていると思います。

コンパイラのインストール時に設定したインストール場所が自分と違う場合や、インストール完了後一度もWindowsを再起動していない場合、コンパイラのパスのところに波線を引かれているかもしれません。
その場合、パスの部分を上手く書き換えたり、PCを再起動したりすると解決できます。
テストする
いよいよここまで来れば設定は終了です。
最後に、適当にプログラムを実行してみて設定がうまく行っているか確認してみましょう。
作業用フォルダの中(.vscodeと同じ階層、.vscodeの下ではない)に適当なファイル名.cを作成し、コードを書いてF5キーを押せばターミナルに実行結果が表示されるはずです。
今回作成した.vscodeフォルダーを使い回せば別に作業用フォルダを作って使うこともできます。適当なクラウドにバックアップを取っておけばコンパイラパスを修正するだけで別PCでも使えると思うので、良い感じにやってください!
追記:C++の場合
ちょっとCではなくC++を動かしたくなったのでコードを書いたのですが、この状態では動作しない‥ということでちょっと調べて追記しました。
C++を扱う場合、コンパイラのパスをgcc.exeからg++.exeに置き換え、launch.jsonの"environment"のところを修正しないといけないっぽいです。
以下が例です。
- c_cpp_properties.json
{
    "configurations": [
        {
            "name": "Win32",
            "includePath": [
                "${workspaceFolder}/**"
            ],
            "defines": [
                "_DEBUG",
                "UNICODE",
                "_UNICODE"
            ],
            "compilerPath": "C:/mingw-w64/mingw64/bin/g++.exe",
            "cStandard": "gnu17",
            "cppStandard": "gnu++14",
            "intelliSenseMode": "gcc-x64"
        },
        {
            "name": "gcc_exe",
            "includePath": [
                "${workspaceFolder}/**",
                "C:/mingw-w64/mingw64/**"
            ],
            "defines": [
                "_DEBUG",
                "UNICODE",
                "_UNICODE"
            ],
            "compilerPath": "C:/mingw-w64/mingw64/bin/g++.exe",
            "cStandard": "gnu17",
            "cppStandard": "gnu++14",
            "intelliSenseMode": "gcc-x64"
        }
    ],
    "version": 4
}
- launch.json
{
    "version": "0.2.0",
    "configurations": [
        {
            "name": "gcc.exe - アクティブ ファイルのビルドとデバッグ",
            "type": "cppdbg",
            "request": "launch",
            "program": "${fileDirname}/${fileBasenameNoExtension}.exe",
            "args": [],
            "stopAtEntry": false,
            "cwd": "${workspaceFolder}",
            "environment": [
                {
                    "name": "PATH",
                    "value": "%PATH%;C:/mingw-w64/mingw64/bin"
                } //C++のデバッグと実行にはこの設定が必要っぽいです
            ],
            "externalConsole": false,
            "MIMode": "gdb",
            "miDebuggerPath": "C:/mingw-w64/mingw64/bin/gdb.exe",
            "setupCommands": [
                {
                    "description": "gdb の再フォーマットを有効にする",
                    "text": "-enable-pretty-printing",
                    "ignoreFailures": true
                }
            ],
            "preLaunchTask": "C/C++: g++.exe build active file"
        }
    ]
}
- tasks.json
{
    "version": "2.0.0",
    "tasks": [
        {
            "type": "cppbuild",
            "label": "C/C++: g++.exe build active file",
            "command": "C:/mingw-w64/mingw64/bin/g++.exe",
            "args": [
                "-g",
                "${file}",
                "-o",
                "${fileDirname}/${fileBasenameNoExtension}.exe"
            ],
            "options": {
                "cwd": "C:/mingw-w64/mingw64/bin"
            },
            "problemMatcher": [
                "$gcc"
            ],
            "group": {
                "kind": "build",
                "isDefault": true
            },
            "detail": "compiler: C:/mingw-w64/mingw64/bin/g++.exe"
        }
    ]
}
一応、gccはC用で、g++はC++用のコンパイラ(厳密にはどちらも同じで、引数が違うだけみたいな話もあるけど自分は理解してないです)なのでコンパイラパスを変更する必要があるのは当たり前だなあという気持ちなのですが、"environment"のところはどうして必要なのか今一つ理解できてないです。
ここ( https://github.com/Microsoft/vscode-cpptools/issues/2655 )を参考にして追加してみたら動いて驚いた、という感じなので....
