Spring4勉強会 第二回
- FORMから値を受け取る
- 解説
- 色々なFORMから値を受け取る
【前提条件】
事前に第一回で環境構築が終えていること。
※FORMの値受け渡しについてだけ見たい人も全然見れます。
FORMから値を受け取る
前回は「ControllerからViewに動的に値を受け渡して、表示する」というところまで学習しました。
今回はHTMLのFORMからControllerに値を受け渡すといった流れを体感していきます。
今まで、JSP/Servletを生でやってきた方は以下のようなやり方でFORM情報を取得してきたかと思います。
▼JSP
<form method="GET" action="<%=request.getContextPath() %>/hoge">
 id  : <input type="text" name="id" >
 name: <input type="text" name="name" >
 <input type="submit" value="送信" />
</form>
▼Servlet
String id = req.getParameter("id");
String name = req.getParameter("name");
リクエスト情報をリクエストオブジェクトから直接取得、参照(上記例ならreq変数)してきたかと思いますが、
SpringMVCでは直接リクエストやレスポンスを操作するようなことはしません。
SpringMVCではFORMで送信される情報専用のFORMオブジェクトを用意し、それを利用してやり取りをします。
ではどんな風になるのか??まずは動くものを書いてみましょう。今回は上のピュアサーブレットをSpringMVCで書いた場合を想定してみます。
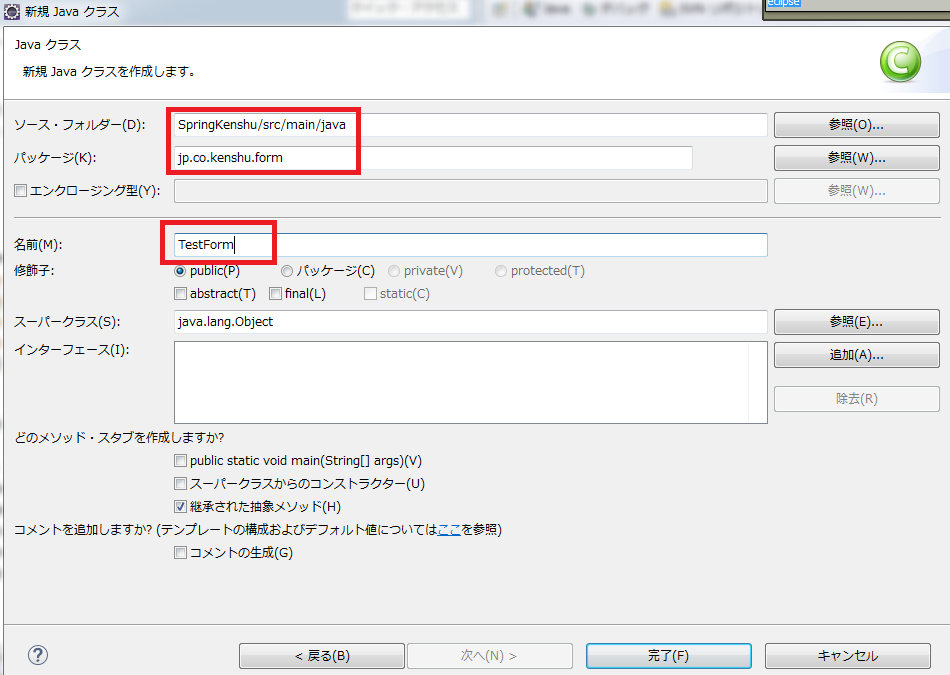
- TestForm.javaの作成
「src/main/java」内に以下のキャプチャに則って新規クラスを作成してみよう
※パッケージが新たに「form」として追加されます。
2. TestForm.javaの修正
今回はHTMLのFORMから「id」と「name」が送信される想定なので、以下のフィールドを定義しよう。
※セッタゲッタを書くのが面倒になったので、lombokを使ってます。
getId/setId、getName/setNameなどの煩わしい記述をclass名の上の「@Data」が自動生成してくれてます。
なので、lombok使わない人は、自前でゲッタセッタを作成してください。(eclipseから、TestForm内で右クリック→ソース→getter及びsetterの作成から手軽に作成も行えます。)
@Data
public class TestForm {
	private int id;
	private String name;
}
3. showMessage.jspの修正
以下に修正してください。
<!DOCTYPE html>
<%@ page language="java" contentType="text/html; charset=UTF-8" pageEncoding="UTF-8"%>
<%@ taglib prefix="form" uri="http://www.springframework.org/tags/form" %>
<html>
	<head>
		<meta charset="utf-8">
		<title>Welcome</title>
	</head>
	<body>
		<h2>${message}</h2>
        <form:form modelAttribute="testForm">
            <form:input path="id" />
            <form:input path="name" />
            <input type="submit">
        </form:form>
	</body>
</html>
4.TestControllerの修正
以下に修正してください。
@RequestMapping(value = "/show", method = RequestMethod.GET)
public String showMessage(Model model) {
	TestForm form = new TestForm();
	form.setId(0);
	form.setName("ここに名前を書いてね");
	model.addAttribute("testForm", form);
	model.addAttribute("message", "FORMの練習");
	return "showMessage";
}

@RequestMapping(value = "/show", method = RequestMethod.POST)
public String getFormInfo(@ModelAttribute TestForm form, Model model) {
	model.addAttribute("message", "ID : " + form.getId() + " & name : " + form.getName());
	return "showMessage";
}
5.文字エンコーディングフィルターの活性化
Springで用意されているCharacterEncodingFilterを有効化します。
「src/main/webapp/WEB-INF/」下にある「web.xml」に以下を追記してください。
<!-- 文字エンコーディング -->
<filter>
<filter-name>CharacterEncoding</filter-name>
    <filter-class>org.springframework.web.filter.CharacterEncodingFilter</filter-class>
    <init-param>
        <param-name>encoding</param-name>
        <param-value>UTF-8</param-value>
    </init-param>
    <init-param>
        <param-name>forceEncoding</param-name>
        <param-value>true</param-value>
    </init-param>
</filter>
<filter-mapping>
    <filter-name>CharacterEncoding</filter-name>
    <url-pattern>/*</url-pattern>
</filter-mapping>
以上で動かす準備が整いました。
では早速http://localhost:8080/SpringKenshu/showにアクセスしてみましょう。
表示されたら、初期値として、「0」と「ここに名前を書いてね」がテキストボックスのvalueとして設定されているかと思います。
適当にidを123、nameを「佐藤」とかにして、submitしてみましょう。
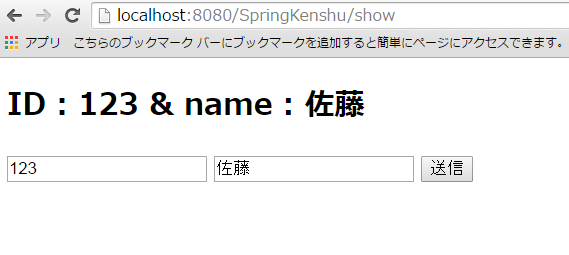
こんな画面が表示されれば成功です!!
解説
まずはjspを見てみましょう。
1. jspの解説
<%@ taglib prefix="form" uri="http://www.springframework.org/tags/form" %>
これはSpringフレームワークが提供してくれているtagを使うための宣言となります。
使う際に、prefixとして「form」としているため、form:~という記述でSpringが提供するtagを使用することができます。
jstlのcoreタグやfunctionタグを使うときと同じ記述です。今回taglibとして「www.springframework.org/tags/form」を使うというだけです。
<form:form modelAttribute="testForm">
    <form:input path="id" />
    <form:input path="name" />
    <input type="submit">
</form:form>
form前置詞でアクセスができるようになったので、実際に使ってみた結果が上記となります。
一つづつ分解してみましょう。
まずはhttp://localhost:8080/SpringKenshu/showを開き、HTMLのソースを見てみよう。
jspに記述したコードと、HTMLにレンダリングされたソースで内容が異なりますよね??
▼レンダリングされたHTMLソース
<form id="testForm" action="/SpringKenshu/show" method="post">
    <input id="id" name="id" type="text" value="0">
    <input id="name" name="name" type="text" value="ここに名前を書いてね">
    <input type="submit">
</form>
jspでform:~で書いた内容は、結局はHTMLのタグに展開されていることがわかります。(当たり前かもしれませんが…)
順に解説していきます。
<form:form modelAttribute="testForm">
これはHTMLの<form>タグとして展開されます。
遷移先としてのactionが見当たりませんが、省略して書いた場合は自身に飛びます。
そのため、今回は
action="/SpringKenshu/show"
が設定されることになります。また、明示的にaction="/SpringKenshu/hoge"のように書くこともできます。
続いて、methodも省略されていることが見て取れます。
form:formのmethodを省略した場合はPOST扱いとなります。
これも明示的に「method="get"」のように記述することも可能です。
modelAttribute="testForm"
最後にこの記述ですが、こう書くことで、HTMLのid属性に「testForm」という値がセットされます。
TestFormの解説でも触れますが、formのidに指定した値とControllerに指定した@ModelAttributeのオブジェクト名がネームベースでバインドされる挙動をとります。
そのため、今回の例では「TestForm」クラスにHTMLからForm経由で送信した情報が格納されることとなります。
ここが一致しないとバインドされず、以下のようなエラーが発生します。
Neither BindingResult nor plain target object for bean name 'xxxxx' available as request attribute
「xxxxx」みたいなbeanは存在しないのでバインドできませーんってお手上げしてるんですね。
なので、「form:fromのmodelAttributeに指定する値と、実際にControllerでバインドさせるFormオブジェクトは名前を一致させる」と覚えておいてください。
続いて
<form:input path="id" />
の解説に移ります。
form:inputタグは、HTMLの<input type="text">タグに展開されます。
pathに指定した値は下記のように
<input id="id" name="id" type="text">
HTMLの<input type="text">タグのidとnameに設定されることになります。
idとnameに指定する名前は、TestFormのフィールド名と一致する必要があります。
一致しないと以下のようなエラーが発生します。
▼<form:input path="idd" />とした場合
Invalid property 'idd' of bean class [jp.co.kenshu.form.TestForm]: Bean property 'idd' is not readable or has an invalid getter method: Does the return type of the getter match the parameter type of the setter?
つまり、TestFormには「idd」という名前のプロパティなんか存在しませんよってことで怒られています。
pathに指定する値はFormオブジェクトのプロパティ名/フィールド名と合わせる*ということを覚えておいてください。
2. Controllerの解説
TestControllerの中身を見てみると、今回はGETとPOSTで二つのメソッドに分かれています。
▼GET(今回のサンプルでは、初回画面表示時に使用)
@RequestMapping(value = "/show", method = RequestMethod.GET)
public String showMessage(Model model) {
	TestForm form = new TestForm();
	form.setId(0);
	form.setName("ここに名前を書いてね");
	model.addAttribute("testForm", form);
	model.addAttribute("message", "FORMの練習");
	return "showMessage";
}
▼POST(今回のサンプルでは、HTMLからFORMで値が送信された時に使用)
@RequestMapping(value = "/show", method = RequestMethod.POST)
public String getFormInfo(@ModelAttribute TestForm form, Model model) {
	model.addAttribute("message", "ID : " + form.getId() + " & name : " + form.getName());
	return "showMessage";
}
GETから見てみましょう。
jspの「form:form modelAttribute="testForm"」がFormオブジェクトと関連していると先ほど紹介しました。
ControllerからViewに遷移するときも同様です。
model.addAttribute("testForm", form);
上記でaddした「"testForm"」という値が、jspの
<form:form modelAttribute="testForm">
と関連付けられているんですね。そのため、TestControllerのshowMessageメソッドでセットした以下の値が、
初回表示時にgetId()とgetName()メソッドが評価され、画面に表示されているわけです。
TestForm form = new TestForm();
form.setId(0);
form.setName("ここに名前を書いてね");
model.addAttribute("testForm", form);
続いてPOSTの解説です。
public String getFormInfo(@ModelAttribute TestForm form, Model model) {
「@ModelAttribute」で指定したオブジェクトがjspで指定した
<form:form modelAttribute="testForm">
と関連し、バインドされます。
そのため、今回はTestFormオブジェクトにHTMLのformで送信した情報がセットされた状態でgetFormInfoメソッドに渡ってくることになります。form情報はform専用のクラスで情報管理をしているんですね。
3. CharacterEncodingFilterの解説
今回のサンプルはCharacterEncodingFilterを有効にしないと、日本語が文字化けします。
これはSpringを使っているから特別にこの措置が必要という訳ではありません。
Tomcatはデフォルトで文字コードが「ISO-8859-1」となっています。
そのため、今回取り扱っている「UTF-8」と文字コードが合わず、文字化けが発生しているわけです。
生のjsp/Servletを使っていた場合も発生する問題です。GETもPOSTも文字化けを防ぐために、
server.xmlに「useBodyEncodingForURI="true"」を設定したことが有る人はいるかと思います。
Springを使っているとはいえ、土台はTomcatに乗せているので、状況は変わりありません。
encodeされたクリストリングをdecodeする際の文字コードをCharacterEncodingFilterが行っているに過ぎません。
色々なFORMから値を受け取る
ここまでで最低限のForm情報の受け渡しを学ぶことができました。
HTMLからForm情報を受け取るには、まだまだ色々なタグがありますよね??
selectboxやradioなど、有名どころは一通り体感してコツを掴んでおきましょう。
- CheckBoxタグから値を受け取る
- RadioButtonタグから値を受け取る
- Selectタグから値を受け取る
1. CheckBoxタグから値を受け取る
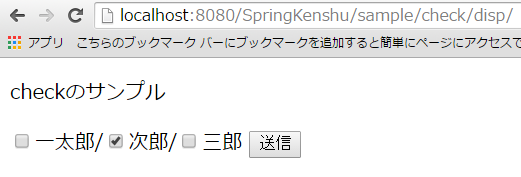
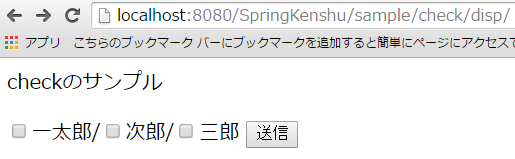
こんな画面がGETで表示され、チェックを入れて「送信」が押されると、
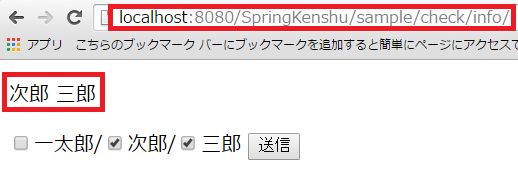
みたいな画面が表示されるサンプルを作成してみましょう。
なお、赤枠であるように、今回はform:formの遷移先をactionで指定してみました。
早速作っていこう。
まずはjspから作成。「WEB-INF/view」下に「checkSample.jsp」を作成してみよう。
<%@ page language="java" contentType="text/html; charset=UTF-8"
    pageEncoding="UTF-8"%>
<%@ taglib prefix="form" uri="http://www.springframework.org/tags/form" %>
<!DOCTYPE>
<html>
<head>
<meta http-equiv="Content-Type" content="text/html; charset=UTF-8">
<title>Insert title here</title>
</head>
<body>
<p>${message}</p>

<form:form modelAttribute="checkForm" action="${pageContext.request.contextPath}/sample/check/info/">
    <form:checkboxes path="employees" items="${checkEmployees}" delimiter="/" />
    <input type="submit" />
</form:form>
</body>
</html>
続いて、modelAttribute="checkForm"を受け取るためのFormオブジェクトを作成しよう。
「jp.co.kenshu.form」下に「CheckForm.java」を作成しよう。
※Employee…従業員を指します。何でもよかったんですが、とりあえず一太郎、次郎、三郎の三人しかいない会社とします。
package jp.co.kenshu.form;

public class CheckForm {
	private String[] employees;

	public String[] getEmployees() {
		return employees;
	}

	public void setEmployees(String[] employees) {
		this.employees = employees;
	}
}
最後にControllerです。
「jp.co.kenshu」下に「CheckSampleController.java」を作成しよう。
package jp.co.kenshu;

import java.util.LinkedList;
import java.util.List;
import jp.co.kenshu.form.CheckForm;
import org.springframework.stereotype.Controller;
import org.springframework.ui.Model;
import org.springframework.web.bind.annotation.ModelAttribute;
import org.springframework.web.bind.annotation.RequestMapping;
import org.springframework.web.bind.annotation.RequestMethod;

@Controller
public class CheckSampleController {
	@RequestMapping(value = "/sample/check/disp/", method = RequestMethod.GET)
	public String disp(Model model) {
		model.addAttribute("message", "checkのサンプル");
		CheckForm form = new CheckForm();
		form.setEmployees(new String[] { "次郎" });
		model.addAttribute("checkForm", form);
		model.addAttribute("checkEmployees", getCheckEmployees());
		return "checkSample";
	}

	@RequestMapping(value = "/sample/check/info/", method = RequestMethod.POST)
	public String getcheckInfo(@ModelAttribute CheckForm form, Model model) {
		String[] checkedEmployee = form.getEmployees();
		StringBuilder builder = new StringBuilder();
		for (String employee : checkedEmployee) {
			builder.append(employee).append(System.lineSeparator());
		}
		model.addAttribute("message", builder);
		model.addAttribute("checkForm", form);
		model.addAttribute("checkEmployees", getCheckEmployees());
		return "checkSample";
	}

	private List<String> getCheckEmployees() {
		List<String> list = new LinkedList<>();
		list.add("一太郎");
		list.add("次郎");
		list.add("三郎");
		return list;
	}
}
以上で用意完了です。
それではhttp://localhost:8080/SpringKenshu/sample/check/disp/にGETでアクセスしてみよう。
表示されたら、チェックを入れて「送信」された従業員のみが、画面上部に表示されるかまで確認してみてください。
- 解説
【JSP】
新しい記述は以下ですね。
<form:form modelAttribute="checkForm" action="${pageContext.request.contextPath}/sample/check/info/">
    <form:checkboxes path="employees" items="${checkEmployees}" delimiter="/" />
    <input type="submit" />
</form:form>
今回は「action」を省略せずに記述してます。しかし「method」は省略されているため、
「/SpringKenshu/sample/check/info/」にPOSTリクエストを送信するという形になります。
※「${pageContext.request.contextPath}」はEL式の暗黙オブジェクトです。Springは関係ないです。
<form:checkboxes path="employees" items="${checkEmployees}" delimiter="/" />
次に新出した記述はこれです。
展開されたHTMLと一緒に見ると分かりやすいです。
▼展開されたHTML
<form id="checkForm" action="/SpringKenshu/sample/check/info/" method="post">
 <span>
  <input id="employees1" name="employees" type="checkbox" value="一太郎"><label for="employees1">一太郎</label>
 </span>
 <span>
  /<input id="employees2" name="employees" type="checkbox" value="次郎" checked="checked"><label for="employees2">次郎</label>
 </span>
 <span>
  /<input id="employees3" name="employees" type="checkbox" value="三郎"><label for="employees3">三郎</label>
 </span>
 <input type="hidden" name="_employees" value="on">
 <input type="submit">
</form>
form:checkboxesはinput type="checkbox"を複数生成してくれます。
※複数というのは、「items="${checkEmployees}"」に指定した要素数に準拠します。
pathに指定した値がname属性とid属性に付与されるのは、前回のサンプルと変わりありません。
しかし、idに自動で1,2,3と採番されていることがわかります。
checkboxは複数の値を扱うので、form:checkboxesの方でよしなに一意になるように割り振ってくれているんですね。
最後にdelimiterですが、これは単純に複数要素を表示する際の表示分けに、どんな文字列を使用するかを定義してます。
省略すれば、何も表示されません。
【Controller】
まずはGETメソッドでコールされる「disp」関数を見てみます。
@RequestMapping(value = "/sample/check/disp/", method = RequestMethod.GET)
public String disp(Model model) {
	model.addAttribute("message", "checkのサンプル");
	CheckForm form = new CheckForm();
	form.setEmployees(new String[] { "次郎" });
	model.addAttribute("checkForm", form);
	model.addAttribute("checkEmployees", getCheckEmployees());
	return "checkSample";
}
CheckForm form = new CheckForm();
form.setEmployees(new String[] { "次郎" });
model.addAttribute("checkForm", form);
ここの記述はjspのaddAttributeと関連しています。
ただし、form:checkboxesの場合は、「checked="checked"」とする項目に対して作用しています。
そのため、サンプルでは「次郎」の項目がデフォルトでチェックが入った状態となっているのです。
これがもし、チェックボックスに存在しない値をセットした場合はどうなるか??(今回なら「一太郎、次郎、三郎」以外の文字列をセットした場合)
この場合は以下のように何もチェックされないまま表示されることになります。エラーが発生したりはしません。
次に以下の解説です。
model.addAttribute("checkEmployees", getCheckEmployees());
どうも「checkEmployees」というkey値に対し、getCheckEmployees()というメソッドの戻り値が設定されているようです。
getCheckEmployees()は以下となってました。
private List<String> getCheckEmployees() {
	List<String> list = new LinkedList<>();
	list.add("一太郎");
	list.add("次郎");
	list.add("三郎");
	return list;
}
文字列が詰まったArayListが返却されているようです。
「model.addAttribute("checkEmployees", getCheckEmployees());」はチェックボックスとして表示する項目をセットしているのです。
上記で設定された「model.addAttribute("checkEmployees", getCheckEmployees());」は、
jspの
items="${checkEmployees}"
で参照され、結果として画面に「一太郎、次郎、三郎」の三名が表示されます。
続いてPOST処理を見てみましょう。
@RequestMapping(value = "/sample/check/info/", method = RequestMethod.POST)
public String getcheckInfo(@ModelAttribute CheckForm form, Model model) {
	String[] checkedEmployee = form.getEmployees();
	StringBuilder builder = new StringBuilder();
	for (String employee : checkedEmployee) {
		builder.append(employee).append(System.lineSeparator());
	}
	model.addAttribute("message", builder);
	model.addAttribute("checkForm", form);
	model.addAttribute("checkEmployees", getCheckEmployees());
	return "checkSample";
}
POST処理は非常にシンプルです。
jspから送信される値は画面上でチェックがつけられた項目のみとなります。
その項目は、jspの記述に
modelAttribute="checkForm"
とあるため、Controllerの
@ModelAttribute CheckForm form
にバインドされ、チェックの入ったCheckboxのvalue値が文字列配列として渡ってきます。
あとは渡ってきたオブジェクトから値を抽出し、
String[] checkedEmployee = form.getEmployees();
それをforeachで回して文字列を生成しているだけです。
StringBuilder builder = new StringBuilder();
for (String employee : checkedEmployee) {
	builder.append(employee).append(System.lineSeparator());
}
最後にmessageというkeyに連結した文字列を渡し、checkSample.jspに渡しているのです。
model.addAttribute("message", builder);
jspには、
<p>${message}</p>
記述があるため、値がセットされていれば表示されるといった具合になります。
【Form】
jspで
form:form modelAttribute="checkForm"
と定義されているため、フォーム経由で送信された情報がこのCheckForm.javaにバインドされます。
フォーム送信時に
<form:checkboxes path="employees"
が評価され、チェックボックスでチェックした項目がCheckForm.javaの「employees」フィールドに格納されるというカラクリになってます。
2. RadioButtonから値を受け取る
↓
ラジオボタンの生成は「form:radiobutton」タグを使用します。
早速サンプルを作成してみましょう。
▼ JSP
「WEB-INF/view/radioSample.jsp」を作成
<%@ page language="java" contentType="text/html; charset=UTF-8"
    pageEncoding="UTF-8"%>
<%@ taglib prefix="form" uri="http://www.springframework.org/tags/form" %>
<!DOCTYPE>
<html>
<head>
<meta http-equiv="Content-Type" content="text/html; charset=UTF-8">
<title>Insert title here</title>
</head>
<body>
<p>${message}</p>
<form:form modelAttribute="radioForm" action="${pageContext.request.contextPath}/sample/radio/info/">
    <form:radiobuttons path="name" items="${checkEmployees}" />
    <input type="submit" />
</form:form>
</body>
</html>
▼ Form
package jp.co.kenshu.form;

public class RadioForm {
	private String name;

	public String getName() {
		return name;
	}

	public void setName(String name) {
		this.name = name;
	}
}
▼Controller
package jp.co.kenshu;
import java.util.LinkedList;
import java.util.List;
import jp.co.kenshu.form.RadioForm;
import org.springframework.stereotype.Controller;
import org.springframework.ui.Model;
import org.springframework.web.bind.annotation.ModelAttribute;
import org.springframework.web.bind.annotation.RequestMapping;
import org.springframework.web.bind.annotation.RequestMethod;
@Controller
public class RadioSampleController {
@RequestMapping(value = "/sample/radio/disp/", method = RequestMethod.GET)
public String disp(Model model) {
model.addAttribute("message", "radioのサンプル");
RadioForm form = new RadioForm();
form.setName("次郎");
model.addAttribute("radioForm", form);
model.addAttribute("checkEmployees", getRadioEmployees());
return "radioSample";
}
@RequestMapping(value = "/sample/radio/info/", method = RequestMethod.POST)
public String getradioInfo(@ModelAttribute RadioForm form, Model model) {
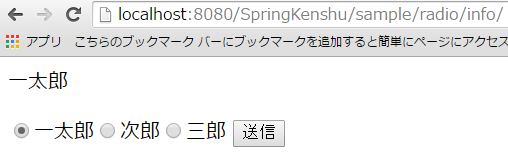
String selectedName = form.getName();
model.addAttribute("message", selectedName);
model.addAttribute("radioForm", form);
model.addAttribute("checkEmployees", getRadioEmployees());
return "radioSample";
}
private List<String> getRadioEmployees() {
List<String> list = new LinkedList<>();
list.add("一太郎");
list.add("次郎");
list.add("三郎");
return list;
}
}
これで用意は完了しました。
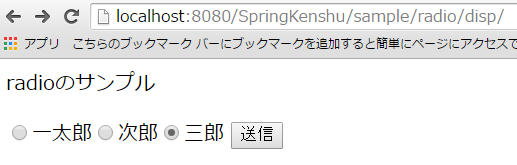
http://localhost:8080/SpringKenshu/sample/radio/disp/
- 解説
ラジオボタンもCheckBoxと基本的に同じです。
異なる箇所のみをピックアップして解説します。
<form:radiobuttons path="name" items="${checkEmployees}" />
この記述で、RadioFormの「name」フィールドにチェックした項目のvalue値がセットされます。
items="${checkEmployees}"
この記述はラジオボタンに表示される項目を指定しています。
Controllerの以下の記述を見てください。
model.addAttribute("checkEmployees", getRadioEmployees());
この記述により、画面に「一太郎、次郎、三郎」がラジオボタンとして表示されます。
3. selectboxから値を受け取る
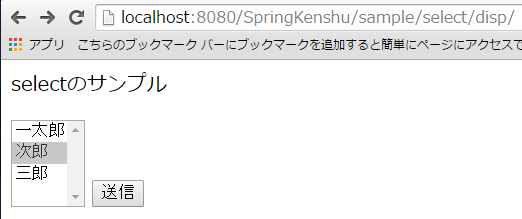
最後はselectboxのサンプルです。
selectのサンプルは「multiple="true"」を指定することで複数指定できるようにしています。
↓
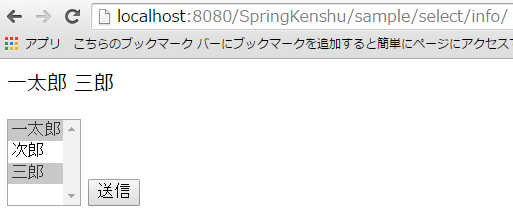
みたいなイメージになります。
ではこれも早速作って動かしてみましょう。
▼JSP
<%@ page language="java" contentType="text/html; charset=UTF-8"
    pageEncoding="UTF-8"%>
<%@ taglib prefix="form" uri="http://www.springframework.org/tags/form" %>
<!DOCTYPE>
<html>
<head>
<meta http-equiv="Content-Type" content="text/html; charset=UTF-8">
<title>Insert title here</title>
</head>
<body>
<p>${message}</p>
<form:form modelAttribute="selectForm" action="${pageContext.request.contextPath}/sample/select/info/">
    <form:select path="employees" items="${selectEmployees}" multiple="true" />
    <input type="submit" />
</form:form>
</body>
</html>
▼Form
package jp.co.kenshu.form;

public class SelectForm {
	private String[] employees;

	public String[] getEmployees() {
		return employees;
	}

	public void setEmployees(String[] employees) {
		this.employees = employees;
	}
}
▼Controller
package jp.co.kenshu;

import java.util.LinkedList;
import java.util.List;
import jp.co.kenshu.form.SelectForm;
import org.springframework.stereotype.Controller;
import org.springframework.ui.Model;
import org.springframework.web.bind.annotation.ModelAttribute;
import org.springframework.web.bind.annotation.RequestMapping;
import org.springframework.web.bind.annotation.RequestMethod;

@Controller
public class SelectSampleController {
	@RequestMapping(value = "/sample/select/disp/", method = RequestMethod.GET)
	public String disp(Model model) {
		model.addAttribute("message", "selectのサンプル");
		SelectForm form = new SelectForm();
		form.setEmployees(new String[] { "次郎" });
		model.addAttribute("selectForm", form);
		model.addAttribute("selectEmployees", getSelectEmployees());
		return "selectSample";
	}

	@RequestMapping(value = "/sample/select/info/", method = RequestMethod.POST)
	public String getcheckInfo(@ModelAttribute SelectForm form, Model model) {
		String[] selectedEmployee = form.getEmployees();
		StringBuilder builder = new StringBuilder();
		for (String employee : selectedEmployee) {
			builder.append(employee).append(System.lineSeparator());
		}
		model.addAttribute("message", builder);
		model.addAttribute("selectForm", form);
		model.addAttribute("selectEmployees", getSelectEmployees());
		return "selectSample";
	}

	private List<String> getSelectEmployees() {
		List<String> list = new LinkedList<>();
		list.add("一太郎");
		list.add("次郎");
		list.add("三郎");
		return list;
	}
}
ではTomcatを起動し、http://localhost:8080/SpringKenshu/sample/select/disp/にアクセスしてみましょう。
- 解説
Selectのケースも今までとあまり変化ないですね。
むしろCheckBoxのサンプルとほぼ一緒です。
当たり前かもしれませんが、JSPのみ異なります。
<form:form modelAttribute="selectForm" action="${pageContext.request.contextPath}/sample/select/info/">
    <form:select path="employees" items="${selectEmployees}" multiple="true" />
    <input type="submit" />
</form:form>
SelectForm.javaの「employee」フィールドに選択した値が送られます。
SelectBoxの項目は「items="${selectEmployees}"」によって設定・表示されています。
なお、Controllerからは以下の記述で"selectEmployees"をViewに渡しています。
model.addAttribute("selectEmployees", getSelectEmployees());
以上になります。
次回は入力値検証(Validation)について紹介していきたいと思います。