はじめに
記事をご覧いただきありがとうございます。
本記事では、Next.jsを使用してAzure OpenAI ServiceのAPIを叩くことで、与えたキーワードから架空のことわざを生成するアプリを作成してみたので、その作り方についてお話しします。
※本記事の内容は、2023年9月時点のものです。Azureなどの画面UIやNext.jsのバージョンの違いなどが発生する場合があります。
対象者
本記事は以下のような方を対象としています。
- chatGPTやAzure OpenAI Serviceを触ったことのある方
- Azure OpenAI ServiceのAPIはまだ触ったことのない方
- Next.js初学者の方
Step1. Azure OpenAI Serviceの事前準備
まず、Azure OpenAI Serviceにアクセスし、APIキーとエンドポイント、デプロイメントIDを取得します。
APIキーとエンドポイントの取得
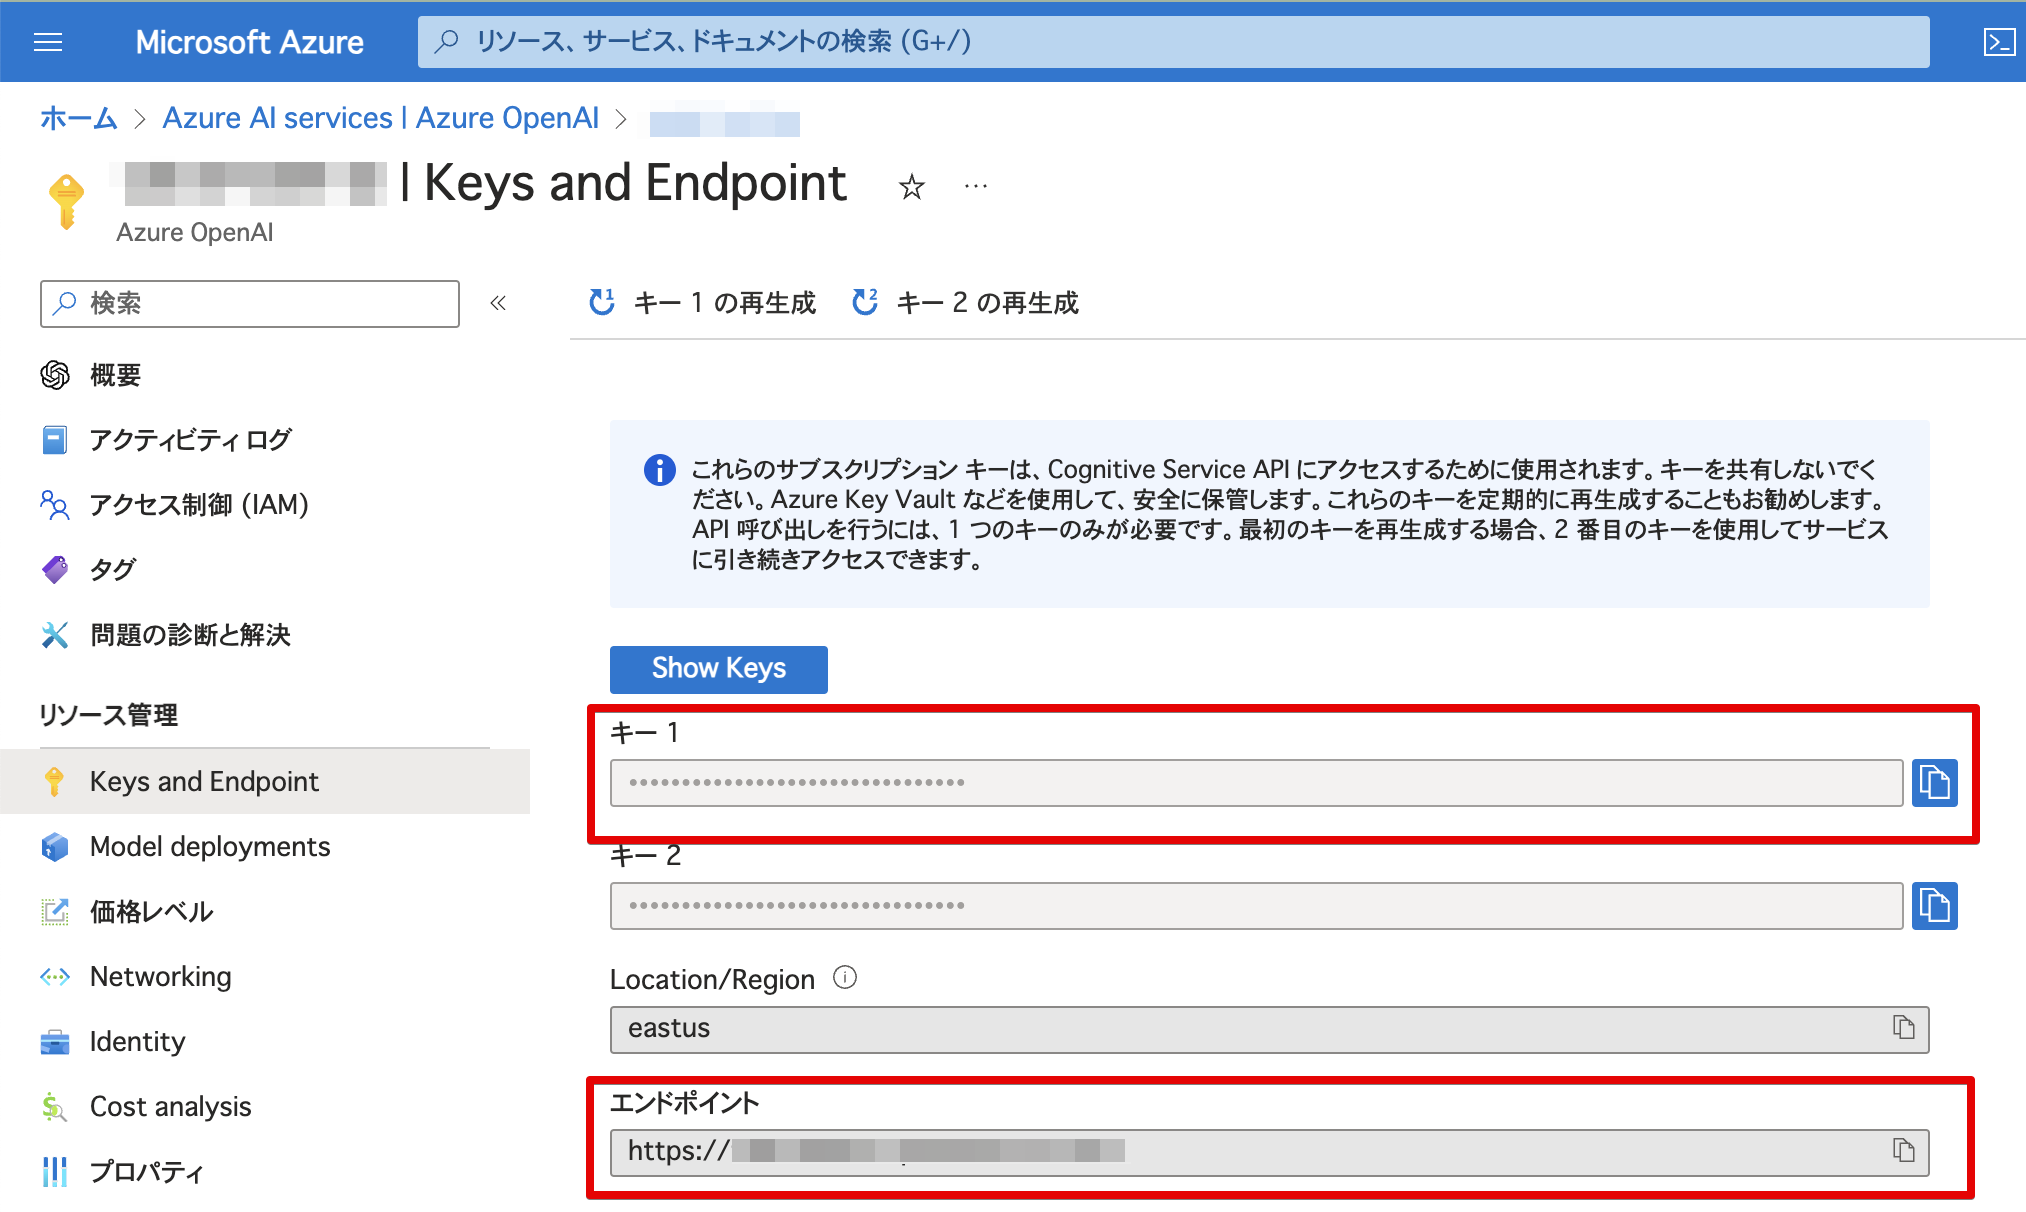
Microsoft AzureのAzure AI services画面から、今回使用するAzure OpenAIのリソースを開き、左側の「リソース管理」タブの「Keys and Endpoint」をクリック。ここに、APIキー(※)とエンドポイントの情報が記載されているので、キー1とエンドポイントの情報を控えておきます。
※キー1とキー2の2つのキーがありますが、どちらのキーでも問題ありません。ここでは、キー1を選択しました。
デプロイメントIDの取得
Microsoft AzureのAzure AI services画面から、先ほどAPIキーやエンドポイントの情報を確認した対象のAzure OpenAIのリソースの「概要」を開き、「Go to Azure OpenAI Studio」をクリック。

Azure OpenAI Studioに遷移したら、「Management」タブの「Deployments」をクリックし、利用したいDeploymentの「Deployment Name」を控えておきます(※)。

※まだ作成してない場合は、「Create new deployment」をクリックし、モデルは「gpt-35-turbo」を選択したら、「Deployments Name」には任意の名前を設定します。この「Deployments Name」がデプロイメントIDになります。
Step2. Next.jsでアプリを作成
Next.jsのインストール
まず、任意の作業ディレクトリを作成します。
次に、その作業ディレクトリで、以下のコマンドを使いNext.jsをインストールしましょう。
npx create-next-app . --ts
インストールするときは、以下のように全てデフォルト値で設定します。

なお、今回の使用するNext.jsのバージョンは以下の通りです。(next -vコマンドで確認してください。)
next -v
Next.js v13.4.19
インストールが完了したら、以下のようなディレクトリ構成であることを確認してください。

コードの修正
.env.local
ルートディレクトリ(作業ディレクトリ)直下に.env.localファイル(※)を作成します。(APIキーなどは環境変数として扱います。)
AZURE_OPENAI_ENDPOINT=Step1.で取得したエンドポイント
AZURE_OPENAI_API_KEY=Step1.で取得したAPIキー
AZURE_OPENAI_DEPLOYMENT_ID=Step1.で取得したDeployment Name
※.env.localファイルは、外部に公開しないようgitの管理対象外にしましょう。(.gitignoreに自動的に記述されているはずです。)
app/global.css
標準で読み込むcssだけ残し、他の項目は削除します。
@tailwind base;
@tailwind components;
@tailwind utilities;
app/layout.tsx
各ページで共通で読み込むスタイルをレイアウトとして定義します。
import "./globals.css";
import type { Metadata } from "next";

export const metadata: Metadata = {
  title: "Azure OpenAI Service × Next.js 13",
  description: "Generated by create next app",
};

export default function RootLayout({
  children,
}: {
  children: React.ReactNode;
}) {
  return (
    <html lang="ja">
      <body>{children}</body>
    </html>
  );
}
app/page.tsx
appディレクトリ配下のpage.tsxを、以下のように書き換えます。
import TestForm from "./testForm";

export default function Page() {
  return (
    <div className="mx-auto lg:w-[800px] py-10 px-10">
      <TestForm />
    </div>
  );
}
app routerの場合、appディレクトリ配下にpage.tsxを作成しておけば、localhostのURLにアクセスすることでアプリの確認ができるようになります。
また、appディレクトリ配下に別のディレクトリ(例えばtestディレクトリ)を作成し、その中にpage.tsxを作成すれば、localhostのURLに/testを付与することで、testディレクトリ内のページも表示することができます。
app/testForm.tsx
appディレクトリ配下に、testForm.tsxファイルを作成し、以下のように記述します。
"use client";
import axios from "axios";
import { useState } from "react";
import { SubmitHandler, useForm } from "react-hook-form";

export default function TestForm() {
  const [isLoading, setIsLoading] = useState<boolean>(false);
  const [keyword, setKeyword] = useState<string>("");
  const [showModal, setShowModal] = useState(false);
  const [imageURLs, setImageURLs] = useState([]);

  const getAzData = async (event: any) => {
    event.preventDefault();
    setIsLoading(true);
    try {
      console.log("AIサポート開始!");
      // 初期化
      setValue("title", "");
      setValue("detail", "");
      setImageURLs([]);

      // postする値はmessageという変数で統一する。keyword以外にも複数の項目を用意する場合は、23行目でそれらを結合すれば1つのmessageにできる。
      const message = keyword;
      const kotowazaTextRes = await axios.post("api/azopenaichat", { message });
      console.log(kotowazaTextRes);
      const { title, detail, englishDetail } = JSON.parse(
        kotowazaTextRes.data[0].message.content
      );

      setValue("title", title);
      setValue("detail", detail);

      const kotowazaImageRes = await axios.post("api/azopenaidalle", {
        message: englishDetail,
      });
      console.log(kotowazaImageRes);
      if (kotowazaImageRes.data && kotowazaImageRes.data.data) {
        setImageURLs(kotowazaImageRes.data.data);
      }
    } catch (error) {
      console.log("フォーム入力エラー", error);
    }

    // ローディングとモーダルの初期化
    setIsLoading(false);
    setShowModal(false);
  };

  // const handleOnSubmit: SubmitHandler<ProductType> = (data) => {
  //   console.log(data);
  //   reset();
  // };

  const {
    register,
    // handleSubmit,
    // reset,
    setValue,
    formState: { errors: formatError, isValid, isSubmitting },
  } = useForm({
    mode: "onBlur",
  });

  return (
    <>
      <button
        className="fixed z-50 top-100 right-20 py-5 px-2 bg-pink-500 text-white active:bg-pink-600 font-bold uppercase px-2 py-2 rounded shadow hover:shadow-lg outline-none focus:outline-none mr-1 mb-1 ease-linear transition-all duration-150 normal-case"
        onClick={() => setShowModal(true)}
      >
        💡 Azure OpenAI Serviceに相談
      </button>
      {showModal ? (
        <>
          <div className="justify-center items-center flex overflow-x-hidden overflow-y-auto fixed inset-0 z-50 outline-none focus:outline-none">
            <div className="relative w-auto my-6 mx-auto max-w-3xl">
              {/*content*/}
              <div className="border-0 rounded-lg shadow-lg relative flex flex-col w-full bg-white outline-none focus:outline-none">
                {/*header*/}
                <div className="flex items-start justify-between p-5 border-b border-solid border-slate-200 rounded-t">
                  <h3 className="text-3xl font-semibold">
                    🤖キーワードカラコトワザヲツクッテミマス
                  </h3>
                  <button
                    className="p-1 ml-auto bg-transparent border-0 text-black opacity-5 float-right text-3xl leading-none font-semibold outline-none focus:outline-none"
                    onClick={() => setShowModal(false)}
                  >
                    <span className="bg-transparent text-black opacity-5 h-6 w-6 text-2xl block outline-none focus:outline-none">
                      ×
                    </span>
                  </button>
                </div>

                <div className="relative p-6 flex-auto">
                  <>
                    <label
                      htmlFor="message"
                      className="block mb-2 text-sm font-medium text-gray-900 dark:text-white"
                    >
                      ナニカキーワードヲニュウリョクシテクダサイ
                    </label>
                    <textarea
                      id="message"
                      onChange={(e) => setKeyword(e.target.value)}
                      rows={4}
                      className="block p-2.5 w-full text-sm text-gray-900 bg-gray-50 rounded-lg border border-gray-300 focus:ring-blue-500 focus:border-blue-500"
                      placeholder="例)台風、居酒屋..."
                    ></textarea>
                  </>
                </div>
                {/*footer*/}
                <div className="flex items-center justify-end p-6 border-t border-solid border-slate-200 rounded-b">
                  <button
                    className="text-red-500 background-transparent font-bold uppercase px-6 py-2 text-sm outline-none focus:outline-none mr-1 mb-1 ease-linear transition-all duration-150"
                    type="button"
                    onClick={() => setShowModal(false)}
                  >
                    閉じる
                  </button>
                  {isLoading ? (
                    <button
                      className="bg-gray-500 text-white font-bold uppercase text-sm px-6 py-3 rounded shadow hover:shadow-lg outline-none focus:outline-none mr-1 mb-1 ease-linear transition-all duration-150"
                      type="button"
                      disabled
                    >
                      AIサポート実行中
                    </button>
                  ) : (
                    <button
                      className="bg-emerald-500 text-white bg-pink-500 font-bold uppercase text-sm px-6 py-3 rounded shadow hover:shadow-lg outline-none focus:outline-none mr-1 mb-1 ease-linear transition-all duration-150"
                      type="button"
                      onClick={getAzData}
                    >
                      AIサポート実行!
                    </button>
                  )}
                </div>
              </div>
            </div>
          </div>
          <div className="opacity-25 fixed inset-0 z-40 bg-black"></div>
        </>
      ) : null}

      <form
        // method="post"
        // onSubmit={(event) => {
        //   void handleSubmit(handleOnSubmit)(event);
        // }}
        className="flex flex-col space-y-10 bg-white p-10 rounded-lg shadow-lg"
      >
        <h1 className="flex text-xl">簡単なフォーム画面</h1>
        <div className="flex mb-6">
          <div className="w-1/4">
            <label className="block text-gray-900 font-bold text-left mb-1 pl-4 mr-2">
              架空のことわざ
            </label>
          </div>
          <div className="w-3/4">
            <input
              className="bg-gray-100 appearance-none border-2 border-gray-200 rounded w-full py-2 px-4 text-gray-700 leading-tight focus:outline-none focus:bg-white focus:border-purple-500"
              type="text"
              {...register("title")}
              placeholder="架空のことわざを記載"
            />
          </div>
        </div>

        <hr className="h-px my-8 bg-gray-200 border-0 dark:bg-gray-700"></hr>

        <div className="flex mb-6">
          <div className="w-1/4">
            <label className="block text-gray-900 font-bold text-left mb-1 pl-4 mr-2">
              架空のことわざの意味
            </label>
          </div>
          <div className="w-3/4">
            <textarea
              {...register("detail")}
              className="h-48 bg-gray-100 appearance-none border-2 border-gray-200 rounded w-full py-2 px-4 text-gray-700 leading-tight focus:outline-none focus:bg-white focus:border-purple-500"
              placeholder="架空のことわざの意味を記載"
            ></textarea>
          </div>
        </div>

        <hr className="h-px my-8 bg-gray-200 border-0 dark:bg-gray-700"></hr>

        <div className="flex mb-6">
          <div className="w-1/4">
            <label className="block text-gray-900 font-bold text-left mb-1 pl-4 mr-2">
              架空のことわざを表す画像
            </label>
          </div>
          <div className="w-3/4">
            <input
              className="block w-full text-sm text-gray-900 border border-gray-300 rounded cursor-pointer bg-gray-50 dark:text-gray-400 focus:outline-none dark:bg-gray-700 dark:border-gray-600 dark:placeholder-gray-400"
              id="file_input"
              type="file"
            />
            {imageURLs.length > 0 && (
              <div className="flex">
                {imageURLs.map((item: any, index: number) => (
                  <div className="mr-2" key={index}>
                    <img src={item.url} alt={`generated image ${index}`} />
                  </div>
                ))}
              </div>
            )}
          </div>
        </div>

        {/* ボタンの見栄えだけ実装(登録機能はありません) */}
        <button
          type="submit"
          disabled={!isValid || isSubmitting}
          className="bg-slate-800 hover:bg-slate-600 rounded px-4 py-2 text-white  disabled:bg-gray-300 md:self-center"
        >
          登録する
        </button>
      </form>
    </>
  );
}
エラーが出るので、以下のコマンドでaxiosとreact-hook-formをインストールしましょう。
npm install axios
npm install react-hook-form
Azure OpenAI Serviceにポストする処理やモーダル表示、入力フォームを実装しています。
lib/generateKotowazaText.ts
ルートディレクトリ配下にlibディレクトリを作成します。さらに、libディレクトリ配下にgenerateKotowazaText.tsファイルを作成し、以下のように記述します。
import { AzureKeyCredential, OpenAIClient } from "@azure/openai";

export const generateKotowazaText = async (message: string) => {
  try {
    const endpoint = process.env.AZURE_OPENAI_ENDPOINT!;
    const azureApiKey = process.env.AZURE_OPENAI_API_KEY!;
    const deploymentId = process.env.AZURE_OPENAI_DEPLOYMENT_ID!;
    const content = `
    #以下のキーワードを含むような、架空のことわざとその意味を教えてください。
    #キーワード:
    ${message}
    #注意
    #・返信する内容は、"{"title": "xxx", "detail": "xxx", "englishDetail": "xxx"}"のようにjson形式で返してください。jsonのキーとバリューは、必ず{"key1": "value1", "key2": "value2", "key3": "value3"}のように、各キーとバリューをダブルクオーテーション("")で囲んでください。
    #・架空のことわざのタイトル(title)は、この世に存在しない架空のことわざ名を記載してください。
    #・架空のことわざの意味(detail)は、架空のことわざ(kotowaza)の意味やその使い方を記載してください。
    #・架空のことわざの意味の英訳(englishDetail)は、架空のことわざの意味(detail)を英語に翻訳して記載してください。
    #・架空のことわざは、30文字以内。
    #・架空のことわざの意味は、100文字程度。
    `;

    const messages = [
      { role: "system", content: "You are a brilliant japanese linguist." },
      { role: "user", content },
    ];
    const client = new OpenAIClient(
      endpoint,
      new AzureKeyCredential(azureApiKey)
    );

    const result = await client.getChatCompletions(deploymentId, messages);
    return result.choices;
  } catch (error) {
    console.log("テキスト生成エラー:", error);
  }
};
エラーが出るので、@azure/openaiをインストールする。
npm install @azure/openai
contentにAzure OpneAI ServiceのChatに投げるプロンプトを記載しています。返答内容に関しては、json形式で返すことや英訳することなどの指示を書くと、概ねその通りに実施してくれます。
なお、英訳した内容を返答してもらっている理由ですが、その内容をAzure OpenAIのDALL·E(画像生成機能)に投げる際に、プロンプトが日本語よりも英語のほうが精度良く生成してくれるためです。
また、ことわざの意味を100文字程度で返答するようにと指定していますが、100文字に全然満たないことが多々あります。これは、使用しているデプロイのモデルによるものだと思われるので、文字数にこだわりたいなどの場合は、gpt-35-turbo-16kなどの上位のモデルを利用してみてください。
lib/generateKotowazaImage.ts
libディレクトリ配下にgenerateKotowazaImage.tsファイルを作成し、以下のように記述します。
import { AzureKeyCredential, OpenAIClient } from "@azure/openai";

export const generateKotowazaImage = async (message: string) => {
  try {
    const endpoint = process.env.AZURE_OPENAI_ENDPOINT!;
    const azureApiKey = process.env.AZURE_OPENAI_API_KEY!;
    const client = new OpenAIClient(
      endpoint,
      new AzureKeyCredential(azureApiKey)
    );

    const prompt = message;
    console.log("ことわざの英訳:", prompt);
    const size = "256x256";
    const n = 1;

    const result = await client.getImages(prompt, { n, size });
    return result;
  } catch (error) {
    console.log("イメージ生成エラー:", error);
  }
};
promptとして、message: englishDetailを受け取り、sizeで画像のサイズとnで画像の生成枚数を指定しています。
app/api/azopenaichat/route.ts
appディレクトリ配下にapiディレクトリ、そのディレクトリ配下にazopenaichatディレクトリを作成します。さらに、azopenaichatディレクトリ配下にroute.tsファイルを作成し、以下のように記述します。
import { NextResponse } from "next/server";
import { generateKotowazaText } from "../../../lib/generateKotowazaText";

export async function POST(request: Request) {
  const { message } = await request.json();
  const data = await generateKotowazaText(message);

  return NextResponse.json(data);
}
今回の構成では、フロントからのリクエストとAPIの処理の間にAPI Routeを挟んでおり、route.tsはAzure OpenAI ServiceのChatのAPIのエンドポイントとして機能します。これにより、APIキーを外部から隠蔽することができます。
app/api/azopenaidalle/route.ts
apiディレクトリ配下にazopenaidalleディレクトリを作成します。さらに、azopenaidalleディレクトリ配下にroute.tsファイルを作成し、以下のように記述します。
import { NextResponse } from "next/server";
import { generateKotowazaImage } from "../../../lib/generateKotowazaImage";

export async function POST(request: Request) {
  const { message } = await request.json();
  const data = await generateKotowazaImage(message);

  return NextResponse.json(data);
}
azopenaidalle/route.tsはAzure OpenAI ServiceのDALL·EのAPIのエンドポイントとして機能します。
Step3. アプリの動作確認
アプリにアクセス
コードにエラーが出ていなければ、以下のコマンドでアプリを起動しましょう。
npm run dev
以下のようにlocalhostのURLが表示されるので、そのURLにアクセスしましょう。

アクセスして、以下のフォーム画面が表示されていればOKです(^-^)v

アプリを触ってみましょう
「💡 Azure OpenAI Serviceに相談」をクリックし、キーワードを1つ入力してみましょう。

「AIサポート実行!」ボタンを押すと、APIを叩く処理が走ります🏃♀️
架空のことわざのタイトルや意味を生成する他、意味に合わせて画像も生成するため、大体10秒ほど時間がかかります。

いい感じに、架空のことわざをキーワードから生成してくれました!
しかし、「架空のことわざを表す画像」はDALL·Eで生成した画像ですが、正直ことわざの意味に合わせた画像とは言えないですね😅
う〜ん、なかなか難しい〜🤨
さいごに
所感
APIを叩く処理として、OpenAIClientクラスのメソッドを使用し、Chat機能やDALL·Eの機能を呼び出すことができました。ただ、それぞれ使用するメソッドも異なるのに加えて、同じようなメソッドも多々あり、どれを使えばいいか判断が難しかったです。今後は、それらのメソッドの使い分けや動作も検証していきたいと思います。
問題点
アプリの動作に関して、いくつか問題が発生することがあるので共有します。
-
返答内容のjsonのキーとバリューにダブルクオーテーションを付けてくれない😞
- generateKotowazaText.tsで
contentに返答内容のjson形式について注意書きをしていますが、必ずしもその通りに返答してくれないようでした。どういう時に、指定した通りに返してくれなかったりするのかその傾向はまだ把握できていません。
- generateKotowazaText.tsで
-
架空のことわざではない😂
- 架空のことわざを生成して欲しいのですが、すでに存在することわざを生成することがあります。また、似たようなことわざの語句を置き換えただけの、架空?のことわざを生成することもあります。これは、プロンプトの問題かもしれないので、色んな内容のプロンプトで試してみる必要がありそうです。
-
与えたキーワードを含んでいない😅
- モダール内で入力したキーワードを使用せず、似た意味の別のキーワードを含む架空のことわざを生成することもあります。これも上記と同様に、プロンプトの問題な気がします。
参考
本記事を執筆するにあたって、参考にしたページを以下に記載いたします。