はじめに
こんにちは、yu-Matsuです!
今月頭の AWS re:Invent 2024 にて、Amazon Bedrockのエージェント機能でも大きなアップデートがありました。それが、マルチエージェント対応です。「マルチエージェントとはそもそも何ぞや?」というのは詳しくは後述するとして、従来のエージェントを複数組み合わせることで、より複雑な処理を実行出来るようになりました。
とはいえ、「実際に触ってようと思ったけど、どうやればいいのか分からない」、「試しに作ってみたものの上手く動かない」といった方も中にはいらっしゃるかと思います。そのような方に向けて、AWSから公式で素晴らしいサンプルコードが提供されているため、今回はそちらをご紹介します!
ちなみに、この記事は KDDIアジャイル開発センター(KAG) Advent Calendar 2024 の25日目の記事になります。(大トリ...)
素晴らしい記事が沢山投稿されていますので、ぜひご覧ください!
マルチエージェントとは
マルチエージェントとは、簡潔に表現すると、複数のエージェントから構成されるシステム になります。単一のエージェントでは解決できないような複雑な処理も、うまくエージェントを組み合わせることでシステム全体として解決しよう、という考え方です。
マルチエージェントに関する詳細な説明に関しては、LangGraphのドキュメントに分かりやすく書かれていますので、ご覧ください。
今回取り扱うAWSのサンプルコードでは、主にマルチエージェントの実現パターンの一つとしてよく見られる Supervisor型 が採用されています。
Supervisor型のイメージは以下のようになります。

Supervisorと呼ばれる監督役(上図だと上司役?)のエージェントと、複数の特定の処理に特化したSubエージェント(部下エージェント)で構成されています。
まず、ユーザーの入力からSupervisorエージェントがどのようなタスクを実行するかを考え、適切なSubエージェントに割り与えます。
Subエージェントは与えられたタスクを実行し、Supervisorエージェントに結果を返します。
各Subエージェントのタスク実行が完了したら、Supervisorエージェントは最終的な実行結果をユーザーに返します。
このように、普段人間が行なっているような連携をエージェント同士で実現しているのがマルチエージェントというワケです。
マルチエージェントの実装は、今までは前述のLangGraphなどを利用して頑張って実装していたのですが、今回のBedrockのアップデートにより、AWSのコンソール上から簡単に実現出来るようになった のはかなり凄いことなのでは、と筆者は思っております。
AWSのサンプルについて
今回利用するサンプルコードは以下になります。AWSから公式で提供されていまして、GitHubからクローンすることで利用可能です。
リポジトリを見てみると、以下のようなディレクトリ構成になっていることが分かります。
├── examples/amazon-bedrock-agents/
│   ├── code_assistant_agent/
│   ├── human_resources_agent/
│   ├── inline_agent/
|   └── ....
├── examples/amazon-bedrock-multi-agent-collaboration/
│   ├── 00_hello_world_agent/
│   ├── devops_agent/
│   ├── energy_efficiency_management_agent/
|   └── ....
├── src/shared/
│   ├── working_memory/
│   ├── stock_data/
│   ├── web_search/
|   └── ....
├── src/utils/
│   ├── bedrock_agent_helper.py
|   ├── bedrock_agent.py
|   ├── knowledge_base_helper.py
|   └── ....
基本的にサンプル実行のために必要なコードは examples ディレクトリ内にあります。
- examples/amazon-bedrock-agents : Bedrockエージェントのサンプルです。(マルチエージェントではない)
- examples/amazon-bedrock-multi-agent-collaboration : マルチエージェントのサンプルです。今回はこちらを利用します
- src/shared : エージェントが利用するツールのコード群になります。Web Search、Working Memory、Stock Data Lookup の3つですが、今回の記事ではWeb Search、Working Memoryを利用することになります
- src/utils : pythonからBedrockエージェントのAPIを利用するために便利なユーティリティのコード群です。単純にサンプルを利用するだけの場合は、特に意識する必要はありません
マルチエージェントは東京リージョン(ap-northeast-1)でも利用可能ですが、サンプルコードを実行する都合上、バージニア北部リージョン(us-east-1) か オレゴンリージョン(us-west-2) でお試しください
体験してみよう!
環境のセットアップ
それでは、まずサンプルを実行する環境を整えていきます。
srcディレクトリ直下のREADMEの Prerequisites に、Bedrockのモデルアクセスを有効化しておく旨が記載されていますので、事前に準備しておきます。(本題からそれるので、本記事では省略)今回は Anthropic社のモデルである Claude 3.5 Sonnet v2 の有効化が必要になります。
次に、以下のような手順(コマンド群)が記載されていますので、順番に実行していきます。リポジトリのクローンやPythonの実行環境を立ち上げています。
//サンプルコードのリポジトリのクローン
git clone https://github.com/awslabs/amazon-bedrock-agent-samples

cd amazon-bedrock-agent-samples

//Pythonの仮想環境の作成(Pythonのバージョンは8以上)
python3 -m venv .venv

//仮想環境のactivate
source .venv/bin/activate

//必要なライブラリを仮想環境にインストール
pip3 install -r src/requirements.txt
また、ローカルからAWSのリソースにアクセスするために、お手元の環境にAWSアカウントの認証情報を設定しておく必要があります。以下のドキュメント等を参考にしてみてください。
ここまで出来ましたら、環境のセットアップが完了です!
サンプル1: Hello World Agent
それでは、早速サンプルを触ってみたいと思います!
まずは、マルチエージェントの簡単な例となる Hello World Agent を見てみましょう。
概要
Hello World Agentのサンプルは、ディレクトリ examples / amazon-bedrock-multi-agent-collaboration / 00_hello_world_agent で実行することができます。ディレクトリにはサンプルコード以外にREADMEがあり、エージェントの概要や実行方法が記載されています。
READMEによると、エージェントのアーキテクチャは以下の図のようになっています。
ユーザーからの入力を受け付けて指示を出す Supervisorエージェント と、その指示を受け取って実際に処理を行う Subエージェント の2つから構成されている簡単なマルチエージェントです。Subエージェントはユーザーからのいかなる入力も「Hello World」で返します。
デプロイ
デプロイの実行
サンプルコードを実行して、エージェントをデプロイしてみます。READMEのUsage & Sample Promptsに記載されている一つ目のコマンドを実行します。
python3 examples/amazon-bedrock-multi-agent-collaboration/00_hello_world_agent/main.py --recreate_agents "true"
00_hello_world_agent ディレクトリに移動している場合は、以下のコマンドになります。
python3 main.py --recreate_agents "true"
実行すると、以下のようなメッセージが流れます。Recreated agents. と表示されれば、デプロイが完了です!
SupervisorエージェントとSubエージェントの作成、そしてそれらの関連付けがコマンド実行一つで実施されていることが分かります。
デプロイされたエージェントの確認
AWSのコンソール上でも確認してみます。
Bedrockのコンソールを開いてエージェント一覧を見てみると、2つエージェントが存在することが分かります。
まず、Supervisorエージェントの詳細を見てみましょう。
しっかりデプロイされていますね。右上の「エージェントビルダーで編集」で詳細な設定を見ることができます。
画像赤枠の部分にエージェント向けの指示、つまりシステムプロンプトが設定されています。ユーザーの入力内容は一切無視して、Subエージェントのレスポンスをそのままユーザーに返す、といったような内容です。
エージェントビルダー画面の下部に「Multi-agent collaboration」欄がありまして、これがマルチエージェントの設定部分になります。
「編集」からマルチエージェントの設定詳細を見てみます。
「Collaborator agent」と「Agent alias」でSubエージェントを指定、「Collaborator instructions」で SupervisorエージェントからSubエージェントへの指示を設定しています。
画像では見切れていますが、Subエージェントを追加したい場合は画面下部の「Add Collaborator」から追加します。
Subエージェントの方も見てみましょう。
Supervisorエージェントと同様に、エージェント向けの指示でシステムプロンプトが定義されています。ユーザーからの入力は無視して「Hello World」と返す旨の指示がなされています。
ローカル実行
エージェントのデプロイが確認できましたので、ローカル環境に戻ってサンプルコードからデプロイされたエージェントを実行してみます。
READMEに記載されている2つ目のコマンドを実行します。
python3 examples/amazon-bedrock-multi-agent-collaboration/00_hello_world_agent/main.py --recreate_agents "false"
実行すると、エージェントへの2パターンの入力が連続でなされ、その結果が出力されます。
まずは1パターン目として、「What is the weather like in Seatle?」と入力した場合です。
Step1 で SupervisorエージェントからSubエージェントが呼び出され、Step1.1でSubエージェントが処理を実行、その結果をSupervisorエージェントに返しています。そして、Step2でSupervisorエージェントが Final Response として「Hello World」をユーザーに返しています。
この後に2パターン目の実行結果が出力されています。今度は「Say hello. Expected output: A greeting.」と「Say hello in French. Expected output: A greeting in French.」というタスクを2つエージェントに与えています。(下の結果を見ると、少し読み替えられていることが分かります)
Step1 と Step2 で、先ほどの単発の入力と同じ流れの処理がなされていることが分かります。最終的にStep3で2つのタスクの結果をSupervisorエージェントがまとめて返しています。
コンソールから実行
とりあえず実行してみる
もちろんコンソールからも実行することが出来ますので、試してみます。
Bedrockのコンソールから、「hello_world_supervisor」の詳細画面を開きます。
画面右側の「テスト」からエージェントを実行できますので、ローカル実行した際の2パターン目の入力である2つのタスクを実行してみます。
どのような入力の仕方をすれば良いかは、src/utils/bedrock-agent.pyのコードを参考にします。サンプルコードを実行した場合、836行目から定義されている「invoke_with_tasks」という関数が呼ばれます。
この中の「prompt」を参考に、入力を以下のように組み立てました。
Please perform the following tasks sequentially. Be sure you do not
perform any of them in parallel. If a task will require information produced from a prior task,
be sure to include the details as input to the task.

Task 1. Say hello. Expected output: A greeting
Task 2. Say hello in French. Expected output: A greeting in French

Before returning the final answer, review whether you have achieved the expected output for each task.
こちらを入力して実行してみます。
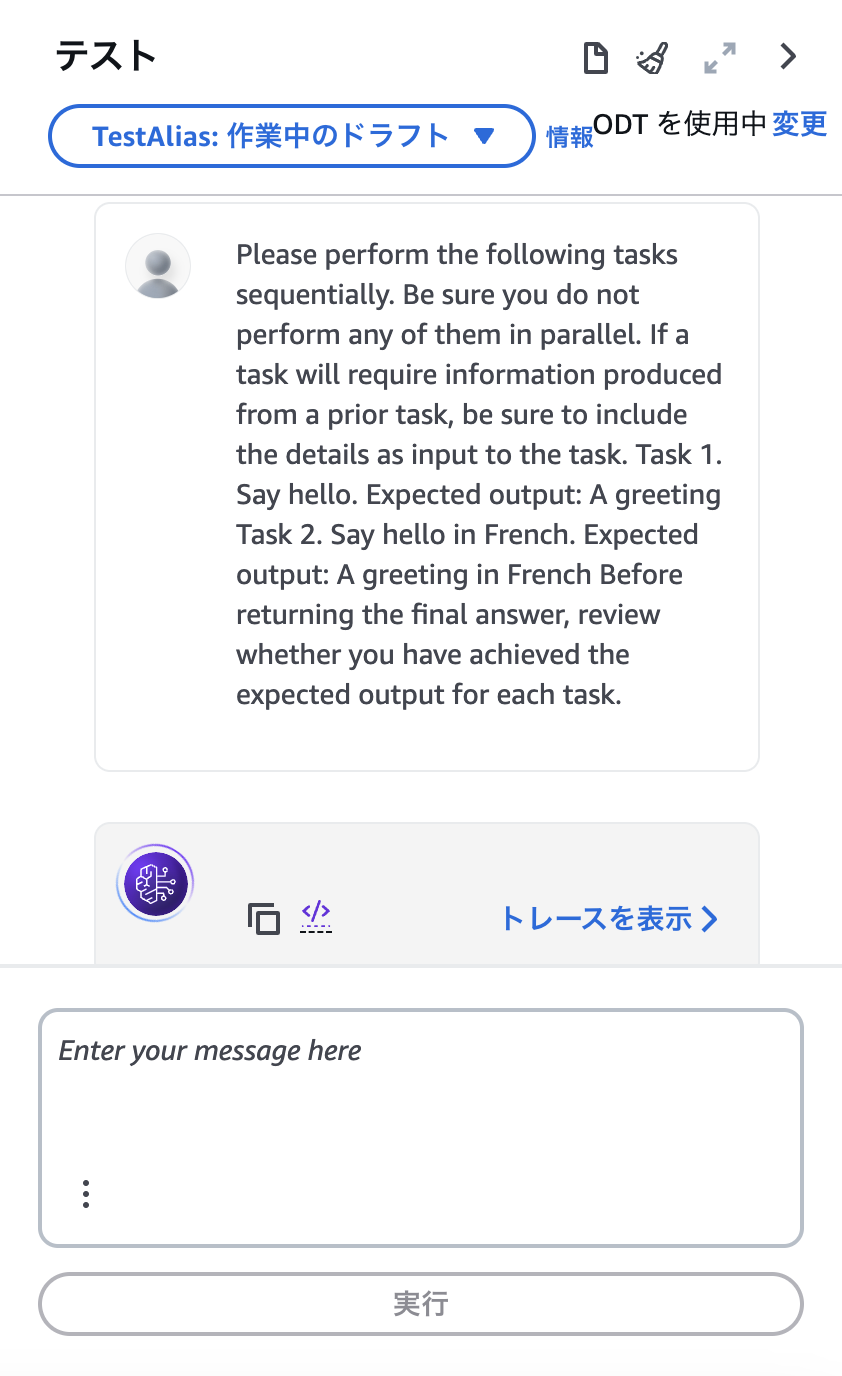
実行が始まると、「トレースを表示」から実行状況を確認出来るので開いてみます。
トレース表示を開いている間に実行が完了したようです。実行結果は上画像赤枠の部分ですが、ローカルで実行した場合と同じような結果になっていることが分かります。
Task 1 Result: Hello World Task 2 Result: Hello World
Review of expected outputs:
Task 1: Expected a greeting ✓ (Received: Hello World)
Task 2: Expected a greeting in French ✓ (Received: Hello World)
トレース画面の右上には、マルチエージェントの実行状況のタイムラインが表示されています。全体の実行時間は13.51秒、その内Subエージェントの実行時間は4.70秒であったことが分かります。

トレースの確認
トレース画面の右下ではトレースの詳細情報を確認することが出来ます。
見てみると、今回は5つのステップで実行されていることが分かります。
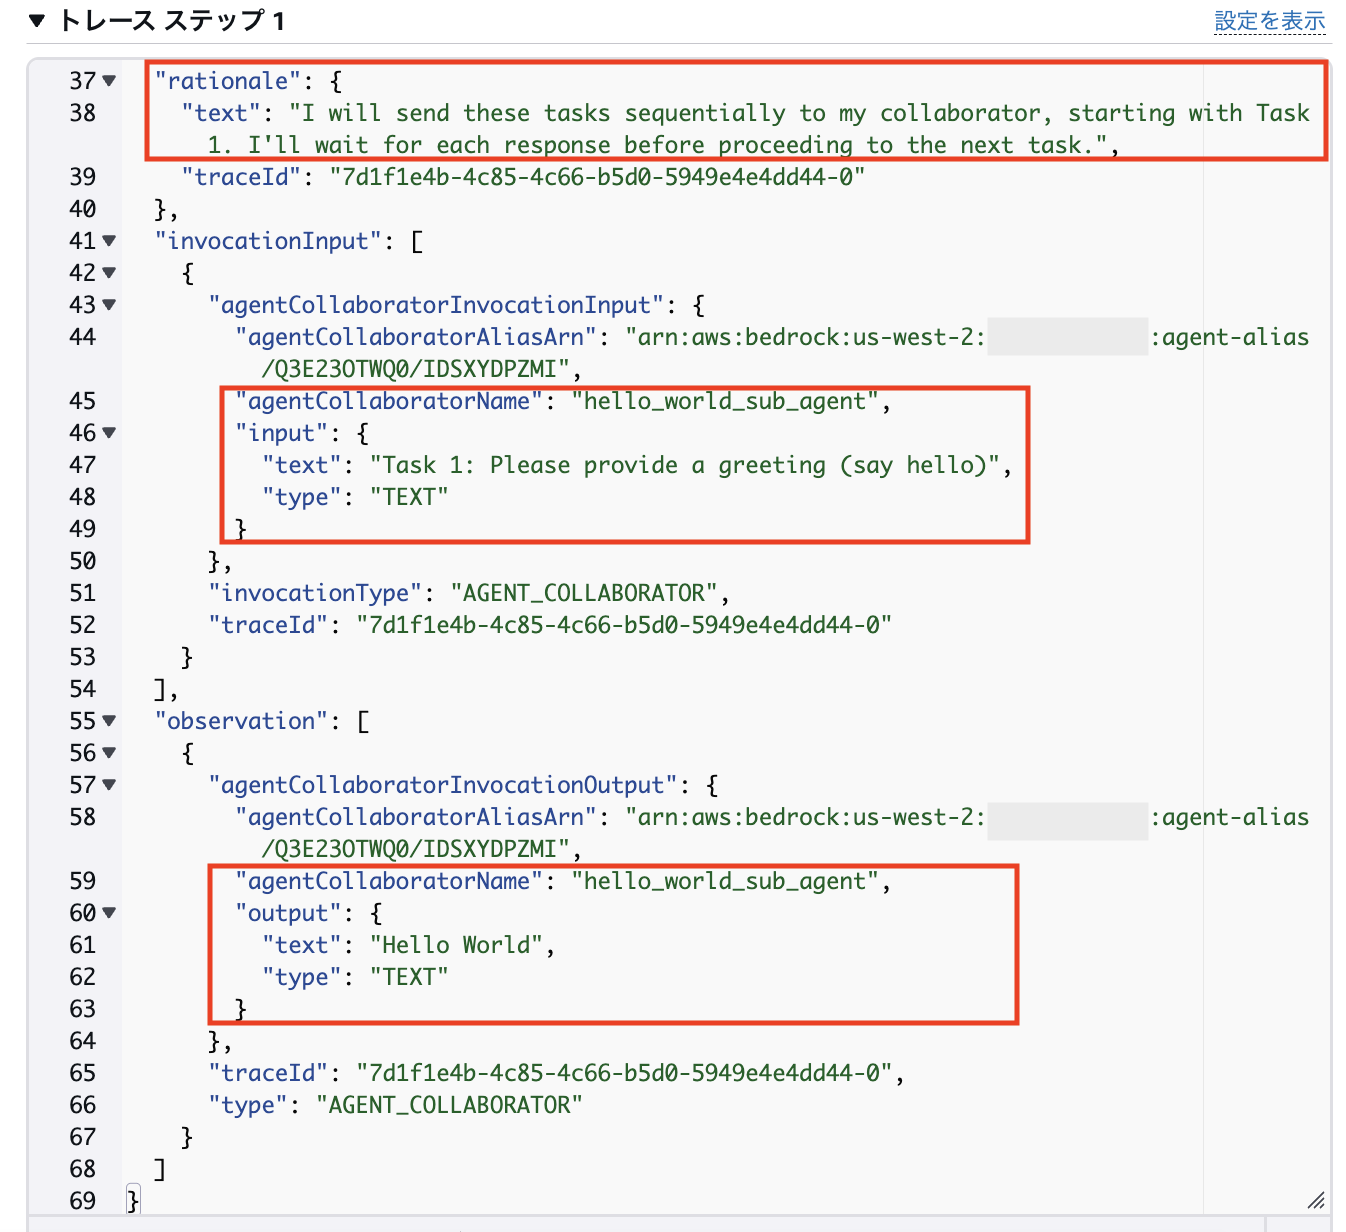
1ステップ目:
ステップ詳細の下部を見てみると、まず「rationale」に「タスクを1から順番に実行、タスクの応答を待ってから次のタスクに進む」という旨の情報があります。
また、「invocationInput」でSubエージェントに「Task 1: Please provie a greeding(say hello)」という入力があること、「observation」で、タスク1の実行結果として「Hello World」が返ってきているとが分かります。
2ステップ目:
「observation」を見ると、タスク1の結果が「finalResponse」で確定しています。

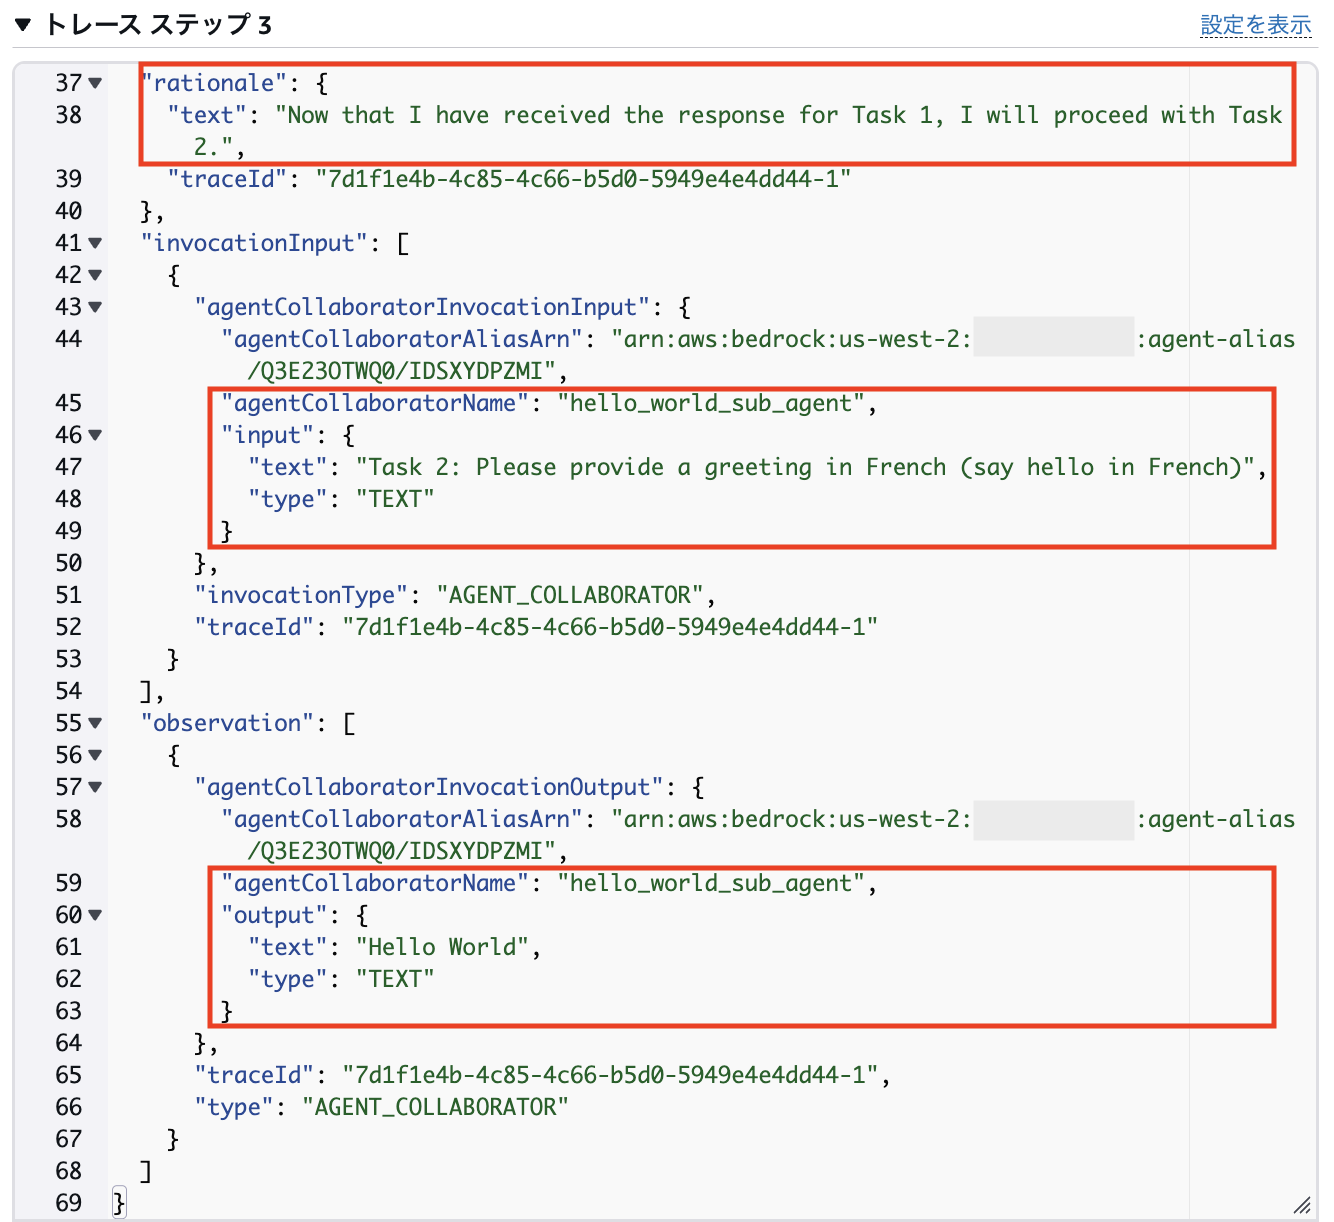
3ステップ目:
「rationale」で、Supervisorエージェントがタスク1の結果を受け取ったのでタスク2に進もうとしていることが分かります。
「invocationInput」、「observation」で、1ステップ目と同様にタスク2が実行されて、その結果が返ってきています。
4ステップ目:
2ステップ目と同様に、タスク2の結果を「finalResponse」で確定しています。

5ステップ目:
最後のステップですが、「rationale」を見ると、全てのタスクの結果が出揃ったので、Supervisorエージェントがユーザーにそれらを返そうとしていることが分かります。「observation」でSupervisorエージェントとしての「finalResponse」を確認できます。
このように、コンソールでテスト実行するとエージェントの詳細なトレース情報を見ることが出来ますので、ぜひ活用してみてください!
Hello World Agent のサンプルコード実行は以上になります。次は、もう少し複雑なマルチエージェントを体験してみたいと思います!
サンプル2: Trip Planner Agent
少し複雑なマルチエージェントの例として、Trip Planner Agentを見てみましょう。
概要
Trip Planner Agentのサンプルは、ディレクトリ examples / amazon-bedrock-multi-agent-collaboration / trip_planner_ageent で実行することができます。このエージェントでは、ユーザーから旅行に関する条件を受け取り、それらをもとにユーザーの希望を満たす旅程を作成します。
エージェントのアーキテクチャは以下になります。
- Trip Planner : Supervisorエージェント。ユーザーから得られた条件をもとにSubエージェントを実行する
- Activity Finder : ユーザーの希望に沿って、旅行先でのアクティビティを検索する
- Restaurant Scout : ユーザーの希望に沿って、旅行先でのおすすめのレストランを検索する
- Itinerary Compiler : Activity Finder、Restaurant Scout の結果を踏まえて旅程を組み立てる
ツール群のデプロイ
エージェントのデプロイの前に、今回はSubエージェントが利用するツール群のデプロイを行う必要があります。
README の 「Prerequisites」の 「2. Deploy Web Search tool」で、「Web Search Tool」をデプロイするように言われているので、「here」から src / shared / web_seachに移動します。
Web Search ToolではWeb検索APIに「Tavily」を利用しますので、先にTavilyのAPIキーを取得しておいて下さい
Web Search ToolのREADMEの「Deploy web_search_stack.yaml」から、デプロイするリージョンを選んで「Launch Stack」を押下すると、CloudFormationのコンソールが開きます。(筆者は「us-west-2」を選択しています。)

「スタックの作成」画面は特に何も変更せずに次へ進みます。
「スタックの詳細を指定」で、取得したTavilyのAPIキーをパラメータに設定します。
「スタックのオプションの設定」の「アクセス許可」で、CloudFormation実行時の権限を設定するのですが、今回は簡単のためAdministratorAccessを付けています。
以上の設定が完了したら、CloudFormationスタックを実行していきます。
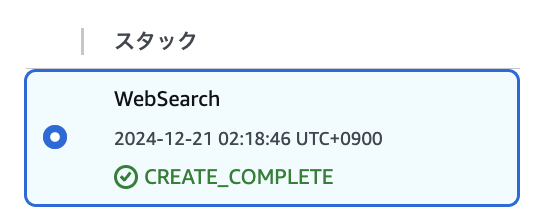
スタックのステータスが「CREATE_COMPLETE」になったらデプロイ完了です。
Trip Planner Agent の README で指定されているツールは Web Search Tool ですが、実際は「Working Memory Tool」も必要です。Web Search Tool デプロイ後に src /
utils / working_memory に移動し、上記の内容を参考にWorking Memory Toolもデプロイして下さい
デプロイ
デプロイの実行
ツール群の準備が完了したので、Trip Planner Agent をデプロイしていきます。
examples / amazon-bedrock-multi-agent-collaboration / trip_planner_ageent に移動し、READMEの「 Usage & Sample Prompts > 1. Deploy Amazon Bedrock Agents 」を参考に、以下を実行します。
python3 main.py --recreate_agents "true"
実行を開始すると、Hello World Agentの時と同様に、デプロイの様子が標準出力されます。「Recreated agents.」が表示されたらデプロイ完了です!
デプロイされたエージェントの確認
Bedrockのコンソールからエージェント一覧を見ると、4つのエージェントが新しく作成されていることが分かります。
Supervisorエージェントである trip_planner の詳細を見てみます。
エージェントビルダー画面を開いて「エージェント向けの指示」を見てみると、以下のようなシステムプロンプトが設定されていることが分かります。
また、マルチエージェントの設定を開いてみると、デプロイされたSubエージェントが全て関連付けられています。
Subエージェントは代表して activity_finder を見てみます。
「エージェント向けの指示」を見てみると、Hollow World Agentの時とは異なり、複数のSubエージェントがあるため、自身の役割(Role)や目的(Goal)がしっかり設定されていることが分かります。
「アクショングループ」の欄を見てみると、今回は4つのアクショングループが設定されています。
「actions_1_activity_finder」を見てみると、先ほどデプロイしたツールである「web_seach」が指定されていることが分かります。
wab_seach実行時の入力パラメータは「パラメータ」欄で設定されています。
ちなみに、残りの3つのアクショングループは Working Memory Tool のアクショングループになりますので、興味がある方は覗いてみて下さい。
ローカル実行
エージェントが問題なくデプロイされていることを確認しましたので、Hello World Agentと同様にまずローカル実行してみましょう。
READMEの「 Usage & Sample Prompts > 2. invoke 」のコマンドを参考に、以下を実行します。
python3 main.py --recreate_agents "false"
このコマンド実行時にエージェントに入力されるプロンプトは以下のようになっています。タスク1でアクティビティ検索(Activity Finder)、タスク2でレストラン検索(Restaurant Scout)、タスク3で旅程作成(Itinerary Compiler)が、シーケンシャルに実行されるようになっています。
Please perform the following tasks sequentially. Be sure you do not
perform any of them in parallel. If a task will require information produced from a prior task,
be sure to include the details as input to the task.

Task 1. Research and find cool things to do at Europe. Focus on activities and events that match the traveler's interests and age group. Utilize internet search tools and recommendation engines to gather the information.
Traveler's information:
- origin: Boston, BOS - destination: Europe - age of the traveler: 25 - hotel localtion: Multiple across Europe - arrival: June 12, 11:00 - departure: June 20, 17:00 - interests: A few of the days on the beach, and some days with great historical museums - itinerary hints: Spend the last day in Paris with friends
 Expected output: A list of recommended activities and events for each day of the trip. Each entry should include the activity name, location, a brief description, and why it's suitable for the traveler. And potential reviews and ratings of the activities.

Task 2. Find highly-rated restaurants and dining experiences at Europe. Use internet search tools, restaurant review sites, and travel guides. Make sure to find a variety of options to suit different tastes and budgets, and ratings for them.
Traveler's information:
- origin: Boston, BOS - destination: Europe - age of the traveler: 25 - hotel localtion: Multiple across Europe - arrival: June 12, 11:00 - departure: June 20, 17:00 - food preferences: Unique to the destination, but with good gluten free options
 Expected output: A list of recommended restaurants for the trip, including one restaurant for each evening, and other ones as needed to provide some interesting and tasy lunches or breakfast. You do not need to identify a restaurant for each and every meal. Each entry should include the name, location (address), type of cuisine or activity, a brief description and ratings.

Task 3. Compile all researched information into a comprehensive day-by-day itinerary for the trip to Europe. Ensure the itinerary integrates all planned activities and dining experiences. Use text formatting and document creation tools to organize the information.
 Expected output: A detailed itinerary document, the itinerary should include a day-by-day plan with activities, restaurants, and scenic locations.

Before returning the final answer, review whether you have achieved the expected output for each task.

Use a single project table in Working Memory for this entire set of tasks,
using table name: agent-trip-planner-xxxxxx. When making requests to your collaborators,
tell them the working memory table name, and the named keys  they should
use to retrieve their input or save their output.
The keys they use in that table will allow them to keep track of state.
As a final step, you MUST use one of your collaborators to delete the
Working Memory table.
For the final response, please only return the final itinerary,
returning the full text as is from your collaborator.
実行すると、以下のように順番にタスクが実行されていきます。
Step1はタスク1に相当し、アクティビティ検索の実行結果が出力されています。

検索が完了すると、アクティビティ検索の finalResponse が確定します。

Step2では、レストラン検索が実行され、同様に検索が完了すると、タスクの finalResponse が確定します。

Step3で、今までのタスクの結果をもとに旅程作成が実行されます。

コンソール実行
Trip Planner Agent も、せっかくなのでコンソール上から実行してみます。
Bedrockコンソールのエージェント一覧から「trip_planner」の詳細画面を開き、先ほど記載したプロンプトを入力してテスト実行します。
実行中のタイムラインを眺めていると、プロンプトで指定した通りに順番にSubエージェントが実行されて行っていることが分かります。
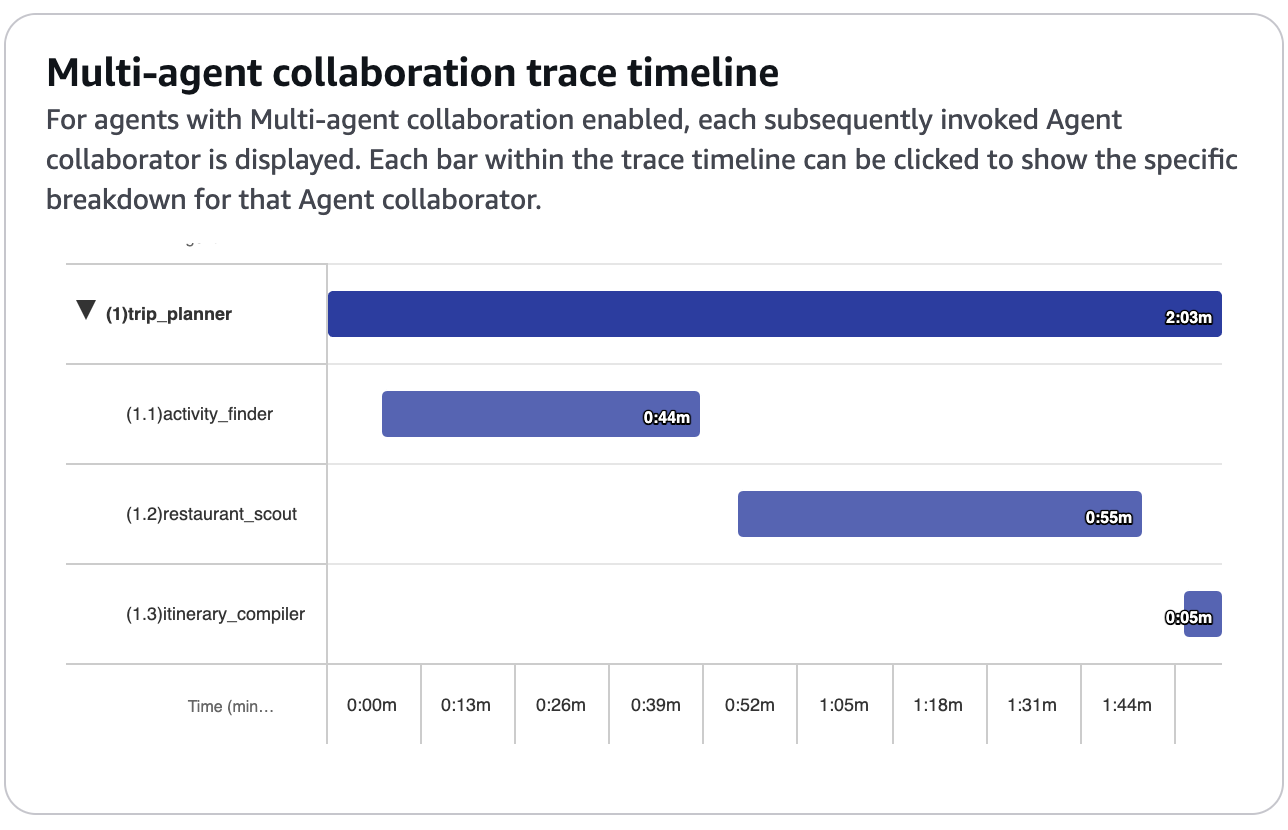
実行が完了しました!
改行がないので見づらいですが、ちゃんと旅程が返ってきていることが分かります。タイムラインを見てみると、全体としては実行に2.34分かかり、それぞれのSubエージェントの実行時間は以下のようになっていました。
- Activity Finder: 0.44分
- Restaurant Scout: 0.55分
- Itinerary Compiler: 0.23分
もちろん、トレースの詳細も確認できます。今回は14ステップ実行されたことが分かります。
流石に詳細を見ていくことはできないので、興味があれば、Hello World Agentで紹介したトレースの見方を参考に、ご覧いただければと思います。

アプリケーション作成
マルチエージェントも、従来のエージェントと同じようにAWSのSDKから呼び出すことができるので、アプリケーションへの組み込みも簡単です。
私の記事ではお馴染みの Streamlit を利用して、Trip Plannner Agent の簡単なWebアプリケーションを作ってみたいと思います。
pip3 install streamlit
examples / amazon-bedrock-multi-agent-collaboration / trip_planner_ageent の直下に app.py というファイルを新しく作成し、アプリケーションを実装します。
import uuid, boto3
import streamlit as st
import datetime
import time

# Bedrockクライアント
if "client" not in st.session_state:
    st.session_state.client = boto3.client("bedrock-agent-runtime")
client = st.session_state.client

# セッションID
if "session_id" not in st.session_state:
    timestamp = int(time.time())
    st.session_state.session_id = "trip-planner-" + str(timestamp) + "-" + str(uuid.uuid1())
session_id = st.session_state.session_id


# アプリケーションのタイトル
st.title("Trip Planner")


# 旅程の作成に必要な情報の入力
st.header("必要な情報を入力!")
origin = st.text_input("出発地", "")
destination = st.text_input("目的地", "")
age = st.number_input("年齢", 0)
hotel_location = st.text_input("ホテルの場所", "")
arrival_date = st.text_input('arrival date', "")
departure_date = st.text_input('departure date', "")
interests = st.text_area('興味、関心', '')
itinerary_hints = st.text_area('特記事項', '')


# エージェントの実行
if st.button("旅程の検索"):

    # プロンプトの作成. ユーザーの入力を埋め込む
    prompt = f'''
    Please perform the following tasks sequentially. Be sure you do not
perform any of them in parallel. If a task will require information produced from a prior task,
be sure to include the details as input to the task.

Task 1. Research and find cool things to do at Europe. Focus on activities and events that match the traveler's interests and age group. Utilize internet search tools and recommendation engines to gather the information.
Traveler's information:
- origin: {origin} - destination: {destination} - age of the traveler: {age} - hotel localtion: {hotel_location} - arrival: {arrival_date} - departure:  {departure_date} - interests: {interests} - itinerary hints: {itinerary_hints}
 Expected output: A list of recommended activities and events for each day of the trip. Each entry should include the activity name, location, a brief description, and why it's suitable for the traveler. And potential reviews and ratings of the activities.

Task 2. Find highly-rated restaurants and dining experiences at Europe. Use internet search tools, restaurant review sites, and travel guides. Make sure to find a variety of options to suit different tastes and budgets, and ratings for them.
Traveler's information:
- origin: {origin} - destination: {destination} - age of the traveler: {age} - hotel localtion: {hotel_location} - arrival: {arrival_date} - departure:  {departure_date} - interests: {interests} - itinerary hints: {itinerary_hints}
 Expected output: A list of recommended activities and events for each day of the trip. Each entry should include the activity name, location, a brief description, and why it's suitable for the traveler. And potential reviews and ratings of the activities.

Task 3. Compile all researched information into a comprehensive day-by-day itinerary for the trip to Europe. Ensure the itinerary integrates all planned activities and dining experiences. Use text formatting and document creation tools to organize the information.
 Expected output: A detailed itinerary document, the itinerary should include a day-by-day plan with activities, restaurants, and scenic locations.

Before returning the final answer, review whether you have achieved the expected output for each task.

Use a single project table in Working Memory for this entire set of tasks,
using table name: {session_id}. When making requests to your collaborators,
tell them the working memory table name, and the named keys  they should
use to retrieve their input or save their output.
The keys they use in that table will allow them to keep track of state.
As a final step, you MUST use one of your collaborators to delete the
Working Memory table.
For the final response, please only return the final itinerary,
returning the full text as is from your collaborator.
    '''

    # エージェントに入力されたプロンプトを表示する
    with st.chat_message("user"):
        st.markdown(prompt)

    # エージェントを実行
    response = client.invoke_agent(
        agentId="FT8DKYEMTT",
        agentAliasId="CLSJ6ZZJQT",
        sessionId=session_id,
        enableTrace=True,
        inputText=prompt,
    )

    # エージェント実行のトレースと最終回答を画面に表示
    orch_step = 0
    sub_step = 0
    action_output = {"flag": False, "content": ""}
    # multi_agent_namesのキーは、各サブエージェントの "{エージェントID}/{エイリアスID}"
    multi_agent_names = {
        "AAAAAAAAAA/BBBBBBBBBB": "activity_finder",
        "CCCCCCCCCC/DDDDDDDDDD" : "restaurant_scout",
        "EEEEEEEEEE/FFFFFFFFFF" : "itinerary_compiler"
    }
    with st.chat_message("assistant"):
        for event in response.get("completion"):
            sub_agent_alias_id = None

            # トレースイベントを逐次画面に表示
            if "trace" in event:
                if "callerChain" in event["trace"]:
                    if len(event["trace"]["callerChain"]) > 1:
                        sub_agent_alias_arn = event["trace"]["callerChain"][1]["agentAliasArn"]
                        sub_agent_alias_id = sub_agent_alias_arn.split("/", 1)[1]
                        sub_agent_name = multi_agent_names[sub_agent_alias_id]

                if "orchestrationTrace" in event["trace"]["trace"]:
                    orch = event["trace"]["trace"]["orchestrationTrace"]

                    if "invocationInput" in orch:
                        _input = orch["invocationInput"]
                        if "agentCollaboratorInvocationInput" in _input:
                            collab_name = _input["agentCollaboratorInvocationInput"]["agentCollaboratorName"]
                            sub_agent_name = collab_name
                            collab_input_text = _input["agentCollaboratorInvocationInput"]["input"]["text"]
                            collab_arn = _input["agentCollaboratorInvocationInput"]["agentCollaboratorAliasArn"]
                            collab_ids = collab_arn.split("/", 1)[1]

                            action_output = {
                                "flag": False,
                                "content": f"Using sub-agent collaborator: '{collab_name} [{collab_ids}]'"
                            }

                    if "observation" in orch:
                        output = orch["observation"]
                        if "actionGroupInvocationOutput" in output:
                            action_output = {
                                "flag": True,
                                "content": f"--tool outputs:\n{output['actionGroupInvocationOutput']['text']}"
                            }

                        if "agentCollaboratorInvocationOutput" in output:
                            collab_name = output["agentCollaboratorInvocationOutput"]["agentCollaboratorName"]
                            collab_output_text = output["agentCollaboratorInvocationOutput"]["output"]["text"]
                            action_output = {
                                "flag": True,
                                "content": f"----sub-agent {collab_name} output text:\n{collab_output_text}"
                            }

                    if "modelInvocationOutput" in orch:
                        if action_output["flag"] and len(action_output["content"])>0 :
                            sub_step += 1
                            with st.expander(f"---- Step {orch_step}.{sub_step} [using sub-agent name:{sub_agent_name}]"):
                                st.write(action_output["content"])
                        elif (not action_output["flag"]) and len(action_output["content"])>0:
                            orch_step += 1
                            sub_step = 0
                            with st.expander(f"---- Step {orch_step} ----"):
                                st.write(action_output["content"])

            # エージェントの実行が完了したら、回答を表示
            if "chunk" in event:
                chunk = event["chunk"]
                answer = chunk["bytes"].decode()

                st.header("以下の旅程はいかがでしょうか")
                st.write(answer)
今まで説明を省略していましたが、Trip Planner Agent は以下のようなパラメータをプロンプトに含める必要があります。
- origin
- destination
- age
- hotel location
- arrival date
- departure date
- interests
- itinerary hints
なので、今回はユーザーの入力は自由記述形式ではなく、必要な項目を埋めていく形式にしています。そして、ユーザーの入力内容をプロンプトに埋め込んでいます。
エージェントの実行に関しては、従来のエージェントと同じように、以下のような感じで記述することができ、マルチエージェントだからといって特に意識する必要はありません。
response = client.invoke_agent(
    agentId="FT8DKYEMTT",
    agentAliasId="CLSJ6ZZJQT",
    sessionId=session_id,
    enableTrace=True,
    inputText=prompt,
)
コードの中盤にややこしい処理が書いていますが、これはエージェントの実行中に、ローカル実行時やコンソールからの実行時にも確認することができたトレース情報を表示するためです。
では実行してみましょう。
以下のコマンドを実行し、Webアプリケーションを起動します。
streamlit run ./examples/amazon-bedrock-multi-agent-collaboration/trip_planner_agent/app.py --server.port 8080
Webブラウザが開き、以下のような画面が表示されたら起動成功です!

今回はローカル実行時と同じパラメータを入力して、エージェントを実行してみたいと思います。
- origin: Boston, BOS
- destination: Europe
- age: 25
- hotel localtion: Multiple across Europe
- arrival date: June 12, 11:00
- departure date: June 20, 17:00
- interests: A few of the days on the beach, and some days with great historical museums
- itinerary hints: Spend the last day in Paris with friends
入力が終わりましたら、「旅程の検索」ボタンを押下します。

すると、エージェントの実行が始まります。エージェントへの入力も表示するようにしています。

実行途中のトレース情報は、リアルタイムで以下のようにアコーディオン形式で追加されていきます。

アコーディオンを開くと、詳細を見ることが出来ます。

実行が完了したら、エージェントが作成した旅程が表示されるようになっています!


最後に
今回は、re:Invent で発表されたBedrockのマルチエージェントを、AWSから提供されているサンプルコードを通して体験してみました!
マルチエージェントは複数のエージェントを組み合わせて実現する以上、その設計がより複雑になるので、試しに作ってみても上手く動かないことが結構あります。しかし、サンプルコードからデプロイされたエージェントの設定を見たり、実際に実行して動きを見たりすることで、「こうすれば良かったんだ」と気づきを得られることもあるのではないかと思います。(筆者は実際そうでした。)
この記事を通して、デプロイしたサンプルのマルチエージェントで改造していく形で自分好みのエージェントを実現するのも良し、はたまたサンプルを参考に1からマルチエージェントを作成するも良し、マルチエージェントの凄さ、面白さを十分に堪能いただければ幸いです!
本記事はこれで以上となります。かなり長くなってしまいましたが。最後までお読みいただきありがとうございました!


