はじめに
背景
業務の中で、ローカルDBをマイグレーションでアップデートすることが多いです。
しかし一つ一つの作業の意味が分からないことが多かったので、調べてまとめてみました。
この記事では C#, Entity Framework Core を用いて説明を行います。
公式ドキュメントを嚙み砕いて解説するくらいのレベルの記事です。
対象読者
- 普段よくわからないけどなんとなくマイグレーション作業を行っている方
- そもそもマイグレーションって何?という方
- Entity Framework Core を使い始めたばかりの方 etc...
前提知識
マイグレーション
マイグレーションとは広い意味で言うと、「古い場所から新しい場所へ、データやプログラムを移行させること」です。
Entity Framework Core では以下の二つをマイグレーションすることができます。
- テーブルやViewなどの定義
- シードデータ
今回は、テーブル定義のマイグレーションを行います。
つまり、「プログラム上で定義されたテーブル定義を、DBに移行させる」ことが今回の目的です。
エンティティ
また、DBの設計手法であるER図に関連する用語で、テーブルを指す言葉です。
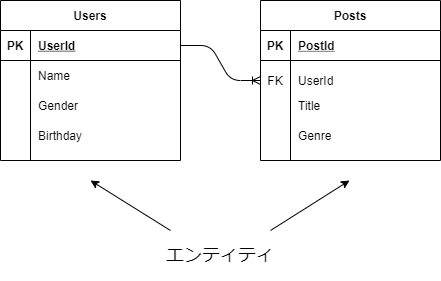
厳密にはエンティティ = テーブルではないのですが、今回の作業ではこの認識で問題ないと思います。
より詳しい定義を知りたい方は、こちらをご覧下さい。
データコンテキスト
データコンテキストは「読み込んだデータをプログラムでどのように変更したか」という情報を持っています。
しかし今回マイグレーションで扱うような、モデル定義の変更情報は持っていません。
マイグレーションという文脈では、データコンテキストが持っているのは以下の二つの情報です。
- 最新のエンティティ
- データベースとのマッピング
環境
- mac OS Big Sur(Version 11.5.2)
- .NET 5.0
- SQLite3(Version 3.32.3)
作業
サンプルプロジェクトの作成
任意の作業ディレクトリに移動して、プロジェクトを作成します。
$ mkdir MigrationApp
$ cd MigrationApp
$ dotnet new web
使いたいデータベースに合わせて、Entity Framework Coreのパッケージをインストールします。
今回は、軽量なSQLiteを使います。
$ dotnet add package Microsoft.EntityFrameworkCore.Sqlite
次に、エンティティを定義するエンティティクラスと、データコンテキストを定義するコンテキストクラスを作成します。
$ mkdir Entities
$ touch Entities/Blog.cs
$ mkdir DbContexts
$ touch DbContexts/SampleDbContext.cs
using System;
namespace MigrationApp.Entities
{
     //  エンティティクラス
    public class Blog
    {
        public int Id { get; set; }
        public string Name { get; set; }
    }
}
using Microsoft.EntityFrameworkCore;
using MigrationApp.Entities;

namespace MigrationApp.DbContexts
{
    // コンテキストクラス
    public class SampleDbContext : DbContext
    {
        public SampleDbContext(DbContextOptions<SampleDbContext> options) : base(options) { }
        public DbSet<Blog> Blog { get; set; }
    }
}
今はまだコンテキストクラスを作成しただけで、使えるようになっていません。
Startup.cs 内で設定をします。
using Microsoft.AspNetCore.Builder;
using Microsoft.AspNetCore.Hosting;
using Microsoft.AspNetCore.Http;
using Microsoft.EntityFrameworkCore;
using Microsoft.Extensions.DependencyInjection;
using Microsoft.Extensions.Hosting;
using MigrationApp.DbContexts;

namespace MigrationApp
{
    public class Startup
    {
        // This method gets called by the runtime. Use this method to add services to the container.
        // For more information on how to configure your application, visit https://go.microsoft.com/fwlink/?LinkID=398940
        public void ConfigureServices(IServiceCollection services)
        {
             // 以下2行を追加
             // SampleDbContextを基にsample.dbを作成、更新するように設定
            services.AddDbContext<SampleDbContext>(
                options => options.UseSqlite("Data Source=sample.db"));
        }

        // This method gets called by the runtime. Use this method to configure the HTTP request pipeline.
        public void Configure(IApplicationBuilder app, IWebHostEnvironment env)
        {
            if (env.IsDevelopment())
            {
                app.UseDeveloperExceptionPage();
            }

            app.UseRouting();

            app.UseEndpoints(endpoints =>
            {
                endpoints.MapGet("/", async context =>
                {
                    await context.Response.WriteAsync("Hello World!");
                });
            });
        }
    }
}
最初のマイグレーションの実行
必要なツールをインストールします。
$ dotnet tool install --global dotnet-ef
$ dotnet add package Microsoft.EntityFrameworkCore.Design
dotnet ef migrations add <マイグレーション名>コマンドでマイグレーションを作成します。
マイグレーション名には、そのマイグレーションで変更する内容を記載することが多いです。
後に作成されるマイグレーションファイルの名前になります。
$ dotnet ef migrations add InitialCreate
Migrations ディレクトリが作成されて、配下に以下の二つのファイルが作成されます。
- <タイムスタンプ>_<マイグレーション名>.cs
- <データコンテキスト名>ModelSnapshot.cs
using Microsoft.EntityFrameworkCore.Migrations;

namespace MigrationApp.Migrations
{
    public partial class InitialCreate : Migration
    {
        // コンテキストの変更を適用するメソッド
        protected override void Up(MigrationBuilder migrationBuilder)
        {
            migrationBuilder.CreateTable(
                name: "Blog",
                columns: table => new
                {
                    Id = table.Column<int>(type: "INTEGER", nullable: false)
                        .Annotation("Sqlite:Autoincrement", true),
                    Name = table.Column<string>(type: "TEXT", nullable: true)
                },
                constraints: table =>
                {
                    table.PrimaryKey("PK_Blog", x => x.Id);
                });
        }

        // コンテキストの変更を元に戻すメソッド
        protected override void Down(MigrationBuilder migrationBuilder)
        {
            migrationBuilder.DropTable(
                name: "Blog");
        }
    }
}
// <auto-generated />
using Microsoft.EntityFrameworkCore;
using Microsoft.EntityFrameworkCore.Infrastructure;
using Microsoft.EntityFrameworkCore.Storage.ValueConversion;
using MigrationApp.DbContexts;

namespace MigrationApp.Migrations
{
    [DbContext(typeof(SampleDbContext))]
    partial class SampleDbContextModelSnapshot : ModelSnapshot
    {
        protected override void BuildModel(ModelBuilder modelBuilder)
        {
#pragma warning disable 612, 618
            modelBuilder
                .HasAnnotation("ProductVersion", "5.0.10");

            modelBuilder.Entity("MigrationApp.Entities.Blog", b =>
                {
                    b.Property<int>("Id")
                        .ValueGeneratedOnAdd()
                        .HasColumnType("INTEGER");

                    b.Property<string>("Name")
                        .HasColumnType("TEXT");

                    b.HasKey("Id");

                    b.ToTable("Blog");
                });
#pragma warning restore 612, 618
        }
    }
}
SampleDbContextModelSnapshot.cs は、マイグレーションを最後まで実行した場合のDB定義のスナップショットです。
このスナップショットとデータコンテキストが持つ最新のモデル定義との差分が、マイグレーションファイルである20211003053213_InitialCreate.cs に記載されています。
Upメソッドは変更の差分をDBに反映されるメソッドで、Downメソッドは変更の差分をDBで元に戻したい時に呼ばれるメソッドです。
dotnet ef database updateコマンドで、作成されたマイグレーションをDBに反映させます。
ここではUpメソッドが実行されます。
$ dotnet ef database update
Startup.csと同じディレクトリに、sample.db が作成されました。(先ほどStartup.csで設定したからですね。)
sample.db の中身を見てみましょう
sqlite3 <DBファイル名>でDBに接続します。
$ sqlite3 sample.db
SQLite version 3.32.3 2020-06-18 14:16:19
Enter ".help" for usage hints.
sqlite>
テーブル一覧を確認します。
sqlite> .tables
Blog                   __EFMigrationsHistory
sqlite>
Blog テーブルが作成されていることが確認できました。
Blog テーブルの構造を確認します。
sqlite> .schema Blog
CREATE TABLE IF NOT EXISTS "Blog" (
    "Id" INTEGER NOT NULL CONSTRAINT "PK_Blog" PRIMARY KEY AUTOINCREMENT,
    "Name" TEXT NULL
);
sqlite>
Id と Name がカラムとして存在しています。
作成されたマイグレーションが、しっかりDBに反映されていることが確認できました。
モデル定義の変更
流れを確認しつつ、もう一度マイグレーションを実行してみましょう。
今度は、モデルの定義に変更を加えます。
using System;
namespace MigrationApp.Entities
{
     //  エンティティクラス
    public class Blog
    {
        public int Id { get; set; }
        public string Name { get; set; }
        // 以下のプロパティを追加
        public string Genre { get; set; }
    }
}
すでにデータコンテキストに追加されているモデルの定義を変更しただけなので、コンテキストクラスはいじらなくて大丈夫です。
モデル自体が増えた際には、DbSetのプロパティを追加する必要があります。
using Microsoft.EntityFrameworkCore;
using MigrationApp.Entities;

namespace MigrationApp.DbContexts
{
    // コンテキストクラス
    public class SampleDbContext : DbContext
    {
        public SampleDbContext(DbContextOptions<SampleDbContext> options) : base(options) { }
        public DbSet<Blog> Blog { get; set; }
    }
}
dotnet ef migrations add <マイグレーション名>コマンドでマイグレーションを作成します。
マイグレーションファイルの名前には、そのマイグレーションで変更する内容を記載することが多いです。
今回は、AddGenreForBlogとしておきます。
$ dotnet ef migrations add AddGenreForBlog
マイグレーションファイル 20211009104019_AddGenreForBlog.cs が作成されます。
using Microsoft.EntityFrameworkCore.Migrations;

namespace MigrationApp.Migrations
{
    public partial class AddGenreForBlog : Migration
    {
        // コンテキストの変更を適用するメソッド
        protected override void Up(MigrationBuilder migrationBuilder)
        {
            migrationBuilder.AddColumn<string>(
                name: "Genre",
                table: "Blog",
                type: "TEXT",
                nullable: true);
        }

        // コンテキストの変更を元に戻すメソッド
        protected override void Down(MigrationBuilder migrationBuilder)
        {
            migrationBuilder.DropColumn(
                name: "Genre",
                table: "Blog");
        }
    }
}
一回目のマイグレーションで作成された SampleDbContextModelSnapshot.cs を確認してみます。
// <auto-generated />
using Microsoft.EntityFrameworkCore;
using Microsoft.EntityFrameworkCore.Infrastructure;
using Microsoft.EntityFrameworkCore.Storage.ValueConversion;
using MigrationApp.DbContexts;

namespace MigrationApp.Migrations
{
    [DbContext(typeof(SampleDbContext))]
    partial class SampleDbContextModelSnapshot : ModelSnapshot
    {
        protected override void BuildModel(ModelBuilder modelBuilder)
        {
#pragma warning disable 612, 618
            modelBuilder
                .HasAnnotation("ProductVersion", "5.0.10");

            modelBuilder.Entity("MigrationApp.Entities.Blog", b =>
                {
                    b.Property<int>("Id")
                        .ValueGeneratedOnAdd()
                        .HasColumnType("INTEGER");

                    // 以下のGenreプロパティが追加された
                    b.Property<string>("Genre")
                        .HasColumnType("TEXT");

                    b.Property<string>("Name")
                        .HasColumnType("TEXT");

                    b.HasKey("Id");

                    b.ToTable("Blog");
                });
#pragma warning restore 612, 618
        }
    }
}
SampleDbContextModelSnapshot.cs に Genre プロパティの定義が追加されています。
これは、今回のマイグレーションにより、スナップショットが更新されたためです。
マイグレーションを作成すると、データコンテキストの最新のモデル定義と、スナップショットを比較して差分がマイグレーションファイルに記載されます。
次にマイグレーションを行う際には、この更新されたスナップショットと比較されます。
dotnet ef database updateコマンドで、作成したマイグレーションをDBに適用します。
$ dotnet ef database update
DBの状態を確認してみましょう。
$ sqlite3 sample.db
SQLite version 3.32.3 2020-06-18 14:16:19
Enter ".help" for usage hints.
sqlite> .schema Blog
CREATE TABLE IF NOT EXISTS "Blog" (
    "Id" INTEGER NOT NULL CONSTRAINT "PK_Blog" PRIMARY KEY AUTOINCREMENT,
    "Name" TEXT NULL
, "Genre" TEXT NULL);
sqlite>
しっかり Genre カラムが追加されています。
日々作業をしていると、前のマイグレーションまでDBの状態を戻したいことがあると思います。
そこで、一回目のマイグレーションまでDBを戻す作業を最後に行ってみたいと思います。
今回は二回目のマイグレーションで Genre カラムを追加したので、Genre カラムがDBから消えていればOKです。
dotnet ef migrations listコマンドで、マイグレーションの履歴を確認します。
$ dotnet ef migrations list
Build started...
Build succeeded.
20211003053213_InitialCreate
20211009104019_AddGenreForBlog
以下の二つのマイグレーションが作成されていることが確認できました。
- 20211003053213_InitialCreate
- 20211009104019_AddGenreForBlog
一回目の 20211003053213_InitialCreate の状態までDBを戻してみます。
dotnet ef database update <マイグレーション名>コマンドで、任意のマイグレーションまでDBを戻すことができます。
$ dotnet ef database update 20211003053213_InitialCreate
二回目のマイグレーションファイル中の、down メソッドが実行されます。
20211009104019_AddGenreForBlog.cs の以下の部分です。
// 省略
// コンテキストの変更を元に戻すメソッド
protected override void Down(MigrationBuilder migrationBuilder)
        {
            migrationBuilder.DropColumn(
                name: "Genre",
                table: "Blog");
        }
// 省略
DBの状態を確認してみましょう。
$ sqlite3 sample.db
SQLite version 3.32.3 2020-06-18 14:16:19
Enter ".help" for usage hints.
sqlite> .tables
Blog                   __EFMigrationsHistory
sqlite> .schema Blog
CREATE TABLE IF NOT EXISTS "Blog" (
    "Id" INTEGER NOT NULL CONSTRAINT "PK_Blog" PRIMARY KEY AUTOINCREMENT,
    "Name" TEXT NULL
);
sqlite>
二回目のマイグレーションで追加し、Genre カラムが消えています。
一回目のマイグレーションまでDBの状態を戻すことができました。
ちなみに、最新のマイグレーションまでDBを更新したいときは、dotnet ef database updateコマンドを実行します。
まとめ
この辺りの流れは、慣れるまで何をやっているのかわかりずらいと思います。
しかし、何回も繰り返して流れを覚えればマイグレーションも怖くなくなります。
少しでもこの記事がお役に立てたら幸いです。