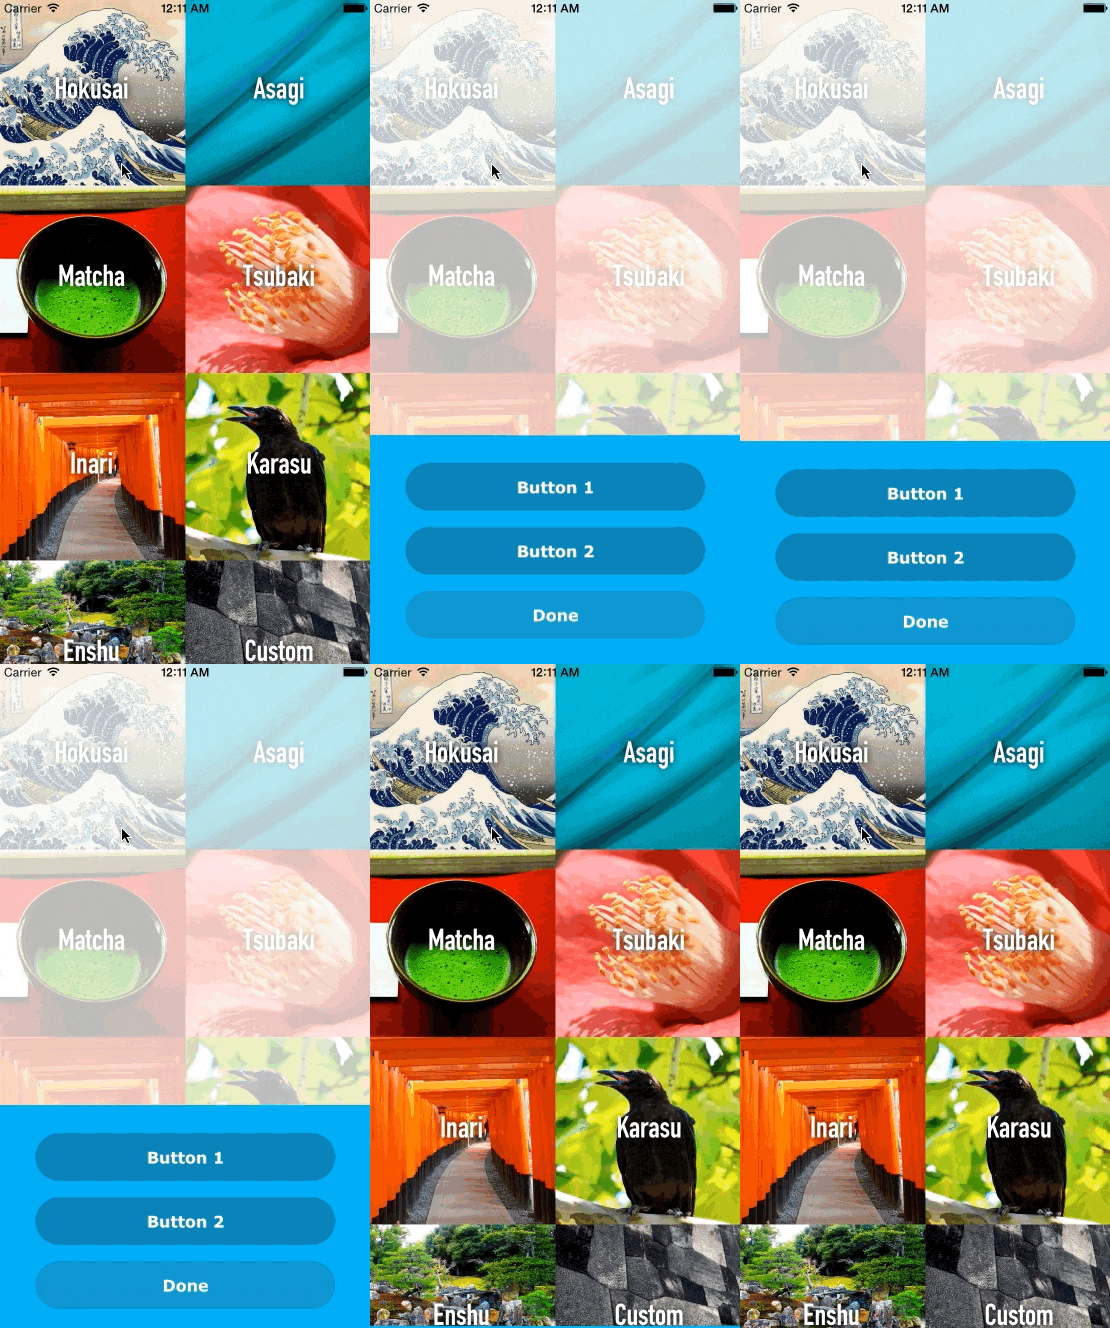
SkypeのiOSアプリで見るバウンドするアニメーションを実装してみた。
その要点をまとめておく。
デモ
https://github.com/ytakzk/Hokusai

実装方法
CADisplayLink
アニメーションにはCADisplayLinkを使用した。
ディスプレイが更新されるタイミングで関数が走るため、
NSTimerよりもアニメーション適している。
UIBezierPath
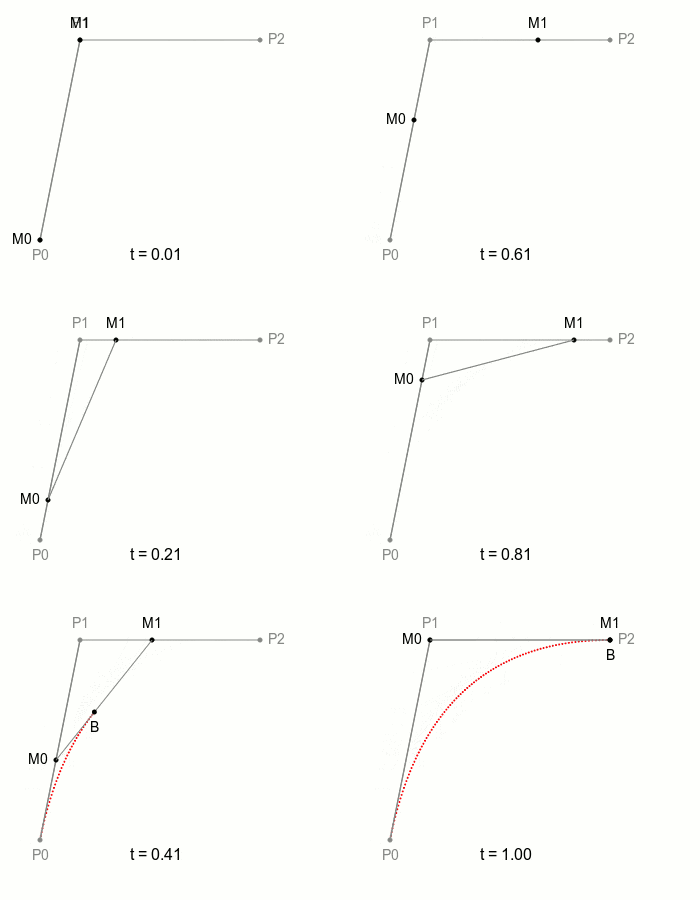
波のようなアニメーションを作るために、 ベジェ曲線を利用する。
具体的にはUIBezierPathで毎フレームごとにCALayerを描画。
// レイヤーの開始点に移動
UIBezierPath().moveToPoint(開始点)

// 現在の点からベジェ曲線を描いて次の点へ移動
UIBezierPath().addQuadCurveToPoint(次の点,
        controlPoint:曲率を作るための制御点)

// 現在の点から開始点までのパスを閉じる
UIBezierPath().closePath()
ベジェ曲線については、これを見ればなんとなくイメージできるはず。

出典:sigbus.info
該当するソースコード
// アニメーション開始時に呼ばれる
func positionAnimationWillStart() {
    // displayLinkでループ開始
    if displayLink == nil {
        displayLink = CADisplayLink(target: self, selector: "tick:")
        displayLink!.addToRunLoop(NSRunLoop.mainRunLoop(), forMode: NSDefaultRunLoopMode)
    }
}

// アニメーションの関数
func updatePath() {
    // 四角形の幅と高さを取得
    let width  = CGRectGetWidth(shapeLayer.bounds)
    let height = CGRectGetHeight(shapeLayer.bounds)

    // パスを描く
    // bendableOffsetが肝で、画面からせり出してくる距離に応じて大きさを変化させ、
    // メニュー上部の波を作る。
    let path = UIBezierPath()
    path.moveToPoint(CGPoint(x: 0, y: 0))
    path.addQuadCurveToPoint(CGPoint(x: width, y: 0),
        controlPoint:CGPoint(x: width * 0.5, y: 0 + bendableOffset.vertical))
    path.addQuadCurveToPoint(CGPoint(x: width, y: height + 100.0),
        controlPoint:CGPoint(x: width + bendableOffset.horizontal, y: height * 0.5))
    path.addQuadCurveToPoint(CGPoint(x: 0, y: height + 100.0),
        controlPoint: CGPoint(x: width * 0.5, y: height + 100.0))
    path.addQuadCurveToPoint(CGPoint(x: 0, y: 0),
        controlPoint: CGPoint(x: bendableOffset.horizontal, y: height * 0.5))
    path.closePath()

    shapeLayer.path = path.CGPath
}

func tick(displayLink: CADisplayLink) {
    if let presentationLayer = layer.presentationLayer() as? CALayer {
        // メニューの位置によってoffsetの大きさを変化させる。
        var verticalOffset = self.layer.frame.origin.y - presentationLayer.frame.origin.y

        bendableOffset = UIOffset(
            horizontal: 0.0,
            vertical: verticalOffset
        )
        // アニメーション用の関数を呼ぶ
        updatePath()

        // offsetが0になったタイミングでループを終了
        if verticalOffset == 0 {
            self.displayLink!.invalidate()
            self.displayLink = nil
        }
    }
}
ライブラリ
せっかくなのでライブラリ化してgithubに公開した。
cocoapods、Carthageどちらにも対応している。
https://github.com/ytakzk/Hokusai
使い方は簡単。
クロージャーでもセレクターにも対応しているので色んな用途に使えるはず。
let hokusai = Hokusai()

// クロージャーでコールバックを定義する
hokusai.addButton("Button 1") {
    println("Rikyu")
}

// セレクターでもコールバックを定義できる
hokusai.addButton("Button 2", target: self, selector: Selector("button2Pressed"))

// メニューを出す
hokusai.show()

func button2Pressed() {
    println("Oribe")
}