では Actions SDK を使ってやってみます。
前回までのおさらい
GoogleHomeで音声を使ったアプリケーションを開発するときの、データの流れは以下の通りです。
[GoogleHome] ---- [Actions on Google] ---- [ <action> ] ---- [backend web-service]
左から3番目の <action> は開発する規模?種類?によって次の4つから選べます。
1) Dialogflow
2) Smart home
3) Actions SDK
4) Converse.AI
今回は 1 と 3 の Dialogflow と ActionSDK の場合をやってみました。
基本的な流れは変わらないので、Webhook は前回使った環境を再利用します。
→ 前回はこちら(https://qiita.com/ysomei/items/b565ec06f90ee8bad5cd)
Actions SDK
とは言いましたが、<action> は一つしか選べないので、新規にプロジェクトを作成します。
Actions on Google のページから Add/import project で新規にプロジェクトを作成。
Add Actions で Actions SDK を選んで BUILD ボタンを押すとこんな画面がでてきます。

そうです、Actions SDK はコマンドラインで設定をしなければならないのです。
というわけで、なんか専用のコマンドがあるっぽいので、ダウンロードします。
まずは 1 Setup のリンク先に行きます。
左のメニューリストの下の方に Tools という項目があるので、開くと gactions CLI という項目が出てきます。
そのページを開くと、各環境に合わせた実行ファイルがダウンロードできるようになっていますので、ダウンロードします。

今回は、さくらのVPS上で Webhook を走らせてるので、 Linux x86_64 をダウンロードしました。
#そのままでは実行権限がないので付けます。
$ wget https://dl.google.com/gactions/updates/bin/linux/amd64/gactions/gactions

# chmod +x gactions
$ gactions --version
Version = 2.1.3
Build = dff629ae63fd0b047d19687b79274524569714e6
Release Channel = stable
action packege の作成
action package という Action の概要・動作的なものを作って登録します。
適当なフォルダ(プロジェクト用フォルダ)を作ってその中で
$ mkdir tara_project
$ cd tara_project
$ gactions init
とすると、サンプルの action.json が作成されるので、これを編集します。
{
  "actions": [
    {
      "description": "Default Welcome Intent",
      "name": "MAIN",
      "fulfillment": {
        "conversationName": "TaraTestAction_Webhook_Conversation"
      },
      "intent": {
        "name": "actions.intent.MAIN",
        "trigger": {
          "queryPatterns": [
            "たらテストと話す"
          ]
        }
      }
    }
  ],
  "conversations": {
    "TaraTestAction_Webhook_Conversation": {
      "name": "TaraTestAction_Webhook_Conversation",
      "url": "https://webhook/tara"
    }
  },
  "locale": "ja"
}
description は アクションのラベルで、fulfillment に webhook 先の情報を指定します。
intent はそのアクションがどういうもので、どんな言葉に反応するかを指定します。
conversations は fulfillment で指定された webhook の飛び先を指定します。
#こういう設定ができるということは、アクションによって飛び先を変えることができる、ということですかね。。。(未検証)
あと、最後の locale を ja にするのを忘れずに。
そしたら、アクションを登録します。
プロジェクト名は Actions on Google の左メニュー上の Overview 横の歯車マークから Project settings で表示される Project ID です。

$ gactions update --action_package action.json --project taratestaction
Gactions needs access to your Google account. Please copy & paste the URL below into a web browser and follow the instructions there. Then copy and paste the authorization code from the browser back here.
Visit this URL:
 https://accounts.google.com/o/oauth2/auth?access_type=offline&client_id=237807841406-o6vu1tjkq8oqjub8jilj6vuc396e2d0c.apps.googleusercontent.com&redirect_uri=urn%3Aietf%3Awg%3Aoauth%3A2.0%3Aoob&response_type=code&scope=https%3A%2F%2Fwww.googleapis.com%2Fauth%2Factions.builder&state=state
Enter authorization code:
すると何か聞いてきます。
どうやら、表示された URL へ飛んでそこに表示されるコードを入力しなければいけないようです。
#うちはここで1日悩みました。。。ちゃんと英語を読めばわかるのにね。。。
というわけで、ブラウザで URL のページを表示して、対応するアカウントを選択して、許可をして、表示されるコードをコピーして、先ほどの Enter authorization code: に貼り付けます。

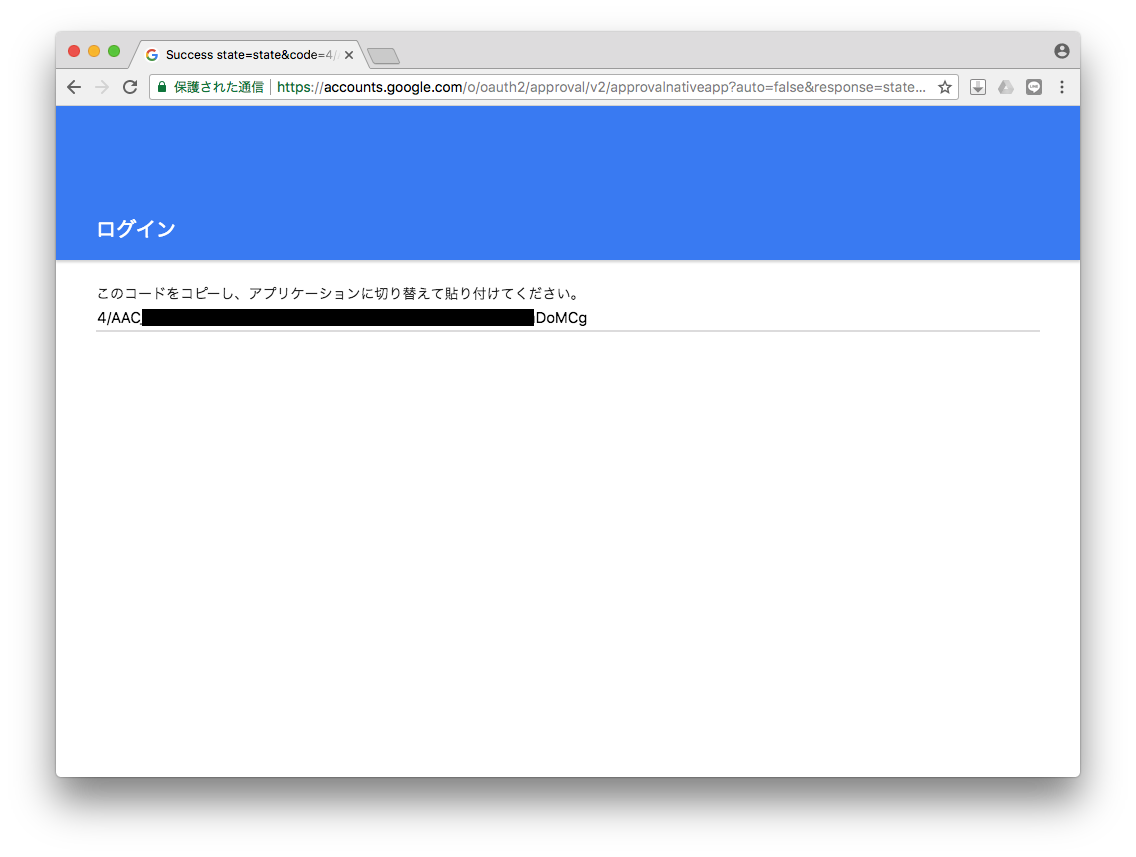
Enter authorization code:
4/AAC………...DoMCg
Your app for the Assistant for project taratestaction was successfully updated with your actions. Visit the Actions on Google console to finish registering your app and submit it for review at https://console.actions.google.com/project/taratestaction/overview
できたみたいですね。
実行したフォルダに creds.data というファイルができてます。これが認証用のデータになっているみたいです。次回以降はすんなり update できるようになります。
Actions on Google のページに戻ると Actions に Actions SDK のアイコンが表示されてプロジェクトのアクションが Actions SDK になったことがわかります。

受け側をつくるよ
sinatra で作ります。
前回の Dialogflow で作ったのとちょっと JSON の項目が違うようです。
# → https://developers.google.com/actions/assistant/responses#tab2
post “/taratestaction” do
  response = {
    :conversationToken => "",
    :expectUserResponse => true,
    :expectedInputs => [
      { :inputPrompt => {
          :richInitialPrompt => {
            :items => [
              { :simpleResponse => {
                :textToSpeech => “こんにちは、世界!”,
                :displayText => “Hello, world!” }
              }
            ]
          }
        },
        :possibleIntents => [
          { :intent => "assistant.intent.action.TEXT" }
        ]
      }
    ]
  }
  content_type :json
  response.to_json
end
とりあえず接続テスト
ではとりあえずテストしてみます。
Actions on Google の 左メニュー Actions から TEST ボタンをクリックします。
するとシミュレーターページに移動するので、コマンド入力してテストします。

返ってきましたね。
このままですとアプリに繋がったままなので、終了処理を追加します。
#とりあえず上の×でテスト用アプリを抜けましょう。
終了処理を追加
本当はきっともっと上手くできるかもしれないけど、とりあえず、力技でやってみました。
「さようなら」と言うと終わるようにします。
post "/taratestaction" do
  body = request.body.read
  params = JSON.parse(body)

  inputs = params["inputs"][0]
  phrase = inputs["rawInputs"][0]["query"]
  case phrase
  when "さようなら"
    response = {
      :conversationToken => "",
      :finalResponse => {
        :richResponse => {
          :items => [
            { :simpleResponse => {
                :textToSpeech => "またね。",
                :displayText => "bye bye." }
            }
          ]
        }
      }
    }
  else
    response = {
      :conversationToken => "",
      :expectUserResponse => true,
      :expectedInputs => [
        { :inputPrompt => {
           :richInitialPrompt => {
              :items => [
                { :simpleResponse => {
                    :textToSpeech => "こんにちは、世界!",
                    :displayText => "Hello, world!" }
                }
              ]
            }
          },
          :possibleIntents => [
            { :intent => "assistant.intent.action.TEXT" }
          ]
        }
      ]
    }
  end
  content_type :json
  response.to_json
end
んでテスト。
「さようなら」と入力すると、無事終了します。

まとめ
ちょっとフレーズによる分岐の処理がいまいちですが、とりあえず Actions SDK でも動くことが確認できました。
Dialogflow と比べると処理のためにいちいちWebを構わなくて済むのは楽ですが、フレーズからキーワードを抜き出す処理とかまだ調査が必要です。もう少し調べてみましょう。。。
とりあえず以上で。