LINEでおすすめの観光地をランダムで3つを送信するアプリケーションをLINE messageing APIとGASを使用して作成した。
そのやり方を共有していく。
完成イメージは以下のようになる。
私は、リッチメニューで「スポット」を押すと、このフレックスメッセージを送信するようにしている。
詳しいフレックスメッセージはLINE公式のドキュメントを見てほしいが私と作成したものと同様のものであればコピペで作成できる。
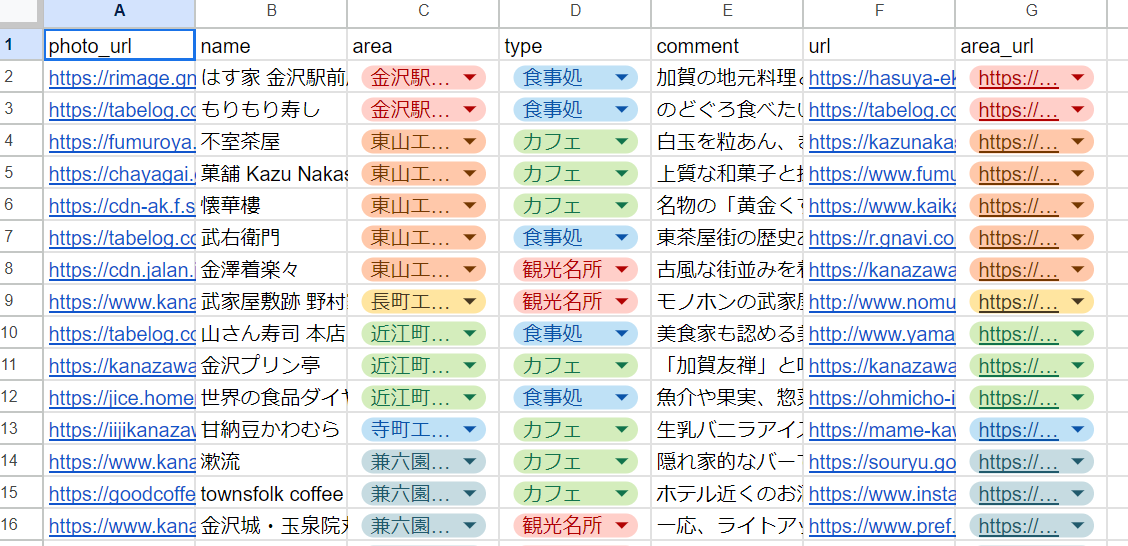
まず、上のようにスプレッドシート内にデータのリストを作成する。
フレックスメッセージに表示したい内容を表にまとめている。
const SPREADSHEET_ID = "スプレッドシートのIDを入力してください。"
const LINE_ACCESS_TOKEN = "LINEのアクセストークンを入力してください"

// スポットを紹介する関数

function sendSpotRecommendation(event, userId) {
  // スプレッドシートとシートを取得
  const spotListSheet = SpreadsheetApp.openById(SPREADSHEET_ID).getSheetByName('spotList');
  const replyToken = event.replyToken;

    // シートの全データを取得
  const spotListData = spotListSheet.getDataRange().getValues();

  // ヘッダー行を削除
  spotListData.shift();

  // データをシャッフルして最初の3つを取得
  const randomSpots = shuffleArray(spotListData).slice(0, 3);


  // Flex Messageを構築
  const flexMessage = {
    type: "flex",
    altText: "おすすめの観光名所はこちら!",
    contents: {
      type: "carousel",
      contents: randomSpots.map(createBubbleContent)
    }
  };

    // LINE Messaging APIを使用してメッセージを送信
  UrlFetchApp.fetch('https://api.line.me/v2/bot/message/push', {
    'method': 'post',
    'headers': {
      'Content-Type': 'application/json',
      'Authorization': 'Bearer ' + LINE_ACCESS_TOKEN,
    },
    'payload': JSON.stringify({
      to: userId,
      messages: [flexMessage]
    })
  });
  //replyToUser(replyToken, message);
}

// 配列をシャッフルするヘルパー関数
function shuffleArray(array) {
  for (let i = array.length - 1; i > 0; i--) {
    const j = Math.floor(Math.random() * (i + 1));
    [array[i], array[j]] = [array[j], array[i]];
  }
  return array;
}

// Flex Messageのバブルコンテンツを作成するヘルパー関数
function createBubbleContent(spot) {
  return {
    type: "bubble",
    hero: {
      type: "image",
      url: spot[0], // 写真URL
      size: "full",
      aspectRatio: "20:13",
      aspectMode: "cover",
      action: {
        type: "uri",
        uri: spot[5] // 詳細URL
      }
    },
    body: {
      type: "box",
      layout: "vertical",
      contents: [
        {
          type: "text",
          text: spot[1], // 観光名所の名前
          weight: "bold",
          size: "xl",
          wrap: true
        },
        {
          type: "box",
          layout: "vertical",
          margin: "lg",
          spacing: "sm",
          contents: [
            {
              type: "box",
              layout: "baseline",
              spacing: "sm",
              contents: [
                {
                  type: "text",
                  text: "エリア",
                  color: "#aaaaaa",
                  size: "sm",
                  flex: 1
                },
                {
                  type: "text",
                  text: spot[2], // エリア
                  wrap: true,
                  color: "#666666",
                  size: "sm",
                  flex: 5
                }
              ]
            },
            {
              type: "box",
              layout: "baseline",
              spacing: "sm",
              contents: [
                {
                  type: "text",
                  text: "種類",
                  color: "#aaaaaa",
                  size: "sm",
                  flex: 1
                },
                {
                  type: "text",
                  text: spot[3], // 施設の分類
                  wrap: true,
                  color: "#666666",
                  size: "sm",
                  flex: 5
                }
              ]
            },
            {
              type: "box",
              layout: "baseline",
              spacing: "sm",
              contents: [
                {
                  type: "text",
                  text: spot[4], // おすすめポイント
                  wrap: true,
                  color: "#666666",
                  size: "sm",
                  flex: 5
                }
              ]
            }
          ]
        }
      ]
    },
    footer: {
      type: "box",
      layout: "vertical",
      spacing: "sm",
      contents: [
        {
          type: "button",
          style: "link",
          height: "sm",
          action: {
            type: "uri",
            label: "詳しく見る",
            uri: spot[5] // 詳細URL
          }
        },
        {
          type: "button",
          style: "link",
          height: "sm",
          action: {
            type: "uri",
            label: spot[2] + "を詳しく見る", // エリアの名前を挿入
            uri: spot[6] // エリア詳細URL
          }
        }
      ],
      flex: 0
    }
  };
}
これをメッセージが送信され、そのメッセージが「スポット」であるときに呼び出されるようにするだけである。
そのやり方はこのブログを参考にしてほしい。
それでは以上!なにか質問があればぜひ。
![IMG_0116[1].PNG](https://qiita-user-contents.imgix.net/https%3A%2F%2Fqiita-image-store.s3.ap-northeast-1.amazonaws.com%2F0%2F2971002%2Fb78e0cbb-75ce-1f7c-aeef-7a1f4e508bbf.png?ixlib=rb-4.0.0&auto=format&gif-q=60&q=75&s=a79c55012c535f699a23868474ce0db4)
