0
0

Delete article

Deleted articles cannot be recovered.

Draft of this article would be also deleted.

Are you sure you want to delete this article?

More than 1 year has passed since last update.

【Figma】Arcを使ってプラグインなしで簡単に円形インジケーターのデザインを作成する方法

Posted at

はじめに

Figmaの標準機能であるArc(円弧)を使ってプラグインなしで円形のインジケーターのデザインを作成する方法についてご紹介します。
Figmaを使って以下のような円形インジケーターのデザインをプラグインなしで作成してみましょう。

手順

1. 円形オブジェクトを配置

まず、ツールバー → Shape tools → Ellipseを選択して円形のオブジェクトを配置してください。
スクリーンショット 2024-04-15 0.12.22.png

2. 円形オブジェクトをクリック&ホバー

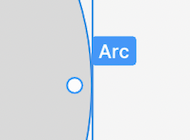
次に、配置した円形オブジェクトをクリックし、ホバーします。
すると、"Arc"という文字と共に小さな白丸が表示されます。
スクリーンショット 2024-04-15 0.17.22.png

↓こんな感じ
スクリーンショット 2024-04-15 0.19.10.png

3. Arcの白丸を円の中心に向かってドラッグ&ドロップ

Arcの白丸が表示されたら、その白丸を円形オブジェクトの中心に向かって白丸をドラッグ&ドロップします。
上手くいくと、円形オブジェクトがカットされたピザのような形になり、右サイドバーにArcのプロパティが追加されます。
名称未設定.gif

↓右サイドバーに新しく追加されたArcのプロパティ
スクリーンショット 2024-04-15 0.29.48.png

4. Arcのプロパティを調整

右サイドバーのプロパティを変更して円形オブジェクトの形を調整し、円弧インジケーターの形を変更します。
今回は、右サイドバーからSweepを64%、Ratioを80%に設定します。
すると、円形オブジェクトを以下のようなインジケーターの形に整形することができました。
スクリーンショット 2024-04-15 0.42.12.png

5. 色の変更

ここまでできれば、Arcの使い方自体はバッチリです。
最後にお好みでインジケーターの色を調整します。
色をグラデーションで設定したい場合は、右サイドバー → Fill → Custom → Gradientから設定できます。
スクリーンショット 2024-04-15 0.48.00.png

さいごに

FigmaのArc機能を使うことにより、簡単に円形インジケーターを作成することができました。
Arcの使い方を覚えれば、円形インジケーター以外の様々な場面でも活躍してくれるはずです。

参考

0
0
0

Register as a new user and use Qiita more conveniently

  1. You get articles that match your needs
  2. You can efficiently read back useful information
  3. You can use dark theme
What you can do with signing up
0
0

Delete article

Deleted articles cannot be recovered.

Draft of this article would be also deleted.

Are you sure you want to delete this article?