目次
1.Qiitaのタグ登録機能
2.対象読者
3. 完成品とコード
4. 仕組み ![]() ここだけ理解できればいいと思います。
ここだけ理解できればいいと思います。
5. コード解説 ![]() わかりにくい
わかりにくい
1. Qiitaのタグ登録機能
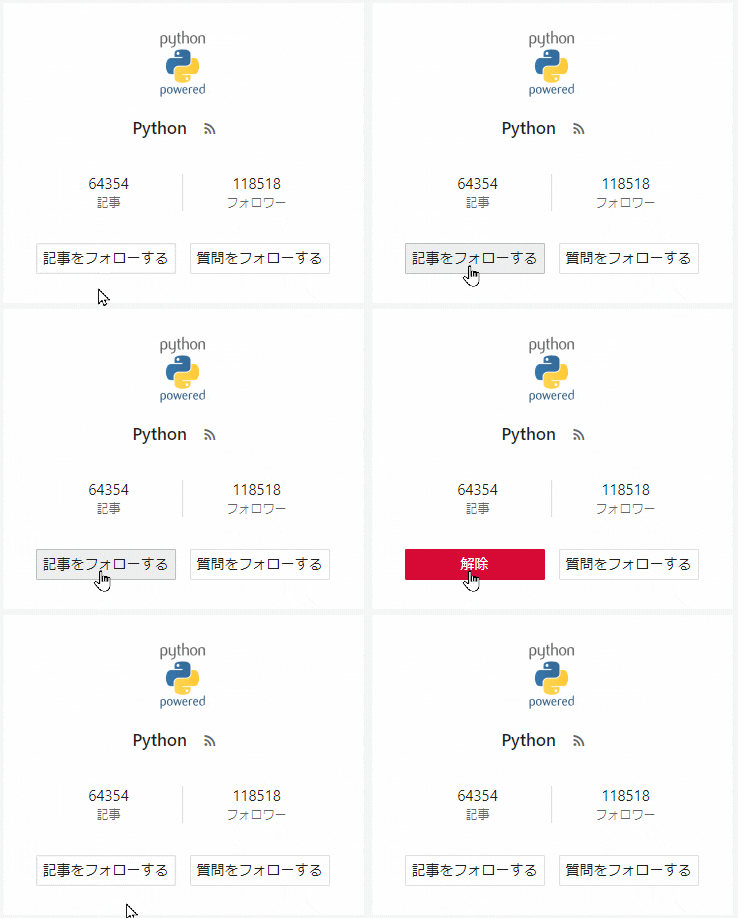
↓これです。画面遷移無しでタグの登録をする機能です。

HTML,CSS,PHPしか書けなかった私が憧れていた「画面遷移無しでのデータベースの操作」です。
実装方法を解説していきます。
※ ぶっちゃけ4. 仕組み のところだけ理解して、fetchAPIの使い方を学べば実装できると思います。
Fetch の使用 - Web API | MDN
2. 対象読者
①LaravelのMVCがチョットワカルひと。
②HTTPのGETとPOSTがチョットワカルひと。
③JavaScriptのFetchAPIがチョットワカルひと。
※JQueryや他のライブラリは使わず生のJavaScriptで実装します。
3. 完成品とコード

↑クリックと同時にお気に入り状態をデータベースに反映しています。
showTag.blade.php
@if(empty(Auth::user()->favoriteTags()->where('tag',$searched_tag->tag)->first()))
    <button id="register-fav-tag-btn" class="register-fav-tag-btn" type="submit" >
        <div id="tag-heart" class="heart"></div>
        <p>お気に入りのタグにする</p>
    </button>
@else
    <button id="register-fav-tag-btn" class="register-fav-tag-btn active" type="submit" >
        <div id="tag-heart" class="heart active"></div>
        <p>お気に入り登録済み</p>
    </button>
@endif

<script>
    const tag_btn = document.getElementById('register-fav-tag-btn');
    const formData = new FormData();
    formData.append('tag',"{{ $searched_tag->tag }}")
    tag_btn.addEventListener('click',()=>{
        // console.log(formData.get('tag'));

        tag_btn.classList.toggle('active');
        const btn_child = tag_btn.lastElementChild
        if(btn_child.innerText === 'お気に入りのタグにする'){
            const new_child = document.createElement('p');
            new_child.innerText = 'お気に入り登録済み';
            tag_btn.replaceChild(new_child,btn_child);
        }else if(btn_child.innerText === 'お気に入り登録済み'){
            const new_child = document.createElement('p');
            new_child.innerText = 'お気に入りのタグにする';
            tag_btn.replaceChild(new_child,btn_child);
        };
        const tag_heart = document.getElementById('tag-heart');
        tag_heart.classList.toggle('active');

        fetch("{{ route('user.registerFavoriteTags') }}",{
            method: 'POST',
            body: formData,
            headers: {'X-CSRF-TOKEN': '{{ csrf_token() }}'}, //Laravelの場合これが必要
        })
        .then((Response)=>{
            if(Response.status == 200){
                console.log('成功しました');
            }else{
                console.log('失敗しました');
                tag_btn.classList.toggle('active');
                const btn_child = tag_btn.lastElementChild
                if(btn_child.innerText === 'お気に入りのタグにする'){
                    const new_child = document.createElement('p');
                    new_child.innerText = 'お気に入り登録済み';
                    tag_btn.replaceChild(new_child,btn_child);
                }else if(btn_child.innerText === 'お気に入り登録済み'){
                    const new_child = document.createElement('p');
                    new_child.innerText = 'お気に入りのタグにする';
                    tag_btn.replaceChild(new_child,btn_child);
                };
                const tag_heart = document.getElementById('tag-heart');
                tag_heart.classList.toggle('active');
            };
        })
    })
</script>
長い。(小並感)
4. 仕組み
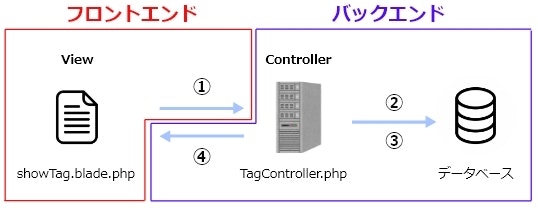
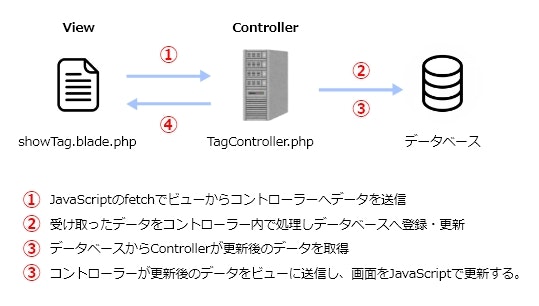
どのような仕組みで画面遷移無しでデータベースを更新しているのかを図に表します。
流れをフロントとバックで分けるとこんな感じ
細かい流れ
本稿では主に①の部分を解説します。
①の流れ
1,ボタンの表示
2,HTTPヘッダーに変更したいデータを挿入する処理
3-1、ボタンにクリックイベントを付ける
3-2、クラスの付け替えでボタンのCSSを変更する
3-3、fetchでTagControllerにデータを送信
5. コード解説
上記のコードにコメントアウトで解説を付けたものがコチラ。
showTag.blade.php (View)
// 1,ボタンの表示--------------------------------------------------------------------------------------
@if(empty(Auth::user()->favoriteTags()->where('tag',$searched_tag->tag)->first()))
    // もし既にタグをお気に入りに登録していないなら↓
    <button id="register-fav-tag-btn" class="register-fav-tag-btn" type="submit" >
        <div id="tag-heart" class="heart"></div>
        <p>お気に入りのタグにする</p>
    </button>
@else
  // タグをお気に入りに登録しているなら↓
    <button id="register-fav-tag-btn" class="register-fav-tag-btn active" type="submit" >
        <div id="tag-heart" class="heart active"></div>
        <p>お気に入り登録済み</p>
    </button>
@endif
// ボタンの表示完成-------------------------------------------------------------------------------------


// 2,HTTPヘッダーに変更したいデータを挿入する処理--------------------------------------------------------------
<script>
    // ボタンの要素を取得
    const tag_btn = document.getElementById('register-fav-tag-btn');
    // ボタンの要素をHTTPヘッダーへ乗せる準備としてFormDataオブジェクトを新規作成
    const formData = new FormData();
    // FormDataオブジェクトのappendメソッドでHTTPヘッダーに【tag => 'タグの主キー'】をセット
    formData.append('tag',"{{ $searched_tag->tag }}") // $searched_tag->tagにはタグの主キー(タグ名)が入っている。

// HTTPヘッダーにデータの挿入準備完了------------------------------------------------------------------------

    // 3-1、ボタンにクリックイベントを付ける
    tag_btn.addEventListener('click',()=>{

        // 3-2、クラスの付け替えでボタンのCSSを変更する処理------------------------------------------------------------
        tag_btn.classList.toggle('active');
        const btn_child = tag_btn.lastElementChild
        if(btn_child.innerText === 'お気に入りのタグにする'){
            const new_child = document.createElement('p');
            new_child.innerText = 'お気に入り登録済み';
            tag_btn.replaceChild(new_child,btn_child);
        }else if(btn_child.innerText === 'お気に入り登録済み'){
            const new_child = document.createElement('p');
            new_child.innerText = 'お気に入りのタグにする';
            tag_btn.replaceChild(new_child,btn_child);
        };
        const tag_heart = document.getElementById('tag-heart');
        tag_heart.classList.toggle('active');
        // ボタンのCSSを変更する処理の記述完了------------------------------------------------------------

        // 3-3、fetchでTagControllerのお気に入り登録をするメソッドにデータを送信-----------------------------
        fetch("{{ route('user.registerFavoriteTags') }}",{
            method: 'POST', // メソッドはPOST
            body: formData, // bodyには2で書いたデータが挿入される。コントローラー側ではrequest->tagで受け取る。
            headers: {'X-CSRF-TOKEN': '{{ csrf_token() }}'}, // Laravelの場合これが必要
        })
        // 送信完了
        // ↓
        // 送信先のコントローラーのメソッドで処理された結果が返ってくる。
        // ↓
        // Responseから結果を受け取る(ここからは上の図の丸4部分の処理です)
        // 登録・更新が成功すればHTTPステータスコード200が返ってくる
        .then((Response)=>{
            // HTTPステータスコードが200ならば↓
            if(Response.status == 200){
                console.log('成功しました');
            }else{
            // HTTPステータスコードが200以外ならば↓
                console.log('失敗しました');
                // 一度クリック後に変更したCSSをクリック前のCSSに戻す。
                tag_btn.classList.toggle('active');
                const btn_child = tag_btn.lastElementChild
                if(btn_child.innerText === 'お気に入りのタグにする'){
                    const new_child = document.createElement('p');
                    new_child.innerText = 'お気に入り登録済み';
                    tag_btn.replaceChild(new_child,btn_child);
                }else if(btn_child.innerText === 'お気に入り登録済み'){
                    const new_child = document.createElement('p');
                    new_child.innerText = 'お気に入りのタグにする';
                    tag_btn.replaceChild(new_child,btn_child);
                };
                const tag_heart = document.getElementById('tag-heart');
                tag_heart.classList.toggle('active');
            };
        })
    })
</script>
最後に
ぶっちゃけ解説が分かりにくいです。だってControllerの処理内容とか書いていないし、そもそもワタクシのコードが読みにくいと思います。
とりあえずワタクシのコードは参考にせず、4. 仕組み のところだけ理解して実装してみたらいいと思います。

