概要
今回、Terraformによく使われたコマンドをご紹介させていただきます。
コマンドリスト
- terraform init
- terraform fmt
- terraform plan
- terraform apply
- terraform state list
- terraform state show
- terraform output
- terraform refresh
- terraform destroy
参照DOC
前提条件
- リソースを作成するためのAWSの権限設定をもつiamユーザーのアクセスキー(access_key,secret_key)
説明
terraform init
ワークスペースを初期化するコマンド。
Terraform を実行するためには、1番初めに terraform init でワークスペースを初期化することが必須となっています。terraform init を実行すると、.tf ファイルで利用している plugin(先述の例でいうと aws provider など)のダウンロード処理などが走ります。
test.tfというファイルを作成します。以下のコードをtest.tfに入力します。
terraform {
  required_providers {
    aws = {
      source  = "hashicorp/aws"
      version = "~> 3.0"
    }
  }
}

# Configure the AWS Provider
provider "aws" {
  region = "ap-northeast-1"
}
terraform initコマンドを実行します。
 % terraform init

Initializing the backend...

Initializing provider plugins...
- Finding hashicorp/aws versions matching "~> 3.0"...
- Installing hashicorp/aws v3.75.2...
- Installed hashicorp/aws v3.75.2 (signed by HashiCorp)

Terraform has created a lock file .terraform.lock.hcl to record the provider
selections it made above. Include this file in your version control repository
so that Terraform can guarantee to make the same selections by default when
you run "terraform init" in the future.

Terraform has been successfully initialized!

You may now begin working with Terraform. Try running "terraform plan" to see
any changes that are required for your infrastructure. All Terraform commands
should now work.

If you ever set or change modules or backend configuration for Terraform,
rerun this command to reinitialize your working directory. If you forget, other
commands will detect it and remind you to do so if necessary.
pluginファイルは.terraform直下にダウンロードされます。
ls -al
total 16
drwxr-xr-x  5 youyonghua  staff   160  7 11 10:15 .
drwxr-xr-x  4 youyonghua  staff   128  7 11 10:05 ..
drwxr-xr-x  3 youyonghua  staff    96  7 11 10:15 .terraform
-rw-r--r--  1 youyonghua  staff  1181  7 11 10:15 .terraform.lock.hcl
-rw-r--r--  1 youyonghua  staff   192  7 11 10:14 test.tf
youyonghua@youyonghuadeMacBook-Pro project-2 % ls -lR .terraform
total 0
drwxr-xr-x  3 youyonghua  staff  96  7 11 10:15 providers

.terraform/providers:
total 0
drwxr-xr-x  3 youyonghua  staff  96  7 11 10:15 registry.terraform.io

.terraform/providers/registry.terraform.io:
total 0
drwxr-xr-x  3 youyonghua  staff  96  7 11 10:15 hashicorp

.terraform/providers/registry.terraform.io/hashicorp:
total 0
drwxr-xr-x  3 youyonghua  staff  96  7 11 10:15 aws

.terraform/providers/registry.terraform.io/hashicorp/aws:
total 0
drwxr-xr-x  3 youyonghua  staff  96  7 11 10:15 3.75.2

.terraform/providers/registry.terraform.io/hashicorp/aws/3.75.2:
total 0
drwxr-xr-x  3 youyonghua  staff  96  7 11 10:15 darwin_arm64

.terraform/providers/registry.terraform.io/hashicorp/aws/3.75.2/darwin_arm64:
total 576360
-rwxr-xr-x  1 youyonghua  staff  295094370  7 11 10:15 terraform-provider-aws_v3.75.2_x5
terraform plan
Terraform による実行計画を参照するコマンド。
以下のコードをtest.tfに入力します。
terraform {
  required_providers {
    aws = {
      source  = "hashicorp/aws"
      version = "~> 3.0"
    }
  }
}

# Configure the AWS Provider
provider "aws" {
  region = "ap-northeast-1"
  access_key = "xxxxx"
  secret_key = "xxxxxx"
}

resource "aws_vpc" "test" {
  cidr_block       = "10.0.0.0/16"

  tags = {
    Name = "test"
  }
}
terraform plan コマンドを実行
% terraform plan

Terraform used the selected providers to generate the following execution plan. Resource actions are indicated with the
following symbols:
  + create

Terraform will perform the following actions:

  # aws_vpc.test will be created
  + resource "aws_vpc" "test" {
      + arn                                  = (known after apply)
      + cidr_block                           = "10.0.0.0/16"
      + default_network_acl_id               = (known after apply)
      + default_route_table_id               = (known after apply)
      + default_security_group_id            = (known after apply)
      + dhcp_options_id                      = (known after apply)
      + enable_classiclink                   = (known after apply)
      + enable_classiclink_dns_support       = (known after apply)
      + enable_dns_hostnames                 = (known after apply)
      + enable_dns_support                   = true
      + id                                   = (known after apply)
      + instance_tenancy                     = "default"
      + ipv6_association_id                  = (known after apply)
      + ipv6_cidr_block                      = (known after apply)
      + ipv6_cidr_block_network_border_group = (known after apply)
      + main_route_table_id                  = (known after apply)
      + owner_id                             = (known after apply)
      + tags                                 = {
          + "Name" = "test"
        }
      + tags_all                             = {
          + "Name" = "test"
        }
    }

Plan: 1 to add, 0 to change, 0 to destroy.

─────────────────────────────────────────────────────────────────────────────────────────────────────────────────────────

Note: You didn't use the -out option to save this plan, so Terraform can't guarantee to take exactly these actions if you
run "terraform apply" now.
今回のケースだとVPCの作成となるので “+create” と出力されました。
terraform apply
.tf ファイルに記載された情報を元にリソースを作成するコマンド。
terraform apply

Terraform used the selected providers to generate the following execution plan. Resource actions are indicated with the
following symbols:
  + create

Terraform will perform the following actions:

  # aws_vpc.test will be created
  + resource "aws_vpc" "test" {
      + arn                                  = (known after apply)
      + cidr_block                           = "10.0.0.0/16"
      + default_network_acl_id               = (known after apply)
      + default_route_table_id               = (known after apply)
      + default_security_group_id            = (known after apply)
      + dhcp_options_id                      = (known after apply)
      + enable_classiclink                   = (known after apply)
      + enable_classiclink_dns_support       = (known after apply)
      + enable_dns_hostnames                 = (known after apply)
      + enable_dns_support                   = true
      + id                                   = (known after apply)
      + instance_tenancy                     = "default"
      + ipv6_association_id                  = (known after apply)
      + ipv6_cidr_block                      = (known after apply)
      + ipv6_cidr_block_network_border_group = (known after apply)
      + main_route_table_id                  = (known after apply)
      + owner_id                             = (known after apply)
      + tags                                 = {
          + "Name" = "test"
        }
      + tags_all                             = {
          + "Name" = "test"
        }
    }

Plan: 1 to add, 0 to change, 0 to destroy.

Do you want to perform these actions?
  Terraform will perform the actions described above.
  Only 'yes' will be accepted to approve.

  Enter a value: yes

aws_vpc.test: Creating...
aws_vpc.test: Creation complete after 2s [id=vpc-00b4d82db2030a8e2]

Apply complete! Resources: 1 added, 0 changed, 0 destroyed.
VPCを確認
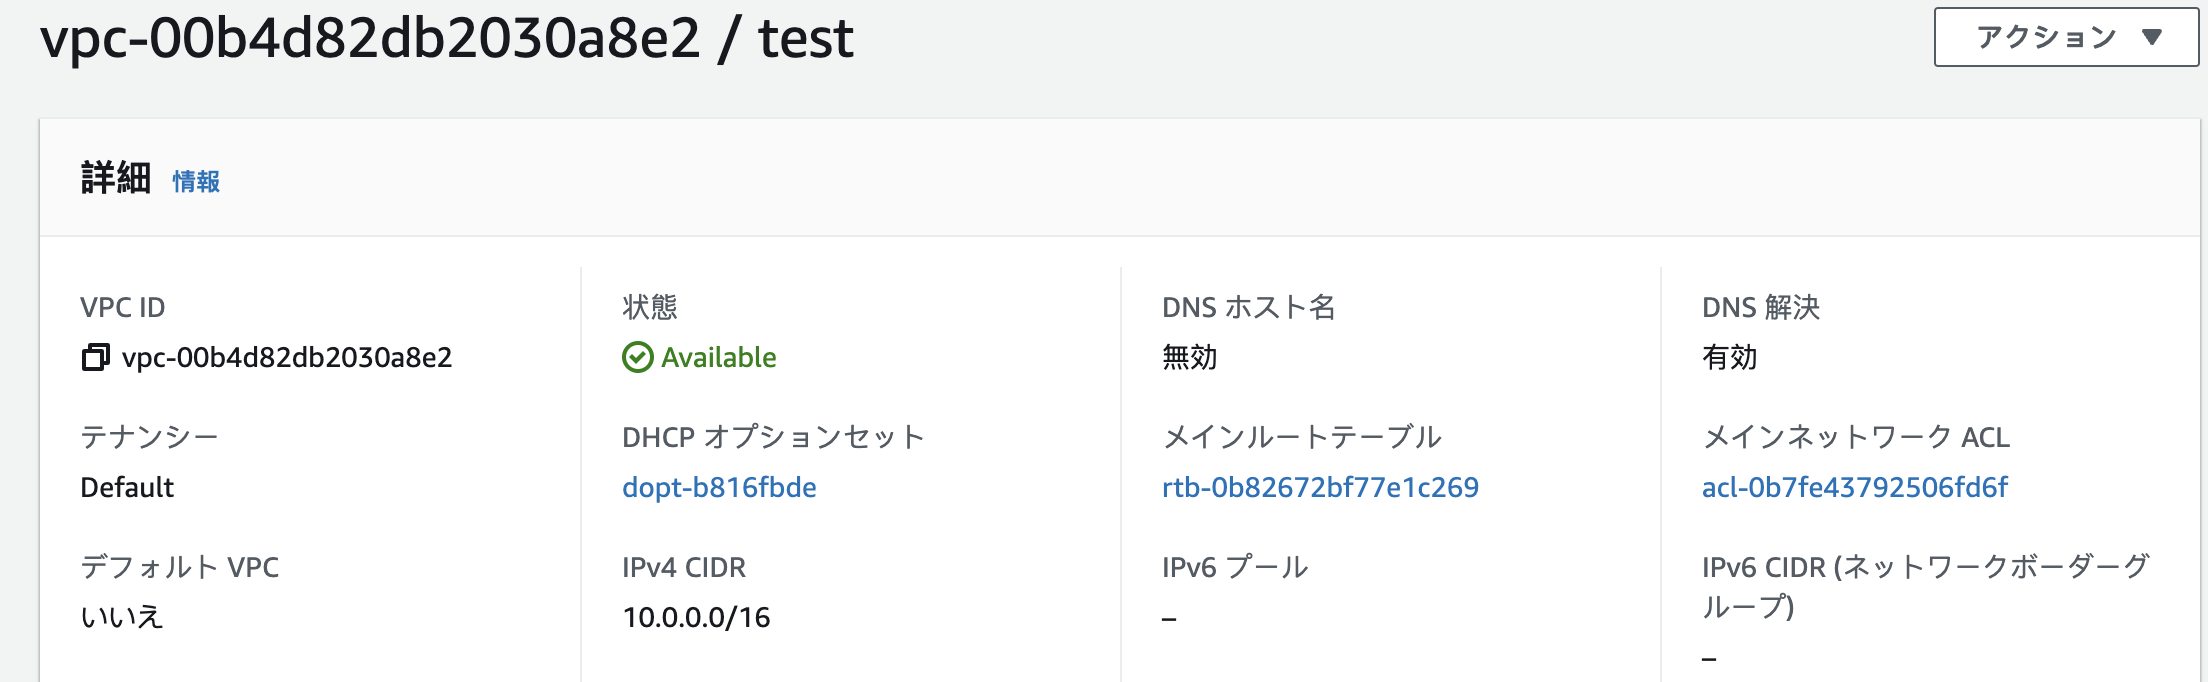
リソースが作成されると terraform.tfstate というファイルに、作成されたリソースに関連する情報が保存されます。また、2度目以降の実行後には、1世代前のものが terraform.tfstate.backup に保存される形となります。Terraform において、この状態を管理する terraform.state ファイルが非常に重要になってくるようです。
毎回terraform applyを実行すると、コンソールに[yes]を入力することが必要です。
--auto-approveで[yes]の入力が要らなくなります。
terraform apply --auto-approve
terraform state list
既に作成したリソース一覧を確認できます。
% terraform state list
aws_vpc.test
terraform state show リソース
作成したリソースの詳細を確認できます。
terraform state show aws_vpc.test
# aws_vpc.test:
resource "aws_vpc" "test" {
    arn                              = "arn:aws:ec2:ap-northeast-1:694047010837:vpc/vpc-00b4d82db2030a8e2"
    assign_generated_ipv6_cidr_block = false
    cidr_block                       = "10.0.0.0/16"
    default_network_acl_id           = "acl-0b7fe43792506fd6f"
    default_route_table_id           = "rtb-0b82672bf77e1c269"
    default_security_group_id        = "sg-007ac38cba387147b"
    dhcp_options_id                  = "dopt-b816fbde"
    enable_classiclink               = false
    enable_classiclink_dns_support   = false
    enable_dns_hostnames             = false
    enable_dns_support               = true
    id                               = "vpc-00b4d82db2030a8e2"
    instance_tenancy                 = "default"
    ipv6_netmask_length              = 0
    main_route_table_id              = "rtb-0b82672bf77e1c269"
    owner_id                         = "694047010837"
    tags                             = {
        "Name" = "test"
    }
    tags_all                         = {
        "Name" = "test"
    }
}
terraform refresh
このコマンドを実行したら、リモートprovidersのリソース情報を参照しながら、terraform.tfstateファイルを更新します。
terraform output
日常の仕事で、terrafromでリソースを作成しました。リソースの一部情報を知りたい時、一般的にawsのコンソール画面でリソースの情報を確認する形となりますが、実はterraformでリソースを作成後、知りたい情報を出力することができます。
例えば、VPCを作成したら、VPCのarnを知りたいであれば、以下のコードをtest.tfファイルに追加します。terraform refreshを実行して、
terraform output を実行します。
output "vpc_arn" {
  value = aws_vpc.test.arn
}
terraform output
vpc_arn = "arn:aws:ec2:ap-northeast-1:694047010837:vpc/vpc-00b4d82db2030a8e2"
terraform destroy
.tf ファイルに記載された情報を元にリソースを削除するコマンド。
% terraform destroy
aws_vpc.test: Refreshing state... [id=vpc-00b4d82db2030a8e2]

Terraform used the selected providers to generate the following execution plan. Resource actions are indicated with the
following symbols:
  - destroy

Terraform will perform the following actions:

  # aws_vpc.test will be destroyed
  - resource "aws_vpc" "test" {
      - arn                              = "arn:aws:ec2:ap-northeast-1:694047010837:vpc/vpc-00b4d82db2030a8e2" -> null
      - assign_generated_ipv6_cidr_block = false -> null
      - cidr_block                       = "10.0.0.0/16" -> null
      - default_network_acl_id           = "acl-0b7fe43792506fd6f" -> null
      - default_route_table_id           = "rtb-0b82672bf77e1c269" -> null
      - default_security_group_id        = "sg-007ac38cba387147b" -> null
      - dhcp_options_id                  = "dopt-b816fbde" -> null
      - enable_classiclink               = false -> null
      - enable_classiclink_dns_support   = false -> null
      - enable_dns_hostnames             = false -> null
      - enable_dns_support               = true -> null
      - id                               = "vpc-00b4d82db2030a8e2" -> null
      - instance_tenancy                 = "default" -> null
      - ipv6_netmask_length              = 0 -> null
      - main_route_table_id              = "rtb-0b82672bf77e1c269" -> null
      - owner_id                         = "694047010837" -> null
      - tags                             = {
          - "Name" = "test"
        } -> null
      - tags_all                         = {
          - "Name" = "test"
        } -> null
    }

Plan: 0 to add, 0 to change, 1 to destroy.

Changes to Outputs:
  - vpc_arn = "arn:aws:ec2:ap-northeast-1:694047010837:vpc/vpc-00b4d82db2030a8e2" -> null

Do you really want to destroy all resources?
  Terraform will destroy all your managed infrastructure, as shown above.
  There is no undo. Only 'yes' will be accepted to confirm.

  Enter a value: yes

aws_vpc.test: Destroying... [id=vpc-00b4d82db2030a8e2]
aws_vpc.test: Destruction complete after 1s

Destroy complete! Resources: 1 destroyed
先ほど作成したVPCが削除されます。
terraform destroy --auto-approve
コンソールに[yes]を入力することが要らなくなります
terraform destroy -target リソース名
一つ単位でリソース削除もできます。