はじめに
ノイズ関連のライブラリを調べていて見かけた、以下の uber-noise に関する記事です。
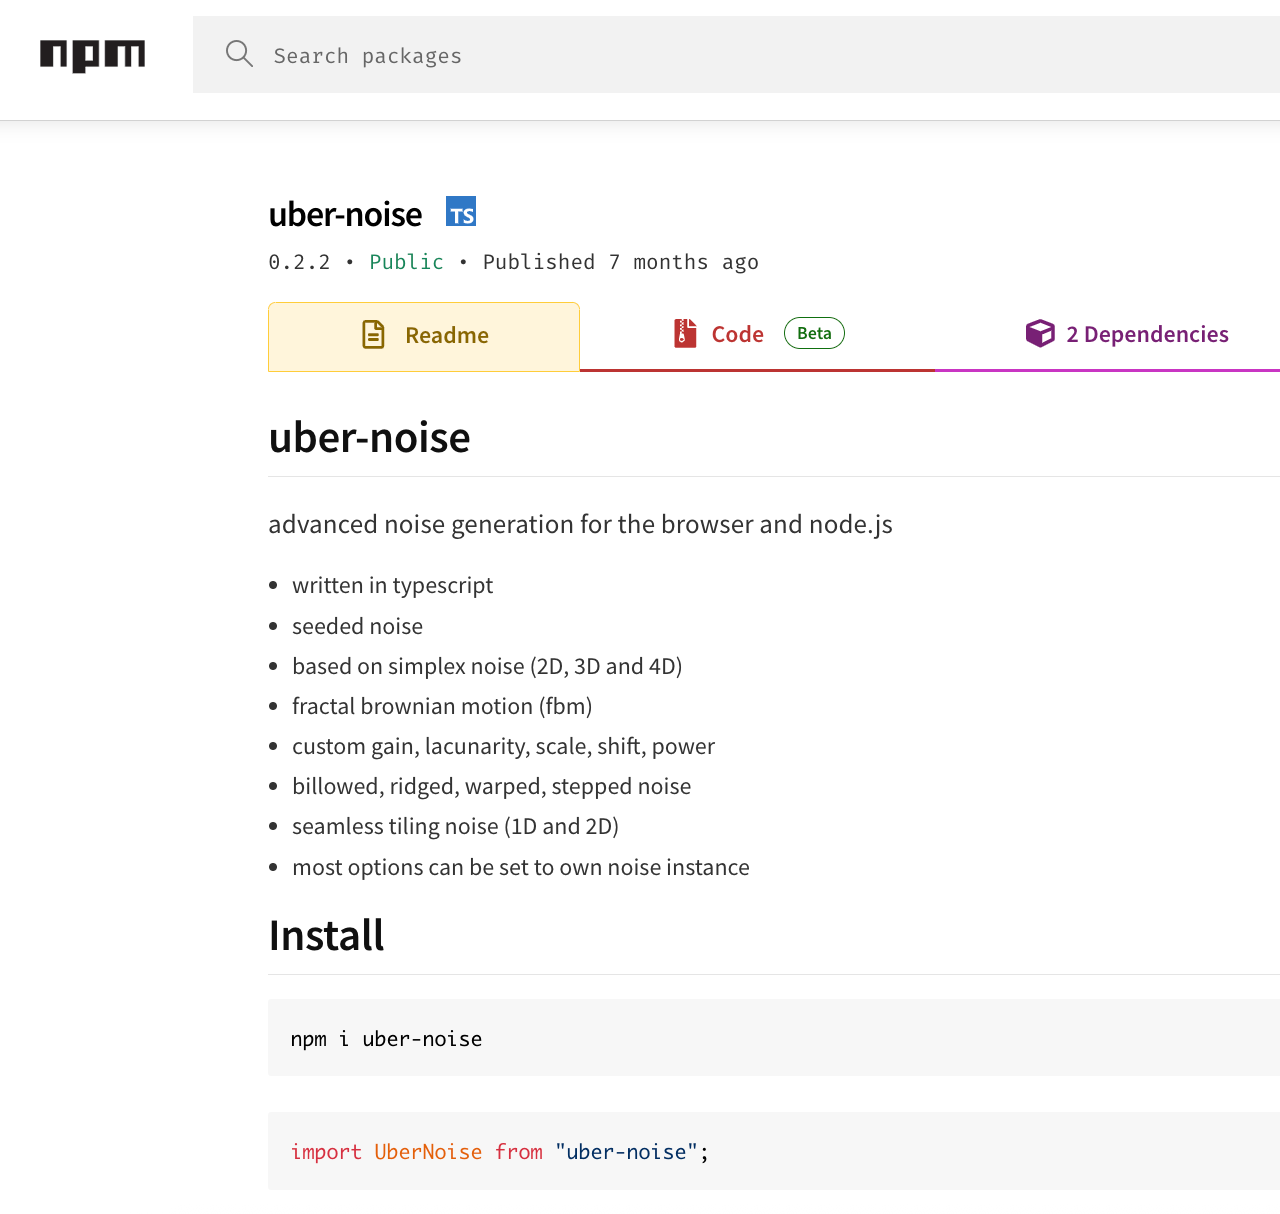
●uber-noise - npm
https://www.npmjs.com/package/uber-noise
興味を持ったきっかけ
uber-noise に興味を持ったきっかけは、冒頭に書かれている以下の部分を見たときに、様々な機能が使えそうだったためです。
- advanced noise generation for the browser and node.js
- 。。。
- based on simplex noise (2D, 3D and 4D)
- fractal brownian motion (fbm)
- custom gain, lacunarity, scale, shift, power
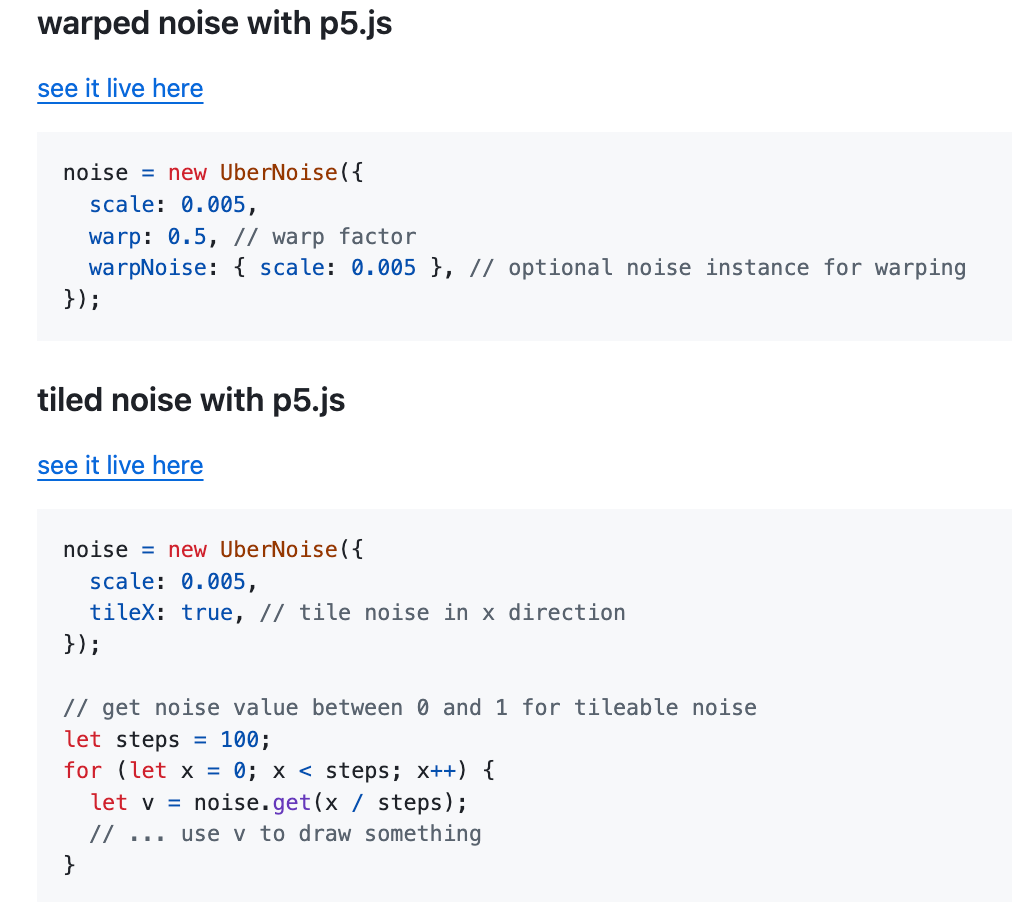
- billowed, ridged, warped, stepped noise
- seamless tiling noise (1D and 2D)
- most options can be set to own noise instance
ブラウザで使う場合
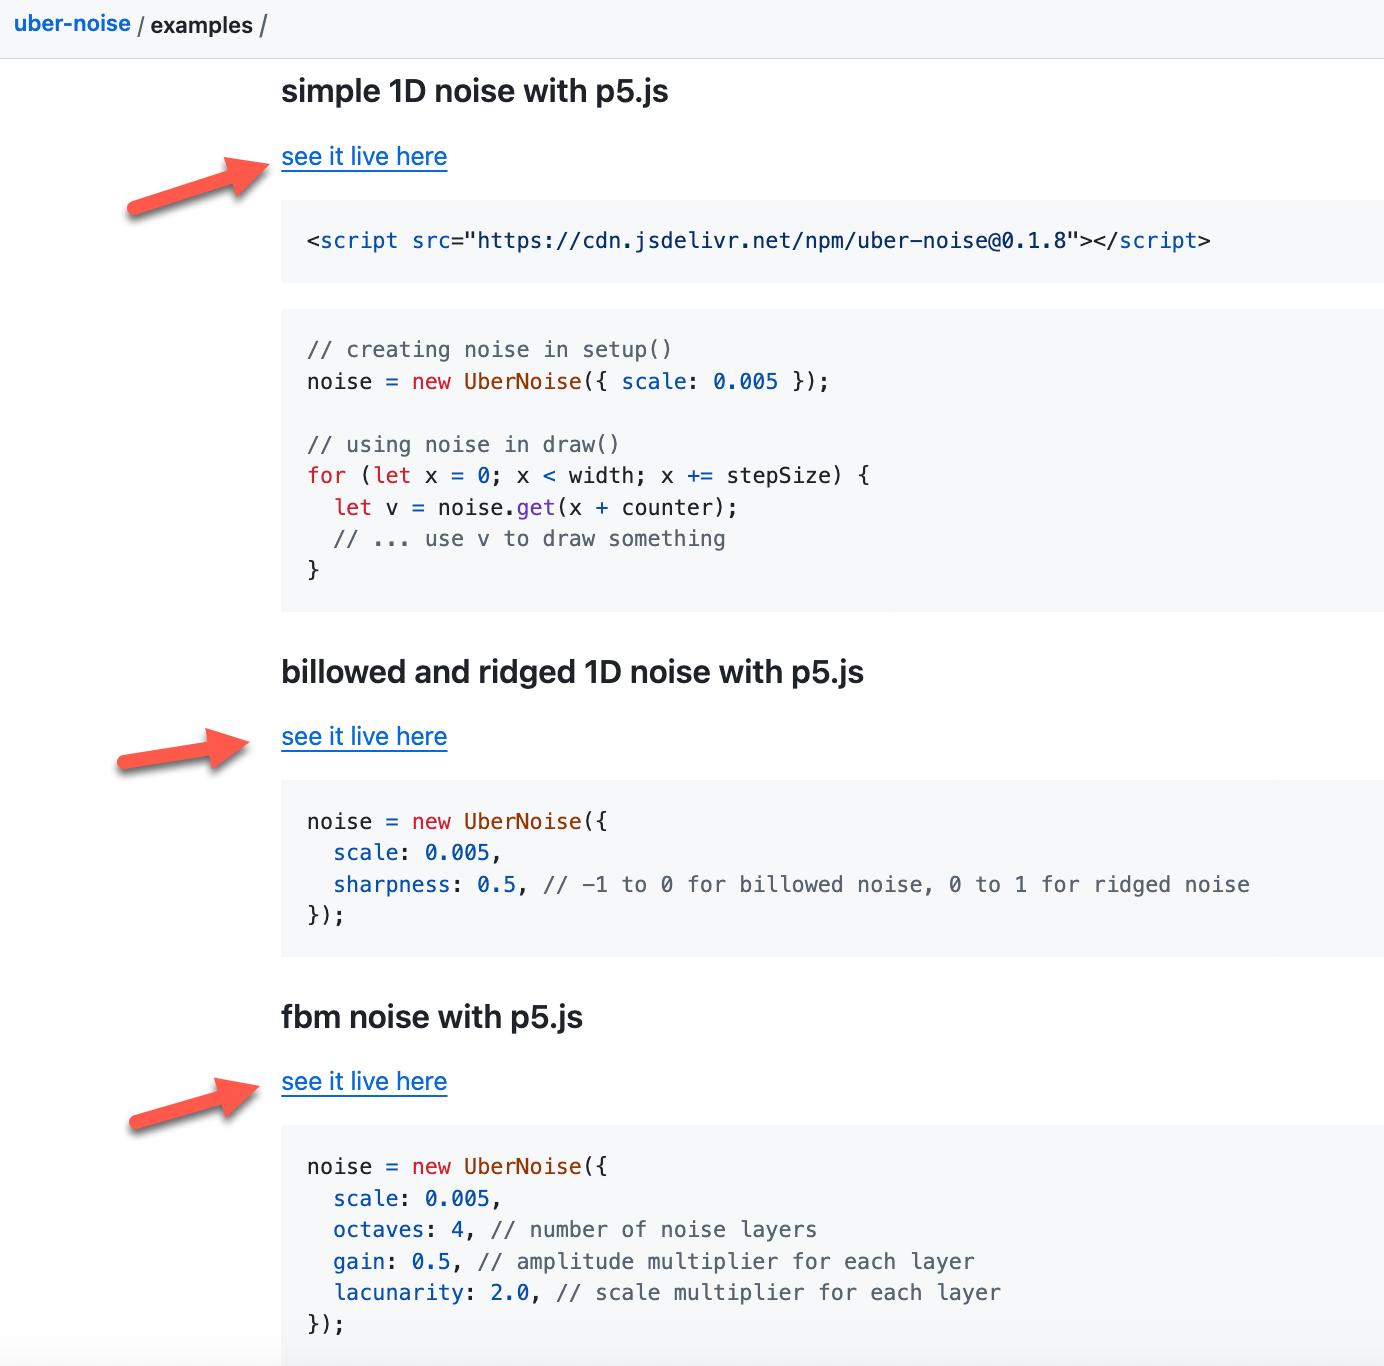
以下を見てみると、ブラウザでも簡単に使えそうでした。CDN から読みこんで、手軽に試せそうです。
●uber-noise/examples at main · flo-bit/uber-noise
https://github.com/flo-bit/uber-noise/tree/main/examples

ちなみに現時点での最新版は、以下の「0.2.2」になるようでした。
●uber-noise CDN by jsDelivr - A CDN for npm and GitHub
https://www.jsdelivr.com/package/npm/uber-noise
●cdn.jsdelivr.net/npm/uber-noise@0.2.2/dist/uber-noise.min.js
https://cdn.jsdelivr.net/npm/uber-noise@0.2.2/dist/uber-noise.min.js
簡単に試せるサンプル
上でも掲載したサンプルのページ(uber-noise/examples)を見ると、実行結果を簡単に確認できる、公式のライブデモが用意されていました。
さらに、上記のものの下にもサンプルが掲載されています。GUI上から動的にパラメータを変更して、その結果を見られるデモになっていて、使い勝手が良かったです。
ライブデモの 1つ
例えば「fbm noise with p5.js のライブデモ」は以下のとおりです。
このデモでは、ノイズに関する 4つのパラメータを GUI で動的に変えることができる仕様です。

実際に試してみる
それでは uber-noise を実際に試してみます。
元にするサンプル
試していくにあたり、以下のページのサンプルを見て参考にするのが良さそうです。
●uber-noise/examples at main · flo-bit/uber-noise
https://github.com/flo-bit/uber-noise/tree/main/examples
各サンプル
●uber-noise/examples/1D at main · flo-bit/uber-noise
https://github.com/flo-bit/uber-noise/tree/main/examples/1D

●uber-noise/examples/2D at main · flo-bit/uber-noise
https://github.com/flo-bit/uber-noise/tree/main/examples/2D

●uber-noise/examples/3D at main · flo-bit/uber-noise
https://github.com/flo-bit/uber-noise/tree/main/examples/3D
ここからお試しの元にするものを 1つ選びました。
試した内容
試しに実行してみたコードは、以下のとおりです。
※ 2D用のサンプルを書きかえて作成
let noise,
  counter = 0,
  img,
  gui;

const settings = {
  scale: 0.5,
  steps: 0,
  // move: true,
  move: false,
  octaves: 3,
  gain: 0.5,
  lacunarity: 2,
};

async function setup() {
  createCanvas(600, 450);
  pixelDensity(1);

  // モジュール版のライブラリ 2つの読み込み
  const uberMod = await import(
    "https://cdn.jsdelivr.net/npm/uber-noise@0.2.2/+esm"
  );
  uberNoise = uberMod.UberNoise;

  const guiMod = await import(
    "https://cdn.jsdelivr.net/npm/dat.gui@0.7.9/+esm"
  );
  gui = new guiMod.GUI();

  createNoise();

  // タイル用グラフィック
  img = createGraphics(150, 150);
  img.noStroke();
  drawImage();

  guiSetting();
  if (settings.move) {
    loop();
  } else {
    noLoop();
    redraw();
  }
}

function createNoise() {
  noise = new uberNoise({
    tile: true,
    ...settings,
  });
}

// タイルにノイズパターンを描く
function drawImage() {
  img.loadPixels();
  for (let x = 0; x < img.width; x++) {
    for (let y = 0; y < img.height; y++) {
      const v = noise.get(x / img.width, y / img.height);
      const c = map(v, -1, 1, 0, 255);
      const idx = 4 * (y * img.width + x);
      img.pixels[idx + 0] = c;
      img.pixels[idx + 1] = c;
      img.pixels[idx + 2] = c;
      img.pixels[idx + 3] = 255;
    }
  }
  img.updatePixels();
}

function guiSetting() {
  gui.add(settings, "scale", 0.01, 10).onChange((v) => {
    noise.scale = v;
    redrawImage();
  });
  gui.add(settings, "steps", 0, 30, 1).onChange((v) => {
    noise.steps = v;
    redrawImage();
  });
  gui.add(settings, "octaves", 0, 10, 1).onChange((v) => {
    createNoise();
    redrawImage();
  });
  gui.add(settings, "gain", 0.01, 5).onChange((v) => {
    noise.gain = v;
    redrawImage();
  });
  gui.add(settings, "lacunarity", 0.01, 5).onChange((v) => {
    noise.lacunarity = v;
    redrawImage();
  });

  gui.add(settings, "move").onChange((v) => (v ? loop() : noLoop()));
}

function redrawImage() {
  drawImage();
  redraw();
}

function draw() {
  if (!img) return;

  background(0);
  counter = (counter + deltaTime / 10) % img.width;

  // タイル表示
  for (let x = -counter; x < width; x += img.width) {
    for (let y = -counter; y < height; y += img.height) {
      image(img, x, y, img.width + 0.5, img.height + 0.5);
    }
  }
}
動作確認
上記のコードを動作させた様子は、以下のとおりです。
GUI上から 6つのパラメータを変更してみたりして、描画がその変更に連動することなどを確認できました。
その他
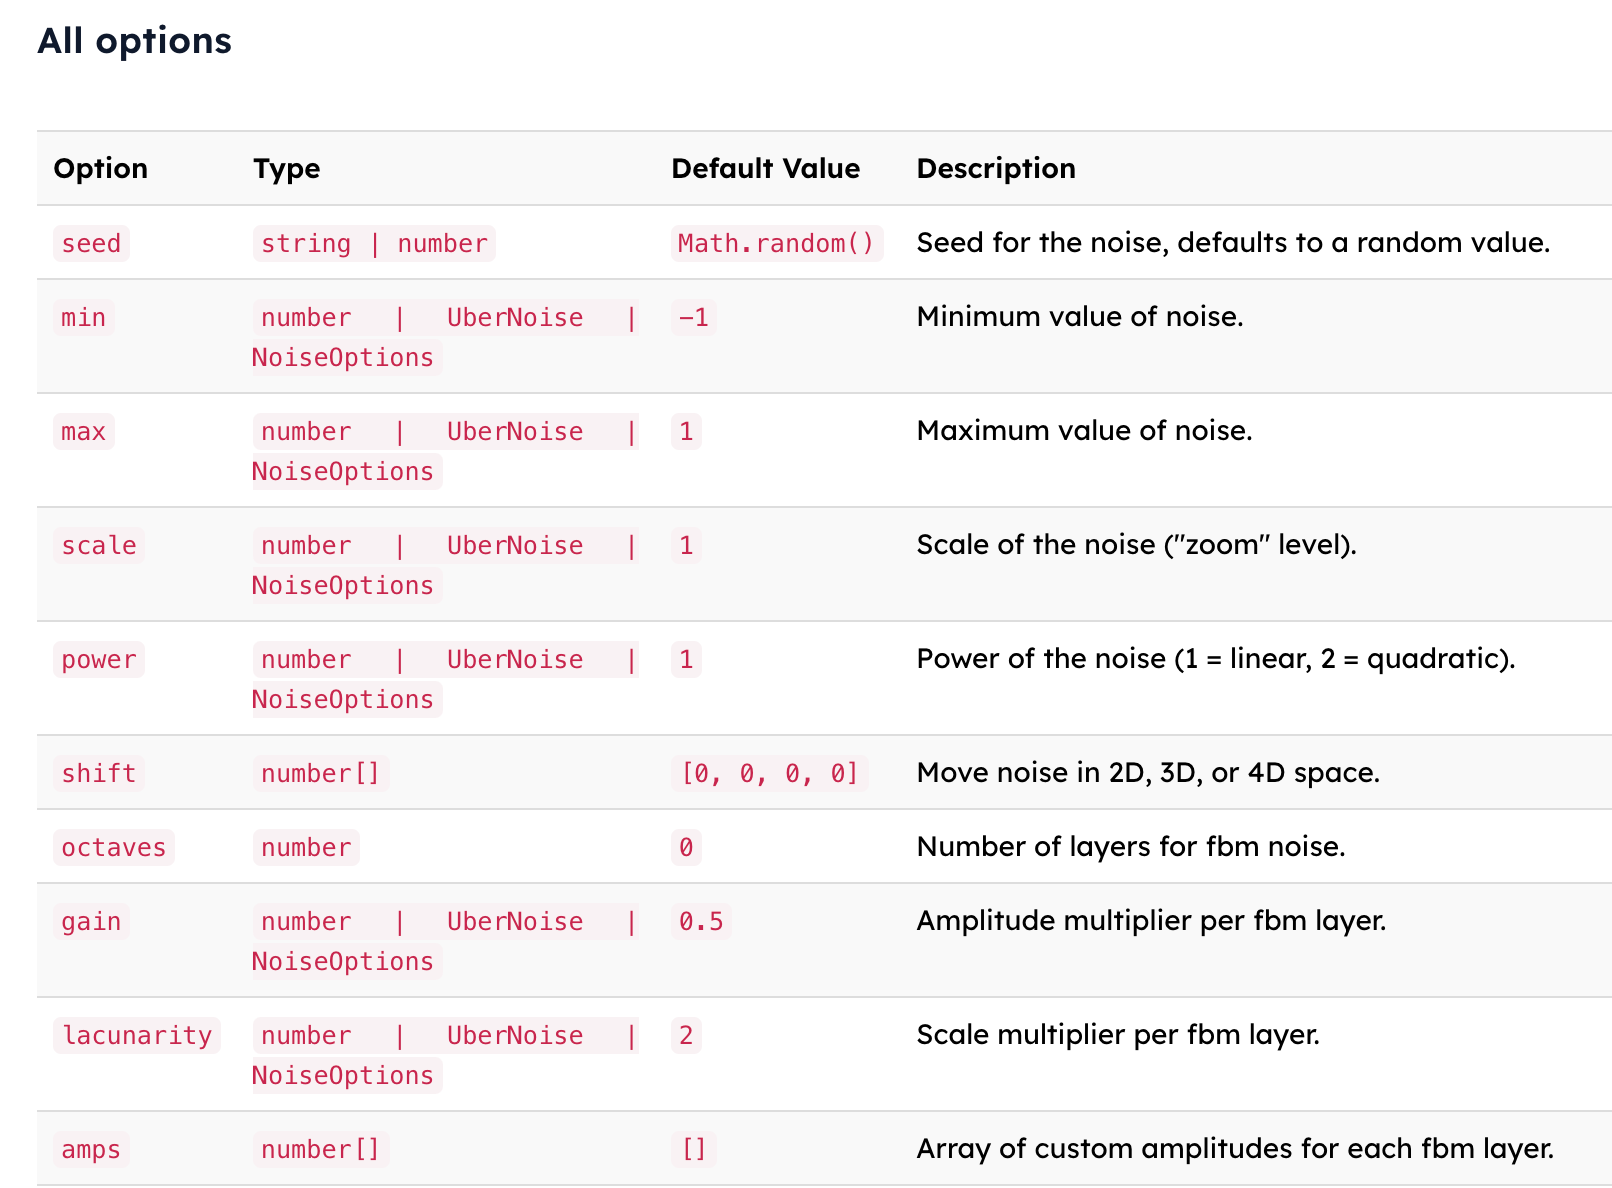
豊富なオプション
uber-noise は、以下のようにオプションが豊富なようなので、まだ使っていないオプションも活用してみようと思います。