はじめに
p5.toio で専用マットのリアルタイム絶対位置検出を利用した仕組みを試した話です。
試した内容
試した内容を、以下で示します。
上記では、ミニキーボードのキーを押下した際に、toio が所定の座標へ移動するというものです。その所定の座標は、1回キーを押すごとに規則的に変化します。
その際の toio の制御には、冒頭にも書いていた「p5.toio」を使います(以下のバージョン 0.8.0 を使って試しています)。

今回使う処理
今回使うメインの処理は、以下の「moveTo()」です。
●Cube | p5.toio
https://tetunori.github.io/p5.toio/docs/cube/classes/cube#moveto

引数
公式の説明にも書かれているとおり、引数は以下のとおりです。
- 【必須】 ゴールの座標(や角度) aim: object
- 【必須】 最大スピード maxSpeed: number
- 【オプション】 動き(移動)のタイプ moveType: 0/1/2/3 デフォルトの値は 0
- 【オプション】 速度変化のタイプ easeType: 0/1/2 デフォルトの値は 0
- 【オプション】 タイムアウト timeout: number デフォルトの値は 5
引数の説明
上記で必須となっている引数の詳細は、それぞれ以下となります。
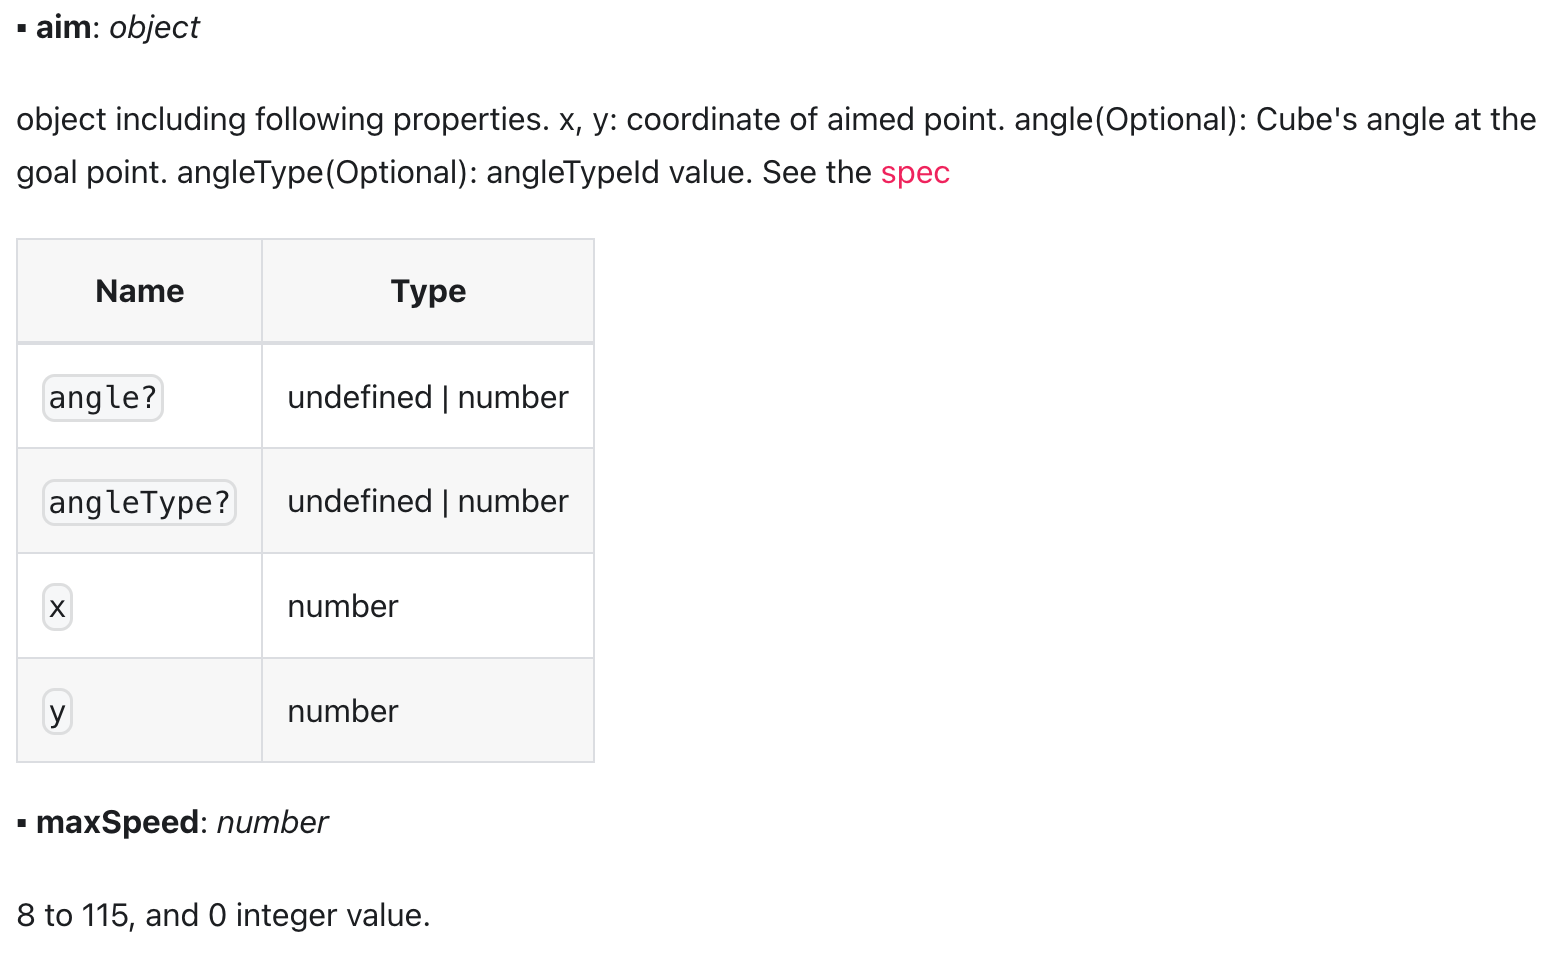
aim のほうは、必須パラメータでオブジェクトを渡します。
その際に、座標情報を示す x と y の値が最低限必要です。この時、オプションで「angle」「angleType」を指定可能です。
maxSpeed は、0 か 8〜115 の値が指定できます。
他、オプションとなっているもの 3つは、以下のように説明されています。
タイムアウト以外の 2つは、toio公式の仕様を見るのが分かりやすいです。

以下に、toio公式の仕様で、該当する部分をピックアップして掲載します。
●モーター | toio™コア キューブ 技術仕様
https://toio.github.io/toio-spec/docs/ble_motor#%E7%A7%BB%E5%8B%95%E3%82%BF%E3%82%A4%E3%83%97

●モーター | toio™コア キューブ 技術仕様
https://toio.github.io/toio-spec/docs/ble_motor#%E3%83%A2%E3%83%BC%E3%82%BF%E3%83%BC%E3%81%AE%E9%80%9F%E5%BA%A6%E5%A4%89%E5%8C%96%E3%82%BF%E3%82%A4%E3%83%97

実際に試してみる
ここから実際に試していきます。
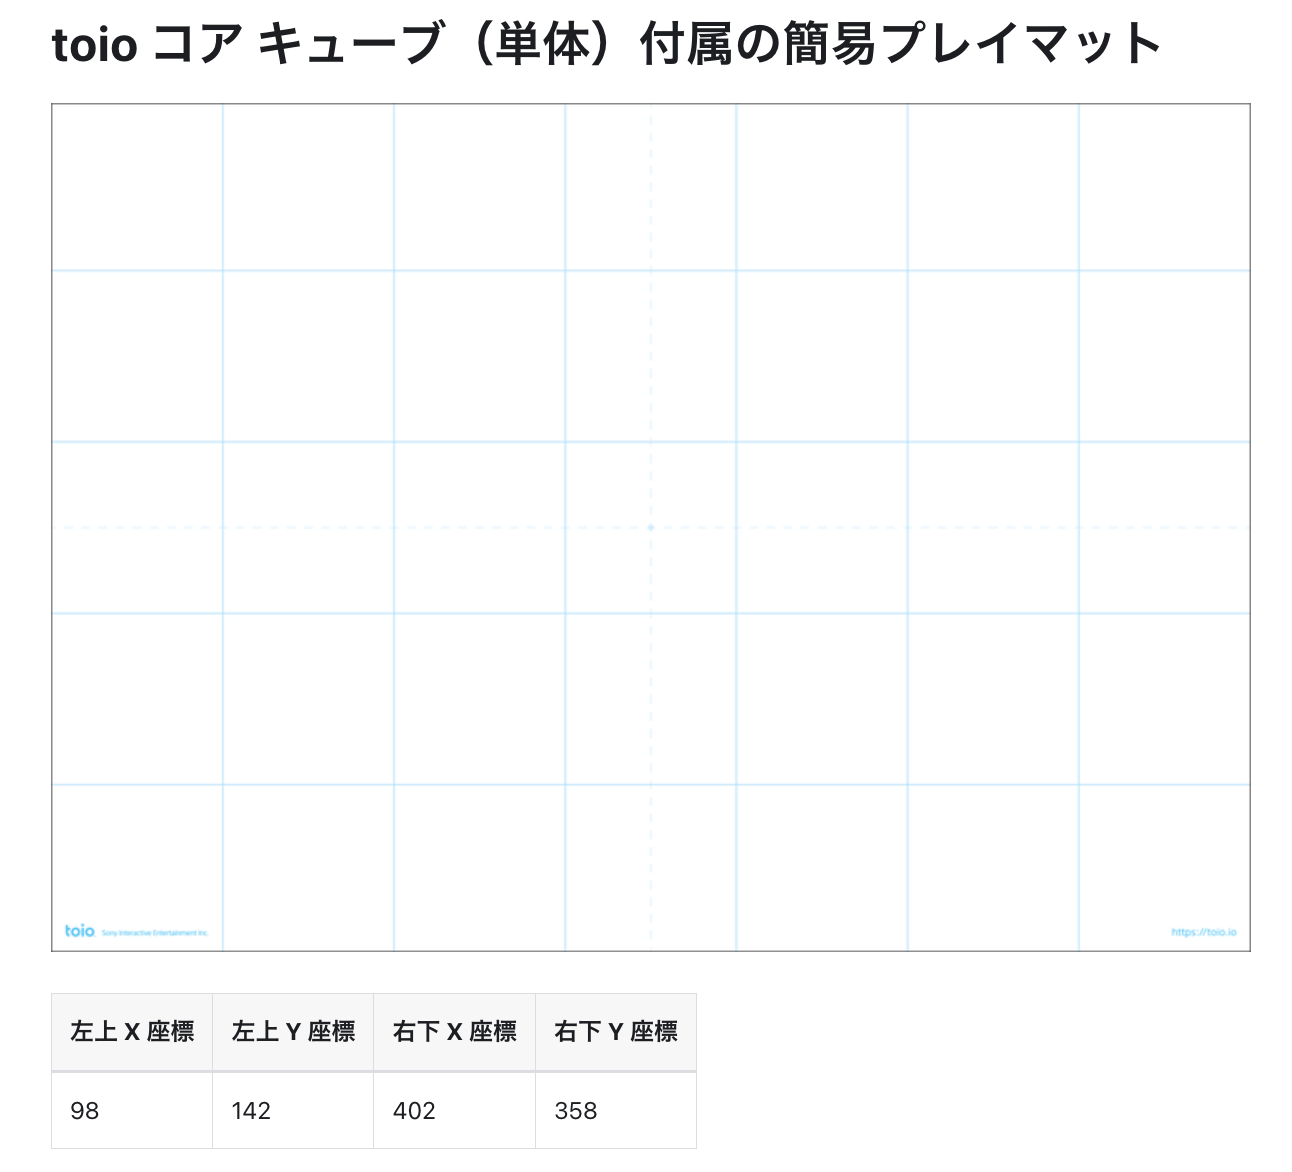
利用するマット
今回、toio用プレイマット・カード印刷で作られたマットを利用します。仕様的には、toio の A3サイズ「簡易プレイマット」と同じになるようです。
座標の情報は、以下のとおりです。
●Position ID 一覧 | toio™コア キューブ 技術仕様
https://toio.github.io/toio-spec/docs/hardware_position_id
マットの座標を読み取ってみる
後でもしかしたら必要になるかもしれないと思い、ひとまずマット上の toio の座標を出力するものを試しに作ってみました。
実装した内容は、以下のとおりです。
const gCubes = [];

function setup() {
  createCanvas(400, 400);
  background(220);
}

function mouseClicked() {
  P5tCube.connectNewP5tCube().then((cube) => {
    gCubes.push(cube);
  });
}

function keyPressed() {
  if (gCubes.length > 0) {
    const { x, y } = gCubes[0];
    console.log(x, y);
  }
}
これを実行して、今回使うマットの上で toio を動かして操作をすると、以下のように座標情報をとることができました。

p5.toio の moveTo() を試す
それでは、p5.toio の moveTo() を使った処理を試します。
以下では、移動処理の部分で toio 1個だけを対象として考えた処理を行っていますので、その点はご注意ください(※ toio との接続処理は、複数台でも大丈夫な実装ではあるものの)。
マットの中心を原点にした処理
最終的にやりたい内容が、マットの中心を原点にできたほうが簡単になるものであったため、マットの中心を原点にした座標系を使える内容のものを試作しました。
const centerX = (98 + 402) / 2;
const centerY = (142 + 358) / 2;

const gCubes = [];

function setup() {
  createCanvas(400, 400);
  background(220);
}

function mouseClicked() {
  P5tCube.connectNewP5tCube().then((cube) => {
    gCubes.push(cube);
  });
}

function keyPressed() {
  if (gCubes.length > 0) {
    const centerCoords = { cx: 0, cy: 0 };
    const originalCoords = toOriginalCoordinates(
      centerCoords.cx,
      centerCoords.cy
    );

    gCubes[0].moveTo(originalCoords, 80);
  }
}

function toOriginalCoordinates(cx, cy) {
  let x = cx + centerX;
  let y = cy + centerY;
  return { x, y };
}
以下が実装内容ですが、 const centerCoords = { cx: 0, cy: 0 } という部分が、原点を目標地点に設定するものになっています。
これを、以下の処理で、元の座標系に変換して使っています。
const centerX = (98 + 402) / 2;
const centerY = (142 + 358) / 2;

・・・

function toOriginalCoordinates(cx, cy) {
  let x = cx + centerX;
  let y = cy + centerY;
  return { x, y };
}
上の「centerX」「centerY」で使っている数値は、簡易プレイマットに関する以下の数字を使っています。
■ 簡易プレイマットの座標情報
・左上X座標  左上Y座標
 98  142
・右下X座標  右下Y座標
 402  358
移動するごとに目標地点が変わるもの
最後に、冒頭で動画を掲載していた「移動するごとに目標地点が変わる」という内容について書きます。
実装した内容は以下のとおりです。
const centerX = (98 + 402) / 2;
const centerY = (142 + 358) / 2;

const gCubes = [];

let angle;

function setup() {
  createCanvas(400, 400);
  background(220);

  angle = 0;
}

function mouseClicked() {
  P5tCube.connectNewP5tCube().then((cube) => {
    gCubes.push(cube);
  });
}

function keyPressed() {
  if (gCubes.length > 0) {
    const speed = 60;
    const steps = 4;

    const radius = 50;
    const tempX = radius * cos(angle),
      tempY = radius * sin(angle);
    angle += TWO_PI / steps;

    const centerCoords = { cx: tempX, cy: tempY };
    const originalCoords = toOriginalCoordinates(
      centerCoords.cx,
      centerCoords.cy
    );

    const moveType = 1;
    const easeType = 0;

    gCubes[0].moveTo(originalCoords, speed, moveType, easeType);
  }
}

function toOriginalCoordinates(cx, cy) {
  let x = cx + centerX;
  let y = cy + centerY;
  return { x, y };
}
移動するごとに目標地点が変わる処理は、以下になります。
目標地点は、マットの中心を原点とした、半径 50 の円の円周上で設定された点になります。1回移動するごとに、その円の円周の 4分の1 ずつ進んだ先が目標地点になっていく仕様です。
function keyPressed() {
  if (gCubes.length > 0) {
    ・・・

    const radius = 50;
    const tempX = radius * cos(angle),
      tempY = radius * sin(angle);
    angle += TWO_PI / steps;
    ・・・
このようにして、冒頭に紹介していた内容を実現しました。
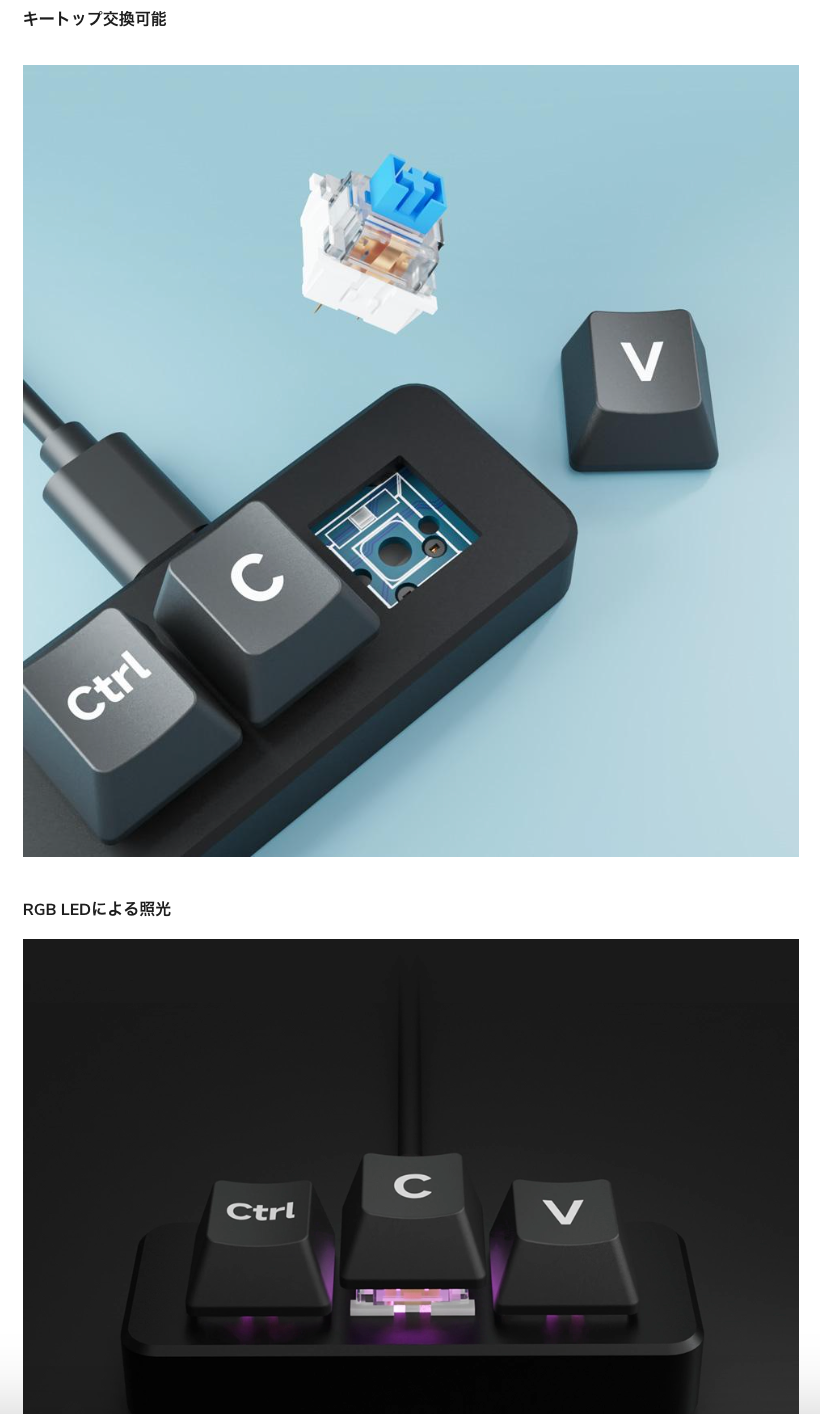
余談: 今回使ったキーボード
今回のデモ動画では、ミニキーボードを使っていました。
余談になりますが、そのキーボードは以下になります。
●RP2040-Keyboard-3-PLUS - Waveshare 3キーUSBキーボード — スイッチサイエンス
https://www.switch-science.com/products/9618