この記事は、2021年の toio のアドベントカレンダー の 1日目の記事です。
今年 4月にリリースされた toio の新機能の「姿勢角(ロール・ピッチ・ヨー)」を Web Bluetooth API で利用する話です。
#toio の新しく公開された仕様「姿勢角検出」で取得できる値をグラフ化してみた!
— you (@youtoy) April 21, 2021
以前も toio の制御で使った Web Bluetooth API で実装して、HTML のページで値を受け取りつつ Smoothie Charts でグラフ描画もする形。
●姿勢角検出 · toio™コア キューブ 技術仕様
https://t.co/YP1K3Z4UTA pic.twitter.com/btzcyTtEZP
上記のツイートの内容は、新機能がリリースされた同月に実装していたのですが、記事などは書いていなかったので、アドベントカレンダー用の記事として書いてみようと思います。
利用する技術・ライブラリ
ブラウザ
今回、HTML+JavaScript を利用するのですが、ブラウザは「Google Chrome」を用います。
これは、「Firefox」や「Safari」だと、次に出てくる Web Bluetooth API に対応していないためです。
●"web bluetooth" | Can I use... Support tables for HTML5, CSS3, etc
https://caniuse.com/?search=web%20bluetooth
ブラウザで toio を扱う「Web Bluetooth API」
今回、toio からのセンサー情報取得には「Web Bluetooth API」を用います。
Web Bluetooth API を用いた、toio との間の通信(「通知・読み出し・書き込み)は、過去に書いた記事で何度も使っており、またその部分だけをまとめた以下の記事も書いていました。
●toio を Web Bluetooth API で制御(「通知・読み出し・書き込み」を行う) - Qiita
https://qiita.com/youtoy/items/791905964d871ac987d6
実装には、以下に出てくる Async/Await を用いた処理を使っています。
●Web Bluetooth / Notifications (Async Await) Sample
https://googlechrome.github.io/samples/web-bluetooth/notifications-async-await.html
UUID
Web Bluetooth API で toio を扱う際に、いくつかの UUID の値(文字列)を利用する必要があります。
後に出てくるソースコード内にも書いていますが、以下のものを用います。
const TOIO_SERVICE_UUID = "10b20100-5b3b-4571-9508-cf3efcd7bbae";
const CONFIGURATION_CHARACTERISTIC_UUID =
  "10b201ff-5b3b-4571-9508-cf3efcd7bbae";
const TOLT_CHARACTERISTIC_UUID = "10b20106-5b3b-4571-9508-cf3efcd7bbae";
これらの UUID は、以下の toio の仕様が書かれたページで公開されています。
●姿勢角検出 | toio™コア キューブ 技術仕様
https://toio.github.io/toio-spec/docs/ble_high_precision_tilt_sensor
●通信概要 | toio™コア キューブ 技術仕様
https://toio.github.io/toio-spec/docs/ble_communication_overview
グラフライブラリ「Smoothie Charts」
今回、toio のセンサーから受けとった値をグラフ化するのですが、グラフ描画には以下のライブラリを用います。
●Smoothie Charts: A JavaScript Charting Library for Streaming Data
http://smoothiecharts.org/
詳細な仕様は、公式ページ内の説明などをご確認ください。
CSSフレームワーク「Bulma」
今回の HTML で作成するページで、手軽に良い感じの見た目にするのに CSSフレームワークを用います。
有名どころだけでも複数のものがありますが、自分が以前利用したことがある「Bulma」を用いました。
●Bulma: Free, open source, and modern CSS framework based on Flexbox
https://bulma.io/
プログラム
今回、1ファイルでプログラムを書いていきます。
HTML+JavaScript のファイル
以下の HTML+JavaScript の1ファイルだけで、今回の内容は動作します。
内容の補足は、この後に書いていきます。
<!DOCTYPE html>
<html>

<head>
    <meta charset="utf-8" />
    <meta name="viewport" content="width=device-width, initial-scale=1" />
    <title>
        Web Bluetooth API による姿勢角検出のデータ取得とデータのグラフ化
    </title>
    <link rel="stylesheet" href="https://cdn.jsdelivr.net/npm/bulma@0.9.3/css/bulma.css" />
    <script src="https://cdn.jsdelivr.net/npm/smoothie@1.35.0/smoothie.min.js"></script>
</head>

<body>
    <section class="section">
        <div class="container">
            <h1 class="title">姿勢角検出(ロール・ピッチ・ヨー)</h1>
            <canvas id="mycanvas1" width="400" height="100"></canvas>
            <canvas id="mycanvas2" width="400" height="100"></canvas>
            <canvas id="mycanvas3" width="400" height="100"></canvas>
            <div class="buttons" style="margin-top: 1.5rem">
                <button class="button is-success is-light" type="button" onclick="onStartButtonClick()">
                    接続+通知ON
                </button>
                <button class="button is-danger is-light" type="button" onclick="onStopButtonClick()">
                    通知OFF
                </button>
                <button class="button is-info is-light" type="button" onclick="onStartNotificationsButtonClick()">
                    通知ON
                </button>
            </div>
        </div>
    </section>

    <script>
        const smoothie = [],
            line = [],
            colors = [[0, 255, 0], [0, 255, 0], [0, 255, 0]];

        for (let i = 0; i < 3; i++) {
            smoothie.push(new SmoothieChart({ minValue: -180.0, maxValue: 180.0 }));
            line.push(new TimeSeries());
            smoothie[i].addTimeSeries(line[i], {
                strokeStyle: `rgba(${colors[i]}, 1)`,
                fillStyle: `rgba(${colors[i]}, 0.2)`,
                lineWidth: 4,
            });
            smoothie[i].streamTo(document.getElementById(`mycanvas${i + 1}`));
        }

        const TOIO_SERVICE_UUID = "10b20100-5b3b-4571-9508-cf3efcd7bbae";
        const CONFIGURATION_CHARACTERISTIC_UUID =
            "10b201ff-5b3b-4571-9508-cf3efcd7bbae";
        const TILT_CHARACTERISTIC_UUID = "10b20106-5b3b-4571-9508-cf3efcd7bbae";

        let myCharacteristic01, myCharacteristic02;

        async function onStartButtonClick() {
            const serviceUuid = TOIO_SERVICE_UUID;

            try {
                console.log("Requesting Bluetooth Device...");
                const device = await navigator.bluetooth.requestDevice({
                    filters: [{ services: [serviceUuid] }],
                });
                console.log("Connecting to GATT Server...");
                const server = await device.gatt.connect();
                console.log("Getting Service...");
                const service = await server.getPrimaryService(serviceUuid);
                // Configuration  https://toio.github.io/toio-spec/docs/ble_configuration#%E5%A7%BF%E5%8B%A2%E8%A7%92%E6%A4%9C%E5%87%BA%E3%81%AE%E8%A8%AD%E5%AE%9A
                console.log("Getting Characteristic...");
                myCharacteristic01 = await service.getCharacteristic(
                    CONFIGURATION_CHARACTERISTIC_UUID
                );
                // Tilt  https://toio.github.io/toio-spec/docs/ble_high_precision_tilt_sensor
                onWriteButtonClick();
                console.log("Getting Characteristic...");
                myCharacteristic02 = await service.getCharacteristic(
                    TILT_CHARACTERISTIC_UUID
                );
                await myCharacteristic02.startNotifications();
                console.log("> Notifications started");
                myCharacteristic02.addEventListener(
                    "characteristicvaluechanged",
                    handleNotifications
                );
            } catch (error) {
                console.log("Argh! " + error);
            }
        }

        async function onWriteButtonClick() {
            // 姿勢角検出の設定 https://toio.github.io/toio-spec/docs/ble_configuration#%E5%A7%BF%E5%8B%A2%E8%A7%92%E6%A4%9C%E5%87%BA%E3%81%AE%E8%A8%AD%E5%AE%9A
            const configuration_buf = new Uint8Array([
                0x1d,
                0x00,
                0x01,
                0x0a,
                0x00,
            ]);

            if (!myCharacteristic01) {
                return;
            }
            let value = configuration_buf;
            try {
                await myCharacteristic01.writeValue(configuration_buf);
            } catch (error) {
                console.log("Argh! " + error);
            }
        }

        async function onStopButtonClick() {
            if (myCharacteristic02) {
                try {
                    await myCharacteristic02.stopNotifications();
                    console.log("> Notifications stopped");
                    myCharacteristic02.removeEventListener(
                        "characteristicvaluechanged",
                        handleNotifications
                    );
                } catch (error) {
                    console.log("Argh! " + error);
                }
            }
        }

        async function onStartNotificationsButtonClick() {
            try {
                console.log("Starting Notifications...");
                await myCharacteristic02.startNotifications();
                myCharacteristic02.addEventListener(
                    "characteristicvaluechanged",
                    handleNotifications
                );
                console.log("> Notifications started");
            } catch (error) {
                log("Argh! " + error);
            }
        }

        function handleNotifications(event) {
            let value = event.target.value;

            if (value.getUint8(0) === 3) {
                console.log(
                    `ロール/X ${value.getInt16(2, true)}、 ピッチ/Y ${value.getInt16(
                        4,
                        true
                    )}、
          ヨー/Z ${value.getInt16(6, true)}`
                );

                const getTime = new Date().getTime();

                for (let i = 0; i < 3; i++) {
                    line[i].append(getTime, value.getInt16(i * 2 + 2, true));
                }
            }
        }
    </script>
</body>

</html>
プログラムの補足
ライブラリ・フレームワークの読み込み
上で登場していた Smoothie Charts と Bulma は、それぞれ CDN から読み込みます。
<link rel="stylesheet" href="https://cdn.jsdelivr.net/npm/bulma@0.9.3/css/bulma.css" />
<script src="https://cdn.jsdelivr.net/npm/smoothie@1.35.0/smoothie.min.js"></script>
HTML の bodyタグ内
bodyタグの中では、グラフ描画用のエリアと、操作用のボタンを用意します。
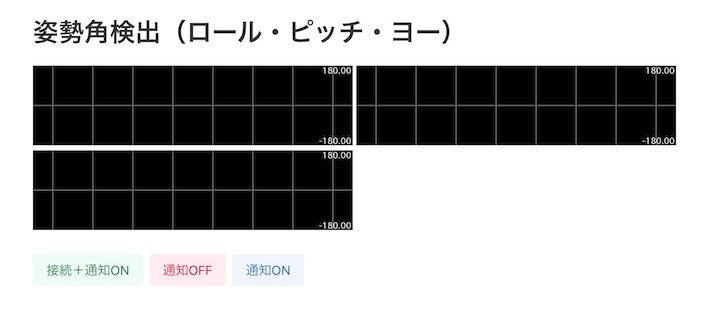
以下が画像に出ているように、タイトルの下に「グラフ描画用の Canvas 3つ」と「操作用ボタン 3つ」を用意しました。
ボタンの部分では、onclick属性で、ボタン押下時に実行する JavaScript の関数を指定しています。
また、クラスの部分で Bulma に関連した内容(is-success や is-light など)を加えています。
グラフ描画の部分
グラフ 3つを Smoothie Charts で描画しています。
個々の描画処理については、以下の公式サンプル「Hello world sample」を見ていただくのが良いかと思います。
●smoothiecharts.org/examples/example1.html
http://smoothiecharts.org/examples/example1.html
toio関連の処理の概要
toio 関連の処理では、主に以下の内容を行っています。
- BLE接続
- 姿勢角検出の有効化
- 通知の有効化/無効化(センサー値の受け取りのためのもの)
- 受領したセンサーの値の処理
以下で、各項目の補足を書いていきます。
BLE接続
BLE接続の部分は、「 navigator.bluetooth.requestDevice() 」を使っている部分です。
Web Bluetooth API の作法に従って、UUID を用いた接続を行います。
server.getPrimaryService() や service.getCharacteristic() を書いている部分は、Web Bluetooth API を用いる際の基本の流れになります。
姿勢角検出の有効化
toio の「姿勢角検出の技術仕様」に書かれているとおり、デフォルトでは無効になっています。
そのため、利用するためには以下のあたりに書かれた機能の有効化を行う必要があります。
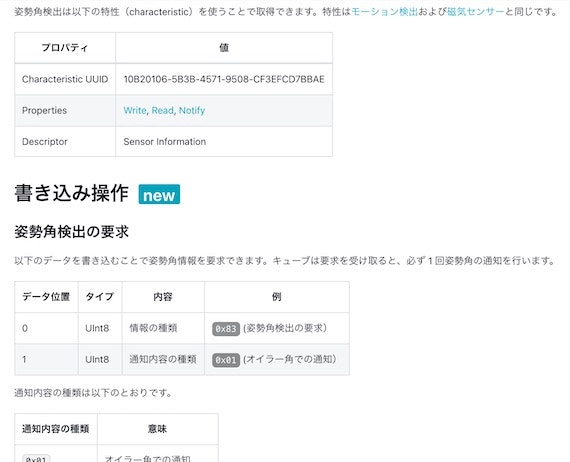
上記のプログラムの中では onWriteButtonClick() の中の処理が、それに該当します。
通知の有効化/無効化(センサー値の受け取りのためのもの)
上記の姿勢角検出の有効化を行うと、姿勢角のデータを通知として受けとることができるようになります(こちらから読みに行かなくても、値が送られてきます)。
startNotifications() ・ addEventListener() が出てくるあたりが、通知の有効化になります。
また、 stopNotifications() ・ removeEventListener() が出てくるあたりが、通知の無効化です。
受領したセンサーの値の処理
受領したセンサーのデータはバイナリになるため、 handleNotifications() の部分で値の取り出しを行っています。
受信できるバイナリ列の構成の情報は、toio公式の技術仕様のページで以下のように書かれているため、これを元に JavaScript の処理を書いています(なお、オイラー角で情報を受けとるようにしています)。
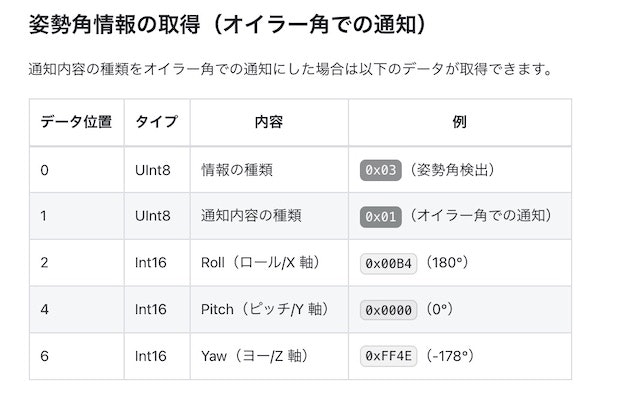
ここで取り出したロール・ピッチ・ヨーの値を、Smoothie Charts に関連した処理に受け渡しています。
実行結果
toio の電源を入れて、上記のプログラムを実行し、自分で作った Webページ上の「接続+通知ON」ボタンを押します。
そうすると、BLE接続が行われた後、Webページ上でグラフ描画が行われます(また、コンソールには値が出力されるようになっています)。
こちらは、冒頭のツイートの動画で使っていたプログラムを、今回用に少し書き直して実行したものです。
書き直したと言っても、目に見える部分(ボタンの見た目、グラフの描画の見た目など)は以前と同じになります。
#toio の「姿勢角検出」、ロール・ピッチ・ヨー の値を Web Bluetooth API 取得して HTML のページ上でグラフ化。
— you (@youtoy) November 20, 2021
グラフ描画には Smoothie Charts を使ってます。
以前、姿勢角検出の仕様が公開された時に作ってたものがあり、それを #toiotomo のもくもく会の中でリファクタリングした形です。 pic.twitter.com/sI8QLytVCq
その後、今回の内容をもとに、p5.js による 3D描画との組み合わせも試してみたりしました。
#toio の「姿勢角検出」、ロール・ピッチ・ヨー の値を Web Bluetooth API 取得して、
— you (@youtoy) November 20, 2021
それを WEBGLモードの #p5js の描画と連動させてみました。#toiotomo のもくもく会の中でやった内容に、p5.js 関連の追加実装をしてみたものです。 pic.twitter.com/Xfi1IciFWY
おわりに
今回、toio の姿勢角(ロール・ピッチ・ヨー)のデータをブラウザで取得し、グラフによる可視化を行ってみました。
最後に書いていた、p5.js との連携の話は今回の内容には入っていないため、また別途記事に書いたりしてみようと思っています。