はじめに
以下で試していた流れの続きになる記事です。
- 「esm.sh/tsx」で HTML に書いた TypeScript や React の処理をブラウザで直接扱う - Qiita
- 「esm.sh/tsx」を使って React と Tailwind CSS をブラウザで直接扱う - Qiita
「esm.sh/tsx」を使って、TypeScript や React、Tailwind CSS をブラウザで直接扱うというのを試していた流れの次に、以下の「Mantine」と「daisyUI」も適用してみる、という内容になります。
試した結果
結果から先に示すと、以下のように両方ともうまくいきました。
今回試すものの補足
今回、以下との組み合わせをそれぞれ試してみます。
●daisyUI — Tailwind CSS Components ( version 5 update is here )
https://daisyui.com/

●Mantine
https://mantine.dev/
さっそく試す
さっそく試していきます。ベースになるのは、前回書いた記事の内容です。
前回は、React と Tailwind CSS を扱っていましたが、これを「React と daisyUI」/「React と Mantine」の組み合わせにします。
React と daisyUI の組み合わせ
先に daisyUI のほうです。
CDN からの読み込み
daisyUI を CDN からの読み込むのですが、その読み込み先は以下の公式情報を参照しました。
●daisyUIをCDN経由で使用する — Tailwind CSS Components
https://daisyui.com/docs/cdn/?lang=ja
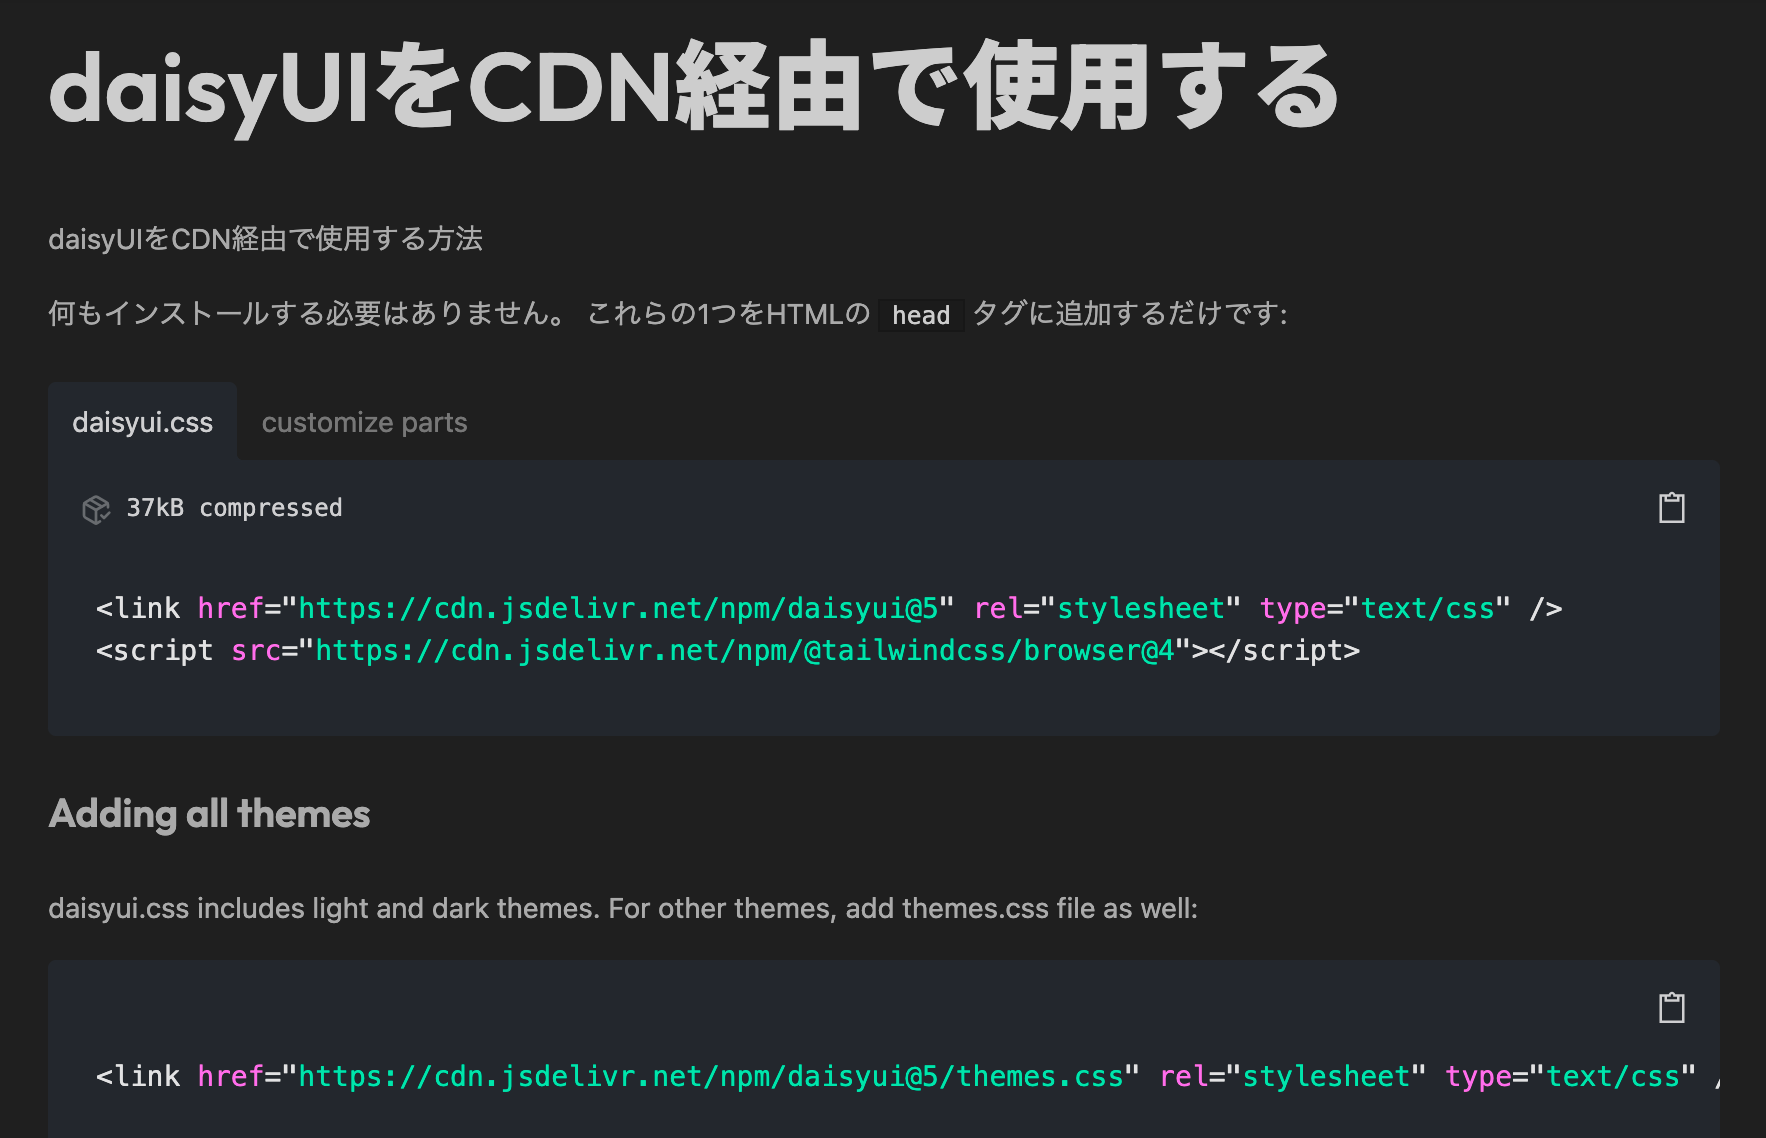
jsDelivr からの読み込みです。
試したコード
試したコードは、以下のとおりです。ボタンの見た目の部分で、daisyUI の「btn btn-primary」を使っています。
<!DOCTYPE html>
<html lang="ja">
  <head>
    <meta charset="utf-8" />
    <link
      href="https://cdn.jsdelivr.net/npm/daisyui@5"
      rel="stylesheet"
      type="text/css"
    />
    <script src="https://cdn.jsdelivr.net/npm/@tailwindcss/browser@4"></script>
    <script type="importmap">
      {
        "imports": {
          "react": "https://esm.sh/react@19",
          "react-dom/client": "https://esm.sh/react-dom@19/client"
        }
      }
    </script>
    <script type="module" src="https://esm.sh/tsx"></script>
  </head>

  <body>
    <div id="root"></div>

    <script type="text/tsx">
      import React, { useState } from "react";
      import { createRoot } from "react-dom/client";

      const Button = () => {
        const [cnt, setCnt] = useState(0);
        return (
          <button className="btn btn-primary" onClick={() => setCnt(cnt + 1)}>
            Clicked {cnt} times
          </button>
        );
      };

      const App = () => (
        <div className="p-4 space-y-2">
          <h1 className="text-xl font-bold">Counters that update separately</h1>
          <div className="flex gap-1">
            <Button />
            <Button />
          </div>
        </div>
      );

      createRoot(document.getElementById("root")!).render(<App />);
    </script>
  </body>
</html>
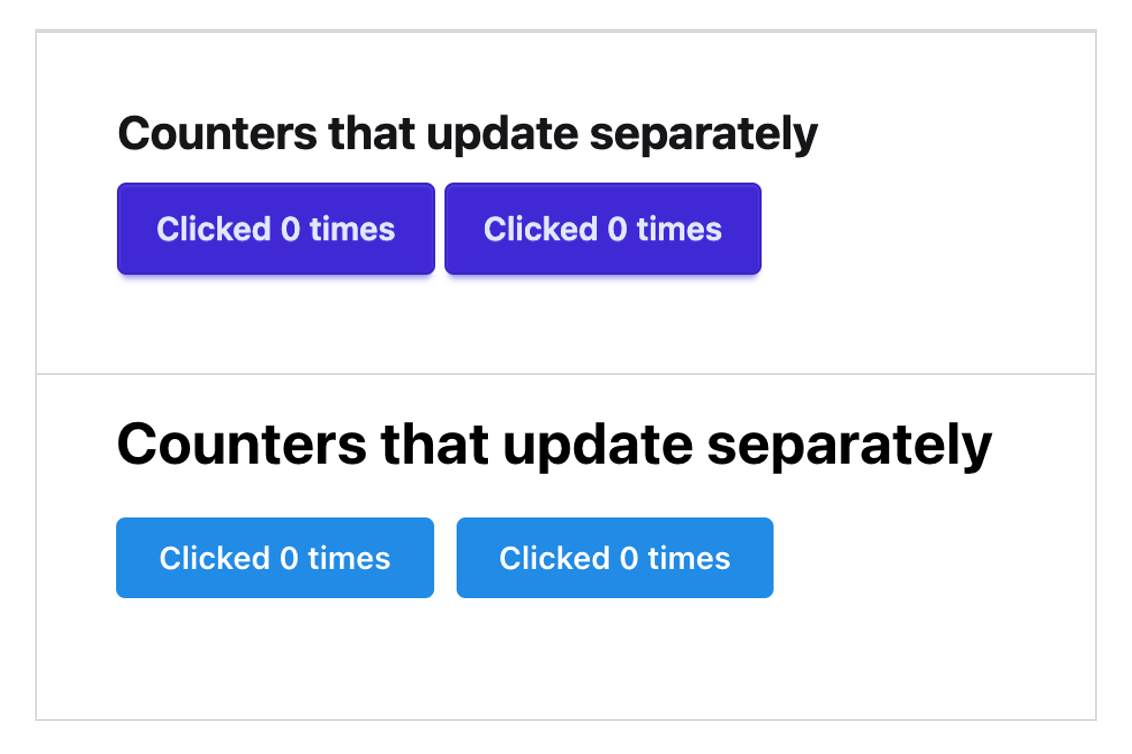
表示結果
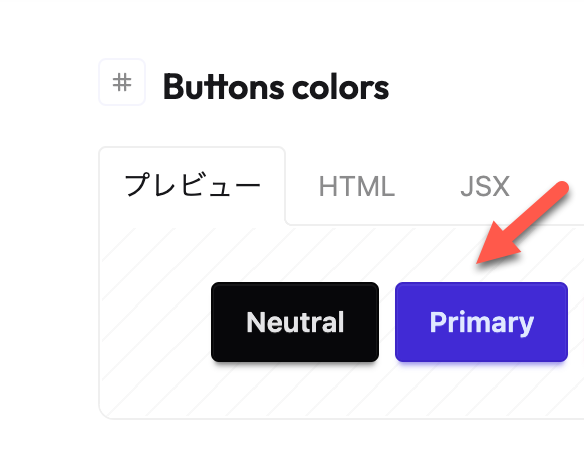
表示結果は、以下の通りです。

以下の「btn btn-primary」というクラス名のボタンの色になっていることが確認できました。
●Tailwind Button コンポーネント — Tailwind CSS Components ( version 5 update is here )
https://daisyui.com/components/button/?lang=ja
React と Mantine の組み合わせ
次に Mantine のほうです。
CDN からの読み込み
Mantine の CDN からの読み込み先についても、上記の daisyUI と同様に公式情報を参照しました。
●Mantine styles | Mantine
https://mantine.dev/styles/mantine-styles/#loading-styles-from-cdn
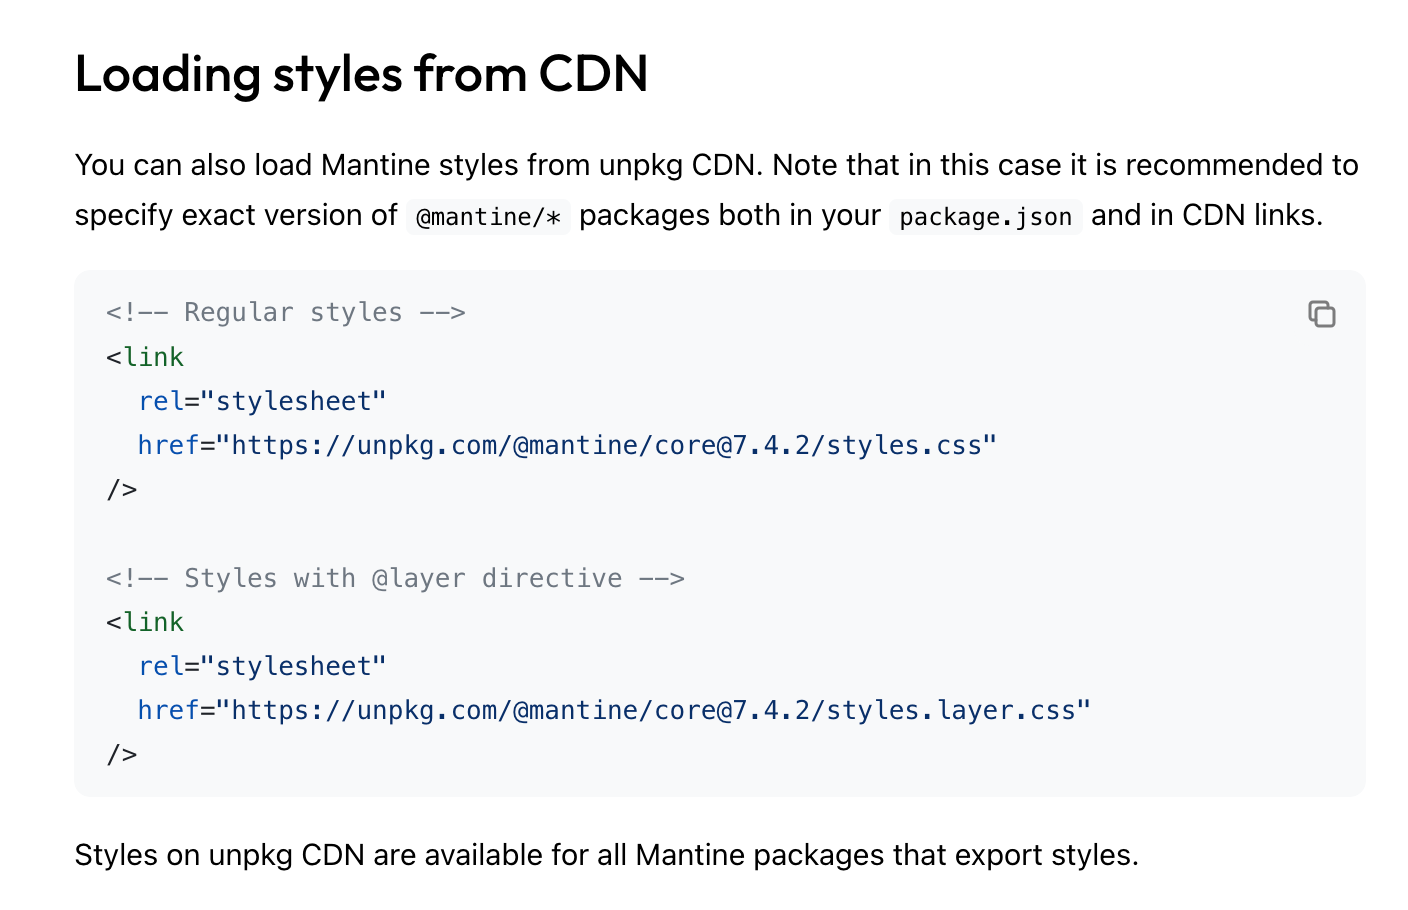
上記の中の「UNPKG」のほうを使います。
コードの内容
試したコードの内容は以下のとおりです。「Button、 Title、 Group、 Stack」といったコンポーネントを使いました。
<!DOCTYPE html>
<html lang="ja">
  <head>
    <meta charset="utf-8" />
    <link
      rel="stylesheet"
      href="https://esm.sh/@mantine/core@7/styles.css"
      type="text/css"
    />
    <script type="importmap">
      {
        "imports": {
          "react": "https://esm.sh/react@19",
          "react-dom/client": "https://esm.sh/react-dom@19/client",
          "@mantine/core": "https://esm.sh/@mantine/core@7"
        }
      }
    </script>
    <script type="module" src="https://esm.sh/tsx"></script>
  </head>

  <body>
    <div id="root"></div>

    <script type="text/tsx">
      import React, { useState } from "react";
      import { createRoot } from "react-dom/client";
      import {
        MantineProvider,
        Button,
        Title,
        Group,
        Stack,
      } from "@mantine/core";

      const CounterButton = () => {
        const [cnt, setCnt] = useState(0);
        return (
          <Button onClick={() => setCnt(cnt + 1)}>
            Clicked {cnt} times
          </Button>
        );
      };

      const App = () => (
        <MantineProvider defaultColorScheme="light">
          <Stack p="md">
            <Title order={2}>Counters that update separately</Title>
            <Group gap="xs">
              <CounterButton />
              <CounterButton />
            </Group>
          </Stack>
        </MantineProvider>
      );

      createRoot(document.getElementById("root")!).render(<App />);
    </script>
  </body>
</html>
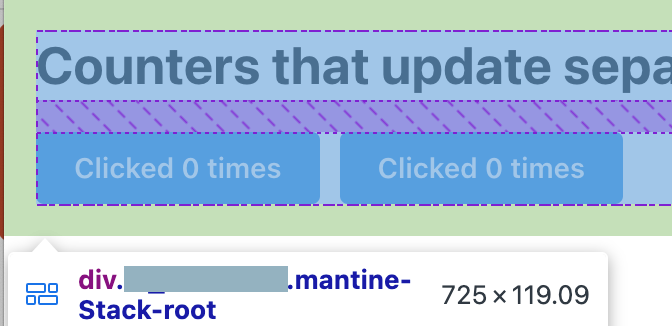
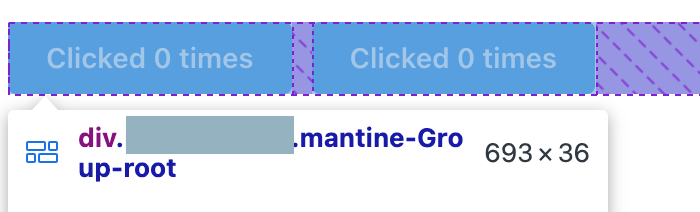
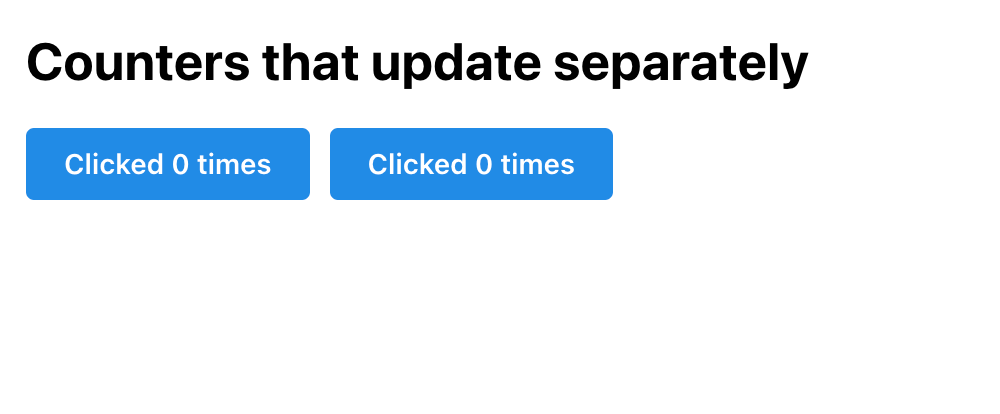
表示結果
表示結果は、以下の通りです。
開発者ツールで見てみると、Stack や Button、Group などが、以下のように適用されているようでした。