はじめに
以下の記事でも扱った、「micro:bit CreateAI」の話です。
●新機能「micro:bit CreateAI」を使った AI・機械学習の仕組みをフルカラーLED と組み合わせてみた【速報版】【micro:bit】 - Qiita
https://qiita.com/youtoy/items/edd4fafac5e5d87b67d7
上記の記事では、以下のように micro:bit に接続したフルカラーLEDテープの制御との組み合わせを試していました。
この時の内容は、処理自体は micro:bit内で完結するものでした。
今回の内容
今回は、micro:bit と別のデバイスを連携させられるようにしてみます。
具体的には、以下の記事などでも扱っていた「ブラウザの Web Bluetooth API」で、ブラウザとの通信をさせてみます。
●Web Bluetooth API を使い micro:bit とブラウザの間で BLE通信【 #GWアドベントカレンダー 2021/4/30 】 - Qiita
https://qiita.com/youtoy/items/c98c0996458a21fc1e67
なお Web Bluetooth API は、対応ブラウザが Chrome系のブラウザ(Chrome や Edge など)に限られるので、その点はご注意ください。
実際に試してみる
実際に試してみます。
micro:bit側
micro:bit側の準備です。
AI・機械学習の部分の対応
AI・機械学習の部分を作ります。
とりあえず、学習させてみた動きは以下の 3つです。
- ほぼ静止
- micro:bit の長辺方向に揺らす
- micro:bit の短辺を上下方向に動かすバタバタさせるような動き
トレーニング前のデータをセットした状態は以下となりました。

この後、トレーニングを実行して、以下の画面で動作確認を行いました。

そして、ブロックコーディングの画面にしたのが以下となります。
3つの動きに応じて、LED の表示が変わるというプログラムがセットされた状態です。

MakeCode側での追加実装・準備
MakeCode側での追加実装・準備を進めます。
メニューから以下の拡張機能の部分を選びます。
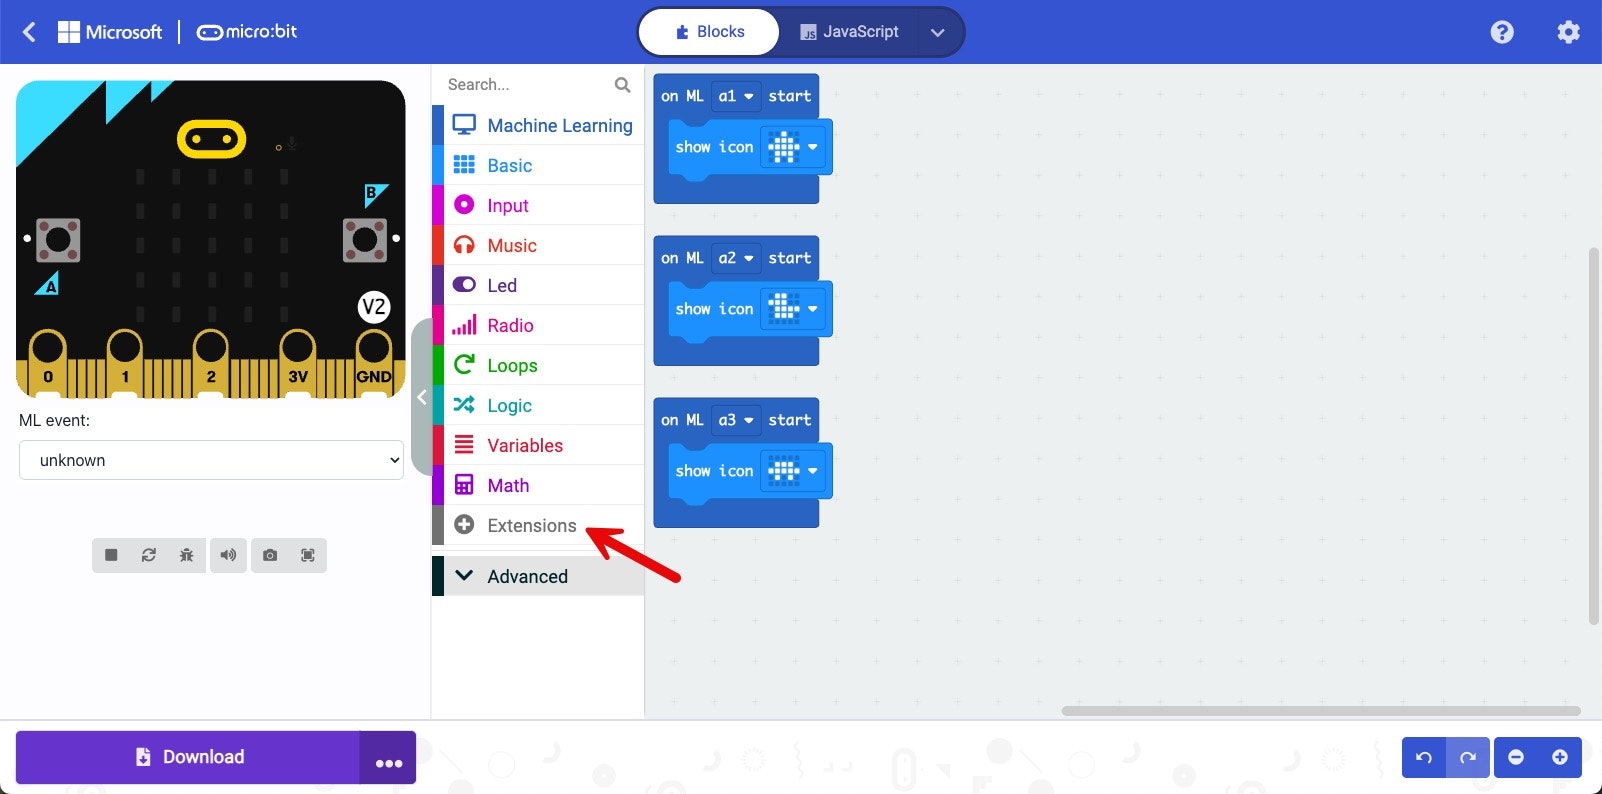
Bluetooth用の拡張機能を検索し、選択します。

そして、Bluetooth接続関連の設定を行います。
画面右上の歯車アイコンから、設定用の項目(Project Settings)を選びます。
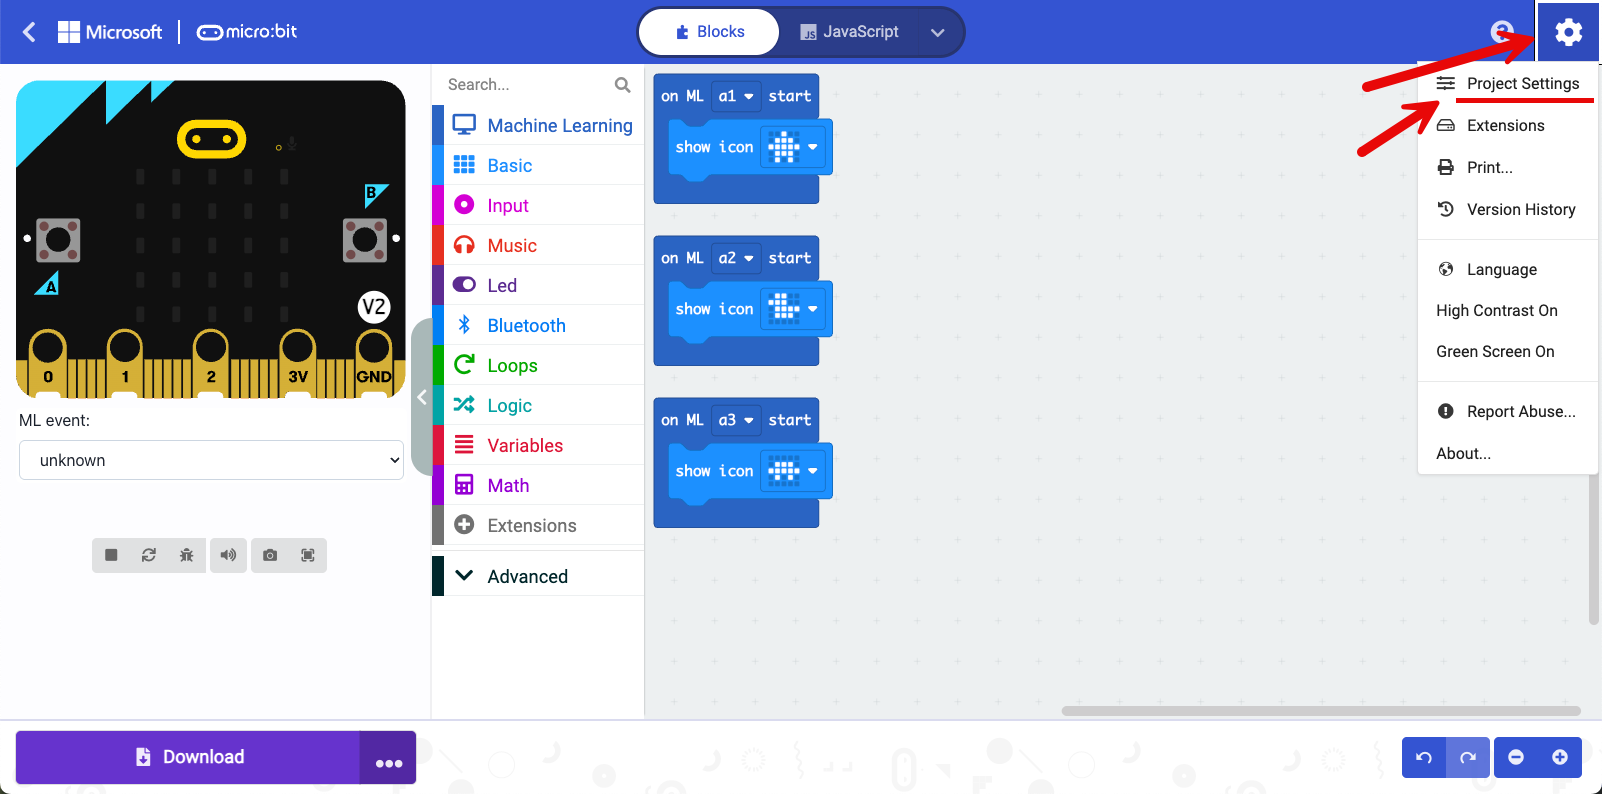
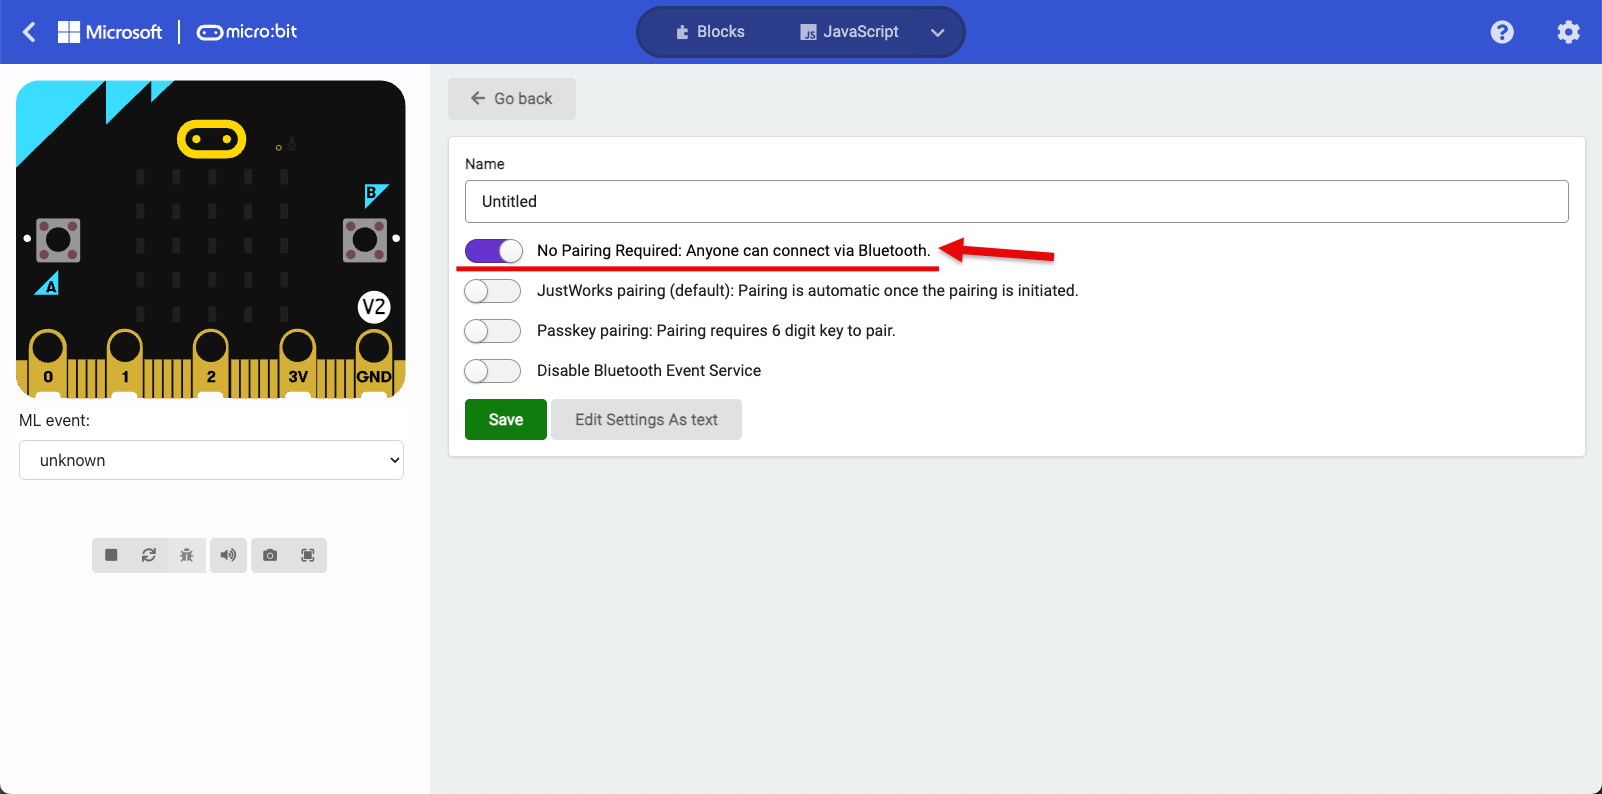
デフォルトでは、上から 2つ目が ON になっているのを、一番上が ON になった状態にします(※ ペアリング関連の設定変更です)。
あとは、Bluetooth の拡張機能のメニューの「・・・ more」から、矢印で示したブロックを使います。

数字の書き込みは、適当な数字を設定したものを「micro:bit の長辺方向に揺らす」「micro:bit の短辺を上下方向に動かすバタバタさせるような動き」のそれぞれに設定しました。
また、メニューの「Basic」にある「on start(日本語化されたメニューだと「最初だけ」のぶろっく)」

最終的には「ほぼ静止」の時の LED表示をなくしてしまったり、起動時・Bluetooth接続/切断時の状態が分かるような LED表示の処理を入れてみました。

HTML+JavaScript の実装
Web Bluetooth API を使った受信側の実装を準備します。
コードは以下のとおりです。
<!DOCTYPE html>
<html>
  <head>
    <meta charset="utf-8" />
    <meta name="viewport" content="width=device-width, initial-scale=1" />
    <title>Web Bluetooth API による通信(micro:bit)</title>
    <style>
      body {
        font-family: sans-serif;
        padding: 20px;
      }
      h1 {
        font-size: 24px;
      }
      button {
        padding: 10px 20px;
        font-size: 16px;
        background-color: #48c774;
        color: #fff;
        border: none;
        border-radius: 4px;
        cursor: pointer;
      }
      button:hover {
        background-color: #3ec46d;
      }
    </style>
  </head>
  <body>
    <h1>操作用ボタン</h1>
    <button type="button" onclick="onStartButtonClick()">micro:bit 接続</button>

    <script>
      const UUID_UART_SERVICE = "6e400001-b5a3-f393-e0a9-e50e24dcca9e";
      const UUID_TX_CHAR_CHARACTERISTIC = "6e400002-b5a3-f393-e0a9-e50e24dcca9e";
      let myCharacteristics;

      async function onStartButtonClick() {
        try {
          console.log("Requesting Bluetooth Device...");
          const device = await navigator.bluetooth.requestDevice({
            filters: [
              { services: [UUID_UART_SERVICE] },
              { namePrefix: "BBC" },
            ],
          });

          console.log("Connecting to GATT Server...");
          const server = await device.gatt.connect();
          console.log("Getting Service...");
          const service = await server.getPrimaryService(UUID_UART_SERVICE);
          console.log("Getting Characteristic...");
          myCharacteristics = await service.getCharacteristic(UUID_TX_CHAR_CHARACTERISTIC);
          await myCharacteristics.startNotifications();
          console.log("> Notifications started");
          myCharacteristics.addEventListener("characteristicvaluechanged", handleNotifications);
        } catch (error) {
          console.log("エラー:" + error);
        }
      }

      function handleNotifications(event) {
        if (myCharacteristics) {
          try {
            const value = event.target.value;
            const inputValue = new TextDecoder().decode(value).replace(/\r?\n/g, '');
            switch (inputValue) {
              case "2":
                console.log("バタバタさせるような動き");
                break;
              default:
                console.log(`センサの値 ${parseInt(inputValue)}`);
            }
          } catch (error) {
            console.log("エラー: " + error);
          }
        }
      }
    </script>
  </body>
</html>
これを Chrome系のブラウザで開き、以下の手順を試します。
- 開発者ツールのコンソールを開く
- 画面上(HTML で実装した内容)に表示される緑のボタンを押す
- ボタン押下後に出てくるリストから、micro:bit に該当するものを選択してペアリング
- micro:bit CreateAI で学習させた動きの通りに、micro:bit を動かす
- 開発者ツールのコンソールでログが出力されているのを確認する
これを試した結果が、以下です。
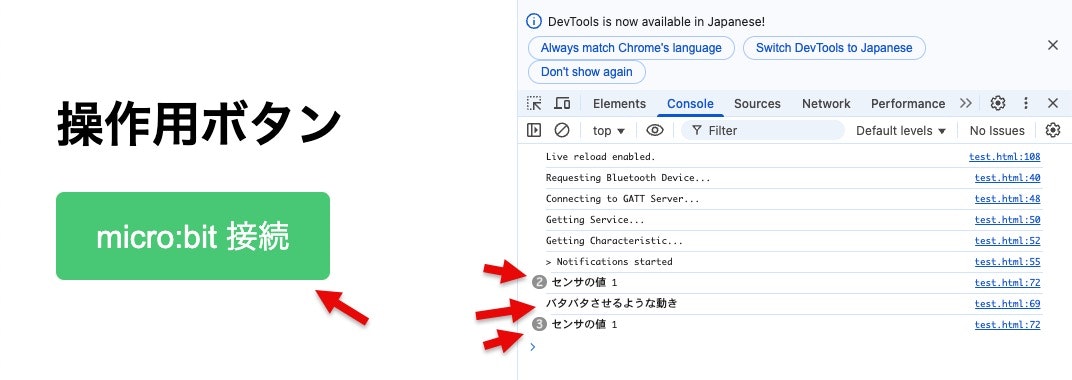
開発者ツールのコンソールに意図通りのログが出力されたことが確認できました。