ファイル転送アプリを作った話
スマートフォンから画像を簡単に(無線で)PCに転送できるようなアプリを開発した時の記録です。
元の記事はこちらになります。

作成・動作環境
受信側はWindowsでの使用になるので.NET Frameworkでの開発。
送信側はAndroidでの使用になるのでXamarin.Formでの開発です。
※動作確認はWindows10+Android(自分のP20Lite等、祖父のらくらくスマートフォン)で行いました👼
パケット構造
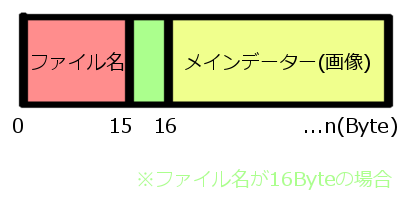
送受信に使うパケットの構造はこんな感じに今回は考えました

ファイル名はUTF-8でバイト列に変換し、メインのファイルデーターのバイト列を1 Byte(0xFF)で仕切った構造となってます。このパケットを送信すれば受信したバイト配列から元のファイル(画像)の復元ができそうです。
送受信の流れ
1・受信側:ファイルの受信を受け付けるためにポート(TCP:23230)監視を開始する
2・送信側:ファイルをユーザーに選択してもらう
3・送信側:選択したファイルを読み取り、独自パケットに変換する
4・送信側:変換したパケットをTCPで送信
5・受信側:受信した独自フォーマットのパケットを変換・ファイルに書き出し
といった流れです。
送信側の処理
まずは送信側の処理についてです。送信側が主にすることは
・ファイルの読み込み
・独自パケットへの変換
・パケットの送信
です。では順を追って説明していきます。
ファイルの読み込み
まずユーザーにスマホで送りたいファイルを選んでもらいます。
そのために画像ピッカーを開き、選択されたファイルのURIを取得し、URIを使いStreamを取得します。
public class ImagePicker
{
    static int REQ_GALLERY = 10;
    public void GetStreamByPicker(Action<string[], Stream[]> result)
    {
        ActivityHost.OnResult = (x) =>
        {
            string[] fileNames;
            Stream[] stms = GetStreamByURI(x, out fileNames);
            result(fileNames, stms);
        };
        var intent = new Intent();
        intent.SetType("image/*");
        intent.PutExtra(Intent.ExtraAllowMultiple, true);
        intent.SetAction(Android.Content.Intent.ActionGetContent);
        ActivityHost.activity.StartActivityForResult(intent, REQ_GALLERY);
    }

    public Stream[] GetStreamByURI(Android.Net.Uri[] uris, out string[] fileNames)
    {
        Android.Content.Context context = Android.App.Application.Context;
        Stream[] streams = new Stream[uris.Length];
        fileNames = new string[uris.Length];

        for (int i = 0; i < uris.Length; i++)
        {
            streams[i] = context.ContentResolver.OpenInputStream(uris[i]);

            ICursor returnCursor = context.ContentResolver.Query(uris[i], null, null, null, null);
            int nameIndex = returnCursor.GetColumnIndex(OpenableColumns.DisplayName);
            returnCursor.MoveToFirst();
            fileNames[i] = returnCursor.GetString(nameIndex);
        }
        return streams;
    }
}
/* 以下はAndroidプロジェクト内に追加 */
public class MainActivity
{
    protected override void OnCreate(Bundle bundle)
    {
        base.OnCreate(bundle);
        ActivityHost.activity = this; //追加
    }

    protected override void OnActivityResult(int requestCode, Result resultCode, Intent data)
    {
        base.OnActivityResult(requestCode, resultCode, data);

        if (requestCode == REQ_GALLERY && resultCode == Result.Ok)
        {
            int cnt = 0;
            bool isSingle = false;

            if (data.ClipData != null) cnt = data.ClipData.ItemCount;
            else isSingle = true;

            Android.Net.Uri[] uris = new Android.Net.Uri[cnt];
            for (int i = 0; i < cnt; i++)
            {
                uris[i] = data.ClipData.GetItemAt(i).Uri;
            }

            if (isSingle)
            {
                uris = new Android.Net.Uri[1];
                uris[0] = data.Data;
            }

            ActivityHost.OnResult?.Invoke(uris);
        }
    }
}

public class ActivityHost{
    public static Activity activity;
    public static Action<Android.Net.Uri[]> OnResult;
}
まずGetStreamByPicker()で画像ピッカーを起動します。起動方法はintentのTypeに**”image/*“を指定し、複数選択を許可するためにExtraAllowMultipleをtrue**にしました。
選択後、**ActivityHost.OnResult(uris)**が呼び出され、**GetStreamByURI()**で取得したUriからファイルのStreamに変換しています。
独自パケットへ変換
先ほどのStreamからデーターのバイト配列を取得し、それを引数(baseByte)にし独自パケットのバイト配列に変換します。
    public static byte[] ToByte(string name, byte[] baseByte)
    {
        byte[] nameByte = Encoding.UTF8.GetBytes(name);
        byte[] bytes = new byte[nameByte.Length + baseByte.Length + 1];
        Console.WriteLine("Encode : " + nameByte.Length + " + " + baseByte.Length + " byte + 1byte");

        Array.Copy(nameByte, 0, bytes, 0, nameByte.Length);
        Array.Copy(baseByte, 0, bytes, nameByte.Length + 1, baseByte.Length);
        bytes[nameByte.Length] = 255; // 0xFF
        return bytes;
    }
パケットの送信
ただただTCPでストリームに流して送信するだけです。
    public async void Send(byte[] sendBytes)
    {
        try
        {
            tcpClient = new TcpClient(ipaddr, USE_PORT);
        }
        catch
        {
            Console.WriteLine("Error");
            return;
        }

        NetworkStream nStream = tcpClient.GetStream();
        nStream.ReadTimeout = 15000;
        nStream.WriteTimeout = 15000;

        //データを送信する
        await nStream.WriteAsync(sendBytes, 0, sendBytes.Length);
        Console.WriteLine("Send : " + sendBytes.Length + "Byte");

        nStream.Close();
        tcpClient.Close();
    }
受信側の処理
受信側はそんなに難しくありません。こちらの流れは
・TCPポートを監視する。
・パケットを受信する。
・パケットを変換・保存する。
といった感じです。
        private async Task Receive()
        {
            bool isError = false;
            if (tcpListener == null)
            {
                tcpListener = new TcpListener(ipaddr, USE_PORT);
                tcpListener.Start();
            }
            Console.WriteLine("Start Server. "+ipaddr);
            tcpClient = await tcpListener.AcceptTcpClientAsync();
            Console.WriteLine("Connected. " + tcpClient.Client.LocalEndPoint);

            NetworkStream nStream = tcpClient.GetStream();
            MemoryStream mStream = new MemoryStream();
            byte[] gdata = new byte[256];
            do
            {
                int dataSize = await nStream.ReadAsync(gdata,0,gdata.Length);
                if (dataSize == 0) isError = true;
                await mStream.WriteAsync(gdata, 0, dataSize);
            }
            while (nStream.DataAvailable);
            byte[] receiveBytes = mStream.GetBuffer();

            byte[] data = new byte[mStream.Length];
            for(int i = 0; i<data.Length; i++)
            {
                data[i] = receiveBytes[i];
            }
            if (isError) return;
            Console.WriteLine("Recived : " + data.Length + " bytes ");

            receiveCallBack?.Invoke(data);
            mStream.Close();
        }
**await tcpListener.AcceptTcpClientAsync()**で接続を待機しています。
接続後NetworkStreamでデーターを受信し、MemoryStreamに一度書き出します。
なお、mStream.GetBuffer()のByte配列のデーターをそのまま使うと最後が0x00の余分なデーターがついてしまうので注意です。
こんな感じでパケットを受け取った後は
        public static byte[] GetByBytes(byte[] bytes,out string name) //受け取ったバイト列から名前とバイナリに分けます。
        {
            byte[] nameByte,fileByte;

            if(!CutByte(bytes,out nameByte,out fileByte)) throw new Exception("Error");
            name = Encoding.UTF8.GetString(nameByte);
            return fileByte;
        }

        private static bool CutByte(byte[] bytes,out byte[] head,out byte[] footer)
        {
            head = null; footer = null;
            for (int i = 0; i < bytes.Length; i++)
            {
                if (bytes[i] == 255) // 0xFF で区切ってある
                {
                    head = new byte[i];
                    Array.Copy(bytes, 0, head, 0, i);
                    footer = new byte[bytes.Length - i - 1];
                    Array.Copy(bytes, i + 1, footer, 0, bytes.Length - i - 1);
                    return true;
                }
            }
            return false;
        }
こんな感じでファイル名とデーターに分けます。
そして、データーの部分をFileStreamで保存します。
保存は
string path; // 保存先パス
string name; // パケットから取得したファイル名
FileStream fs;
try{fs = new FileStream(path+name, FileMode.Create);}
catch{/*OnError*/}
await fs.WriteAsync(bytes, 0, bytes.Length);
fs.Close;
こんな感じです。
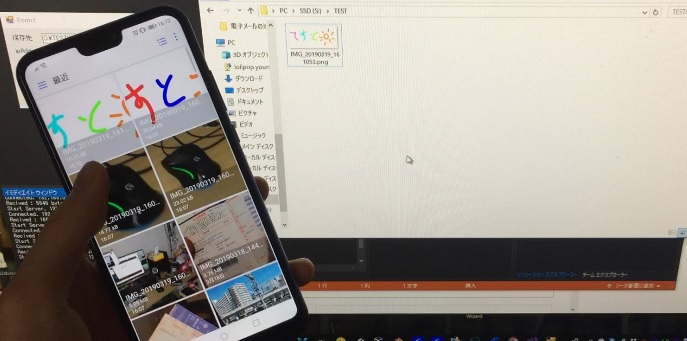
実行の様子

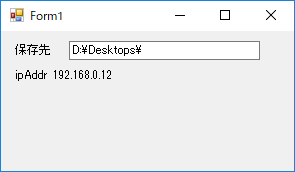
↑ 受信側(Windows10):Windows.Form

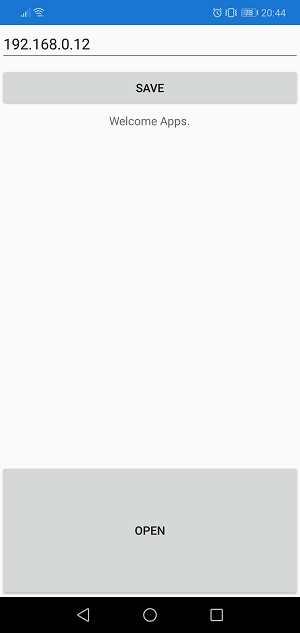
↑ 送信側(Android) : Xamarin.Form
※なお、使用には同じネットワーク上に存在する必要があります。
まとめ
即席で作ったわりに実用性があるものができた気がしました。
※ちなみにユーザー認証などセキュリティー面、エラー処理などは全く配慮されてませんので紹介するソースコードをそのまま使って公開するアプリを作ったら終わります。
