はじめに
SelectMany は、階層化されたデータを平坦化して取り出す LINQ です。同じ LINQ の Select に比べて、一段深い情報を操作するものなので理解が難しいこともあると思います。そこで、イメージ図とコード例を使って説明する記事を書いてみました。
この説明では、LINQ の Select 、ラムダ式についてはほとんど説明しませんので、これらについては知っていることを前提としています。
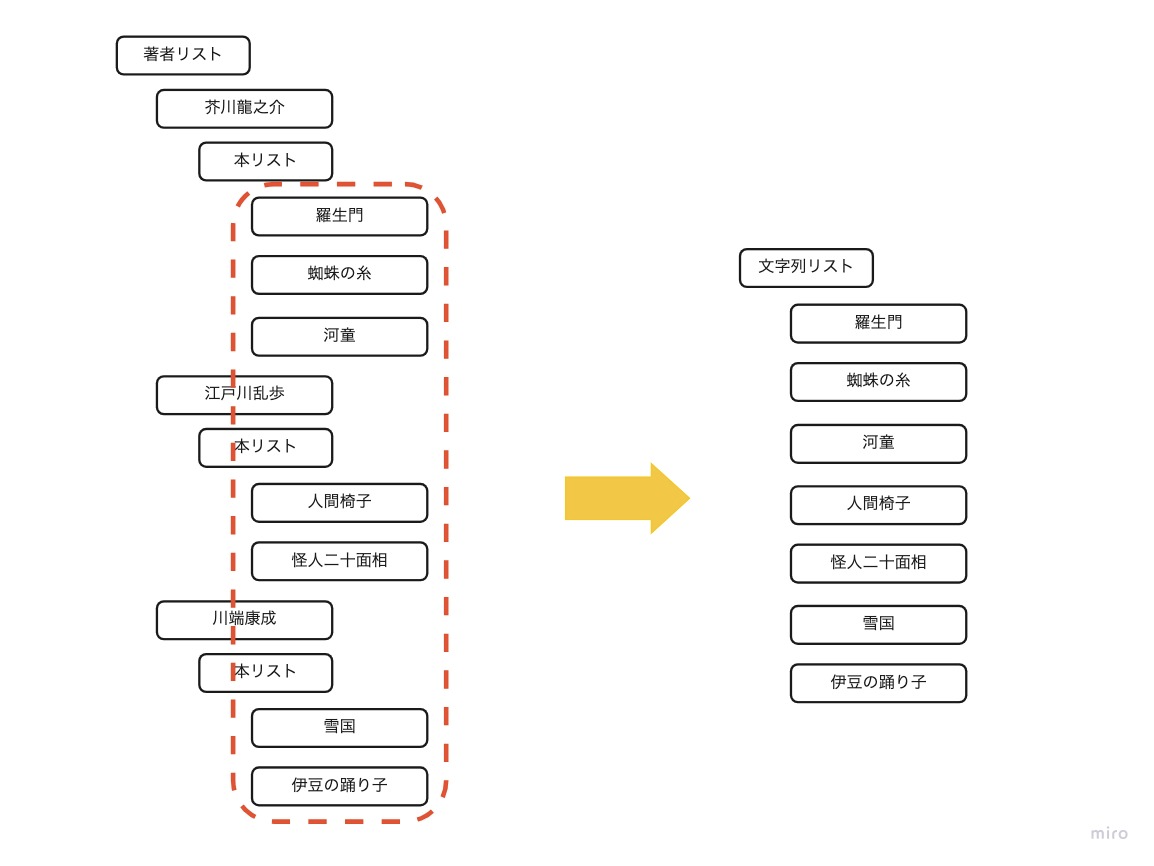
SelectMany は、下の絵のように、リストや配列の階層構造があるときに、深いレベルの情報をまとめて取り出すことができます。山のようになっているデータの山頂部分を一つのリストとして取得できるイメージです。
 |
|---|
基本的な使い方
早速 C# のコードで試してみましょう。以下のコードは、 .NET Core 3.1 の環境で実行できることを確認しています。
前準備
階層構造をもつデータを定義します。
using System;
using System.Linq;

namespace select_many
{
    class Author
    {
        public string Name { get; set; }
        public Book[] Books { get; set; }
    }

    class Book
    {
        public string Name { get; set;}
    }

    class Program
    {
        static void Main(string[] args)
        {
            var authors = CreateAuthors();
        }

        static Author[] CreateAuthors()
        {
            return new[] {
                new Author()
                {
                    Name = "芥川龍之介",
                    Books = new[] {
                        new Book()
                        {
                            Name = "羅生門",
                        },
                        new Book()
                        {
                            Name = "蜘蛛の糸",
                        },
                        new Book()
                        {
                            Name = "河童",
                        },
                    },
                },

                new Author()
                {
                    Name = "江戸川乱歩",
                    Books = new[] {
                        new Book()
                        {
                            Name = "人間椅子",
                        },
                        new Book()
                        {
                            Name = "怪人二十面相",
                        },
                    },
                },

                new Author()
                {
                    Name = "川端康成",
                    Books = new[] {
                        new Book()
                        {
                            Name = "雪国",
                        },
                        new Book()
                        {
                            Name = "伊豆の踊り子",
                        },
                    },
                },
            };
        }
    }
}
Select
通常の Select だと、上の階層にあたる Author の名前一覧が取得したりできるのでした。
static void Main(string[] args)
{
    var authors = CreateAuthors();
    var authorNames = authors.Select(author => author.Name);
    Console.WriteLine(string.Join(", ", authorNames));
}
芥川龍之介, 江戸川乱歩, 川端康成
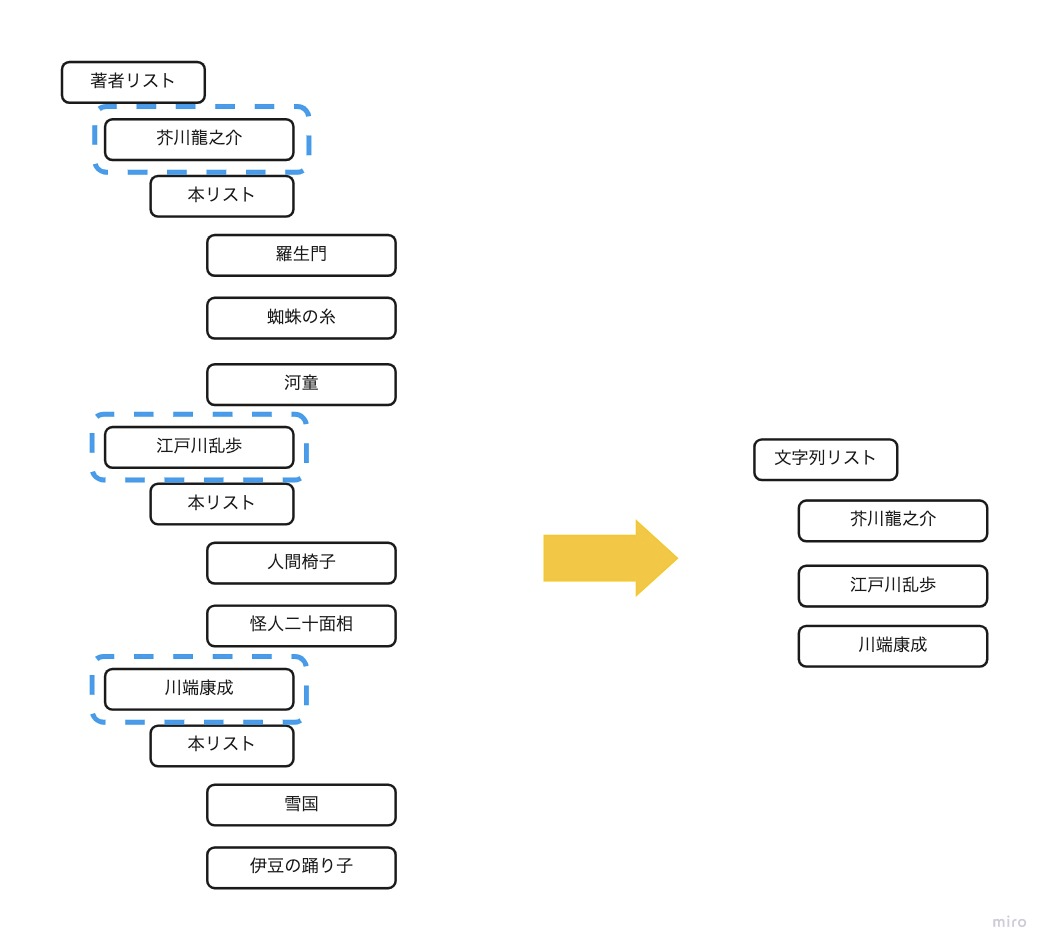
青い点線で囲まれた作者名をラムダ式で指定することで、作者名の文字列のリストが取得できています。
 |
|---|
SelectMany
SelectMany を使うと、下の階層に当たる Book の名前一覧が取得できます。
static void Main(string[] args)
{
    var authors = CreateAuthors();

    var bookNames = authors.SelectMany(
        author => author.Books.Select(book => book.Name)
    );

    Console.WriteLine(string.Join(", ", bookNames));
}
羅生門, 蜘蛛の糸, 河童, 人間椅子, 怪人二十面相, 雪国, 伊豆の踊り子
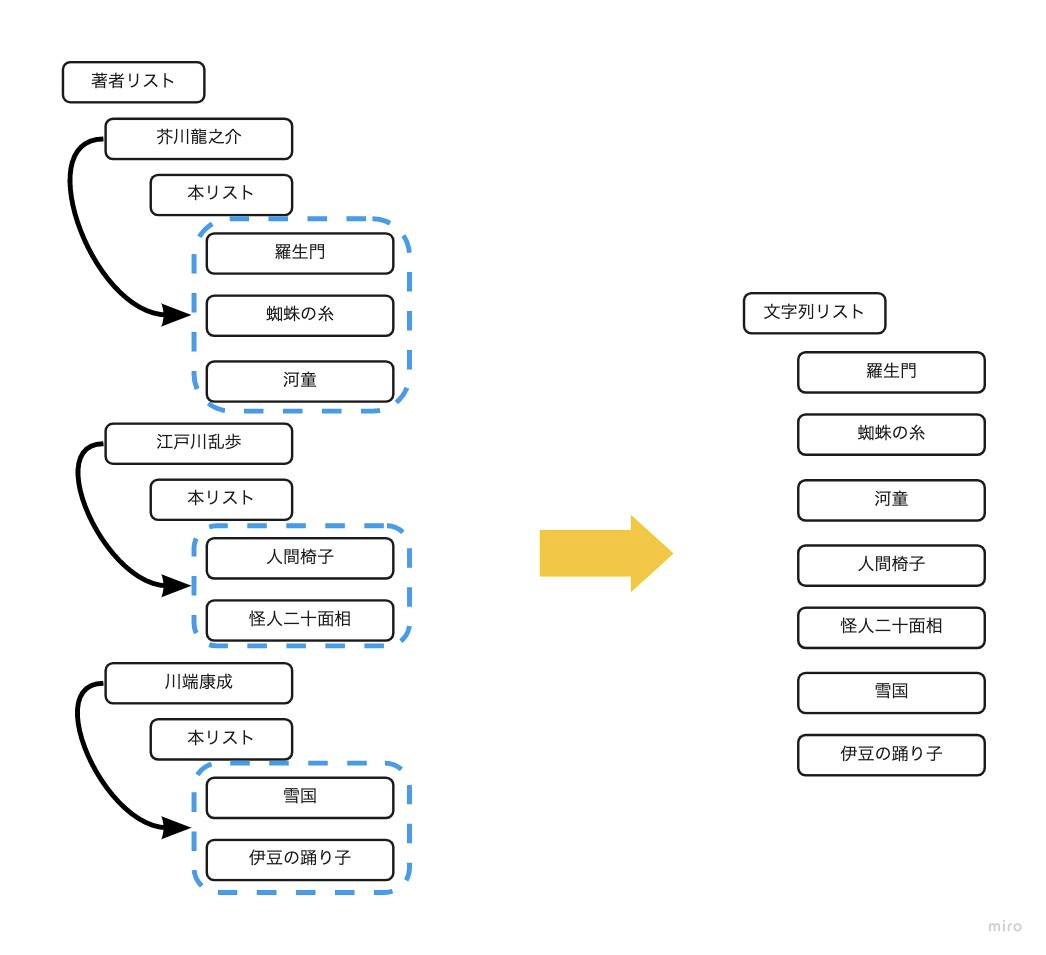
Selectとは違って、引数のラムダ式 a.Books.Select(b => b.Name) では、青い点線で囲まれた部分(本の名前のシーケンス)を指定しています。この複数のシーケンスをつなげた結果が取得できます。
 |
|---|
応用の使い方(オーバーロード)
LINQ には種々のオーバーロードが定義されていることが多いのですが、 SelectMany も同じです。複数の LINQ が必要になる操作をひとまとめにして実行できるものがオーバーロードで定義されていることが多いです。使いこなせるとよりシンプルで理解しやすい書き方ができます。
SelectMany でインデックス番号も取得
SelectMany<TSource,TResult>(IEnumerable<TSource>, Func<TSource,Int32,IEnumerable<TResult>>)
シーケンスの各要素を IEnumerable に射影し、結果のシーケンスを 1 つのシーケンスに平坦化します。 各ソース要素のインデックスは、その要素の射影されたフォームで使用されます。
上の階層のインデックス番号を取得します。
static void Main(string[] args)
{
    var authors = CreateAuthors();

    var bookNames = authors.SelectMany(
        (author, i) => author.Books.Select(book => $"{i}:{book.Name}")
    );

    Console.WriteLine(string.Join(", ", bookNames));
}
0:羅生門, 0:蜘蛛の糸, 0:河童, 1:人間椅子, 1:怪人二十面相, 2:雪国, 2:伊豆の踊り子
余談ですが、 Select も同じ様にインデックス番号を取得できるので、2つを組み合わせると、上位と下位のインデックスをつなげて取得したりできます。
static void Main(string[] args)
static void Main(string[] args)
{`
    var authors = CreateAuthors();

    var bookNames = authors.SelectMany(
        (author, i) => author.Books.Select((book, j) => $"{i}-{j}:{book.Name}")
    );

    Console.WriteLine(string.Join(", ", bookNames));
}
0-0:羅生門, 0-1:蜘蛛の糸, 0-2:河童, 1-0:人間椅子, 1-1:怪人二十面相, 2-0:雪国, 2-1:伊豆の踊り子
SelectMany で上位と下位をまとめて処理
SelectMany<TSource,TCollection,TResult>(IEnumerable<TSource>, Func<TSource,IEnumerable<TCollection>>, Func<TSource,TCollection,TResult>)
シーケンスの各要素を IEnumerable に射影し、結果のシーケンスを 1 つのシーケンスに平坦化して、その各要素に対して結果のセレクター関数を呼び出します。
上位の要素(例だとAuthor)と、下位の結果の要素(例だとbookName)をまとめて処理するラムダ式を追加できます。1つ目のラムダ式の結果の要素一つ一つに対して、2つ目のラムダ式が呼び出されます。
static void Main(string[] args)
{
    var authors = CreateAuthors();

    var bookNames = authors.SelectMany(
        author => author.Books.Select(book => book.Name),
        (author, bookName) => $"{bookName}/{author.Name}"
    );

    Console.WriteLine(string.Join(", ", bookNames));
}
羅生門/芥川龍之介, 蜘蛛の糸/芥川龍之介, 河童/芥川龍之介, 人間椅子/江戸川乱歩, 怪人二十面相/江戸川乱歩, 雪国/川端康成, 伊豆の踊り子/川端康成
SelectMany でインデックス番号を取得した上で、上位と下位をまとめて処理
SelectMany<TSource,TCollection,TResult>(IEnumerable<TSource>, Func<TSource,Int32,IEnumerable<TCollection>>, Func<TSource,TCollection,TResult>)
シーケンスの各要素を IEnumerable に射影し、結果のシーケンスを 1 つのシーケンスに平坦化して、その各要素に対して結果のセレクター関数を呼び出します。 各ソース要素のインデックスは、その要素の中間の射影されたフォームで使用されます。
さきほどの2つのあわせ技です。
static void Main(string[] args)
{
    var authors = CreateAuthors();

    var bookNames = authors.SelectMany(
        (author, i) => author.Books.Select((book, j) => $"{i}-{j}:{book.Name}"),
        (author, bookName) => $"{bookName}/{author.Name}"
    );

    Console.WriteLine(string.Join(", ", bookNames));
}
0-0:羅生門/芥川龍之介, 0-1:蜘蛛の糸/芥川龍之介, 0-2:河童/芥川龍之介, 1-0:人間椅子/江戸川乱歩, 1-1:怪人二十面相/江戸川乱歩, 2-0:雪国/川端康成, 2-1:伊豆の踊り子/川端康成