はじめに
昨年のGoogleI/O 2018でConstraintLayout2.0が紹介されましたが、その中でMotionLayoutという新たなAndroidのアニメーションの仕組みが公開されました。
今回は、そのMotionLayoutを使用して、MaterialDesignのTextFieldっぽいものを実装してみたので、それについて実装方法などを書き連ねたいと思います。
※またMotionLayoutはまだalpha版なので、今回は、constraint-layout:2.0.0-alpha4での実装を紹介しますが、新たなバージョンがリリースされた場合、実装が変わる可能性もあるので、ご了承ください。
作ったもの
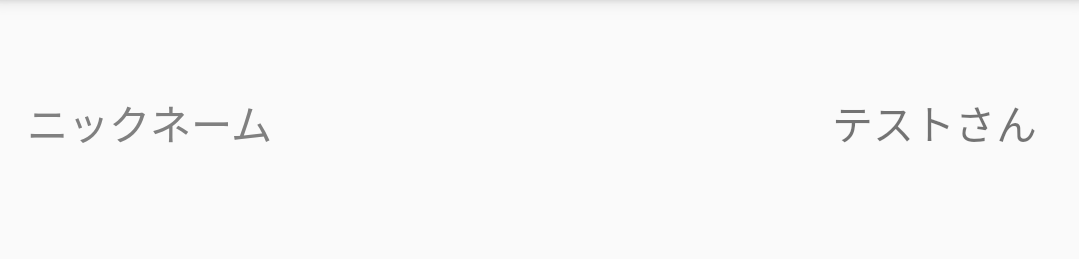
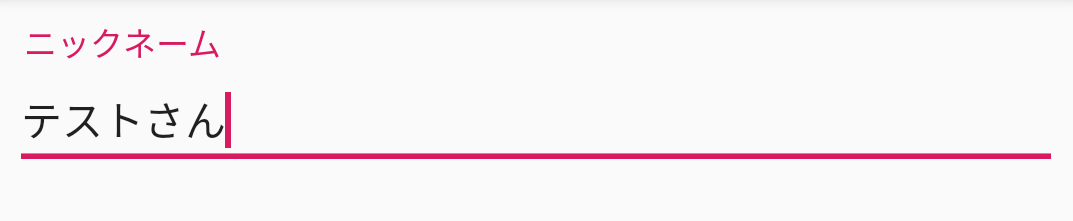
こちらのような項目がリストのように表示されていて、画面遷移させることなく閲覧モードから入力モードにすることができます。それぞれのモード間の遷移時のアニメーションでMotionLayoutを使って実装しています。
挙動としては、
- 右のテキスト部分をクリックした場合、入力モードになる
- フォーカスが外れたら、閲覧モードに戻る
(フォーカスは別のテキストFieldをクリックするか、下のボタンを押下すると外れる)

ソースコードはこちらに上げています。参考にされたい方はこちらをご覧ください。
https://github.com/youmitsu/MotionLayoutMaterialTextField
MotionLayoutの概要
MotionLayoutについては、多くの方が仕組みについての記事を公開しているので、ここでは省略します。
基本的なステップとしては、以下となります。
- アニメーションさせる前のレイアウトをMotionLayoutを親として実装
- Sceneのxmlを作成
- 1のattributeに2のSceneファイルを指定
実装方法
1. ConstraintLayout2.0のインストール
まずは、ConstraintLayout2.0をインストールします。
AndroidXと、SupportLibraryの2つのArtifactsがあるので、自身のプロジェクトに応じて、使い分けましょう。
リリースノートはこちら
https://androidstudio.googleblog.com/2019/04/constraintlayout-200-alpha-4.html
AndroidXの場合
dependencies {
    ...
    implementation 'androidx.constraintlayout:constraintlayout:2.0.0-alpha4'
}
SupportLibraryの場合
dependencies {
    ...
    implementation 'com.android.support.constraint:constraint-layout:2.0.0-alpha4'
}
2. 初期状態のviewを作成
まずは、こちらのクリックされる前のレイアウトを作っていきます。
xmlは以下になります。MotionLayoutはConstraintLayoutの子クラスなので、基本的にはConstraintLayoutでレイアウトを作るのと同じ要領で実装します。
※サンプルリポジトリでは、Databindingを使って入力データをバインディングしているので、<layout>と<data>タグが入っていますが、無くても動きます。
<?xml version="1.0" encoding="utf-8"?>
<layout xmlns:android="http://schemas.android.com/apk/res/android"
        xmlns:app="http://schemas.android.com/apk/res-auto">

    <data>
        <variable name="data" type="jp.co.youmitsu.myapplication.CustomMotionEditTextLayout"/>
    </data>

    <androidx.constraintlayout.motion.widget.MotionLayout
            android:layout_width="match_parent"
            android:layout_height="match_parent"
            android:id="@+id/motion_layout"
    >

        <TextView
                android:id="@+id/nickname_title"
                android:layout_width="0dp"
                android:layout_height="wrap_content"
                android:gravity="start|center_vertical"
                android:layout_marginStart="10dp"
                android:textColor="#808080"
                app:layout_constraintTop_toTopOf="parent"
                app:layout_constraintBottom_toBottomOf="parent"
                app:layout_constraintStart_toStartOf="parent"
                app:layout_constraintEnd_toStartOf="@id/nickname_value"
                android:text="@{data.title}"
        />

        <TextView
                android:id="@+id/nickname_value"
                android:layout_width="0dp"
                android:layout_height="match_parent"
                android:gravity="end|center_vertical"
                android:textSize="15sp"
                android:layout_marginEnd="10dp"
                android:ellipsize="end"
                android:singleLine="true"
                android:maxEms="15"
                android:text="@{data.value}"
                android:clickable="true"
                android:focusable="true"
                app:layout_constraintTop_toTopOf="parent"
                app:layout_constraintBottom_toBottomOf="parent"
                app:layout_constraintEnd_toEndOf="parent"
                app:layout_constraintStart_toEndOf="@id/nickname_title"/>

        <androidx.appcompat.widget.AppCompatEditText
                android:id="@+id/edit_text"
                android:layout_height="wrap_content"
                android:layout_width="0dp"
                android:alpha="0"
                android:visibility="invisible"
                android:textSize="15sp"
                android:inputType="text"
                android:text="@{data.value}"
                app:layout_constraintStart_toStartOf="parent"
                app:layout_constraintEnd_toEndOf="parent"
                app:layout_constraintTop_toTopOf="parent"
                app:layout_constraintBottom_toBottomOf="parent"/>

    </androidx.constraintlayout.motion.widget.MotionLayout>
</layout>
3. アニメーション前後のConstraintの状態とTransitionを表すMotionSceneファイルを作成
次に、タップしてアニメーションし始める時と終わった時のレイアウトのConstraintSetとTransitionをMotionSceneという形で定義します。
MotionSceneファイルはxmlで記述するので、res/xml配下に新たなファイルを作成します。
xmlファイルは以下です。
@id/startがアニメーションする前のConstraintSet。@id/endがアニメーションした後のConstraintSetを表しています。
今回の場合、start時のConstraintと上記2で定義したMotionLayout内の要素のConstraintは一致することになります。
@id/startのConstraintSetでのレイアウト:
@id/endのConstraintSetでのレイアウト:
<?xml version="1.0" encoding="utf-8"?>
<MotionScene
        xmlns:motion="http://schemas.android.com/apk/res-auto"
        xmlns:android="http://schemas.android.com/apk/res/android">

    <Transition
            motion:constraintSetStart="@id/start"
            motion:constraintSetEnd="@id/end"
            motion:duration="200">

        <OnClick motion:targetId="@id/nickname_value"
                 motion:clickAction="transitionToStart|transitionToEnd"/>

    </Transition>

    <ConstraintSet android:id="@+id/start">
        <Constraint
                android:id="@+id/nickname_title"
                android:layout_width="0dp"
                android:layout_height="wrap_content"
                android:textSize="@dimen/text_size_normal"
                android:layout_marginStart="5dp"
                motion:layout_constraintTop_toTopOf="parent"
                motion:layout_constraintBottom_toBottomOf="parent"
                motion:layout_constraintStart_toStartOf="parent"
                motion:layout_constraintEnd_toStartOf="@id/nickname_value">
            <CustomAttribute
                    motion:attributeName="textSize"
                    motion:customFloatValue="15"
            />
            <CustomAttribute
                    motion:attributeName="textColor"
                    motion:customColorValue="#808080"
            />
        </Constraint>

        <Constraint
                android:id="@+id/nickname_value"
                android:layout_width="0dp"
                android:layout_height="match_parent"
                android:textSize="15sp"
                android:layout_marginEnd="10dp"
                motion:layout_constraintTop_toTopOf="parent"
                motion:layout_constraintBottom_toBottomOf="parent"
                motion:layout_constraintEnd_toEndOf="parent"
                motion:layout_constraintStart_toEndOf="@id/nickname_title"/>

        <Constraint
                android:id="@+id/edit_text"
                android:layout_height="wrap_content"
                android:layout_width="0dp"
                android:alpha="0"
                android:visibility="invisible"
                android:textSize="15sp"
                motion:layout_constraintStart_toStartOf="parent"
                motion:layout_constraintEnd_toEndOf="parent"
                motion:layout_constraintTop_toTopOf="parent"
                motion:layout_constraintBottom_toBottomOf="parent"/>
    </ConstraintSet>

    <ConstraintSet android:id="@+id/end">

        <Constraint
                android:id="@id/nickname_title"
                android:layout_width="0dp"
                android:layout_height="wrap_content"
                android:layout_marginStart="5dp"
                motion:layout_constraintBottom_toTopOf="@id/edit_text"
                motion:layout_constraintStart_toStartOf="parent"
                motion:layout_constraintEnd_toEndOf="parent">
            <CustomAttribute
                    motion:attributeName="textSize"
                    motion:customFloatValue="12"
            />
            <CustomAttribute
                    motion:attributeName="textColor"
                    motion:customColorValue="@color/colorAccent"
            />
        </Constraint>

        <Constraint
                android:id="@+id/nickname_value"
                android:layout_width="wrap_content"
                android:layout_height="0dp"
                android:textSize="15sp"
                android:alpha="0"
                android:visibility="invisible"
                motion:layout_constraintTop_toTopOf="parent"
                motion:layout_constraintBottom_toBottomOf="parent"
                motion:layout_constraintStart_toStartOf="parent"/>

        <Constraint
                android:id="@id/edit_text"
                android:layout_height="wrap_content"
                android:layout_width="0dp"
                android:alpha="1"
                android:visibility="visible"
                motion:layout_constraintStart_toStartOf="parent"
                motion:layout_constraintEnd_toEndOf="parent"
                motion:layout_constraintTop_toTopOf="parent"
                motion:layout_constraintBottom_toBottomOf="parent"/>
    </ConstraintSet>

</MotionScene>
4. MotionLayoutのattributeにlayoutDescriptionとして3のSceneファイルを設定
アニメーションする対象のview(MotionLayout)とMotionSceneファイルを作成できたら、それぞれを結びつけるために、MotionLayoutのlayoutDescription属性を設定します。こうすることで、画像のようなアニメーションが実現できます。
<?xml version="1.0" encoding="utf-8"?>
<layout xmlns:android="http://schemas.android.com/apk/res/android"
        xmlns:app="http://schemas.android.com/apk/res-auto">

    <data>
        <variable name="data" type="jp.co.youmitsu.myapplication.CustomMotionEditTextLayout"/>
    </data>

    <androidx.constraintlayout.motion.widget.MotionLayout
            android:layout_width="match_parent"
            android:layout_height="match_parent"
            android:id="@+id/motion_layout"
            app:layoutDescription="@xml/layout_custom_motion_edittext_scene"  // これを追加
    >
    ...
    </androidx.constraintlayout.motion.widget.MotionLayout>
</layout>
まとめ
今回は、MotionLayoutを使って、MaterialDesignのTextFieldの拡張っぽいものを実装してみました。アニメーションに関するコードをほとんどxmlだけで完結させることができるので、とても使いやすそうだなという印象です。
これからも色々機能追加があるみたいなので、楽しみです。
最後まで読んでいただきありがとうございました。