はじめに
自分メモですが、Azure Kubernetes Service(AKS)のデプロイ時に「高度ネットワーク」の設定を使用して既存の仮想ネットワーク内のサブネットにデプロイする際の注意点をまとめました。
構成
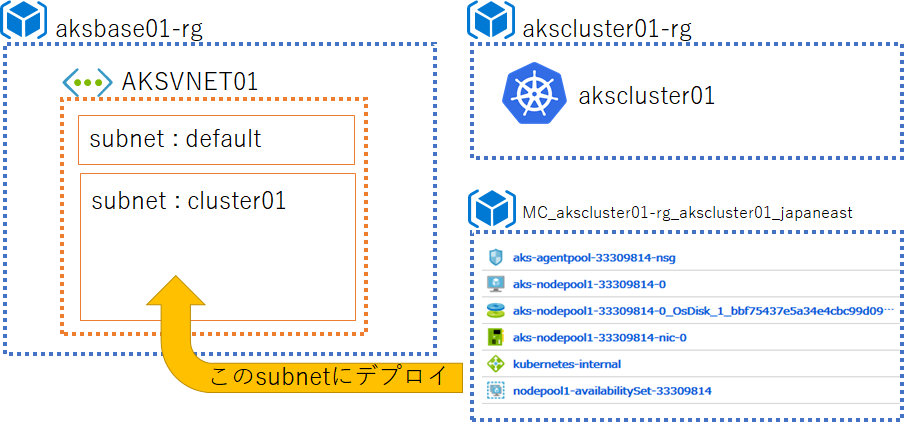
リソースグループ「aksbase01-rg」には既に仮想ネットワーク「AKSVNET01」が作成されており、その中のサブネット「cluster01」にAKSのノードをデプロイします。
AKSの作成
事前に仮想ネットワークは作成済みとします。他に必要なリソースグループ(akscluster01-rg)も作成しておきます。
リソースグループ「akscluster01-rg」にAKS「akscluster01」を作成します。
以下はAzure CLIでの実行例です。引数として、AKSVNET01のcluster01のIDを渡しています。
# SubnetのIDを取得
SUBNET_ID=$(az network vnet subnet list -g aksbase01-rg --vnet-name AKSVNET01 --query "[?name=='<適宜修正>cluster01</適宜修正>'].id" -o tsv)

# AKSの作成
az aks create --resource-group akscluster01-rg --name akscluster01 --network-plugin azure --vnet-subnet-id $SUBNET_ID --docker-bridge-address 172.17.0.1/16 --dns-service-ip 10.1.0.10 --service-cidr 10.1.0.0/24
参考 : Azure Kubernetes Service (AKS) のネットワーク構成
ロードバランサの作成
検証用nginxの作成
とりあえず素のnginxを動かします。
apiVersion: apps/v1
kind: Deployment
metadata:
  name: nginx
  labels:
    app: nginx
spec:
  replicas: 1
  selector:
    matchLabels:
      app: nginx
  template:
    metadata:
      labels:
        app: nginx
    spec:
      containers:
      - name: nginx
        image: nginx
        ports:
        - containerPort: 80
          name: nginx
$ kubectl apply -f nginx.yaml
$ kubectl get pods
NAME                     READY     STATUS    RESTARTS   AGE
nginx-744f657968-5c2gz   1/1       Running   0          12s
既存仮想ネットワークのあるリソースグループへロール追加
公式ドキュメントを見ると、以下の文言があります。

参考 : Azure Kubernetes Service (AKS) で内部ロード バランサーを使用する
ちょっとこの記述だけではロール割り当てに何を引数として渡すべきか分かりづらいですね(後ほどフィードバックしておきます)
というわけで、既存の仮想ネットワークリソースのあるリソースグループに対して、AKSクラスターからネットワーク共同管理者権限でアクセスできるようにする必要があります。
スクリプトを作りましたので以下に示します。
# !/bin/sh

VNET_RGNAME="aksbase01-rg" # 既存VNETが配置されているリソースグループ名を指定
AKS_RGNAME="akscluster01-rg" # AKSを展開したリソースグループ名を指定
AKS_NAME="akscluster01" # AKSの名前を指定

AKS_CLIENT_ID=$(az aks show -g $AKS_RGNAME -n $AKS_NAME --query "servicePrincipalProfile.clientId" -o tsv)
ACR_ID=$(az group show -g $VNET_RGNAME --query id -o tsv)

az role assignment create --assignee $AKS_CLIENT_ID --role "Network Contributor" --scope $ACR_ID

exit 0
こちらを実行すると、リソースグループ「aksbase01-rg」のロールの割り当てに、AKSのサービスプリンシバルがネットワーク共同管理者で追加されます。
ILBの作成
つづいて、他のサブネットからこのnginxにアクセスできるように、ILBを作成します。
apiVersion: v1
kind: Service
metadata:
  name: ilbsvc
  annotations:
    service.beta.kubernetes.io/azure-load-balancer-internal: "true"
spec:
  type: LoadBalancer
  ports:
  - port: 80
  selector:
    app: nginx
$ kubectl apply -f ilb.yaml
service/ilbsvc created
暫く待つと、EXTERNAL-IPが割り当てられました。
$ kubectl get service ilbsvc
NAME      TYPE           CLUSTER-IP   EXTERNAL-IP   PORT(S)        AGE
ilbsvc    LoadBalancer   10.1.0.36    192.168.1.4   80:31414/TCP   4m
接続確認
仮想ネットワークの別サブネットから、curlコマンドで確認します。
# curl 192.168.1.4
<!DOCTYPE html>
<html>
<head>
<title>Welcome to nginx!</title>
<style>
    body {
        width: 35em;
        margin: 0 auto;
        font-family: Tahoma, Verdana, Arial, sans-serif;
    }
</style>
</head>
<body>
<h1>Welcome to nginx!</h1>
<p>If you see this page, the nginx web server is successfully installed and
working. Further configuration is required.</p>

<p>For online documentation and support please refer to
<a href="http://nginx.org/">nginx.org</a>.<br/>
Commercial support is available at
<a href="http://nginx.com/">nginx.com</a>.</p>

<p><em>Thank you for using nginx.</em></p>
</body>
</html>
というわけで、無事ILBが作成されていることが確認できました。
おわりに
ポイントとしては、リソースグループ「MC_akscluster01-rg_akscluster01_japaneast」配下に作成されたAKSのノードが、ILBを作成する際に別リソースグループ内のリソース(今回は仮想ネットワーク)に対してアクセスできる必要があるので、権限を適切に設定しましょうね、ということでした。
kubernetesをAzureで使っていく上での注意点として今回記事を書きました。
参考になれば幸いです。