本手順は、Orchestrator Agentが不要になったServerless Agent 5.3.1以上を対象とした手順になります。
本記事では、AWS ECS Fargateのランタイム脅威検知を実現する、Sysdig Serverless Agentバージョン5.3.1のマニュアルでのインストール方法をご紹介します。ドキュメントは下記になります。
Terraformを使用した手順は下記記事をご参照ください。
Workload Agentのデプロイ
マニュアルでのインストール手順では、ワークロードコンテナをデプロイするために使用しているタスク定義ファイルを書き換えます。
例として、元のタスク定義ファイルは以下になります(書き換え後のタスク定義ファイルは最後に掲載しています)。
後ほどの脅威検知テストのため、本手順では外部からcurlコマンドを介してコンテナ上で任意のコマンド実行が可能なsecurity-playgroundイメージを使用しています。自己責任でご利用ください。
{
    "family": "securitiy-playground",
    "containerDefinitions": [
        {
            "name": "securitiy-playground",
            "image": "sysdiglabs/security-playground",
            "cpu": 0,
            "portMappings": [
                {
                    "name": "securitiy-playground-8080-tcp",
                    "containerPort": 8080,
                    "hostPort": 8080,
                    "protocol": "tcp",
                    "appProtocol": "http"
                }
            ],
            "essential": true,
            "entryPoint": [
                "gunicorn",
                "-b",
                ":8080",
                "--workers",
                "2",
                "--threads",
                "4",
                "--worker-class",
                "gthread",
                "--access-logfile",
                "-",
                "--error-logfile",
                "-",
                "app:app"
            ],
            "environment": [],
            "mountPoints": [],
            "volumesFrom": []
        }
    ],
    "taskRoleArn": "arn:aws:iam::XXXXXXXX:role/ecsTaskExecutionRole",
    "executionRoleArn": "arn:aws:iam::XXXXXXXX:role/ecsTaskExecutionRole",
    "networkMode": "awsvpc",
    "requiresCompatibilities": [
        "FARGATE"
    ],
    "cpu": "1024",
    "memory": "2048",
    "runtimePlatform": {
        "cpuArchitecture": "X86_64",
        "operatingSystemFamily": "LINUX"
    }
}
1. pidモードとしてtaskを設定します(行頭の+マークは不要です)。
{
   "containerDefinitions": [...],
+  "pidMode": "task"
}
2. ワークロードコンテナのコンテナ定義の記述を編集し、sysdigInstrumentationコンテナからワークロードコンテナにボリュームマウントする記述を追加します。
          "volumesFrom": [
              {
                "sourceContainer": "SysdigInstrumentation",
                "readOnly": true
              }
            ],
3. ワークロードコンテナにSYS_PTRACE機能を追加するため、コンテナ定義に以下を追加します。
"linuxParameters": {
  "capabilities": {
    "add": ["SYS_PTRACE"]
  }
}
4. ワークロードコンテナのentryPointの先頭に/opt/draios/bin/instrumentを追加します。たとえば、元のentryPointが ["my", "original", "entrypoint"] の場合、["/opt/draios/bin/instrument", "my", "original", "entrypoint"] になります。
entryPointに["/opt/draios/bin/instrument"]だけを記載して、commandの記載がない場合はコンテナが起動しません。上記例のようにコンテナ定義のentryPointもしくはcommandにワークロードコンテナが起動時に実行するコマンドを明示的に記載してください。元のコンテナ定義のentryPointとcommandの値が両方とも空の場合(もしくは記載自体がない場合)は、docker inspectコマンド等でコンテナイメージのEntrypointもしくはCMDの記述を確認し、明示的に記載してください。
5. ワークロードコンテナの環境変数として、SYSDIG_SIDECAR環境変数をautoとして設定します。
      "environment": [
        ...
+       {
+         "name": "SYSDIG_SIDECAR",
+         "value": "auto"
+       }
      ]
6. Workload Agentとなる新しいコンテナを既存のタスク定義に追加します。sysdigInstrumentationなどの名前を付けます。このコンテナではquay.io/sysdig/workload-agent:latestイメージを使用します。
-
SYSDIG_COLLECTORおよびSYSDIG_COLLECTOR_PORT環境変数を設定します。 -
SYSDIG_ACCESS_KEY環境変数を設定します。 -
SYSDIG_PRIORITY環境変数を設定します。値として、ワークロードの可用性を重視するavailabilityか、ワークロードのセキュリティ保護を重視するsecurityのどちらかを選択します。 -
SYSDIG_SIDECAR環境変数をautoとして設定します。
{
  ...
  "containerDefinitions": [
    ...
+   {
+     "name": "sysdigInstrumentation",
+     "image": "quay.io/sysdig/workload-agent:latest",
+     "essential": false,
+     "environment": [
+       {
+           "name": "SYSDIG_COLLECTOR",
+           "value": "ingest-us2.app.sysdig.com"
+       },
+       {
+           "name": "SYSDIG_COLLECTOR_PORT",
+           "value": "6443"
+       },
+       {
+           "name": "SYSDIG_ACCESS_KEY",
+           "value": "0123456789abcdef"
+       },
+       {
+           "name": "SYSDIG_PRIORITY",
+           "value": "availability"
+       },
+       {
+           "name": "SYSDIG_SIDECAR",
+           "value": "auto"
+       }
+     ]
+   }
  ]
}
Sysdig Collectorの値はご利用のSysdig SaaSリージョンにより異なります。下記ドキュメントをご参照ください。一般的なUS West(Oregon)リージョンであれば ingest-us2.app.sysdig.com になります。
https://docs.sysdig.com/en/docs/administration/saas-regions-and-ip-ranges/
7. 更新したタスク定義を保存し、ECSクラスターにデプロイします。
更新後のタスク定義は以下のようになります(行頭の+マークは不要です)。
{
    "family": "securitiy-playground",
    "containerDefinitions": [
        {
            "name": "securitiy-playground",
            "image": "sysdiglabs/security-playground",
            "cpu": 0,
+           "linuxParameters": {
+               "capabilities": {
+                 "add": ["SYS_PTRACE"]
+               }
+           },
            "portMappings": [
                {
                    "name": "securitiy-playground-8080-tcp",
                    "containerPort": 8080,
                    "hostPort": 8080,
                    "protocol": "tcp",
                    "appProtocol": "http"
                }
            ],
            "essential": true,
            "entryPoint": [
+               "/opt/draios/bin/instrument",
                "gunicorn",
                "-b",
                ":8080",
                "--workers",
                "2",
                "--threads",
                "4",
                "--worker-class",
                "gthread",
                "--access-logfile",
                "-",
                "--error-logfile",
                "-",
                "app:app"
            ],
            "environment": [
+               {
+                   "name": "SYSDIG_SIDECAR",
+                   "value": "auto"
+               }
              ],
            "mountPoints": [],
+           "volumesFrom": [
+               {
+                 "sourceContainer": "SysdigInstrumentation",
+                 "readOnly": true
+               }
+           ]
        },
+       {
+           "name" : "SysdigInstrumentation",
+           "image" : "quay.io/sysdig/workload-agent:latest",
+           "essential": false,
+           "environment": [
+             {
+                 "name": "SYSDIG_COLLECTOR",
+                 "value": "ingest-us2.app.sysdig.com"
+             },
+             {
+                 "name": "SYSDIG_COLLECTOR_PORT",
+                 "value": "6443"
+             },
+             {
+                 "name": "SYSDIG_ACCESS_KEY",
+                 "value": "0123456789abcdef"
+             },
+             {
+                 "name": "SYSDIG_PRIORITY",
+                 "value": "availability"
+             },
+             {
+                 "name": "SYSDIG_SIDECAR",
+                 "value": "auto"
+             }
+           ]
+       }
    ],
+   "pidMode": "task",
    "taskRoleArn": "arn:aws:iam::XXXXXXXX:role/ecsTaskExecutionRole",
    "executionRoleArn": "arn:aws:iam::XXXXXXXX:role/ecsTaskExecutionRole",
    "networkMode": "awsvpc",
    "requiresCompatibilities": [
        "FARGATE"
    ],
    "cpu": "1024",
    "memory": "2048",
    "runtimePlatform": {
        "cpuArchitecture": "X86_64",
        "operatingSystemFamily": "LINUX"
    }
}
上記のタスク定義からデプロイすると、サイドカーコンテナとしてのWorkload Agentが一緒に起動します。Sysdig UIのIntegrations > Data Sources > Sysdig Agents に移動し、
Deployment Type が fargate のSysdig Agentが接続されていることを確認します。

脅威検知テスト
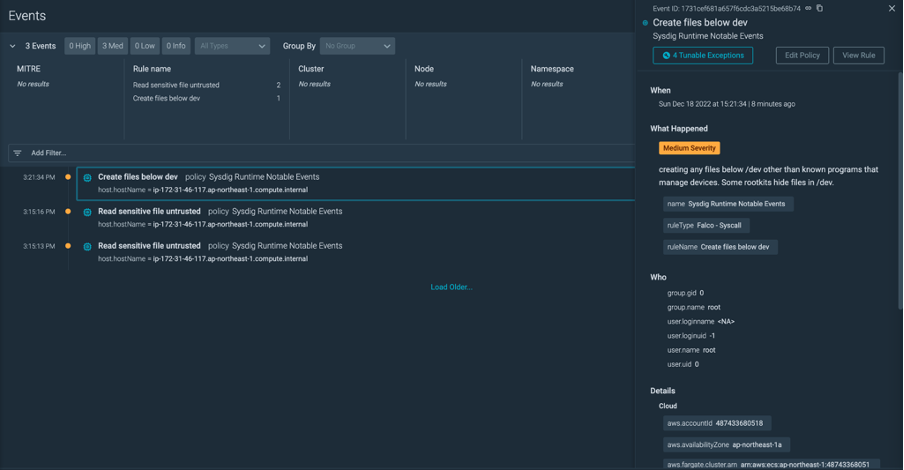
ワークロードコンテナとしてsecurity-playgroundイメージを使用した場合は、下記手順で脅威検知テストを実施可能です。脅威検知では、以下のような経路でSysdig UIに検知イベント結果が表示されます。

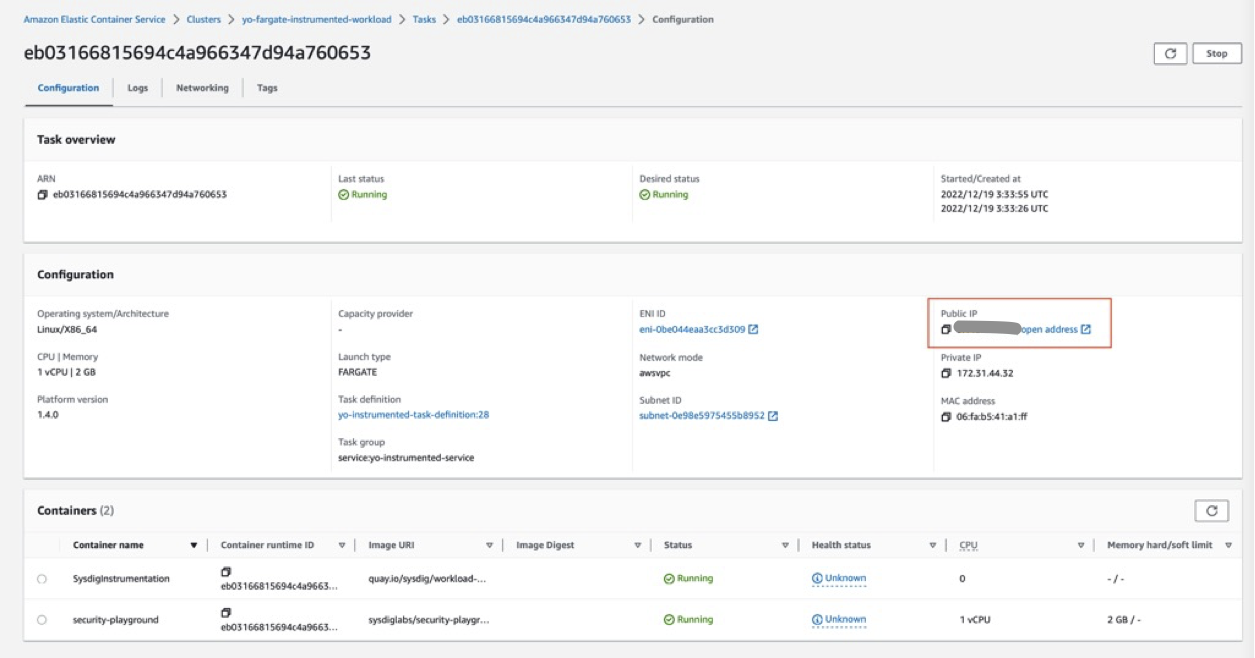
下記curlコマンドの引数にワークロードタスクのPublicもしくはPrivate IPアドレスを指定します
curlを実行する端末からワークロードタスクに対するInboundのポート8080接続を、AWSのSecurity Groupで許可する必要があります。
攻撃例1:shadowファイルの読み込み
curl IPアドレス:8080/etc/shadow
※FalcoルールでException指定されているcat /etc/shadowではないので検知します
攻撃例2:/dev配下へのファイル書き込み
curl -X POST IPアドレス:8080/exec -d 'command=touch /dev/bbb'
Sysdig UIにログインし、Eventsに検知イベントが表示されていることを確認します。

まとめ
タスク定義を少し変更するだけで、Sysdig Serverless Agentのマニュアルでのインストールが簡単に実行できることが確認できました。
