SwitchBot を Android から制御したい
自宅のライトを Echo から制御したくて SwitchBot を買いました。SwitchBot って何かと言うと、「Bluetoothで物理スイッチを制御するデバイス」です。
物理スイッチに取り付けて公式のアプリでスマホからスイッチのON/OFFとかやって遊べます。
SwitchLink という別売のハブを買えば IFTTT からの制御も可能です。
しかし! SwtichLink を買うのももったいない。エンジニアならここでラズパイでも使う所ですがその為に家にラズパイ設置するのも面倒臭い!
そこで思いついたのが「なら自宅用タブから制御すればいいんじゃね?」って案。
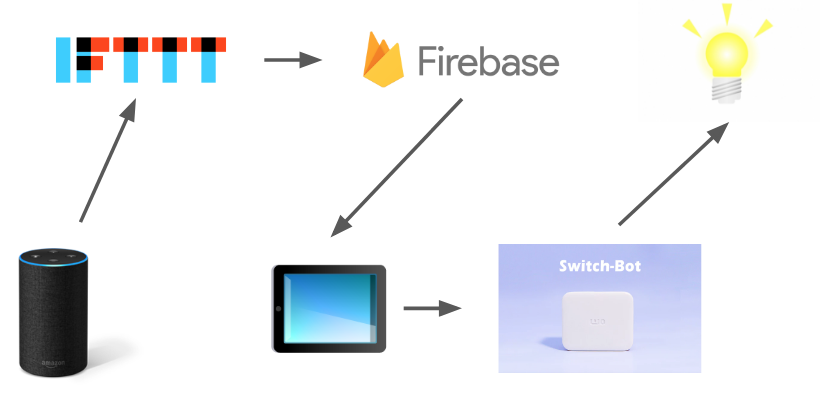
汚く図にすると ↓ な感じ。
IFTTT から Firebase にトリガーし、FCM を自宅のタブレットに送ってそのアプリから制御するという手ですね。
というわけでたかだか ¥9,400 を節約する為に Bluetooth制御アプリを作る作戦が始まりました。
プロトコル調査
プロトコル調査も何もちょっとぐぐれば公式の制御コマンドが見つかりました。とりあえず落として色々遊んでみます。
どうでも良いですが Bluetooth の制御を Bluepy でやっている為、Mac では動きません。大人しく Linux 使いましょう。
しばらく遊んでソース見て、サービスUUID 'cba20002-224d-11e6-9fb8-0002a5d5c51b' のデバイスに繋いで3バイトのコマンドを送れば良い模様。
| コマンド名 | 操作 | 送信コマンド |
|---|---|---|
| Press | 物理スイッチを押して戻す動作 | 0x57, 0x01, 0x00 |
| Turn On | 物理スイッチを押す | 0x57, 0x01, 0x01 |
| Turn Off | 物理スイッチを引き上げる | 0x57, 0x01, 0x02 |
また、複数SwitchBot設置時の為にデバイスのUUIDを調べてメモっておきます。
IFTTT/Firebase側の作成
Firebase関数の用意
次にサーバ側を作っていきます。どうせ自分用のサービスなので端末登録等面倒臭い事は行わず、FCMのトピック送信で送ってしまいます。
const functions = require('firebase-functions');
const admin = require('firebase-admin');
admin.initializeApp(functions.config().firebase);

// // Create and Deploy Your First Cloud Functions
// // https://firebase.google.com/docs/functions/write-firebase-functions
//
// exports.helloWorld = functions.https.onRequest((request, response) => {
//  response.send("Hello from Firebase!");
// });

exports.func = functions.https.onRequest((request, response) => {
    console.info("device : " + request.body.device);
    console.info("command : " + request.body.command);

    var payload = {
        data: {
          device: request.body.device,
          command: request.body.command
        }
      };

    admin.messaging().sendToTopic("topic", payload)
    .then(function(response2) {
      // See the MessagingTopicResponse reference documentation for the
      // contents of response.
      console.log("Successfully sent message:", response2);
      response.send("success.");
    })
    .catch(function(error) {
      console.log("Error sending message:", error);
      response.send("failed.");
    });
});
IFTTT のトリガーで機器やON/OFFを制御できるようパラメータにデバイスとコマンドを受け付けるようにしました。
IFTTTトリガーの作成
作成した Firebase Function に POST するトリガーを作ります。
私の場合 「ライトオン」「ライトオフ」 にこんな感じでトリガーを設定していきました。
SwitchBot操作アプリの開発
見た目は気にしない(というか要らない)ので Xamarin.Forms で開発する事にしました。
Bluetooth制御には Plugin.BLE を使用。制御アプリを書いていきます。
Plugin.BLE は Rx を使っていて私自身 Rx にはあまり馴染みがないので変な所はご容赦ください。
また、実ソースはタイムアウト等もチェックしていますが省略します。
デバイス検索
まず、デバイスを探索します。ソースはこんな感じ。
private async Task<IDevice> DiscoverDevice(string deviceUUID) {
    // 結果受信用Subject
    var resultSubject = new Subject<IDevice>();

    // BluetoothLE Scanストリーム
    IDisposable scanSubscribe = null;
    scanSubscribe = CrossBleAdapter.Current.Scan().Subscribe(sr => {
        // デバイス発見
        if (sr.Device.Uuid.ToString().Contains(deviceUUID)) {
            Debug.WriteLine($"Scan Discovered:{sr.Device.Name}:{sr.Device.Uuid}:{sr.Rssi}");

            resultSubject.OnNext(sr.Device);
            resultSubject.OnCompleted();
        }
    }, error => {
        Debug.WriteLine($"Scan Failed {error.Message}");

        resultSubject.OnNext(null);
        resultSubject.OnCompleted();
    });
    return await resultSubject.ToTask();
}
スキャンを開始し、調査時にメモっておいたUUIDを持つデバイスを発見したらそのデバイスを返します。
コマンド送信
次にデバイスにコマンドを送信する部分を書きます。
private async Task<bool> SendCommandAsync(IDevice device, byte[] command) {
    // 結果受信用Subject
    var resultSubject = new Subject<bool>();

    device.Connect().Subscribe(co => {
        // SwitchBotのCharacteristicに繋ぐ
        IDisposable serviceDiscoverSub = null;
        serviceDiscoverSub = device
            .WhenAnyCharacteristicDiscovered()
            .Subscribe(ch => {
                Debug.WriteLine($"Characteristic Discovered: {ch.Uuid}:{ch.Service.Uuid}/{ch.Service.Description}");
                if (ch.Service.Uuid.ToString().Contains("cba20d00-224d-11e6-9fb8-0002a5d5c51b")) {
                    if (ch.CanWrite()) {
                        // コマンド送信
                        IDisposable writeSub = null;
                        writeSub = ch.Write(command)
                            .Subscribe(cr => {
                                resultSubject.OnNext(true);
                                resultSubject.OnCompleted();
                            }, error => {
                                resultSubject.OnNext(false);
                                resultSubject.OnCompleted();
                            });
                    }
                }
            }, error => {
                Debug.WriteLine($"WhenAnyCharacteristicDiscovered() failed {error.Message}");
                resultSubject.OnNext(false);
                resultSubject.OnCompleted();
            });
    }, error => {
        Debug.WriteLine($"Connect() failed {error.Message}");
        resultSubject.OnNext(false);
        resultSubject.OnCompleted();
    });

    return await resultSubject.ToTask();
}
見つかったデバイスのCharacteristicを列挙し、UUID ’cba20002-224d-11e6-9fb8-0002a5d5c51b’ のサービスが見つかったらコマンドを送信します。
ここまで書いたらUIにテストボタンでも置いて、コマンド送信を叩いてみます。
しばし SwitchBot をちゅいんちゅいん言わせて遊びましょう。
FCM受信部の実装
Xamarin での FCM受信そのものに関しては Microsoft様が公式にドキュメントを置いてくれていますのでその通りに作りましょう。
留意点としては、FCMのトークン取得後に↑で設定したトピックを購読する事・プッシュ受信後、IntentServiceを立ち上げてデバイスの操作をする事くらいです。
public override void OnMessageReceived(RemoteMessage message) {
    Intent intent = new Intent(Forms.Context, typeof(SbIntentService));
    intent.PutExtra("device", message.Data["device"]);
    intent.PutExtra("command", message.Data["command"]);
    Forms.Context.StartService(intent);
}
protected override void OnHandleIntent(Intent intent) {
    var device = intent.GetStringExtra("device");
    var command = intent.GetStringExtra("command");

    SwitchBotの操作メソッド呼び出し
    ...
}
余談
これで Amazon echo から家の照明をON/OFFできるようになったのですが、なぜかタブレットがスリープの時調子は動かないという問題が・・・
どうも「位置情報の取得を許可」にしていないとスキャンでコケるみたいです。私は自宅のタブレットを使っているので良いのですが、スマホから使いたい人は位置情報OFFにしてる事もあるだろうし困りますね。どうしようもありませんが。

