はじめに
Cognito User Pools は Federation 機能を使って、外部認証プロバイダ(Google とか Facebook)のログインを統合し、Cognito User Pools の ID として統合された認証を行うことが出来ます。
というような説明が Cognito User Pools にあり、Google・Facebook・Amazon(EC サイトの方)・SAML のユーザーを User Pool の ID としてログインさせることが出来るということらしいですが、いまいち情報が少ないのでまとめました。動くサンプルも作りました。
動くコードは以下です。
https://github.com/gcoka/gognito
OpenIDやOAuthの概念がいまいち掴めていない場合は、一番分かりやすい OpenID Connect の説明がとても丁寧に説明していて理解しやすいので、先に読んでおくと良いと思います。
やることを整理
作るものは、3 つ
- Cognito User Pools に User Pool
- Cognito User Pools の認証が必要な WEB アプリ
- Cognito User Pools の認証(JWT)が必要な API サーバー(AWS の外部で動作)
WEB アプリは、AWS-Amplify 試してみたかったので React の SPA です。
API サーバーは Go でやりたかったので Golang です。サンプルのリポジトリ名は Go で Cognito と連携するというだけで gognito です。
Cognito の機能は大きく分けて 3 つ
| 機能 | 概要 |
|---|---|
| Cognito Federated Identities | 複数の認証プロバイダの認証を束ねて、認証に対して Cognito ID を発行して、IAM Role の形で認可を与える ( 今回使いません ) |
| Cognito User Pools | AWS 上でのマネージドなユーザー管理して、ユーザーの本人認証とユーザ情報管理をする ( 今回使います! ) |
| Cognito Sync | Cognito ID に対して異なるデバイス(モバイルと WEB など)間でのデータ共有を実現するサービス( 今回使いません ) |
Cognito Federated Identities と、Cognito User Pools の Federation とは別の機能です。
よくあるユースケースとして、Cognito User Pools のユーザーに対して API Gateway の認証必須 API を呼び出せるようにするというものがあると思いますが、その場合は、Cognito User Pools を Cognito Federated Identities の認証プロバイダとして登録する必要があります。
ですが、今回は API Gateway の API ではなく、独自サーバーの API なので、Federated Identities は不要です。
2018/04/27追記
API Gatewayの機能でAPIのエンドポイントに対して Authorization: COGNITO_USER_POOLS を設定することで Cognito Federated Identitiesを使わずにCognito User PoolsのJWTによる認証を組み込むことが可能です。
その場合は、User Poolが発行するJWTを Authorizationヘッダに添付します。
User Pools の Federation とは
記述が長くなるので、ここからは Cognito User Pools は単に User Pools とだけ書きます。
User Pools の Federation を使うと、(2018/01/07 時点で) Google, Facebook, AmazonEC, SAML の外部認証プロバイダ(External Identity Providers)のユーザーを、User Pools の 1 ユーザーとして管理出来ます。実質、ユーザー情報の移管です。さらに、email などの属性を User Pools の属性にマッピングしてまとめて管理できます。さらに、User Pools にサインアップすると email か SMS での本人確認が必要ですが、外部認証プロバイダ経由ならそんなものは不要です(当たり前といえば当たり前)。
これが出来ると、最終的に作る API サーバーは User Pools が発行する ID トークン(JWT)の検証をするだけで、認証付きの API を作成することが出来ます。
これが、各 SNS の認証を個別に検証するということを考えると、とてもめんどくさい。メールでのサインインと、定番の Google と Facebook での SNS サインインが出来るので素晴らしいと思います。
他の SNS からのサインインが必要な場合は、Auth0などの、もっと多数の SNS 連携をしているサービスでユーザーの管理をしましょう。Auth0 を使ったとしても OpenID に対応しているので、Cognito Federated Identities を通して AWS へアクセス認可を与えるように組むことは出来ます。
Cognito User Pools の設定
User Pool の作成
設定を始める前に、ハマりどころというか、設定を間違えると User Pools の作り直しになるところがあるので、AWS Cognito を実践で使うときのハマりどころなどを参考にしておいてください。
Manage user User Pools -> Create a user pool と進んで、
Pool name を入力、 いちいち確認したいので、Step through settings を選択します。
Email address or phone number のうち、 email のみ使うオプションを選択、これは、他の SNS と統合する場合は email を共通キーとしたいためです。必須属性は、後で対応 SNS が増加したときのことを考えると選ばない方が良いと思います。
custom attributes は後で追加できるので今は無視。
Allow users to sign themselves up を選択して、ユーザーのサインアップ可能にしておきます。
この説明では MFA は有効にしません。後で変更できないので、必須であれば有効にしましょう。Off <-> Optional の切り替えは後ででも出来ます。
Verification は Email にします。
認証メールの形式などはそのままで進めます。
Tag はご自由に。
MFA を有効にしていないので、remember user's devices は関係ありません。No にします。
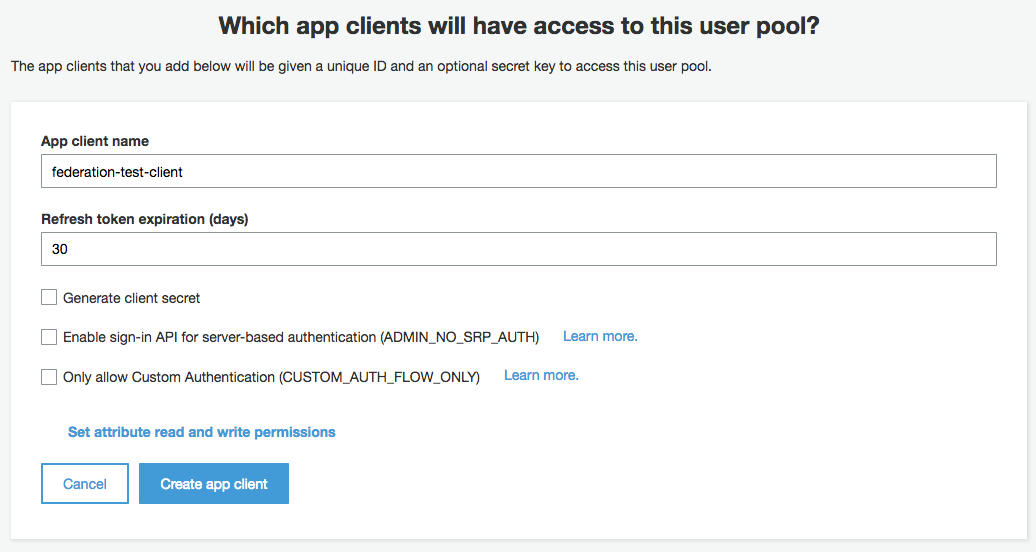
App client を追加します。
WEB アプリで User Pool の認証をするので、 Generate client secret はチェックを外します。
triggers は設定しません。設定すれば、サインアップ->認証完了後に認証完了メールを送信するなどのカスタマイズが可能です。
設定は全て確認したので Create pool で User Pool を作成します。
pool 作成後にまだ設定があります。
Domain の追加
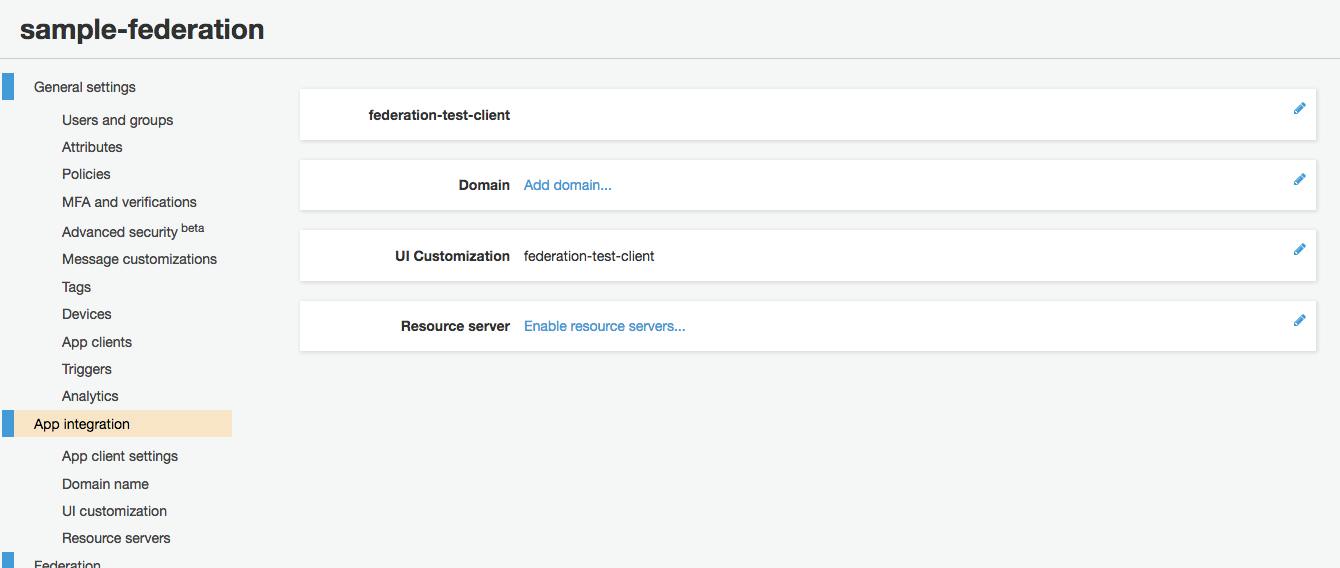
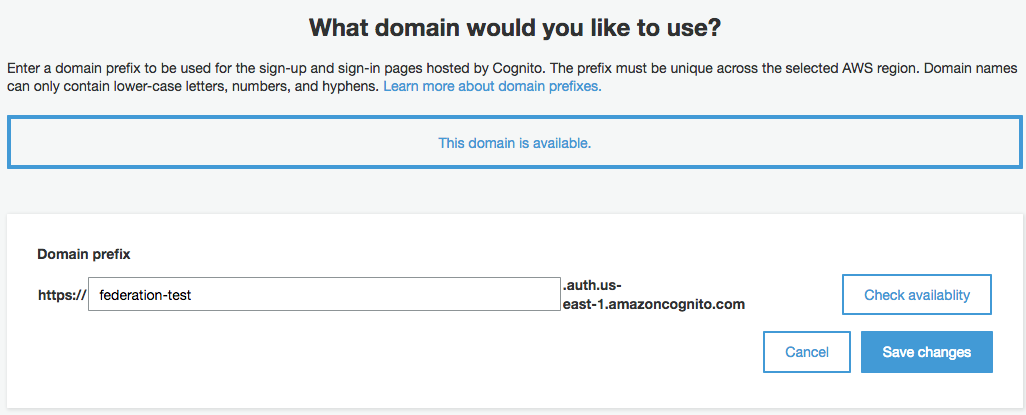
App Integration メニューを開き、 domain を追加します。domain は後で使用します。
Federation の設定
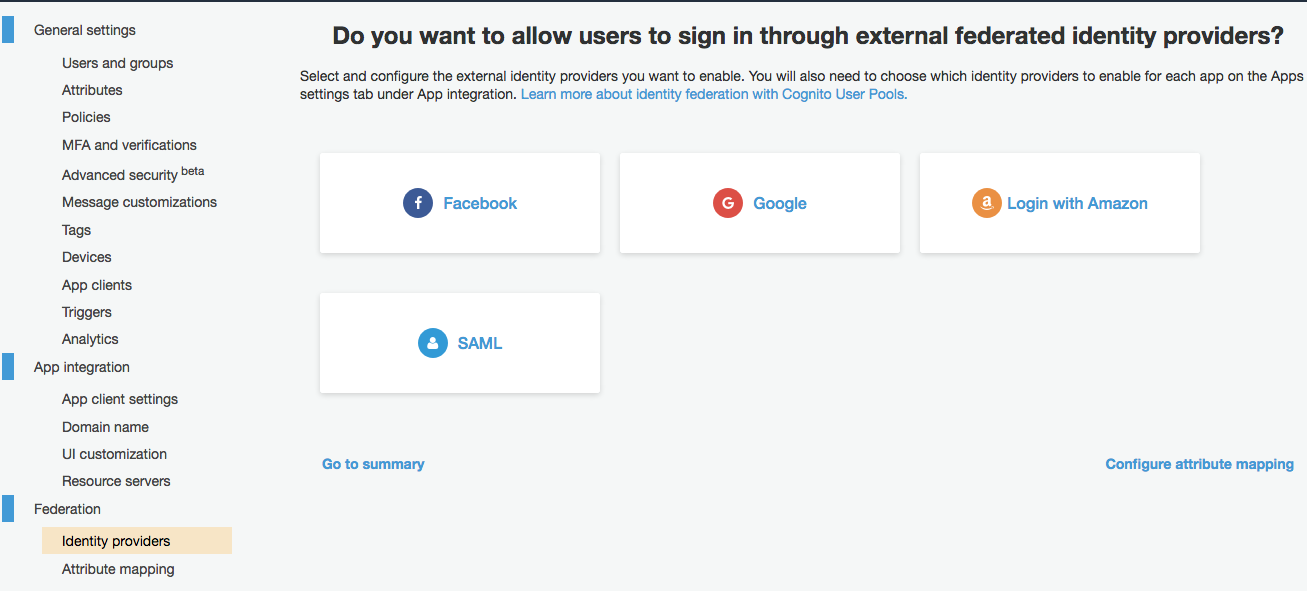
Federation メニューを開き、Facebook と Google の設定をします。あらかじめ、Facebook と Google で OAuth の App を作成しておく必要があります。さらに App Client ID と Client Secret を User Pool に登録する必要があります。
Authorize scope にはとりあえず email を設定します。
そのあたりの手順は、こちらを参考にしてください。
https://docs.aws.amazon.com/cognito/latest/developerguide/cognito-user-pools-social.html
Federation メニューから Attribute mapping も確認しておきます。最初から少しだけマッピングがありますが、ここでマッピングした内容が ID トークンに埋め込まれるので、独自 API サーバーで必要となる情報があればマッピングしておきましょう。普通は email, username, id くらいがあれば十分かと思います。
App client settings
App integration メニューの App client settings を開きます。
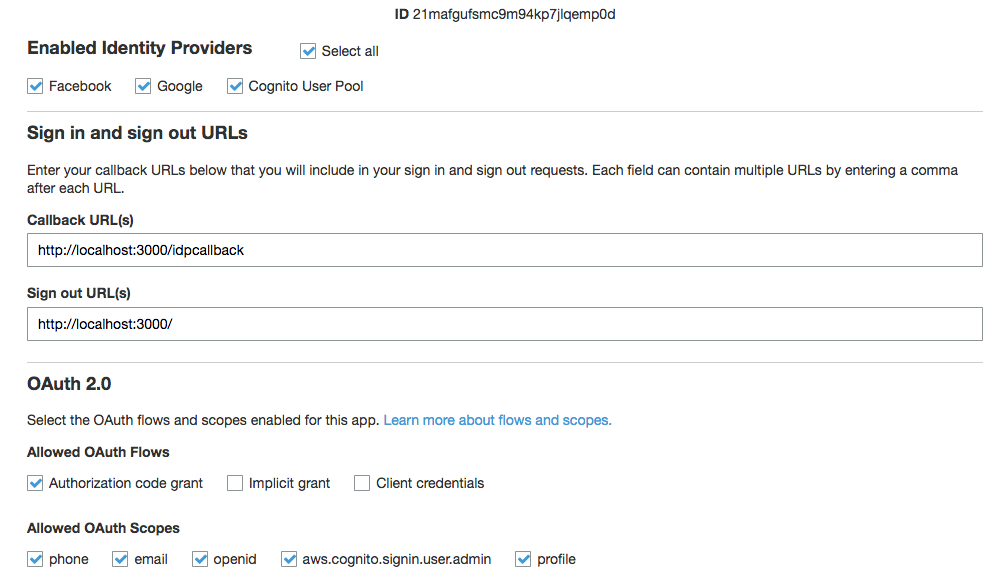
Select all をクリック。
Callback URL(s)に今回のサンプルであれば、http://localhost:3000/idpcallbackとします。これは User Pool が User Pool のユーザーや、Google、Facebook のユーザーを認証し終えた後に、codeを返す URL となるので、設定が合っていないと動きません。
OAuth flow は Authorization code grant を選択します。
OAuth Scope はとりあえず全て選択しています。
Authorization code grant を選択すると、refresh token を入手することが出来るので、(デフォルトなら 30 日)ログインさせたままにすることが出来ます。
Implicit grant の場合は refresh token が手に入らないので、その場限り(1 時間)の認証になります。
Client credentials は独自サーバー内など、User Pool の App client secret を安全に隠せる場合のみ使うことが出来ます。今回は client secret を生成していないのでこのオプションは選べません。
WEB アプリの作成
コードはサンプルを見ていただくとして、ポイントだけ紹介します。
使っているパッケージ
amazon-cognito-auth-jsaws-amplifyaws-amplify-react
どれも AWS が管理しているパッケージなので、認証した後の token の扱いが同じです。したがって、aws-amplify でサインインしても、amazon-cognito-auth-js でサインインしても認証情報は共有されます。
(動作としては localStorage に token が保存される)
Cognito User Pools の設定
import { CognitoAuth } from 'amazon-cognito-auth-js/dist/amazon-cognito-auth';
は、こうしなければうまく import 出来ませんでした。
設定しなければいけないものは以下の通りです。
- Cognito User Pools の region
- User Pool ID
- User Pool Web Client ID
- User Pool Domain (
https://は付けない) - RedirectUriSignIn には User Pool App Client ID に指定した URL
- OAuth Flowに
Authorization code grantを選択しているので、auth.useCodeGrantFlow()の呼び出し
import { CognitoAuth } from 'amazon-cognito-auth-js/dist/amazon-cognito-auth';
export const AuthConfig = {
  // identityPoolId はCognito Identity PoolのFederatedItentityProviderにGoogleやFacebookを登録している場合に必要。
  // このサンプルではCognito User PoolのユーザーとしてGoogleやFacebookのユーザーをログインさせる(UserPoolのログインIDが付与される)
  // identityPoolId: "us-east-1:6317760e-ae25-4c71-9901-855dd1d9c435", //REQUIRED - Amazon Cognito Identity Pool ID
  region: "us-east-1", // REQUIRED - Amazon Cognito Region
  userPoolId: "us-east-1_VpFb4U9MM", //OPTIONAL - Amazon Cognito User Pool ID
  userPoolWebClientId: "21mafgufsmc9m94kp7jlqemp0d" //OPTIONAL - Amazon Cognito Web Client ID
};

export const GetCognitoAuth = (identifyProvider, onSuccess, onFailure)=>{

  var authData = {
    ClientId : '21mafgufsmc9m94kp7jlqemp0d', // Your client id here
    AppWebDomain : 'federated-test.auth.us-east-1.amazoncognito.com',
    TokenScopesArray : ['profile', 'email', 'openid', 'aws.cognito.signin.user.admin', 'phone'],
    RedirectUriSignIn : 'http://localhost:3000/idpcallback',
    RedirectUriSignOut : 'http://localhost:3000/',
    IdentityProvider: identifyProvider
  };
  var auth = new CognitoAuth(authData);
  auth.userhandler = {
    onSuccess: function(result) {
      if (onSuccess){onSuccess(result);}
      console.log(result);
    },
    onFailure: function(err) {
      console.log(err);
      if (onFailure){onFailure(err);}
    }
  };
  auth.useCodeGrantFlow();

  return auth;

};
この設定は、index.js などで読み込ませておきます。
import { AuthConfig } from "./awsConfig";
Amplify.configure({
  Auth: AuthConfig
});
react-router の設定
router の設定で /a/以下は認証必要とするために、router の設定は 2 段階としました。
aws-amplify-reactを使ったので、withAuthenticator でラップするだけで認証必要ゾーンが出来上がりです。
export default () => (
  <Switch>
    <Route path="/" exact component={Home} />
    <Route path="/a" component={WithAuthRoutes} />
    <Route path="/idpcallback" component={IDPCallback} />
    <Route component={NotFound} />
  </Switch>
);
const WithAuth = withAuthenticator(
  ({ match }) => (
    <Switch>
      <Route path={match.url} exact component={Member} />
      <Route path={`${match.url}/api`} component={MemberAPI} />
      <Route component={NotFound} />
    </Switch>
  )
);

// Cognito Federated IdentitiesでのGoogleとFacebook統合にしか上手く対応しないので今回は使わない
const federated = {
  // google_client_id: "",
  // facebook_app_id: "",
  amazon_client_id: ""
};

const WithAuthRoutes = props => {
  return <WithAuth federated={federated} {...props} />;
};

export default WithAuthRoutes;
サインイン処理
App.jsにサインイン用のコードを書いています。といっても、aws-cognito-auth-jsを呼んでいるだけです。コードを抜粋します。
import { GetCognitoAuth } from "./awsConfig";

  handleSignIn = (identityProvider) => () => {
    const auth = GetCognitoAuth(identityProvider, () => {
      this.updateAuthInfo();
    }, () => {
      this.updateAuthInfo();
    });
    auth.getSession();
  }

  handleSignOut = () => {
    const auth = GetCognitoAuth(null, () => {
      this.updateAuthInfo();
    }, () => {
      this.updateAuthInfo();
    });
    auth.signOut();
  }

  render() {
    return (

{this.state.authenticated ?
          <div className="buttons">
          <button onClick={this.handleSignOut}>Sign Out</button>
          </div>
          : (
            <div className="buttons">
              {/*
               identity_providerに使える値
               Facebook, Google, LoginWithAmazon,
               */}
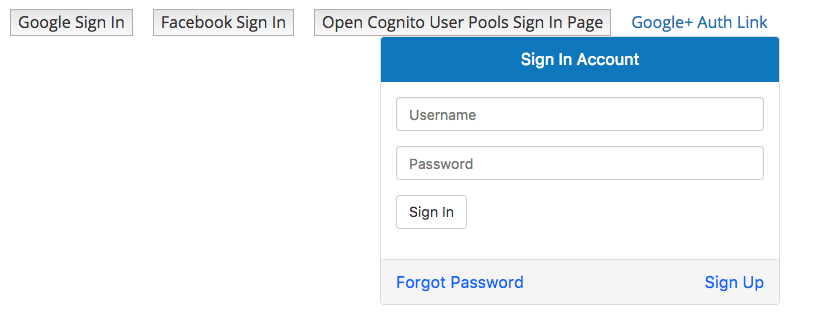
              <button onClick={this.handleSignIn("Google")}>Google Sign In</button>
              <button onClick={this.handleSignIn("Facebook")}>Facebook Sign In</button>
              <button onClick={this.handleSignIn("")}>Open Cognito User Pools Sign In Page</button>
              {/* 参考リンク */}
              {/* https://docs.aws.amazon.com/ja_jp/cognito/latest/developerguide/authorization-endpoint.html */}
              <a href="https://fs-fish-test.auth.us-east-1.amazoncognito.com/authorize?response_type=code&client_id=21mafgufsmc9m94kp7jlqemp0d&identity_provider=Google&scope=openid+email+profile+aws.cognito.signin.user.admin" >Google+ Auth Link</a>
            </div>
          )
        }
    );
  }
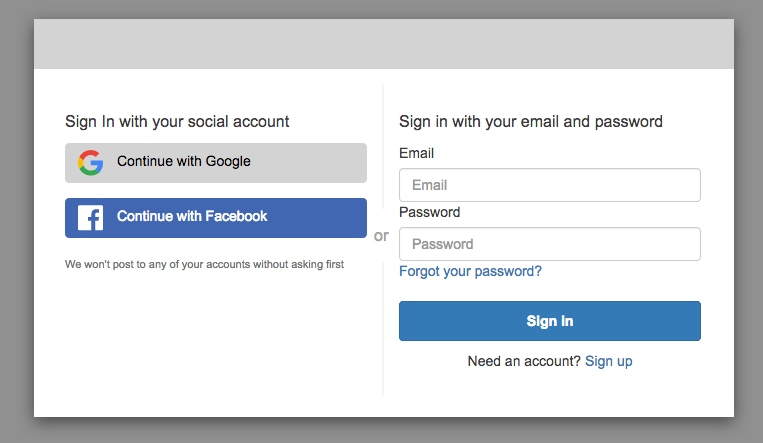
identity_providerを空にした場合、次のような User Pool が用意しているサインイン画面が表示されます。
aws-amplify-reactで作成している認証ゾーンに入ろうとすると、次のようなサインイン画面が表示されます。これはaws-amplify-reactが用意してくれている画面で、やろうと思えばカスタマイズ出来ますし、使用しているパーツを個別に使ったり、そもそもaws-amplifyだけで独自のサインイン画面を構築することが出来ます。
サインイン後のTokenの取得
User Pool での認証が終わると、callback URL に ?code=xxxxxxx-xxxxxxxx-xxxxxxxxx-xxxxxxxxxxという形の query param が添付されてくるので、Callback を受け付けるページでその値を使って、User Pool に IDToken, AccessToken, RefreshToken を要求します。これもaws-cognito-auth-jsに任せます。
import React, { Component } from "react";
import { GetCognitoAuth } from "../awsConfig";
import { Redirect } from "react-router-dom";

export default class IDPCallback extends Component {

  constructor(props) {
    super(props);
    this.state = {
      needRedirect: false,
      redirectPath: "/"
    }
  }

  componentDidMount() {
    const auth = GetCognitoAuth(null, this.invokeRedirect("/a"), this.invokeRedirect("/"));
    auth.parseCognitoWebResponse(this.props.location.search);
  }

  invokeRedirect = (path) => () => {
    this.setState({ needRedirect: true, redirectPath: path });
  }

  render() {
    if (this.state.needRedirect) {
      return <Redirect to={this.state.redirectPath} />
    }
    return (
      {/* ここは適当でいい */}
    );
  }
}
APIの呼び出し
あとは、ログイン出来たら IDToken と AccessToken が localStorage に保存されているので、Authorizationヘッダーに Bearer token として IDToken または Access Token(JWT)を埋め込みます。この Token が正しいか検証するのは API サーバーの仕事です。
  callMemberAPI() {
    // 実験プログラムなので、IDTokenがない場合はdummyを入れています。
    const jwt = this.state.jwtToken ? this.state.jwtToken : this.dummyJwt;
    const bearer = `Bearer ${jwt}`;
    const headers = { Authorization: bearer };
    axios
      .get("http://localhost:3100/member", { headers })
      .then(res => {
        this.setState({ result: res.data.text });
      })
      .catch(err => {
        this.showError(err);
      });
  }
Cognito の IDToken(JWT)を API サーバーで検証する
検証の前に
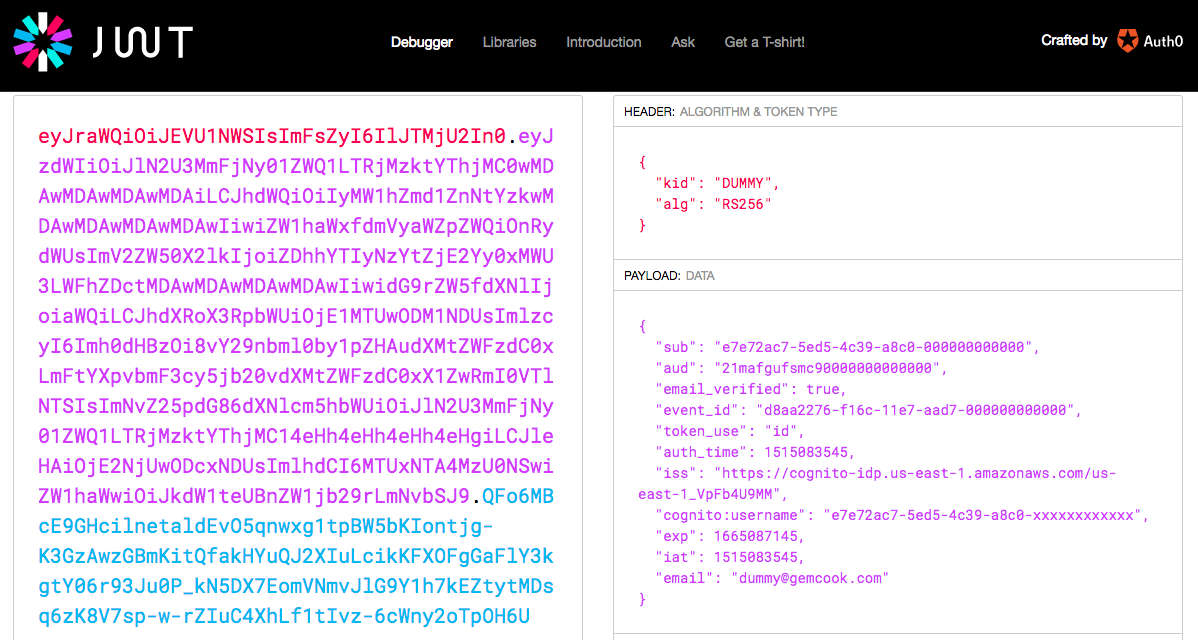
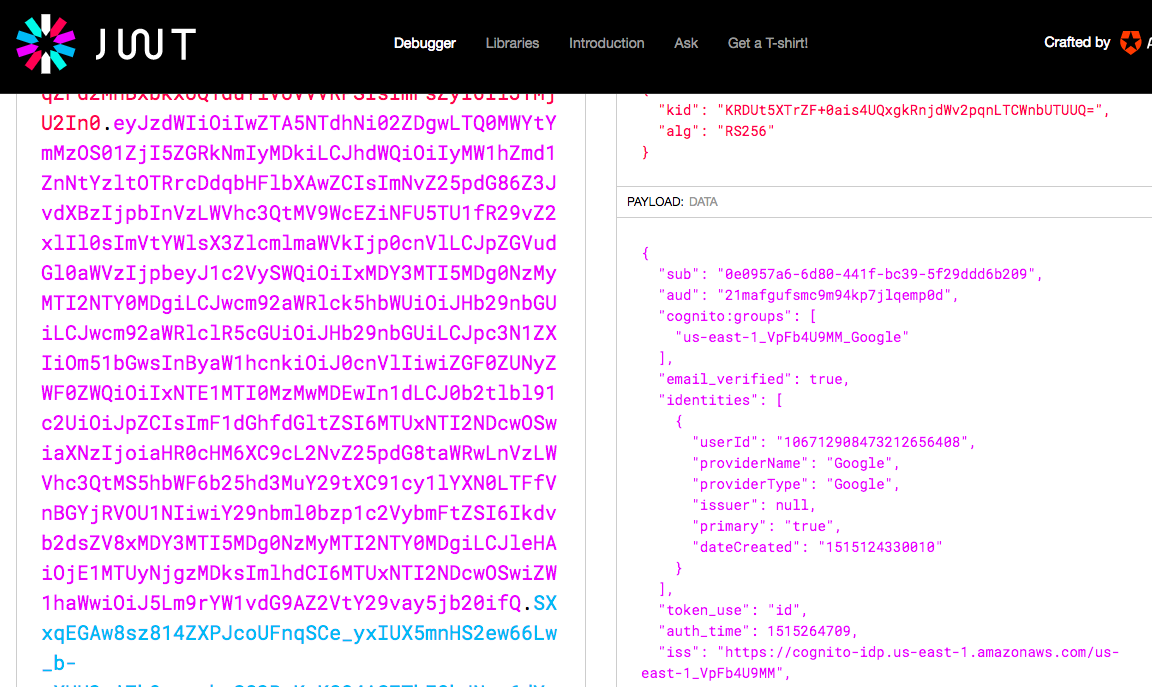
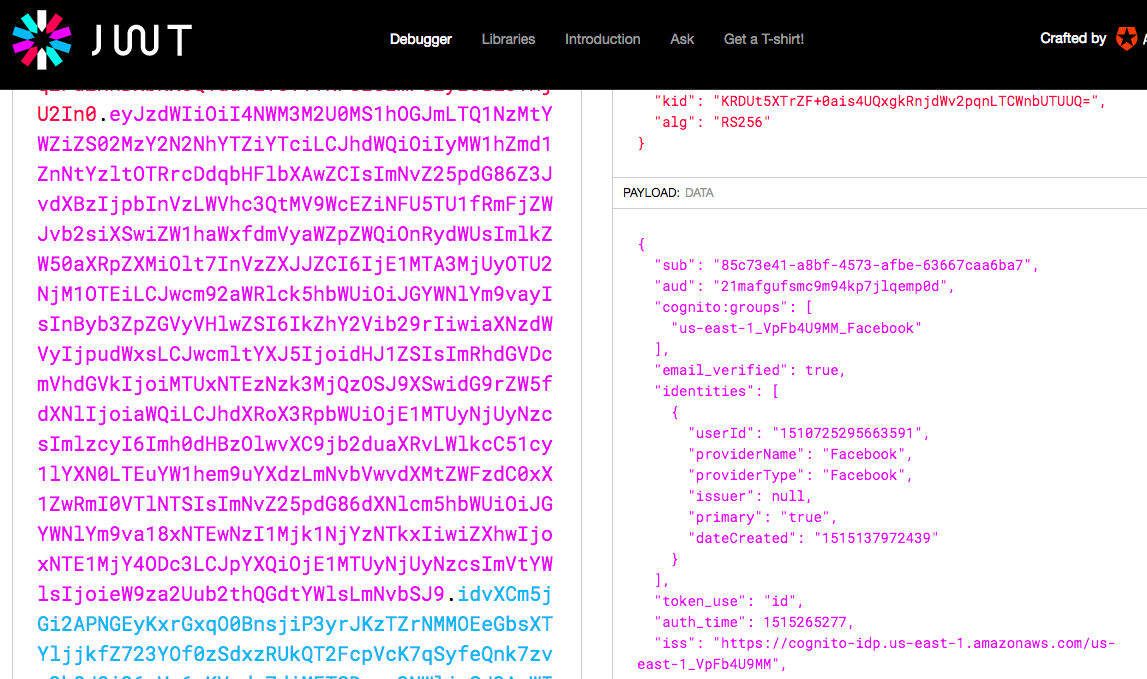
Cognito User Pools が発行する IDToken の例
User Pools Federation で Google 認証を使った場合の IDToken の例
User Pools Federation で Facebook 認証を使った場合の IDToken の例
どれも iss(Issuer)が作成した User Pool になっていますね。これで Google や Facebook のユーザーで認証していたとしても、自分が実装する API では、自分の User Pool で発行された JWTか?だけを検証すれば良いので、開発の負担が軽減されます。
コードについて
Golang で書きました。
WAF は Gin を使いましたが、特別 Gin でないといけない機能は使っていません。
JWT の扱いはjwt-goに任せました。自分でやるものじゃないです。
User Pool の JWT 検証方法
こちらの公式ドキュメントに手順があるので、それに従います。手順の中で、作成した User Pool ID と region 情報が必要となります。
https://docs.aws.amazon.com/cognito/latest/developerguide/amazon-cognito-user-pools-using-tokens-with-identity-providers.html#amazon-cognito-identity-user-pools-using-id-and-access-tokens-in-web-api
また、User Pool の JWK は、RSA Public Key のうち、E 値と N 値を直接 Base64 エンコーディングしたものを提供しているので、Golang 標準パッケージのcrypto/rsaでrsa.PublicKeyに変換する必要があります。
RSA Public Key については、RSA 公開鍵のファイル形式と fingerprintが参考になります。
手順とコード
認証処理は Gin の Middleware という形で実装してみました。
Middlewareなので、認証必要なリソースパスへのアクセス時に共通処理として呼び出せば済むようになります。
	// auth必要なリソースパスを定義するときにauthMiddlewareを使う
	auth := r.Group("/", authMiddleware(region, userPoolID))
	auth.GET("/member", func(c *gin.Context) {
		token := c.MustGet("token")
		claims := token.(*jwt.Token).Claims.(jwt.MapClaims)
		// token情報を使ってユーザーを識別するなどをする

		c.JSON(200, res{Text: "hello member"})
	})
authMiddleware
そもそも JWT の検証をする前に Authorization ヘッダに Bearer Token として添付されていなければいけないので、その取得を行なっています。
// cognito user poolの認証したJWTのチェックを行う
func authMiddleware(region, userPoolID string) gin.HandlerFunc {
	// この部分はサーバー起動時に1度だけ実行される

	// 1. Download and store the JSON Web Key (JWK) for your user pool.
	jwkURL := fmt.Sprintf("https://cognito-idp.%v.amazonaws.com/%v/.well-known/jwks.json", region, userPoolID)
	jwk := getJWK(jwkURL)

	// この部分はクライアント接続毎に実行される
	return func(c *gin.Context) {
		tokenString, ok := getBearer(c.Request.Header["Authorization"])

		if !ok {
			// jwtがHeaderに添付されていない
			c.AbortWithStatusJSON(401, res{Text: "Authorization Bearer Header is missing"})
			return
		}

		token, err := validateToken(tokenString, region, userPoolID, jwk)
		if err != nil || !token.Valid {
			// jwtの検証に失敗
			fmt.Printf("token is not valid\n%v", err)
			c.AbortWithStatusJSON(401, res{Text: fmt.Sprintf("token is not valid%v", err)})
		} else {
			// 認証したtokenを渡してやると、そこに含まれるユーザー情報を各リソースパスで利用できる
			c.Set("token", token)
			c.Next()
		}
	}
}
JWKの入手
- Download and store the JSON Web Key (JWK) for your user pool. You can locate it at https://cognito-idp.{region}.amazonaws.com/{userPoolId}/.well-known/jwks.json.
Each JWK should be stored against its kid.
まずは JWK を入手。1 つとは限らないので、kid の値ごとにすぐ取り出せるようにmap[string]JWKに保管しておきます。これは Cognito が管理している RSA の秘密鍵がバレない限りは更新されないので、サーバー起動時に一度だけ入手すれば問題ありません。
// JWK is json data struct for JSON Web Key
type JWK struct {
	Keys []JWKKey
}

// JWKKey is json data struct for cognito jwk key
type JWKKey struct {
	Alg string
	E   string
	Kid string
	Kty string
	N   string
	Use string
}

func getJSON(url string, target interface{}) error {
	var myClient = &http.Client{Timeout: 10 * time.Second}
	r, err := myClient.Get(url)
	if err != nil {
		return err
	}
	defer r.Body.Close()

	return json.NewDecoder(r.Body).Decode(target)
}

func getJWK(jwkURL string) map[string]JWKKey {

	jwk := &JWK{}

	getJSON(jwkURL, jwk)

	jwkMap := make(map[string]JWKKey, 0)
	for _, jwk := range jwk.Keys {
		jwkMap[jwk.Kid] = jwk
	}
	return jwkMap
}
この取得用のコードを使って、認証を通したい API リソースパス用の middleware の冒頭で JWK 取得を実施しています。
JWTのDecode
2 . Decode the token string into JWT format.
これは Base64 デコードするだけなのですが、jwt-goのjwt.Parseに任せます。手順には無いですが、一応 alg が RS256 であるかのチェックも入れました。
	// 2. Decode the token string into JWT format.
	token, err := jwt.Parse(tokenStr, func(token *jwt.Token) (interface{}, error) {

		// cognito user pool, googleは : RS256
		if _, ok := token.Method.(*jwt.SigningMethodRSA); !ok {
			return nil, fmt.Errorf("Unexpected signing method: %v", token.Header["alg"])
		}
Issuerチェック
3 . Check the iss claim. It should match your user pool. For example, a user pool created in the us-east-1 region will have an iss value of https://cognito-idp.us-east-1.amazonaws.com/{userPoolId}.
Issuer のチェック。作成した User Pool のものになっているかチェックします。
	// 3. Check the iss claim. It should match your user pool.
	issShoudBe := fmt.Sprintf("https://cognito-idp.%v.amazonaws.com/%v", region, userPoolID)
	err = validateClaimItem("iss", []string{issShoudBe}, claims)
	if err != nil {
		return err
	}
Token用途のチェック
4 . Check the token_use claim.
If you are using both tokens, the value is either id or access.
IDToken を受け付けるのか、AccessToken を受け付けるのかのチェックをします。
IDToken の方は User Pool に保管しているユーザーの Identity が入るので、それらの値が必要であれば IDToken を指定すれば良いと思います。
AccessToken の方はリソースの Scope 情報が入るのでそちらの情報が必要であれば AccessToken を指定すれば良いと思います。
	// 4. Check the token_use claim.
	validateTokenUse := func() error {
		if tokenUse, ok := claims["token_use"]; ok {
			if tokenUseStr, ok := tokenUse.(string); ok {
				if tokenUseStr == "id" || tokenUseStr == "access" {
					return nil
				}
			}
		}
		return errors.New("token_use should be id or access")
	}
JWTの検証
5 . Get the kid from the JWT token header and retrieve the corresponding JSON Web Key that was stored in step 1.
JWK のリストから jwt.Header の kid に一致するものを取得します。
6 . Verify the signature of the decoded JWT token.
kid に一致する JWK を使って JWT の検証をします。別途定義したconvertKeyで E と N 値を rsa.PublicKey にしています。
		// 5. Get the kid from the JWT token header and retrieve the corresponding JSON Web Key that was stored
		if kid, ok := token.Header["kid"]; ok {
			if kidStr, ok := kid.(string); ok {
				key := jwk[kidStr]
				// 6. Verify the signature of the decoded JWT token.
				rsaPublicKey := convertKey(key.E, key.N)
				return rsaPublicKey, nil
			}
		}

		// rsa public key取得できず
		return "", nil
Token有効期限チェック
7 . Check the exp claim and make sure the token is not expired.
exp をみて JWT の期限が切れていないかチェックします。
jwt-goの機能一覧に exp のチェックがあるので、もしかすると必要ないかもしれません。
func validateExpired(claims jwt.MapClaims) error {
	if tokenExp, ok := claims["exp"]; ok {
		if exp, ok := tokenExp.(float64); ok {
			now := time.Now().Unix()
			if int64(exp) > now {
				return nil
			}
		}
		return errors.New("cannot parse token exp")
	}
	return errors.New("token is expired")
}
これで、JWT の検証が完了です。
追加課題
AccessToken に関する設定など。
AccessToken を取得するためには Cognito User Pool への認証要求時に scope にaws.cognito.signin.user.adminを追加する必要がある。などの OAuth フローと User Pools の対応整理。
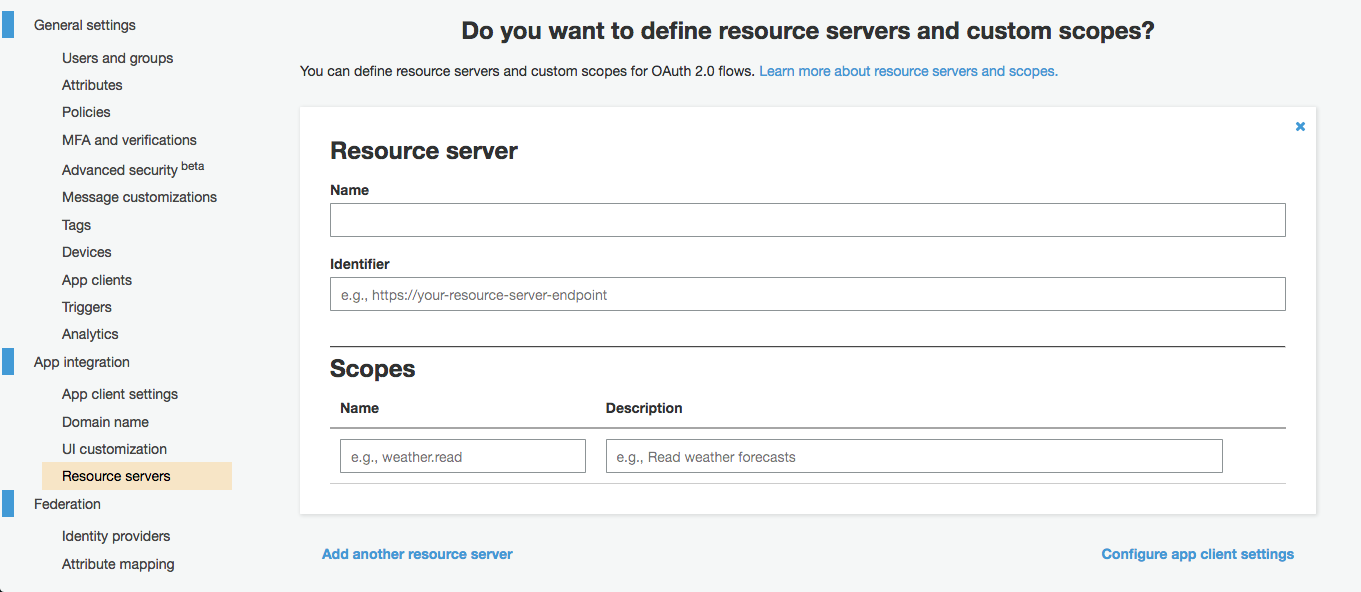
Resource Server's の設定について。
