概要
高位合成をやってみようと思い、vitis hlsでIPを作成して、vivadoでデザイン作成、Vitisでソフトウェア作成という一連の作業をやってみました。
はじめはWindows10にVitis2020.2をインストールして動かしていたのですが、Vitis HLSで自作したIPを使ってデザインを作成した後、Vitisでアプリを作ろうとしたらコンパイルエラーが出て進めませんでした。
FPGAの部屋にも似たような現象が報告されていて、Windowsでは動かなかったがLinuxでは動いたとのことだったので、Ubuntu20.04にVitis2020.2をインストールすることにしました。
開発環境
- Ubuntu 20.04
- Vitis HLS 2020.2
Vitisインストール
2020/12/19現在最新の2020.2をインストールしました。
依存ライブラリ
以前までは自分で依存ライブラリをインストールしてきたのですが、(知らなかっただけかも)、バージョン2020.2からは、依存ライブラリをインストールするスクリプトinstallLibs.shが用意されていました。
まず、いつも通りインストールして、依存ライブラリが無いのでvivadoを起動しないことを確認しました。librdi_commontasks.soがないとちゃんと怒られました。
~$ source /tools/Xilinx/Vivado/2020.2/settiings64.sh
~$ vivado &
application-specific initialization failed: couldn't load file "librdi_commontasks.so": libtinfo.so.5: cannot open shared object file: No such file or directory
依存ライブラリをインストールするスクリプトを実行してみました。場所は/<install_dir>/Vivado/<version>/scripts/installLibs.shにあります。実行すると確かにライブラリをインストールしてきているようなログが流れてきました。インストールが完了するとvivadoが起動できるようになりました。
~# /tools/Xilinx/Vitis/2020.2/scripts/installLibs.sh
(一部抜粋)
:
:
パッケージリストを読み込んでいます...
依存関係ツリーを作成しています...
状態情報を読み取っています...
以下の追加パッケージがインストールされます:
  libann0 libcdt5 libcgraph6 libgts-0.7-5 libgts-bin libgvc6 libgvpr2
  liblab-gamut1 libpathplan4
提案パッケージ:
  gsfonts graphviz-doc
以下のパッケージが新たにインストールされます:
  graphviz libann0 libcdt5 libcgraph6 libgts-0.7-5 libgts-bin libgvc6 libgvpr2
  liblab-gamut1 libpathplan4
アップグレード: 0 個、新規インストール: 10 個、削除: 0 個、保留: 107 個。
1,880 kB のアーカイブを取得する必要があります。
この操作後に追加で 9,205 kB のディスク容量が消費されます。
:
:

~$ vivado &
****** Vivado v2020.2 (64-bit)
  **** SW Build 3064766 on Wed Nov 18 09:12:47 MST 2020
  **** IP Build 3064653 on Wed Nov 18 14:17:31 MST 2020
    ** Copyright 1986-2020 Xilinx, Inc. All Rights Reserved.

start_gui
USB driver
FPGAにコンフィグレーションデータを書き込むときにUSBを使いますが、Linuxでは手動でUSB driverをインストールする必要があるようです。インストーラはVitisをインストールしてきたとき一緒にインストールされています。場所は/tools/Xilinx/Vivado/2020.2/data/xicom/cable_drivers/lin64/install_script/install_drivers/にあり、install_drivers.shがそのインストーラです。
~$ cd /tools/Xilinx/Vivado/2020.2/data/xicom/cable_drivers/lin64/install_script/install_drivers/
~$ sudo ./install_drivers
Vitis HLS
高位合成をやってみようと思うのでvitis_hlsを起動しました。コマンドからはvitis_hlsで起動できます。背景が黒になっていてクールになりましたね。
~$ vitis_hls &
****** Vitis HLS - High-Level Synthesis from C, C++ and OpenCL v2020.2 (64-bit)
  **** SW Build 3064766 on Wed Nov 18 09:12:47 MST 2020
  **** IP Build 3064653 on Wed Nov 18 14:17:31 MST 2020
    ** Copyright 1986-2020 Xilinx, Inc. All Rights Reserved.
:
:
Cデザインコード
C言語で簡単なデザインを作成してみました。入力されたものをそのままLEDで表示するという単純なものです。#pragmaで入力のin_dataはs_axiliteで、出力のoutはregister属性に指定しています。
# include <ap_int.h>

void led(ap_uint<4> *in_data, ap_uint<4> *out) {
# pragma HLS TOP name=led
# pragma HLS INTERFACE s_axilite port=in_data
# pragma HLS INTERFACE ap_none register port=out

    *out = *in_data;
}
テストベンチ
特に意味のあるテストではないですが、入力として与えたaがbに返ってきているかをチェックを16回繰り返しています。
# include <ap_int.h>

void led(ap_uint<4> *in_data, ap_uint<4> *out);

int main()
{
    ap_uint<4> a, b;
    const int test_case = 16;
    int pass = 0;
    int fail = 0;

    a = 0;
    b = 0;

    for (int i = 0; i < test_case; i++) {
    	led(&a, &b);
    	if (a == b) {
    		pass++;
    	} else {
    		fail++;
    	}
    	a++;
    }

    std::cout << "test_case:" <<  test_case << " pass:" << pass << " fail:" << fail << std::endl;

    if (test_case == pass) {
    	std::cout << "PASS" << std::endl;
    	return 0;
    } else {
    	std::cout << "FAIL" << std::endl;
    	return -1;
    }
}
C Simulation
C言語でシミュレーションを実行したところ、成功しているようでした。
(一部抜粋)
:
:
NFO: [SIM 211-2] *************** CSIM start ***************
INFO: [SIM 211-4] CSIM will launch GCC as the compiler.
   Compiling ../../../src/led.cpp in debug mode
   Generating csim.exe
test_case:16 pass:16 fail:0
PASS
INFO: [SIM 211-1] CSim done with 0 errors.
INFO: [SIM 211-3] *************** CSIM finish ***************
:
:
Synthesis
高位合成もうまくいっています。WARNINGが出ていますが、今度改めて確認します。
(一部抜粋)
:
:
INFO: [HLS 200-10] ----------------------------------------------------------------
INFO: [HLS 200-10] -- Generating RTL for module 'led'
INFO: [HLS 200-10] ----------------------------------------------------------------
WARNING: [RTGEN 206-101] Design contains AXI ports. Reset is fixed to synchronous and active low.
INFO: [RTGEN 206-500] Setting interface mode on port 'led/in_data' to 's_axilite & ap_none'.
INFO: [RTGEN 206-500] Setting interface mode on port 'led/out_r' to 'ap_none' (register, both mode).
WARNING: [RTGEN 206-101] Port 'out_r' with mode 'ap_none' may require an associated data valid signal to correctly communicate with other blocks or a test bench; automatic C/RTL co-simulation may not be able to verify such a port.
INFO: [RTGEN 206-500] Setting interface mode on function 'led' to 'ap_ctrl_hs'.
WARNING: [RTGEN 206-101] Cannot apply register mode option on port out_r. It is not an AXI-Stream interface.
INFO: [RTGEN 206-100] Bundling port 'in_data' to AXI-Lite port control.
INFO: [RTGEN 206-100] Finished creating RTL model for 'led'.
INFO: [HLS 200-111] Finished Creating RTL model: CPU user time: 0.01 seconds. CPU system time: 0.01 seconds. Elapsed time: 0.02 seconds; current allocated memory: 203.917 MB.
INFO: [HLS 200-111] Finished Generating all RTL models: CPU user time: 1.03 seconds. CPU system time: 0.03 seconds. Elapsed time: 1.08 seconds; current allocated memory: 211.559 MB.
INFO: [VHDL 208-304] Generating VHDL RTL for led.
INFO: [VLOG 209-307] Generating Verilog RTL for led.
INFO: [HLS 200-789] **** Estimated Fmax: 1000.00 MHz
INFO: [HLS 200-111] Finished Command csynth_design CPU user time: 9.31 seconds. CPU system time: 0.81 seconds. Elapsed time: 10.76 seconds; current allocated memory: 211.724 MB.
INFO: [HLS 200-112] Total CPU user time: 12.99 seconds. Total CPU system time: 1.42 seconds. Total elapsed time: 13.74 seconds; peak allocated memory: 211.559 MB.
Finished C synthesis.
:
:
Co-Simulation
高位合成後コシミュレーションを実行したところ、これも成功しているようでした。
(一部抜粋)
:
:
////////////////////////////////////////////////////////////////////////////////////
// Inter-Transaction Progress: Completed Transaction / Total Transaction
// Intra-Transaction Progress: Measured Latency / Latency Estimation * 100%
//
// RTL Simulation : "Inter-Transaction Progress" ["Intra-Transaction Progress"] @ "Simulation Time"
////////////////////////////////////////////////////////////////////////////////////
// RTL Simulation : 0 / 16 [0.00%] @ "125000"
// RTL Simulation : 1 / 16 [100.00%] @ "225000"
// RTL Simulation : 2 / 16 [100.00%] @ "325000"
// RTL Simulation : 3 / 16 [100.00%] @ "425000"
// RTL Simulation : 4 / 16 [100.00%] @ "525000"
// RTL Simulation : 5 / 16 [100.00%] @ "625000"
// RTL Simulation : 6 / 16 [100.00%] @ "725000"
// RTL Simulation : 7 / 16 [100.00%] @ "825000"
// RTL Simulation : 8 / 16 [100.00%] @ "925000"
// RTL Simulation : 9 / 16 [100.00%] @ "1025000"
// RTL Simulation : 10 / 16 [100.00%] @ "1125000"
// RTL Simulation : 11 / 16 [100.00%] @ "1225000"
// RTL Simulation : 12 / 16 [100.00%] @ "1325000"
// RTL Simulation : 13 / 16 [100.00%] @ "1425000"
// RTL Simulation : 14 / 16 [100.00%] @ "1525000"
// RTL Simulation : 15 / 16 [100.00%] @ "1625000"
// RTL Simulation : 16 / 16 [100.00%] @ "1725000"
////////////////////////////////////////////////////////////////////////////////////
$finish called at time : 1765 ns : File "/home/yoshi/fpga/hls/s_axi_led/ip/led/solution1/sim/verilog/led.autotb.v" Line 382
## quit
INFO: [Common 17-206] Exiting xsim at Sat Dec 19 22:05:26 2020...
INFO: [COSIM 212-316] Starting C post checking ...
test_case:16 pass:16 fails:0
PASS
INFO: [COSIM 212-1000] *** C/RTL co-simulation finished: PASS ***
:
:
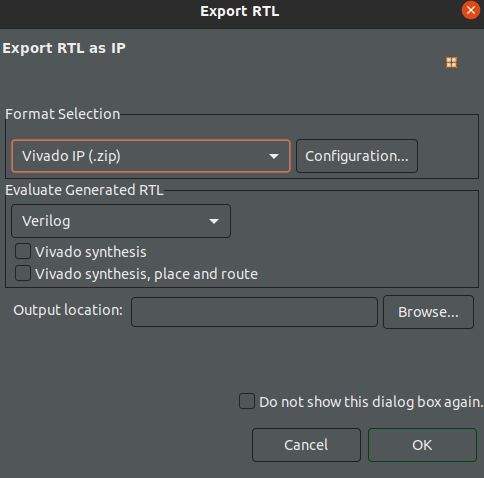
RTL Export
できたデザインをVivadoでIPとして使えるようにエクスポートします。ここでエクスポートして作成したZipファイルをVivadoのIPのパスに追加するとIPとして使えるようになります。
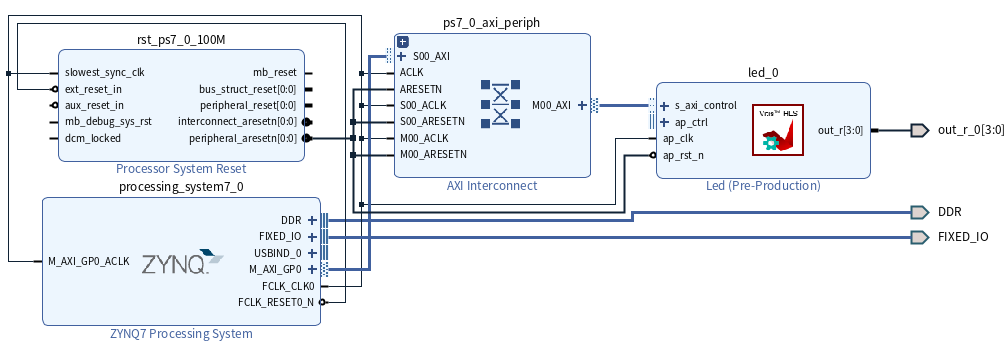
vivado
vivadoを起動して、先ほど作成したIPにパスを設定します。
デザインの作成をして、Generate Bitstreamまで終わらせます。
Export Hardwareをするときはbitstreamを含めて実行します。
vitis
ソフトウェアの開発環境は、昔はXilinx SDKと呼ばれていたのですが最近はvitisに変わったようです。
まずはplatform projectを作ります。このときにvivadoでExportしたXSAファイルを指定します。
次にapplication projectを作ります。Windows10だとここあたりでコンパイルエラーがでて進めませんでしたが、Linuxだと無事コンパイルできました。LEDが点灯することも確認できました。
今後
AXIのインターフェースが指定すれば自動で作ってくれるのは嬉しいですね。あとハードウェアデザインを変更した後のソフトウェア側へ変更は、ハードウェアプラットフォームをUpdate Hardware Specficationを実行すればよいので楽になりました。(前からあるんでしたっけ?)
高位合成はかなり使いやすくなってきたと感じていますが、プラグマの効果はもっと調べていく必要がありそうです。
フィルタや行列などの演算系やUART、SPIなどの通信系にも挑戦していこうと思います。