はじめに
UIKitで作ったアプリをSwiftUIベースに移行しました。
移行方法を簡単にまとめようと思います。
環境
Xcode 15.1
サポートバージョン
iOS 17.0以上
内容
実際にリリースしているこちらのアプリで作業します。
ざっくりとした画面構成はこちら
主に、NavigationとTabBar部分の切り替えについて書いていきます。
Navigaton(メニュー)→画面A→TabBar


下準備
まずはUIKitベースからSwiftUIベースに切り替えられるよう起動画面動線を変更します。
AppDelegate.swiftを修正
@UIApplicationMainのアノテーションを削除します。
- @UIApplicationMain
class AppDelegate: UIResponder, UIApplicationDelegate {
    func application(_ application: UIApplication, didFinishLaunchingWithOptions launchOptions: [UIApplication.LaunchOptionsKey: Any]?) -> Bool {
...
初期表示画面を追加
SwiftUIで初期表示するUIを作っておきます。
import SwiftUI

@main
struct PadeLoversApp: App {

    @UIApplicationDelegateAdaptor(AppDelegate.self) var delegate

    var body: some Scene {
        WindowGroup {
            HomeView()
        }
    }
}
import SwiftUI

struct HomeView: View {
    var body: some View {
        Text("Hello, World!")
    }
}

#Preview {
    HomeView()
}
@UIApplicationDelegateAdaptorを実装することでこれまで通りAppDelegateの処理が起動時に呼ばれるようになります。
info.plistの修正
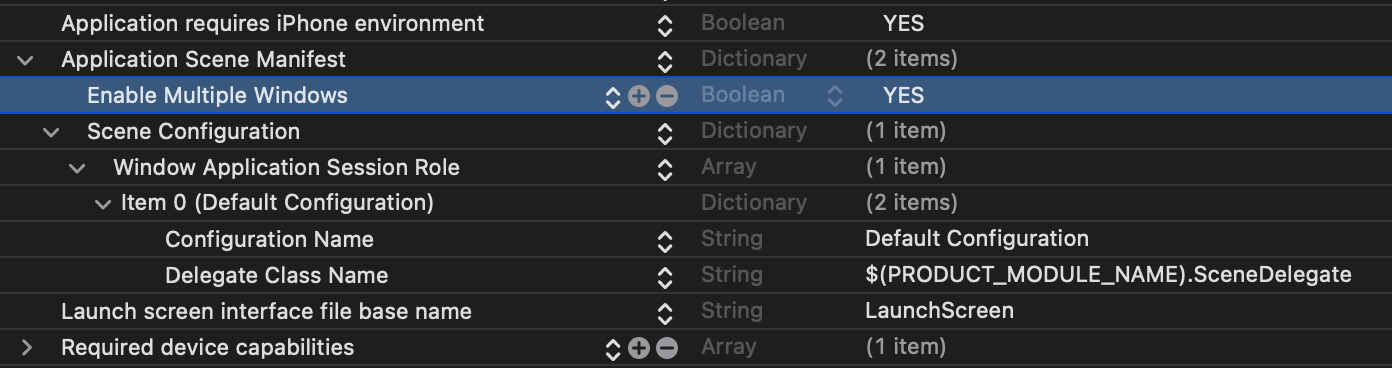
Application Scene Manifestの以下3箇所を修正するとSwiftUIの画面が表示されるようになります。
-
Enable Multiple Windowsを YESに変更 -
Storyboard Nameを削除 -
Main storyboard file base nameを削除
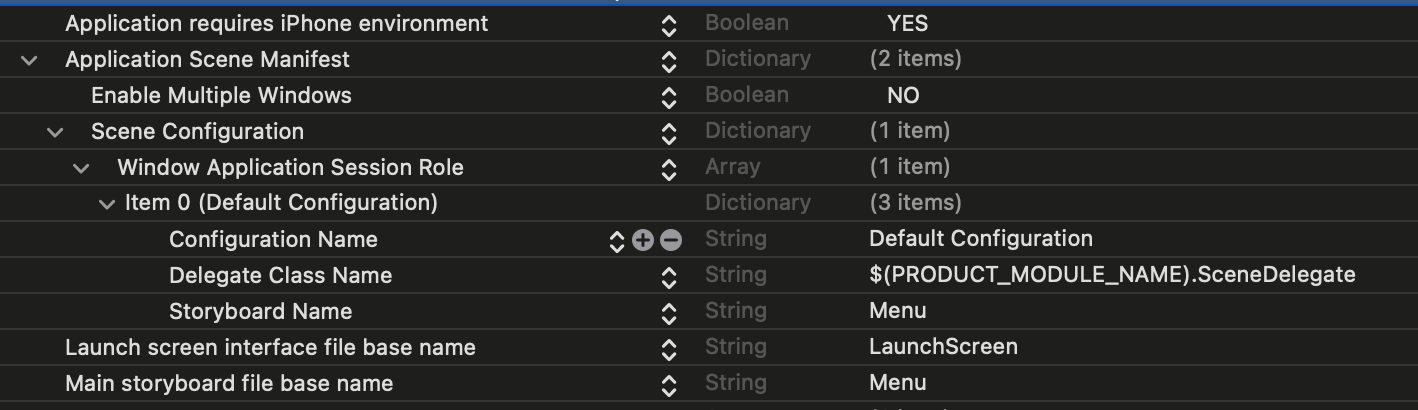
↓
最低限の処理のみ記載しているので、その他不要な部分はお掃除する必要があります。
ここまでの作業でアプリを起動すると既存画面は表示されず、SwiftUIのViewが表示されます。
各画面のViewControllerをUIViewControllerRepresentableでラップする
まずは各画面をSwiftUIベースの実装で使えるようにUIViewControllerRepresentableで実装します。
画面を生成するだけの場合は単純にラップしただけです。
struct RandomNumberViewRepresentable: UIViewControllerRepresentable {
    func makeUIViewController(context: Context) -> UIViewController {
        let storyboard = UIStoryboard(name: "RandomNumber", bundle: nil)
        let viewController = storyboard.instantiateViewController(identifier: "RandomNumber") as! RandomNumberViewController
        return viewController
    }

    func updateUIViewController(_ uiViewController: UIViewController, context: Context) { }
}
Delegateの処理が含まれている場合は親画面に値を渡せるようにしておきました。
struct StartGameViewRepresentable: UIViewControllerRepresentable {
    @Binding var groupID: String?
    @Binding var padelID: UUID?

    func makeUIViewController(context: Context) -> UIViewController {
        let storyboard = UIStoryboard(name: "StartGame", bundle: nil)
        let viewController = storyboard.instantiateViewController(identifier: "StartGame") as! StartGameTableViewController
        viewController.delegate = context.coordinator
        return viewController
    }

    func updateUIViewController(_ uiViewController: UIViewController, context: Context) { }

    func makeCoordinator() -> Coordinator {
        Coordinator(self)
    }

    class Coordinator: NSObject, StartGameTableViewControllerDelegate {
        var viewController: StartGameViewRepresentable

        init(_ viewController: StartGameViewRepresentable) {
            self.viewController = viewController
        }

        func callBackFromStartGameModalVC(groupID: String?, padelID: UUID?) {
            if let groupID {
                viewController.groupID = groupID
            }
            if let padelID {
                viewController.padelID = padelID
            }
        }
    }
}
このまま表示させるとUIKitでNavigationBarに表示させていたボタンなどが表示されません。
必要に応じてtoolbarを使ってNavigationBarにボタンを配置、クリック時の処理も追加します。
struct RandomNumberView: View {
    @State private var showPopover = false

    var body: some View {
        VStack {
            RandomNumberTableViewRepresentable()
        }
        .toolbar {
            ToolbarItem(placement: .navigationBarTrailing) {
                Button(action: {
                    showPopover.toggle()
                }, label: {
                    Image(systemName: "gearshape")
                })
            }
        }
        .popover(isPresented: $showPopover) {
            VStack {
                SettingViewRepresentable()
            }
        }
    }
}
この辺りの実装が大変な場合は、SwiftUIで実装し直す方が早いこともありそうですね。。。
SwiftUIのNavigationStackを使う
※ NavigationStackはiOS16以上で使用できます
まずは、Home画面にNavigationStackを追加します。
NavigationStackに渡すpathを渡すため、enumで各画面の値を定義しておきます。
struct HomeView: View {
    @State private var path: [Screen] = []

    enum Screen: Hashable {
        case gameSetting
        case gameStart
        case randomNumber
        case mainSetting
        case gameStartDefault(groupID: String? = nil, padelID: UUID? = nil)
        case gameStartMix(groupID: String)
        ...
    }

    var body: some View {
        NavigationStack(path: $path) {
            VStack {
                HStack(spacing: 20) {
                    NavigationLink(value: Screen.gameSetting) {
                        Image("btn_game_setting")
                            .resizable()
                            .frame(width: 100, height: 100)
                            .padding(20)
                    }
                    ...
                }
            }
            .navigationDestination(for: Screen.self) { screen in
                switch screen {
                case .gameSetting:
                    CommonDataView()
                case .gameStart:
                    StartGameView(path: $path)
                case .randomNumber:
                    RandomNumberTableView()
                case .mainSetting:
                    MainSettingView()
                case let .gameStartDefault(groupID, padelID):
                    DefaultGameTabView(path: $path, groupID: groupID, padelID: padelID)
                case .gameStartMix(let groupID):
                    MixGameTabView(path: $path, viewModel: MixGameViewModel(groupID: groupID))
                }
            }
        }
    }
}
画面遷移をさせる方法は
NavigationLink(value:)で値を渡す、もしくはpathに直接追加する形でも画面遷移することができます。
画面の表示は.navigationDestination(for: Screen.self)で受け取る形で実現できます。
移行方法については以前もまとめたことがありました。
SwiftUIのTabViewを使う
タブの定義とselectionの値を追加、TabView(selection: $selection)を使ってTabViewを実装します。
struct DefaultGameTabView: View {
    @State private var selection: Screen = .gameSetting
    var groupID: String?
    var padelID: UUID?

    enum Screen {
        case gameSetting, gameData, gameResult

        var title: String {
            switch self {
            case .gameSetting:
                "試合設定"
            case .gameData:
                "試合組合せ"
            case .gameResult:
                "試合結果"
            }
        }
    }

    var body: some View {
        TabView(selection: $selection) {
            GameViewSettingRepresentable(groupID: groupID, padelID: padelID)
                .tabItem {
                    Image(systemName: "person.crop.rectangle.stack")
                    Text("試合設定")
                }
                .tag(Screen.gameSetting)
            GameDataRepresentable()
                .tabItem {
                    Image(systemName: "person.3")
                    Text("試合組合せ")
                }
                .tag(Screen.gameData)
            GameResultRepresentable()
                .tabItem {
                    Image(systemName: "doc.text.magnifyingglass")
                    Text("試合結果")
                }
                .tag(Screen.gameResult)
        }
        .navigationBarBackButtonHidden(true)
        .navigationTitle(selection.title)
        .toolbar {
            ToolbarItem(placement: .topBarTrailing) {
                switch selection {
                case .gameResult:
                    Button(action: {
                        showAlert = true
                    }, label: {
                        Image(systemName: "house.fill")
                    })
                default:
                    Spacer()
                }
            }
        }
    }
}
.navigationTitle(selection.title)の部分では、タブを切り替えるごとにNavigationBarのタイトルが変わるようにしました。
また、NavigationBarに配置したボタンについても、タブの条件で表示の出しわけをしています。
おわりに
重い腰を上げて取り組んでみましたが、規模が小さく画面数も少ないからかそこまで大変ではなかった印象です。
サポートバージョンも一気に上げてみたので(個人アプリということもあり)iOS17以上で使える機能もどんどん取り入れていこうと思います。
参考