やりたいこと
Redmineの REST API を利用してフロントエンドを作りたい。
(Reactでフロント周りをガシガシ書きたい。)
解決方法(選択肢)
-
Redmineのローカル(AppRoot/public)にReactでフロントエンドを構築する。
-> 複数のRedmineとの連携ができないし、会社で使用しているRedmineでは使えないので却下。(Saasのためコードに変更が咥えられない。) -
JSONPを利用する。
-> 使い方よくわからないので、却下。 -
サーバーを準備して、例えばRailsでAPIをプロキシする仕組みを作って、フロントをReactで作る。
-> 多分これが一般的だけど、サーバー準備めんどくさいので保留。
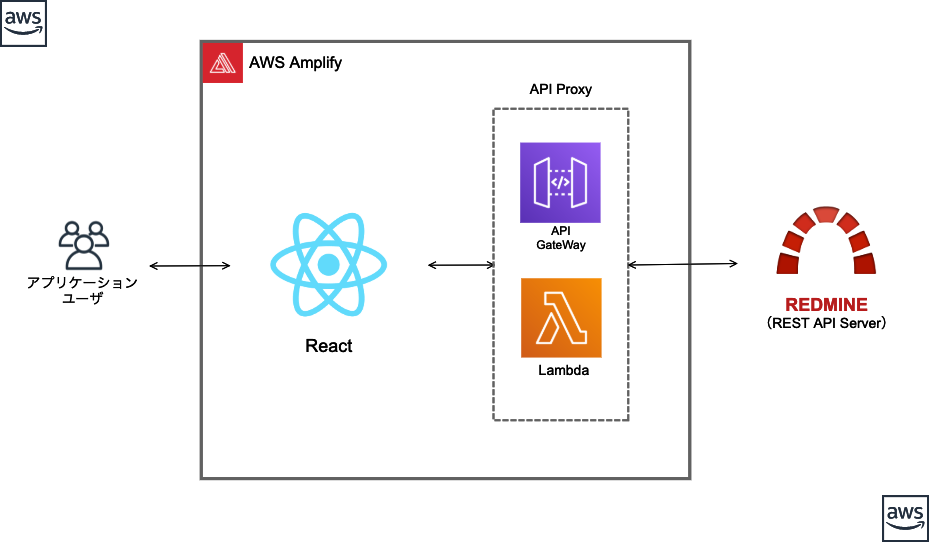
4. AWS Amplifyを利用して、フロントエンドとバックエンドをサーバレスで構築する!
これが良さそう。採用 🎉
注)今回はamplifyのバージョンは4.16.1です。バージョンによって、コンソールの表示が異なりますので、ご注意ください。
構成図
作業手順
$ npx create-react-app sample-proxy
$ cd sample-proxy
$ npm start
プロジェクト作成後、 npm start で、サーバー起動後、Reactの初期画面にアクセスできることを確認してください。
Amplify初期化
以下、参考までにですがご自分の環境に合わせて設定をしてください。
$ amplify init

# 以下サンプル
Scanning for plugins...
Plugin scan successful
Note: It is recommended to run this command from the root of your app directory
? Enter a name for the project sample-proxy
? Enter a name for the environment dev
? Choose your default editor: Visual Studio Code
? Choose the type of app that you're building javascript
Please tell us about your project
? What javascript framework are you using react
? Source Directory Path:  src
? Distribution Directory Path: build
? Build Command:  npm run-script build
? Start Command: npm run-script start
Using default provider  awscloudformation

For more information on AWS Profiles, see:
https://docs.aws.amazon.com/cli/latest/userguide/cli-multiple-profiles.html

? Do you want to use an AWS profile? Yes
? Please choose the profile you want to use xxxxxxxxx(環境に合わせて選択)
API追加
$ amplify add api

# 以下サンプル
? Please select from one of the below mentioned services: REST
? Provide a friendly name for your resource to be used as a label for this category in the project: apixxxxxxxx
? Provide a path (e.g., /book/{isbn}): /v1/redmine/proxy
? Choose a Lambda source Create a new Lambda function
? Provide a friendly name for your resource to be used as a label for this category in the project: sampleproxyxxxxxx
? Provide the AWS Lambda function name: sampleproxyxxxxxx
? Choose the function template that you want to use: Serverless express function (Integration with Amazon API Gateway)
? Do you want to access other resources created in this project from your Lambda function? No
? Do you want to edit the local lambda function now? No
Succesfully added the Lambda function locally
? Restrict API access No
? Do you want to add another path? No
Successfully added resource api0a97322f locally

Some next steps:
"amplify push" will build all your local backend resources and provision it in the cloud
"amplify publish" will build all your local backend and frontend resources (if you have hosting category added) and provision it in the cloud
Lambdaの設定
lambdaのパッケージ追加
Lambdaで使用するパッケージを追加します。
$ cd amplify/backend/function/sampleproxyxxxxxx/src/
$ npm install request
Code
以下、lambadaの実行コードになりますので、修正を咥えます。
※ LambdaでNode.js動かした経験がなく、関数への切り出しがうまくできなかったため、お見苦しいですが。。。
※ API GateWay の登録の都合でget, post, put, deleteの処理を書いていますが、フロントではget, postのみ実装しています。
var express = require('express')
var bodyParser = require('body-parser')
var awsServerlessExpressMiddleware = require('aws-serverless-express/middleware')
var request = require('request')

// declare a new express app
var app = express()
app.use(bodyParser.json())
app.use(awsServerlessExpressMiddleware.eventContext())

// Enable CORS for all methods
app.use(function(req, res, next) {
  res.header("Access-Control-Allow-Origin", "*")
  res.header("Access-Control-Allow-Headers", "Origin, X-Requested-With, Content-Type, Accept")
  next()
});


/**********************
 * Example get method *
 **********************/

app.get('/v1/redmine/proxy', async function(req, res) {
  // Add your code here
  const apikey = req.apiGateway.event.headers['x-api-key']
  const path   = req.apiGateway.event.queryStringParameters.path
  const origin = req.apiGateway.event.queryStringParameters.url
  const urlClass = new URL(path, origin)
  const url = urlClass.toString()
  const headers = {
    'Content-type': 'application/json',
    'X-Redmine-API-Key': apikey
  }

  const options = {
    url: url,
    method: 'GET',
    headers: headers,
    json: true
  }
  const requestPromise = (options) => {
    return new Promise(function (resolve, reject) {
      request(options, function (error, res, body) {
        if (!error && res.statusCode == 200) {
          resolve(body)
        } else {
          reject(error)
        }
      })
    })
  }
  const result = await requestPromise(options)
  res.json({success: result, url: req.url})
});

app.get('/v1/redmine/proxy/*', function(req, res) {
  // Add your code here
  res.json({success: 'get call succeed!', url: req.url});
});

/****************************
* Example post method *
****************************/

app.post('/v1/redmine/proxy', async function(req, res) {
  // Add your code here
  const apikey = req.apiGateway.event.headers['x-api-key']
  const path   = req.apiGateway.event.queryStringParameters.path
  const origin = req.apiGateway.event.queryStringParameters.url
  const data   = req.body
  const urlClass = new URL(path, origin)
  const url = urlClass.toString()
  const headers = {
    'Content-type': 'application/json',
    'X-Redmine-API-Key': apikey
  }
  const options = {
    url: url,
    method: 'POST',
    headers: headers,
    form: data
    // json: data
  }
  const requestPromise = (options) => {
    return new Promise(function (resolve, reject) {
      request(options, function (error, res, body) {
        if (!error && res.statusCode == 201) {
          resolve(body)
        } else {
          reject(error)
        }
      })
    })
  }
  const result = await requestPromise(options)
  res.json({success: result, url: req.url})
});

app.post('/v1/redmine/proxy/*', function(req, res) {
  // Add your code here
  res.json({success: 'post call succeed!', url: req.url, body: req.body})
});

/****************************
* Example put method *
****************************/

app.put('/v1/redmine/proxy', async function(req, res) {
  // Add your code here
  const apikey = req.apiGateway.event.headers['x-api-key']
  const path   = req.apiGateway.event.queryStringParameters.path
  const origin = req.apiGateway.event.queryStringParameters.url
  const data   = req.body
  const urlClass = new URL(path, origin)
  const url = urlClass.toString()
  const headers = {
    'Content-type': 'application/json',
    'X-Redmine-API-Key': apikey
  }
  const options = {
    url: url,
    method: 'PUT',
    headers: headers,
    form: data
    // json: data
  }
  const requestPromise = (options) => {
    return new Promise(function (resolve, reject) {
      request(options, function (error, res, body) {
        if (!error && res.statusCode == 204) {
          resolve({body, error, statuscode: res.statusCode})
        } else {
          reject(error)
        }
      })
    })
  }
  const result = await requestPromise(options)
  res.json({success: result, url: req.url})
});

app.put('/v1/redmine/proxy/*', function(req, res) {
  // Add your code here
  res.json({success: 'put call succeed!', url: req.url, body: req.body})
});

/****************************
* Example delete method *
****************************/

app.delete('/v1/redmine/proxy', async function(req, res) {
  // Add your code here
  const apikey = req.apiGateway.event.headers['x-api-key']
  const path   = req.apiGateway.event.queryStringParameters.path
  const origin = req.apiGateway.event.queryStringParameters.url
  const urlClass = new URL(path, origin)
  const url = urlClass.toString()
  const headers = {
    'Content-type': 'application/json',
    'X-Redmine-API-Key': apikey
  }
  const options = {
    url: url,
    method: 'DELETE',
    headers: headers
  }
  const requestPromise = (options) => {
    return new Promise(function (resolve, reject) {
      request(options, function (error, res, body) {
        if (!error && res.statusCode == 204) {
          resolve(body)
        } else {
          reject(error)
        }
      })
    })
  }
  const result = await requestPromise(options)
  res.json({success: result, url: req.url})
});

app.delete('/v1/redmine/proxy/*', function(req, res) {
  // Add your code here
  res.json({success: 'delete call succeed!', url: req.url});
});

app.listen(3000, function() {
    console.log("App started")
});

module.exports = app
上記、準備ができましたら、Amplifyを利用してデプロイします。
$ amplify push
push が完了後、フロントエンドの設定も行います。
まずは、必要なライブラリーをインストールし、その後、App.js を書き換えます。
$ npm install aws-amplify
※ 参考までに作成用の関数もコメントアウトでつけています。
import Amplify, { API } from 'aws-amplify';
import awsconfig from './aws-exports';

Amplify.configure(awsconfig);

const apiName = 'apixxxxxx' // Amplifyで`amplify add api`した時に指定したapiNameになります。
const path = '/v1/redmine/proxy' // Amplifyで`amplify add api`した時に指定したpathになります。

const apiKey = '[ApiKey]'; // ApiKeyはご自分の準備したRedmineのApiKeyに書き換えてください。
const redmineUrl = 'http://[Domain]/'; // Domainはご自分の準備したRedmineのDomainに書き換えてください。
const headers = {
  'Content-type': 'application/json',
  'X-Api-Key': apiKey
}

const issuesRead = async (id) => {
  const pathStr = id ? `issues/${id}.json` : 'issues.json';
  const myInit = {
    headers,
    queryStringParameters: {
      path: pathStr,
      url: redmineUrl
    }
  };
  return await API.get(apiName, path, myInit);
}

// issue 作成用の関数
// const issueCreate = async (body) => {
//   const myInit = {
//     body,
//     headers,
//     queryStringParameters: {
//       "path": "issues.json",
//       "url": redmineUrl
//     },
//   }
//   return await API.post(apiName, path, myInit)
// }


const App = () => {

  // issue 一覧
  console.log('response: ', issuesRead())

  // issue 個別
  // console.log('response: ', issuesRead(1))

  // issue 作成
  // const body = {
  //   issue: {
  //     project_id: 1,
  //     subject: 'test',
  //     description: 'test',
  //   }
  // }
  // console.log('response: ', issuesRead(1))

  return (
    <div>
      <h1>sample proxy test</h1>
    </div>
  );
}

export default App;
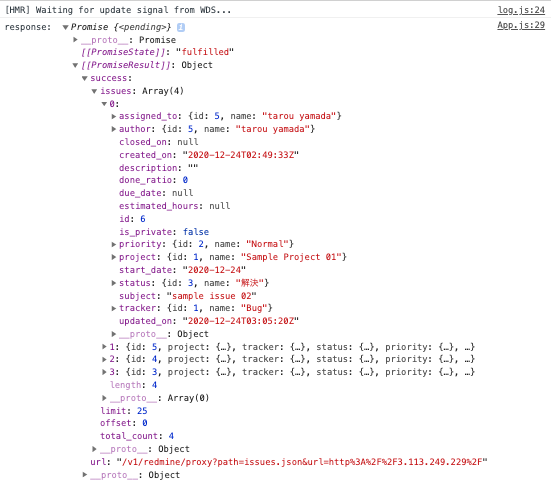
書き換え後、ローカルでサイトを起動して、developer tool でconsole.logの出力でデータが取得できているか確認してみてください。
npm start
以下のように出力を確認できればOKです!
これで無事にredmineのapiが取得できたことが確認できるかと思います。
参考サイト
https://docs.amplify.aws/lib/restapi/getting-started/q/platform/js
https://www.redmine.org/projects/redmine/wiki/Rest_Issues

