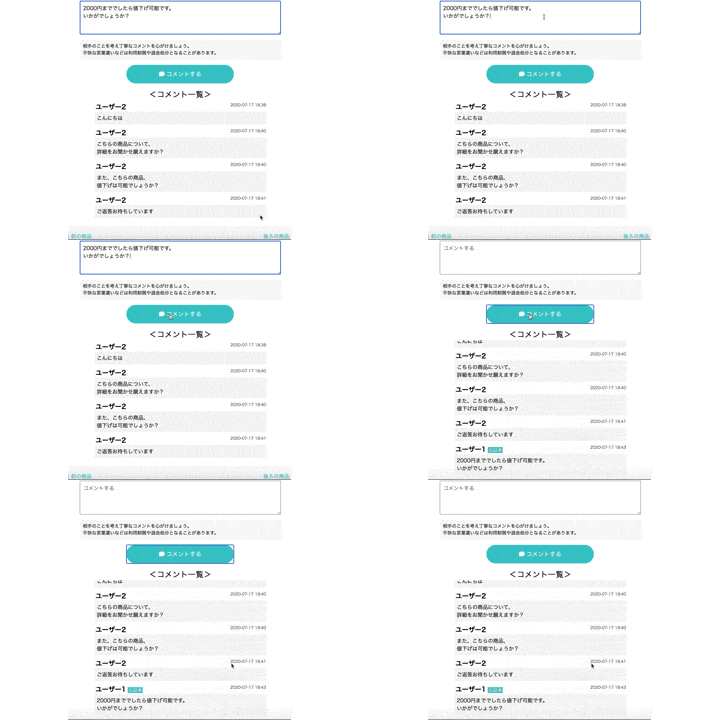
やりたいこと
フリマアプリで、商品に対するコメント機能をjQueryを用いた非同期通信で実装する。
出品者とそれ以外が区別できるようにする。
目指すものは以下のようになります。

gemの導入などを含めてjQueryが使える状態である、
deviseによるユーザーと、商品(Product)モデルは作ってある前提で始めます。
モデルの作成
% rails g model comment
class CreateComments < ActiveRecord::Migration[6.0]
  def change
    create_table :comments do |t|
      t.integer :user_id
      t.integer :product_id
      t.text :text
      t.timestamps
    end
  end
end
bundle installを実行
アソシエーションを定義する
1つのcommentは1人のuser、1つのproductに所属。
1人のユーザーは複数のcomments,
1つの商品は複数のcommentsを持つため以下のように記述。
belongs_to :product
belongs_to :user
validates :text, presence: true
has_many :comments
has_many :comments
ルーティングの記述
コメントはどの商品に対するものなのかという情報を持つ必要があるため、ネストさせます。
また、createアクションのみ必要なので明記します。
resources :products do
  resources :comments, only: :create
end
コントローラーの作成
% rails g controller comments
class CommentsController < ApplicationController
  def create
    comment = Comment.create(comment_params)
    redirect_to product_path(comment.product.id)
  end

  private
  def comment_params
    params.require(:comment).permit(:text).merge(user_id: current_user.id, product_id: params[:product_id])
  end
end
まずは同期通信のまま実装します。
ビューの実装
まずはフォーム。クラス名は各自調整してください。
ログインしてない場合はコメント入力欄を消して、ログイン,新規登録へのリンクを表示します。
- if current_user
  = form_with(model: [@product, @comment], local: true, id: "new_comment") do |f|
    = f.text_area :text, placeholder: "コメントする", class: "product__topContent__commentBox__text"
    .product__topContent__commentBox__caution
      相手のことを考え丁寧なコメントを心がけましょう。
      %br
      不快な言葉遣いなどは利用制限や退会処分となることがあります。
    = button_tag type: "submit", class: "product__topContent__commentBox__submit" do
      %i.fa.fa-comment
      コメントする
- else
  .product__topContent__commentBox__signin
    %p コメントの投稿には、
    = link_to "ログイン", new_user_session_path
    または
    = link_to "新規会員登録", new_user_registration_path
    が必要です
続いて、コメントの一覧を表示させます。先に変数を定義しておきましょう。
コメントをしたユーザーが出品者の場合、区別できるようになっています。
saler_idは出品者のユーザーを指しています。
@comment = Comment.new
@comments = @product.comments.includes(:user)
.product__topContent__commentBox__index
  - if @comments
    - @comments.each do |comment|
      .product__topContent__commentBox__index__box
        %span.product__topContent__commentBox__index__box--name= comment.user.nickname
        - if comment.user.id == @product.saler_id
          %span.product__topContent__commentBox__index__box--saler 出品者
        %span.product__topContent__commentBox__index__box--date= comment.created_at.strftime("%Y-%m-%d %H:%M")
        %p.product__topContent__commentBox__index__box--text= comment.text
ここまでで、コメント機能自体は実装できました。
非同期通信にする
コントローラーの修正
def create
  @comment = Comment.new(comment_params)
  if @comment.save
    respond_to do |format|
      format.json
    end
  else
    render product_path(@comment.product.id)
  end
end
渡すデータをjbuilderに記述する
以下のファイルを作成して記述してください。
json.text  @comment.text
json.user_id  @comment.user.id
json.user_name  @comment.user.nickname
json.created_at @comment.created_at.strftime("%Y-%m-%d %H:%M")
json.saler_id @comment.product.saler_id
非同期通信で送信されたデータからHTMLを作成して追加する。
$(document).on('turbolinks:load', ()=> {
  // 追加するビューを定義。長く見えますが、先ほど書いたビューのeach以下と同じです。
  function buildHTML(comment){
    // コメントをしたのが出品者だった時の場合分け
    if (comment.user_id === comment.saler_id) {
      let html =
      `<div class='product__topContent__commentBox__index__box'>
        <span class='product__topContent__commentBox__index__box--name'>${comment.user_name}</span>
        <span class='product__topContent__commentBox__index__box--saler'>出品者</span>
        <span class='product__topContent__commentBox__index__box--date'>${comment.created_at}</span>
        <p class='product__topContent__commentBox__index__box--text'>${comment.text}</p>
      </div>`
      return html;
    } else {
      let html =
      `<div class='product__topContent__commentBox__index__box'>
        <span class='product__topContent__commentBox__index__box--name'>${comment.user_name}</span>
        <span class='product__topContent__commentBox__index__box--date'>${comment.created_at}</span>
        <p class='product__topContent__commentBox__index__box--text'>${comment.text}</p>
      </div>`
      return html;
    }
  }
  // データが送信された時の処理
  $('#new_comment').on('submit', function(e){
    e.preventDefault();
    let formData = new FormData(this);
    let url = $(this).attr('action')
    // 送るデータとオプションを指定
    $.ajax({
      url: url,
      type: "POST",
      data: formData,
      dataType: 'json',
      processData: false,
      contentType: false
    })
    // 通信が成功した時
    .done(function(data){
      // 上で定義したHTML
      let html = buildHTML(data);
      // html要素を追加する
      $('.product__topContent__commentBox__index').append(html);
      // フォームの中身をからにする
      $('.product__topContent__commentBox__text').val('');
      // 追加した要素の分だけスクロールさせる
      $('.product__topContent__commentBox__index').animate({ scrollTop: $('.product__topContent__commentBox__index')[0].scrollHeight});
      // 送信ボタンが一度押したら再度押せなくなる処理を無効にして、連続投稿可能にする。
      $('.product__topContent__commentBox__submit').prop('disabled', false);
    })
    // 通信に失敗した時
    .fail(function(){
      alert('コメントを入力してください');
    })
  })
})
まとめ
Railsにおけるアソシエーションの確認、jQueryを用いた非同期通信など基礎的な要素の振り返りには最適でした。
チーム開発をしているため、一つ一つのクラスが長くなっていて見づらいかもしれませんが、
何かの参考になれば幸いです。