Istio v1.12から、HTTP/3対応を実験的にはじめていました。
https://istio.io/latest/news/releases/1.12.x/announcing-1.12/change-notes/
Istioとは
Istioは最も有名なサービスメッシュです。
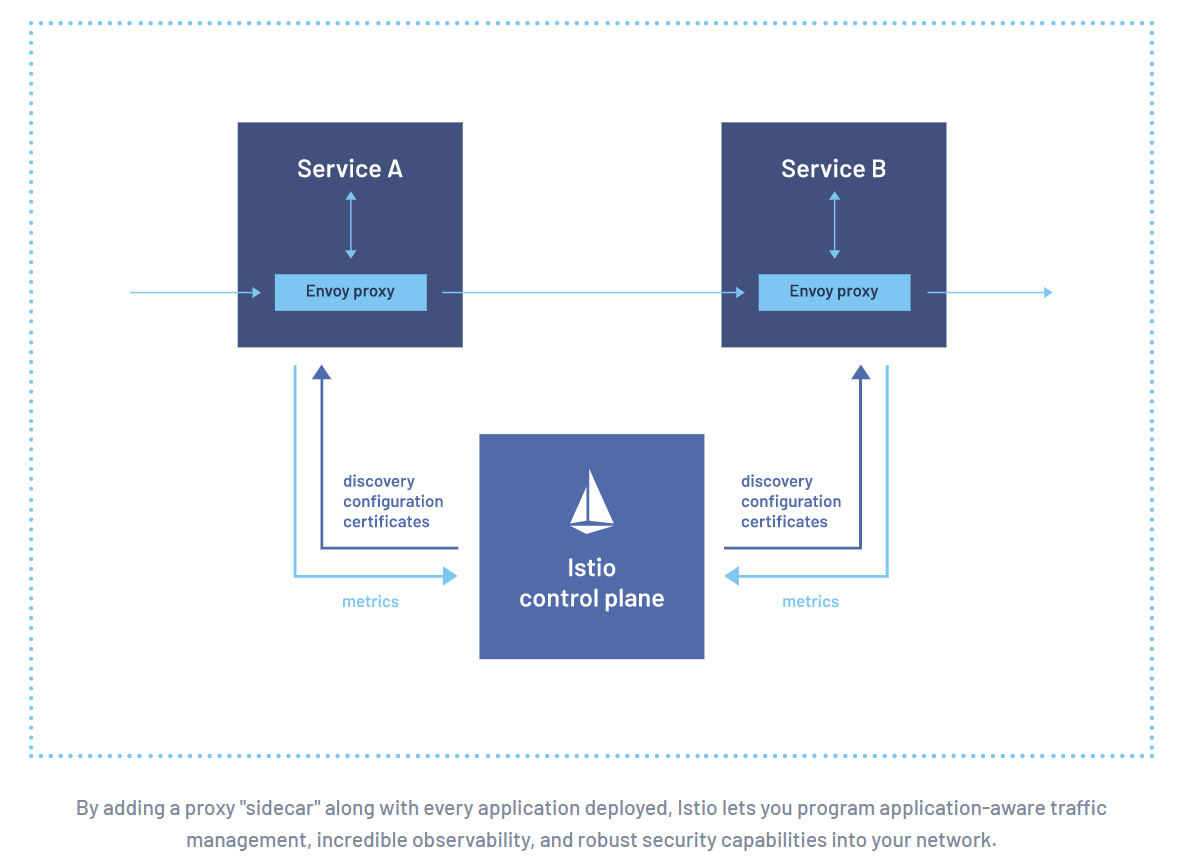
サービスメッシュとは、マイクロサービス間の通信状況を確認したり、アクセスコントロールしたりするツールです。

引用元:https://istio.io/latest/about/service-mesh/
上図の通り、IstioはEnvoyプロキシを用いて通信を行います。また、制御できるプロトコルは、HTTP/1.1、 HTTP/2、TCP、gRPCと様々なものがあります。
HTTP/3とは
HTTP/3とは、QUICと呼ばれる新たなトランスポートプロトコルを用いた通信方式です。
QUICはUDPベースでストリーム多重化、暗号化トランスポートを行うプロトコルです。QUICのおかげで、HTTP/3はHTTP/2よりもはやく通信できます。またQUICを採用したことで、HTTP/3は必ず通信を暗号化するようになりました。
なお、QUICは標準化団体IETF(Internete Engineering Task Force)のRFC 9000にて公開されました。
IstioでHTTP/3を使う
Istio v1.12では、ゲートウェイでのHTTP/3サポートをα版として提供しはじめており、公式のデモを用いて挙動確認が可能です。
1.Istio設定準備
IstioOperatorの設定をyamlファイルで作成し、それを反映させます。
(注:Kubernetesはロードバランサーにて複数のポートが定義された場合、デフォルトでは同じプロトコルしか使えません。
そのため、異なるプロトコルを使用できるように、Kubernetesの設定にてMixedProtocolLBServiceを事前に有効にする必要があります。)
apiVersion: install.istio.io/v1alpha1
kind: IstioOperator
metadata:
  name: install
spec:
  hub: localhost:5000
  tag: master
  components:
    ingressGateways:
    - name: istio-ingressgateway
      enabled: true
      k8s:
        service:
          ports:
          - name: status-port
            port: 15021
            targetPort: 15021
          # HTTPSと HTTP/3は同じポート番号を指定する必要あり
          # (443/TCPが公開される場合は、443/UDPも公開)
          - name: https
            port: 443
            targetPort: 8443
          - name: http3
            port: 443
            targetPort: 8443
            protocol: UDP
  values:
    pilot:
      # QUICをIstioで使えるようにするために、Istioの設定`PILOT_ENABLE_QUIC_LISTENERS`をtrueにする
      env:
        PILOT_ENABLE_QUIC_LISTENERS: true
$ istioctl apply -f istio-operator.yaml -y
2.デモアプリ準備
まず、namespaceとしてhttpbinを作成し、labelとしてistio-injectionを設定します。
$ kubectl create namespace httpbin
$ kubectl label namespace httpbin istio-injection=enabled
次に、デモアプリをデプロイします。
$ kubectl -n httpbin apply -f samples/httpbin/httpbin.yaml
その後、IngressのためのTLS certificates設定をします。このとき設定はhttpbin.cnfに記載します。
[req]
default_bits       = 2048
prompt             = no
distinguished_name = req_distinguished_name
req_extensions     = san_reqext

[ req_distinguished_name ]
countryName         = IN
stateOrProvinceName = KA
organizationName    = QuicCorp

[ san_reqext ]
subjectAltName      = @alt_names

[alt_names]
DNS.0   = httpbin.quic-corp.com
// CA、server certificatesの作成
$ openssl req -x509 -sha256 -nodes -days 365 -newkey rsa:4096 -subj "/C=IN/ST=KA/O=QuicCorp" -keyout quiccorp-ca.key -out quiccorp-ca.crt
$ openssl req -out httpbin.csr -newkey rsa:2048 -nodes -keyout httpbin.key -config httpbin.cnf
$ openssl x509 -req -days 365 -CA quiccorp-ca.crt -CAkey quiccorp-ca.key -set_serial 0 -in httpbin.csr -out httpbin.crt -extfile httpbin.cnf -extensions san_reqex
//Secretの作成
$ kubectl -n istio-system create secret tls httpbin-cred --key=httpbin.key --cert=httpbin.crt
3.HTTP/2、HTTP/3(over QUIC)の両方でアクセスできるように設定
まず、サービスを公開するためのゲートウェイの設定をyamlファイルで作成します。
apiVersion: networking.istio.io/v1beta1
kind: Gateway
metadata:
  name: httpbin-gateway
spec:
  selector:
    app: istio-ingressgateway
    istio: ingressgateway
  servers:
  - port:
      number: 443
      name: https
      protocol: HTTPS
    hosts:
    - httpbin.quic-corp.com
    tls:
      mode: SIMPLE
      credentialName: httpbin-cred
$ kubectl -n istio-system apply -f gateway-config.yaml
つぎに、ルーティングのためにVirtualServiceの設定をyamlファイルで作成します。
apiVersion: networking.istio.io/v1beta1
kind: VirtualService
metadata:
  name: httpbin-route
spec:
  hosts:
  - httpbin.quic-corp.com
  gateways:
  - httpbin-gateway
  http:
  - name: httpbin-default-route
    route:
    - destination:
        host: httpbin.httpbin.svc.cluster.local
        port:
          number: 8000
$ kubectl -n istio-system apply -f virtualservice-config.yaml
正しく適用できていれば、指定したポートに対して2つのリスナーが作成されます。
4.テスト
HTTP/3トラフィックをテストするためには、HTTP/3をサポートしているcurlを利用する必要があります。
$ curl --http3 --resolve httpbin.quic-corp.com:443:$INGRESS_IP https://httpbin.quic-corp.com/headers
* Added httpbin.quic-corp.com:443:172.XX.XX.XX to DNS cache
* Hostname httpbin.quic-corp.com was found in DNS cache
*   Trying 172.XX.XX.XX:443...
* Connect socket 5 over QUIC to 172.XX.XX.XX:443
* Sent QUIC client Initial, ALPN: h3,h3-29,h3-28,h3-27
* Connected to httpbin.quic-corp.com () port 443 (#0)
* h3 [:method: GET]
* h3 [:path: /headers]
* h3 [:scheme: https]
* h3 [:authority: httpbin.quic-corp.com]
* h3 [user-agent: curl/7.78.0-DEV]
* h3 [accept: */*]
* Using HTTP/3 Stream ID: 0 (easy handle 0xa64260)
> GET /headers HTTP/3
> Host: httpbin.quic-corp.com
> user-agent: curl
> accept: */*
>
< HTTP/3 200
< server: istio-envoy
< date: Wed, dd MM yyyy hh:mm:ss GMT
< content-type: application/json
< content-length: 642
< access-control-allow-origin: *
< access-control-allow-credentials: true
< x-envoy-upstream-service-time: 2
< alt-svc: h3=":443"; ma=86400
<
{
  "headers": {
    "Accept": "*/*",
    "Host": "httpbin.quic-corp.com",
    "Transfer-Encoding": "chunked",
    "User-Agent": "curl",
    "X-B3-Parentspanid": "XXXXXXXXXXXXXX",
    "X-B3-Sampled": "0",
    "X-B3-Spanid": "XXXXXXXXXXXXXX",
    "X-B3-Traceid": "XXXXXXXXXXXXXXXXXXXXXX",
    "X-Envoy-Attempt-Count": "1",
    "X-Envoy-Internal": "true",
    "X-Forwarded-Client-Cert": "By=spiffe://cluster.local/ns/httpbin/sa/httpbin;Hash=XXXXXXXXXXXXXX;Subject=\"\";URI=spiffe://cluster.local/ns/istio-system/sa/istio-ingressgateway-service-account"
  }
}
