概要
こんにちは、よしデブです。
今回、TypeScript×Next.jsとRedux Hooksの組み合わせに初めて挑戦したので、同期処理と非同期処理の書き方紹介しようと思います!
TypeScript×Next.jsとRedux Hooksの組み合わせの記事はいくつかあったのですが、 非同期処理のHooks についての記事が少ないように思いました。せっかくなので現在の私の中でのReduxの書き方ベストプラクティスを共有したいと思います。 あくまでも私の思うベストプラクティス なので、もっと良い書き方があるよ!という方はコメントお待ちしておりますm(_ _)m
今回は4部構成でいきたいと思います。
- Reduxを始めるの準備(今回はここ)
- 同期処理でTodo追加・完了機能を作る
- 非同期処理でログイン機能を作る(メイン)
- (おまけ)その他のライブラリ紹介
ReduxやNext.js基本的な考え方は軽く触れますが、その詳細やTypeScriptの書き方の説明は割愛させていただきます。
TypeScriptでReduxの書き方で悩んでいる方やReduxの非同期処理の書き方に悩んでいる方の手助けになれれば幸いです。
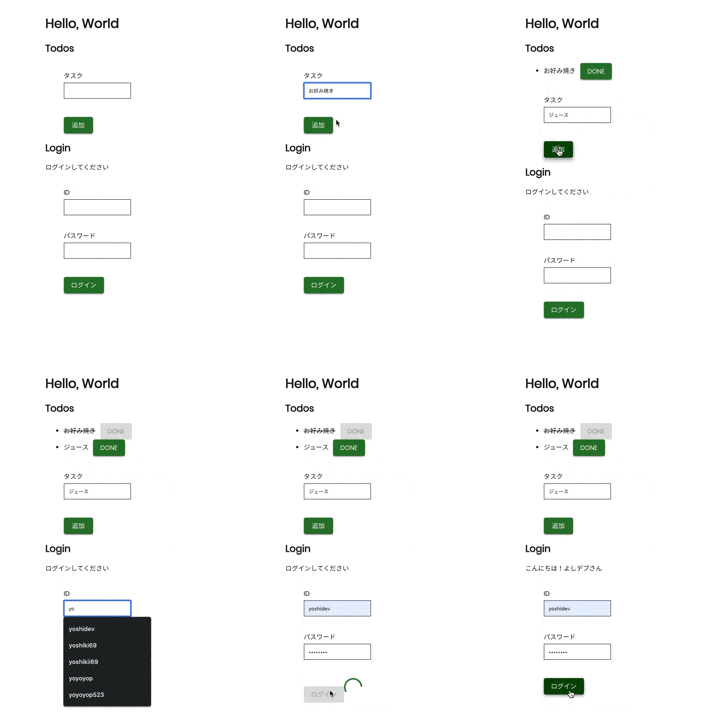
作成したデモがこちら
Todoリストを追加、完了機能と簡単な認証機能を実装しました。
Todoのタスク追加、完了はReduxで同期的、ログイン機能は非同期処理で実現しています。

Hooksについて
私は趣味でReactを使ったアプリを作っています。
ReactやRedux自身は3年ほど前から使っており、Reduxを用いた状態管理は便利だなぁ...と思って感心していました。
しかし、ここ最近はTypeScriptでNext.jsを使った簡単なWebアプリケーション開発が多く、Reduxほどしっかり状態を管理する機会が少なかったです。
React ver.16.8からHooks機能が加わり、stateなどのReactの機能を、クラスを書かずに使えるようになりました。React Hooks(公式)
これに伴ってReduxも独自のHooksを提供するようになり、stateの受け渡しもClass ComponentではなくFunctional Componentで書けるようになりました。Redux Hooks(公式)
環境
- Node: v12.16.1
- yarn: v1.22.4
- TypeScript: v3.8.3
主要なパッケージのバージョンは以下の通りです。(各パッケージの@typesもインストールします)
- react: v16.13.0
- redux: v4.5.0
- react-redux: v7.2.0
- redux-thunk: v2.3.0
- next: v9.3.1
- next-compose-plugins: v2.2.0
- next-redux-wrapper: v5.0.0
- @material-ui/core: v4.9.13
- formik: v2.1.4
- styled-components: v5.1.0
ディレクトリ構造
Next.jsの仕様でpagesディレクトリでルーティング処理を書きます。Next.js Pages(公式)
srcディレクトリでは、commonで共通的なもの、componentsでは自作のコンポーネント(Atomic Design)、storeでReduxに必要なActionやReducerなどを置いています。
ここではNext.jsやAtomic Designについては触れません。
.
├── pages
│   ├── _app.tsx
│   ├── _document.tsx
│   └── index.tsx
├── server
│   └── index.ts
├── src
│   ├── common
│   │   ├── Color.ts
│   │   ├── api.ts
│   │   └── theme.ts
│   ├── components
│   │   ├── atoms
│   │   │   └── forms
│   │   │       ├── ErrorText.tsx
│   │   │       └── TextInput.tsx
│   │   ├── molecules
│   │   │   └── TextField
│   │   │       └── TextField.tsx
│   │   └── organisms
│   │       ├── LoginForm
│   │       │   └── LoginForm.tsx
│   │       └── TodoForm
│   │           └── TodoForm.tsx
│   └── store
│       ├── auth
│       │   ├── actions.ts
│       │   ├── asyncActions.ts
│       │   ├── index.ts
│       │   └── types.ts
│       ├── todos
│       │   ├── actions.ts
│       │   ├── index.ts
│       │   └── types.ts
│       ├── index.ts
│       ├── actions.ts
│       └── reducer.ts
├── types
│   └── svg.d.ts
├── package-lock.json
├── package.json
├── next-env.d.ts
├── next.config.js
├── tsconfig.json
├── tsconfig.server.json
├── tslint.json
├── yarn-error.log
└── yarn.lock
Todoリストを作るためのReduxの準備
Todoリストの状態を管理するためのReduxの準備をしていきます。
ActionType、ActionCreatorを定義
早速作っていきましょう。
まずはTodoのActionType、ActionCreatorを作っていきます。
この辺のActionType、ActionCreateorの作り方はいくつかあると思いますが、私はこんな感じで書いてます。
ポイントはActionTypeは一意に決まるように定義するようにします。 これはReducerでActionTypeを見て次に返すStateを決めるからです。
export default {
  ADD_TODO: 'ADD_TODO',
  DONE_TODO: 'DONE_TODO'
} as const
ActionCreatorにはロジックを書かず、素直にActionを返します。
import uuid from 'uuid/v4'
import types from './types'

// ActionCreator
export function addTodo(task: string) {
  // Actionを返す
  return {
    type: types.ADD_TODO,
    payload: {
      id: uuid(),
      done: false,
      task,
    },
  }
}

export function doneTodo(id: string) {
  return {
    type: types.DONE_TODO,
    payload: { id },
  }
}
Actionの型をActionCreator推論するためにCreatorsToActions型を定義
次にReducerで使用するActions型を定義します。
複数のActionCreatorからまとめてActionの型を推論するために、CreatorsToActions型を定義します。
CreatorsToActionsにActionCreatorを渡すと、ActionCreatorの返り値を見てActionの型を推論してくれます。
type Unbox<T> = T extends { [K in keyof T]: infer U } ? U : never
type ReturnTypes<T> = {
  [K in keyof T]: T[K] extends (...args: any[]) => any
  ? ReturnType<T[K]>
  : never
}
type CreatorsToActions<T> = Unbox<ReturnTypes<T>>

// todoのActionCreatorを渡す
export type Actions = CreatorsToActions<typeof import('./todos/actions')>

/** Actionsの推論結果
type Actions = {
  type: 'ADD_TODO'
  payload: {
    id: string,
    done: boolean,
    task: string,
  }
} | {
  type: 'DONE_TODO'
  payload: {
    id: string
  }
}
*/
Reducerを定義
次にReducerを定義します。Reducerは引数に与えられたActionを基に、新しいStateを返します。今回StateはTodoの配列を持ちます。
import { Actions } from '../actions'
import types from './types'

interface Todo {
  id: string
  done: boolean
  task: string
}

interface State {
  todos: Todo[]
}

export function initialState(injects?: State): State {
  return {
    todos: [],
    ...injects,
  }
}

export function reducer(state = initialState(), action: Actions): State {
  switch (action.type) {
    // todosの末尾にaction.payloadを追加して返す
    case types.ADD_TODO:
      return { ...state, todos: [...state.todos, action.payload] }
    // idがaction.idに一致するtodoのdoneをtrueにして返す
    case types.DONE_TODO:
      return {...state,
        todos: state.todos.map(
          todo => todo.id === action.payload.id
            ? {...todo, done: true} : todo)
        }
    default:
      return state
  }
}
先ほどきちんとActions型を定義しているおかげで図のようにActionTypeを補完をしてくれたりするのでコードミスを防ぐことができます。この辺が型を持つTypeScriptの強みですね。

RootState、RootReducer、RootStoreを定義
最後にRootState、RootReducer、RootStoreを定義しましょう。
RootReducerは複数定義したreducerを一つにまとめます。まとめるには combineReducers を用います。今回はTodoに関するState、Reducerしかありませんが、今後、機能ごとにこれらを切り分けたい時に便利です。次に続く認証機能で新たなState、Reducerを作る予定なので最初からRootReducerを用意しておきます。
import {combineReducers} from "redux";
import * as Todos from  './todos';

// RootState(initialState)
export function initialState() {
    // 今後、機能ごとにstateを追加していく
    return {
        todos: Todos.initialState()
    }
}

// RootReducer
export const reducer = combineReducers({
    // 今後、機能ごとにstateを追加していく
    todos: Todos.reducer,
});
RootStoreはアプリケーションにStateとReducerを渡すために作成します。
import { applyMiddleware, createStore, Store } from 'redux'
import { composeWithDevTools } from 'redux-devtools-extension'
import thunkMiddleware from 'redux-thunk'
import { initialState, reducer } from "./reducer";

export type StoreState = ReturnType<typeof initialState>;
export type ReduxStore = Store<StoreState>;

/**
 * initStore
 * Initialise and export redux store
 */
export const initStore = (state = initialState()) => {
  // RootStore
  return createStore(
    reducer,
    state,
    composeWithDevTools(applyMiddleware(thunkMiddleware))
  )
}
アプリケーションにStoreを渡す
Next.jsでは_app.tsxにアプリケーションのRootを書きます。Next.js Custom App(公式)
これがReactアプリケーションの一番外側(root)のコンポーネントなるので、ここにProviderで上記で定義したinitStoreを与えます。これで アプリケーション内のどこでもReduxにアクセスすることが可能になります。
※今回、material-uiを使用しておりProviderの他にもThemeProviderやCssBaselineを呼び出していますが、Reduxとは別の設定になるのでここでは説明は割愛します。
import theme from '@common/theme'
import CssBaseline from '@material-ui/core/CssBaseline'
import ThemeProvider from '@material-ui/styles/ThemeProvider'
import { initStore, ReduxStore } from '@store/index'
import withRedux from 'next-redux-wrapper'
import App from 'next/app'
import React from 'react'
import { Provider } from 'react-redux'

/**
 * withRedux HOC
 * NextJS wrapper for Redux
 */
export default withRedux(initStore)(
  class CustomApp extends App<{ store: ReduxStore }> {
    // (中略)
    public render() {
      const { Component, pageProps, store } = this.props
      // Providerの中にあるコンポーネントでreduxで定義したstoreに参照することができるため、一番外側にProviderを呼ぶ
      // material-uiを使用しているのでThemeProviderやCssBaselineを呼んでいるが、Reduxとは別の設定なので説明は割愛
      return (
        <Provider store={store}>
          <ThemeProvider theme={theme}>
            <CssBaseline />
            <Component {...pageProps} />
          </ThemeProvider>
        </Provider>
      )
    }
  }
)
これでReduxを使用する準備は終わりになります!お疲れ様でした!!
終わりに
これで一通りのReduxの定義は終わりました。いやぁ、結構書くことあって大変です。。
次回は実際に今回定義したReduxをガンガン使っていきたいと思います!!
次回はこちら Next.js × TypeScriptの同期・非同期処理をHooksを使って書く ~同期的処理編~