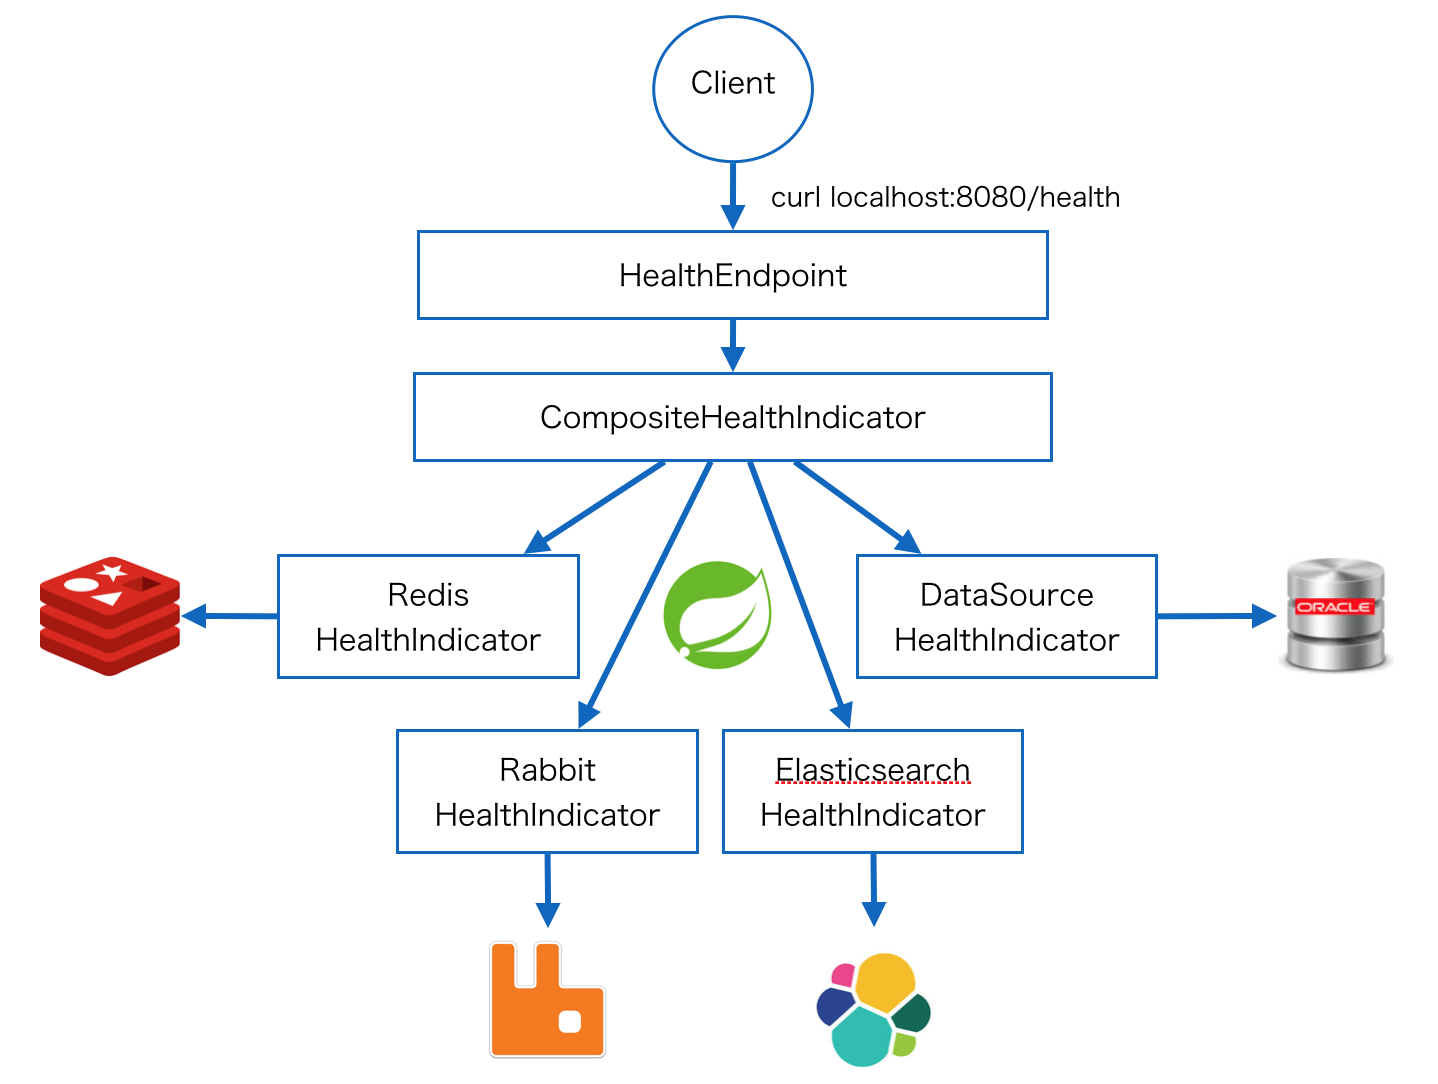
今回はSpring Bootに対するヘルスチェックを試してみる。
spring-boot-actuatorを利用することでヘルスチェックを簡単に実現できる。
依存関係の追加
<parent>
	<groupId>org.springframework.boot</groupId>
    <artifactId>spring-boot-starter-parent</artifactId>
    <version>1.3.0.M5</version>
</parent>

<dependencies>
	<dependency>
		<groupId>org.springframework.boot</groupId>
		<artifactId>spring-boot-starter-actuator</artifactId>
	</dependency>
</dependencies>
ヘルスチェック処理対象
依存関係の追加だけでHealthIndicatorAutoConfigurationにより、自動的にヘルスチェックを行うことが可能になる。
spring-boot-actuator-1.3.0.M5では現在これだけのヘルスチェックをサポートしている。
| 対象 | ヘルスチェック内容 |
|---|---|
| DataSource | SpringのBeanとして管理されている全DataSourceに対してPINGクエリを実行(ORACLEの場合は"SELECT 'Hello' from DUAL") |
| MongoDB | SpringのBeanとして管理されている全MongoTemplateに対して{ buildInfo: 1 }コマンドを発行 |
| Redis | SpringのBeanとして管理されている全RedisConnectionFactoryに対してINFOコマンドを発行 |
| RabbitMQ | SpringのBeanとして管理されている全RabbitTemplateに対して、com.rabbitmq.client.Channel#getConnection.getServerProperties()を試行 |
| Solr | SpringのBeanとして管理されている全SolrServerに対してSolrServer#ping()を実行 |
| ディスク空き領域 | デフォルトではnew File(".").getFreeSpace()で10MB以上空きがあるかチェック |
| メール送信 | SpringのBeanとして管理されている全JavaMailSenderImplに対してJavaMailSenderImpl#testConnection()を実行 |
| JMS | SpringのBeanとして管理されている全ConnectionFactoryに対してConnectionFactory#createConnection() and Closeを実行 |
| Elastitsearch | SpringのBeanとして管理されている全Clientに対してRequests#clusterHealthRequestを実行。対象indexはデフォルトで_all |
一つのエンドポイントにリクエストすると全てのヘルスチェックを実施する。
そのため、システム全体として稼働しているかどうかを判定することができる。
利用方法
/healthにリクエストするとjson形式でヘルスチェック結果が返却される。
$ curl localhost:8080/health
{
	"status":"DOWN",
	"redis":{
		"status":"UP",
 		"redisDataWriter" {"status":"UP","version":"2.8.21"},
 		"redisDataReader":{"status":"UP","version":"2.8.21"}},
	"elasticsearch":{
		"status":"DOWN",
		"clusterName":"elaseticsearch_sample",
		"numberOfNodes":1,
		"numberOfDataNodes":1,
		"activePrimaryShards":7,
		"activeShards":7,
		"relocatingShards":0,
		"initializingShards":0,
		"unassignedShards":1},
	"db":{
		"status":"UP",
		"database":"Oracle","hello":1}
}
この結果ではredis、elasticsearch、dbに対するヘルスチェックが実施されている。
elasticsearchのヘルスチェックが失敗しているため、DOWNとなっている。
デフォルトでは、一つでもDOWNが存在すると全体としてDOWNとなる。
そのため、先頭要素のstatusがDOWNとなっている。
Load Balancer等でヘルスチェックを実施する時には先頭要素のstatusを参照して判断することになる。
ヘルスチェックに関する設定
management.healthプロパティでヘルスチェックの実施対象を限定することができる。
デフォルトでは「ヘルスチェック処理対象」で記載した条件でヘルスチェックをすることになるが、
プロパティを設定することでヘルスチェック対象から除外することもできる。
management:
    health:
        diskspace:
            enabled: false
この設定ではディスク空き領域のヘルスチェックを無効にしている。
ヘルスチェック処理の追加
独自にHealthIndicatorを作成することでヘルスチェック処理を追加することができる。
ここではstopFileが配置されていたら強制的にDOWNとするヘルスチェックのIndicatorを追加する。
public class StopFileHealthIndicator extends AbstractHealthIndicator {

  private final File stopFile;

  public StopFileHealthIndicator(String filePath) {
    this.stopFile = new File(filePath);
  }

  @Override
  protected void doHealthCheck(Builder builder) throws Exception {
    if (stopFile.exists()) {
      builder.down().withDetail("stop-file-found", stopFile.getAbsolutePath());
    } else {
      builder.up().withDetail("stop-file-not-found", stopFile.getAbsolutePath());
    }

  }
}
SpringのBeanとして登録する。
ここでは他のHealthIndicatorと同様にプロパティで有効無効を判定可能にさせている。
@Bean
@ConditionalOnProperty(prefix = "management.health.stopfile", name = "enabled",
      matchIfMissing = true)
public HealthIndicator stopFileHealthIndicator() {
   return new StopFileHealthIndicator("./stop-file");
}
これだけ。
エンドポイントにリクエストをするとヘルスチェックが追加されていることが分かる。
$curl localhost:8080/health
{
	"status":"DOWN",
	"redis":{
		"status":"UP",
 		"redisDataWriter" {"status":"UP","version":"2.8.21"},
 		"redisDataReader":{"status":"UP","version":"2.8.21"}},
	"elasticsearch":{
		"status":"DOWN",
		"clusterName":"elaseticsearch_sample",
		"numberOfNodes":1,
		"numberOfDataNodes":1,
		"activePrimaryShards":7,
		"activeShards":7,
		"relocatingShards":0,
		"initializingShards":0,
		"unassignedShards":1},
	"stopFile":{
		"status":"UP",
		"stop-file-not-found":"./stopfile"}
	"db":{
		"status":"UP",
		"database":"Oracle","hello":1}
}
