はじめに
こんにちは、yoshiと申します。
このたび、自己受容をテーマにしたWebサービス「JustBe U」をリリースいたしました。🌱
初めての個人開発だったため、エラーやわからないことでつまずくこともありましたが試行錯誤して完成させることができました。今回は、実装でこだわった部分や工夫した部分をお伝えできればと思いますので、技術的な部分で誤りがありましたらコメント等いただけますと幸いです。
サービス名: JustBe U

サービスURL: https://www.justbe-u.com
Github: https://github.com/yoshi5170/self_acceptance_journey
Xアカウント: https://twitter.com/Justbe_uu
概要
JustBe Uは自分の性格をコンプレックスに感じたり否定してしまう人々に対し、自身の良い部分も悪い部分も全て受け入れるという自己受容の考え方に導くサポートをするサービスです。ユーザーはこのサービスを通して自己受容ができるようになり自分らしく生きるための道筋を見つけることができます。
主な機能
| ログイン・新規登録 | 自己否定度診断 |
|---|---|
 |
 |
| 診断結果によってユーザーにおすすめの機能を提案します | |
| 自己受容トレーニング | 自己発見トレーニング |
 |
 |
| 自己否定的な思考や感情を自己受容に向けた視点でAIが変換し自己受容する感覚を養うことができる | 自身がマイナスだと感じる特性をポジティブな視点から見るトレーニングです |
| マイガーデン | 月刊セルフケアー |
 |
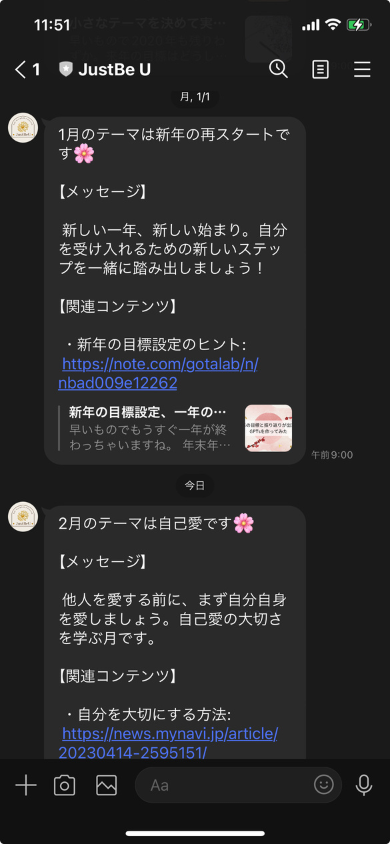 |
| 自己受容トレーニングした回数を確認するこができ、達成感を視覚的に楽しめます | 毎月の1日に、その月のテーマに沿って自己受容するためのアドバイスや有益なリソースの通知します |
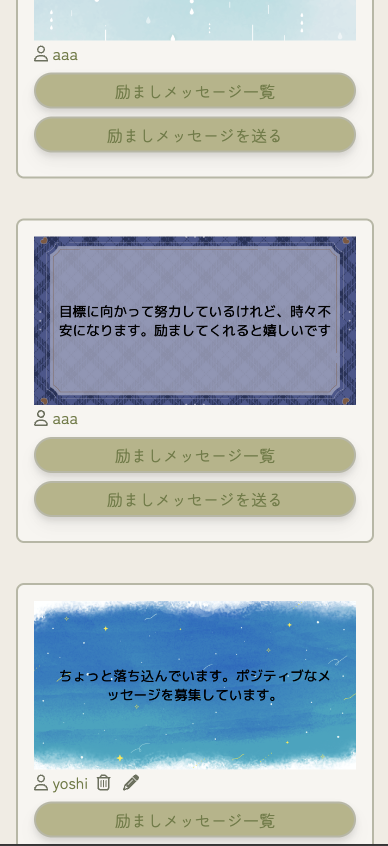
| 励ましリクエスト作成 | 励ましメッセージ作成 |
 |
 |
| 励ましリクエストカードを作成し投稿すると励ましメッセージを受け取ることができます | 励ましたい相手に励ましメッセージカードを作成し送ることができます |
| 幸せ日記作成 | みんなの励ましリクエスト一覧 |
 |
 |
| 1日のよかったことを3つ記録する機能 |
その他の機能
・ 動的OGP
・ Xシェアー
工夫した点
①診断機能
実装の流れは以下のとおりです。
1.1 - 質問を1問ずつ表示する実装
- QuestionsControllerのindexアクションから質問をすべて取得し、それらを
@questions変数に割り当てます - ビューで、
@questions変数から質問を一つずつ表示し、それぞれの質問に対して複数の選択肢も表示します。それぞれの質問とその質問に対する選択肢は最初の段階ではhiddenに設定してあります。 -
診断を始めるをクリックするとクリックイベントが発火し、説明文をhiddenに変更し質問1の欄のhiddenをremoveして質問1が表示されます。 - 質問1の選択肢から一つ選択して
次へをクリックするとクリックイベントが発火し質問1にhiddenを追加し、質問2からhiddenが取り除かれ質問1が隠れて質問2が画面に表示されます。 - 質問3以降の質問も上記と同じ流れで処理されていきます。
1.2 - エラーの表示
1から4の選択肢を選択せずに次の質問に進もうとするとエラーメッセージが表示される仕組みになっています。
具体的には、以下の部分でラジオボタンが選択されているかをチェックしています。
const selectedAnswer = document.querySelector(`input[data-question-id="${currentQuestion}"]:checked`);
もし、チェックされているラジオボタンが一つもなかった場合は、ビューのエラーメッセージの部分のhiddenをJS側で取り除く処理をすることによってエラーメッセーが表示されます。
1.3 - ラジオボタンの非表示化
見た目とユーザーの使いやすさを考慮してラジオボタンの非表示化を行いました。
| ラジオボタンがある場合 | ラジオボタンを非表示にした場合 |
|---|---|
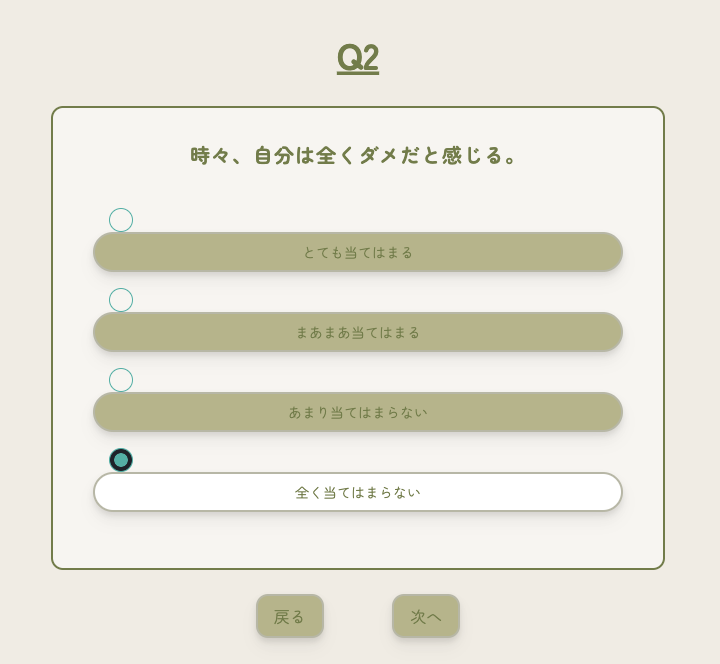 |
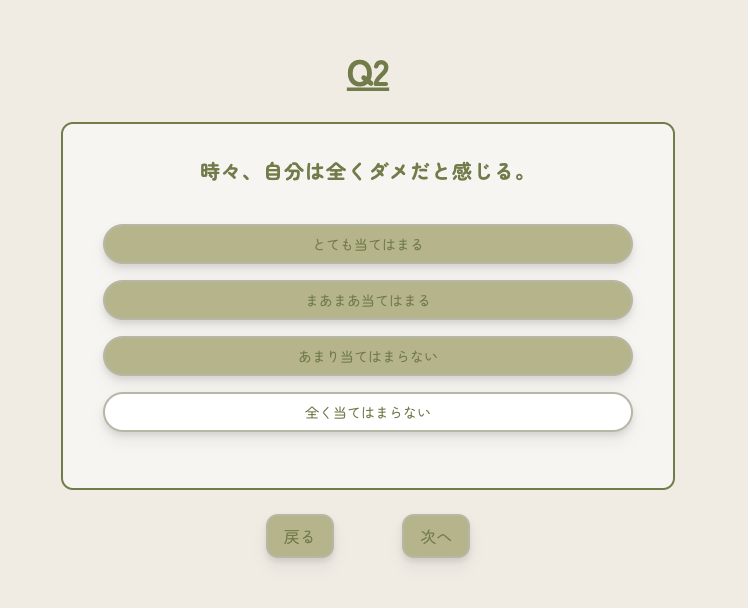 |
- ラジオボタンの非表示化:
<%= f.radio_button ... %>で生成されるラジオボタンにはclass: 'hidden'を設定しています。これによりラジオボタンを画面上に表示させないようにすることができます。 - ラベルの関連付け:
<%= f.label ... %>で生成されるラベルには、for属性を設定しています。このfor属性の値はラジオボタンのIDと一致しています。
例えば、ラジオボタンのIDがid="calculate_answer_1_10"の時対応するラベルのforはfor="calculate_answer_1_10"とラベルのIDと同じになります。
<input type="radio" id="calculate_answer_1_10" name="answer_1" value="10" class="hidden radio radio-accent ml-4" data-question-id="1">
<label for="calculate_answer_1_10" class="text-customGreen5 bg-customGreen6 ...">選択肢のテキスト</label>
上記のコードでは、<label>がfor="calculate_answer_1_10"を持っているため、このラベルをクリックすると、IDがcalculate_answer_1_10である<input>(ラジオボタン)が選択されます。そして、ラジオボタンは.hiddenクラスにより非表示に設定されているため、見た目上はラベルだけがクリック可能な要素として機能しているように見えます。
1.4 - 選択欄のハイライト
選択されたラジオボタンに対応するラベルの背景色を(緑)から(白)変更して選択肢をハイライトしています。
具体的な流れ:
- 1から4の選択肢から一つ選択すると、changeイベントが発火します
- それによってhighlightSelectedOption関数が呼ばれます
- highlightSelectedOption関数では、まずすべてのラベルの背景色をデフォルト(緑色)に戻します
- 次に、選択されたラジオボタンに対応するラベルを探し、そのラベルの背景色をハイライト色(白色)に変更します
コード:
class QuestionsController < ApplicationController
  skip_before_action :authenticate_user!
  def index
    @questions = Question.all
  end
    <省略>
end
<% content_for( :title, t('.title'))%>
<div class="bg-customBeige min-h-screen flex items-center">
  <div class="container mx-auto bg-customBeige">
    <div class="flex flex-col justify-center items-center">
      <div class="text-center">
        <p class="text-customGreen6 text-xl sm:text-2xl font-extrabold my-4 px-2" id="start-description">
          この診断では自己否定度を知ることができます。<br> 質問は合計で10問です。
        </p>
        <button type="button" class="text-customGreen5 bg-customGreen6  transition duration-150 ease-in-out border-2 border-customGreen2 rounded-xl drop-shadow-lg hover:bg-customGreen7 hover:drop-shadow-lg hover:-translate-y-1 px-4 py-2 my-8" id="start-questions">診断を始める</button>
      </div>
      <div class="container mx-auto text-center">
        <%= form_with url:calculate_questions_path, scope: :calculate, method: :post, data: { turbo: false } do |f| %>
          <div class="error-message hidden px-10 py-2 mb-10 mx-10 text-sm text-red-800 bg-red-100 rounded-xl dark:bg-red-100 dark:text-red-800" id="error_message">選択してください</div>
          <% @questions.each_with_index do |question, index| %>
            <div id="question_<%= index+1 %>", class="hidden">
              <h2 class="text-customGreen5 text-4xl text-center font-extrabold underline mt-4 mb-8 md:text-4xl">Q<%=index+1%></h2>
              <div class="container mx-auto sm:w-4/5 sm:bg-customBeige3 sm:border-2 sm:border-customGreen5 sm:rounded-xl lg:w-3/5 ">
                <p class="text-customGreen5 text-xl font-bold tracking-wider mt-8 mb-10 mx-2 lg:text-2xl"><%= question.text %></p>
                <div class="flex flex-col justify-center mt-6 mb-10 text-sm px-2 sm:px-10">
                  <% question.scores_for_role.each do |choice, score| %>
                    <%= f.radio_button "answer_#{question.id}", score, class:'hidden radio radio-accent ml-4', data: { question_id: index + 1 }%>
                    <%= f.label nil, choice, value: score, class: 'text-customGreen5 bg-customGreen6 border-2 border-customGreen2 rounded-3xl drop-shadow-lg hover:bg-white hover:drop-shadow-lg px-4 py-2 py-2 mb-4', for: "calculate_answer_#{question.id}_#{score}" %>
                  <% end %>
                </div>
              </div>
            </div>
          <% end %>
          <button type="button" data-action="previous-question" id="previous_button" class="hidden text-customGreen5 bg-customGreen6 transition duration-150 ease-in-out border-2 border-customGreen2 rounded-xl drop-shadow-lg hover:bg-customGreen7 hover:drop-shadow-lg hover:-translate-y-1 mx-8 my-6 px-4 py-2">戻る</button>
          <button type="button" data-action="next-question" id="next_button" class="hidden text-customGreen5 bg-customGreen6  transition duration-150 ease-in-out border-2 border-customGreen2 rounded-xl drop-shadow-lg hover:bg-customGreen7 hover:drop-shadow-lg hover:-translate-y-1 mx-8 my-6 px-4 py-2">次へ</button>
          <%= f.submit "結果", id: "submit-button", class: 'hidden text-customGreen5 bg-customGreen6  transition duration-150 ease-in-out border-2 border-customGreen2 rounded-xl drop-shadow-lg hover:bg-customGreen7 hover:drop-shadow-lg hover:-translate-y-1 mx-6 my-6 px-4 py-2' %>
        <% end %>
      </div>
    </div>
  </div>
</div>
document.addEventListener("DOMContentLoaded", () => {
  let currentQuestion = 1;
  const totalQuestions = 10;

  const startButton = document.getElementById('start-questions');
  const startDescription = document.getElementById('start-description');

  //診断の説明を非表示にする
  startButton.addEventListener('click', () => {
    startButton.classList.add('hidden');
    startDescription.classList.add('hidden');

    // 初めの質問を表示
    document.getElementById(`question_${currentQuestion}`).classList.remove('hidden');
    updateButtonVisibility();
  });

  // ボタンの表示を更新する関数
  function updateButtonVisibility() {
    document.getElementById(`next_button`).classList.toggle('hidden', currentQuestion >= 10);  // 質問10の場合、次へボタンを非表示に
    document.getElementById(`previous_button`).classList.toggle('hidden', currentQuestion <= 1);  // 質問1の場合、戻るボタンを非表示に
    document.getElementById(`submit-button`).classList.toggle('hidden', currentQuestion !== 10);  // 質問10以外の場合、結果ボタンを非表示に
  }

  // ラジオボタンがチェックされたときのイベントリスナーをすべてのラジオボタンに設定
  document.querySelectorAll('input[type="radio"]').forEach(radio => {
    radio.addEventListener('change', (event) => {
      highlightSelectedOption(event.target);
    });
  });

  function highlightSelectedOption(selectedRadio) {
    // すべてのラベルから背景色のリセット
    document.querySelectorAll(`label`).forEach(label => {
      label.classList.remove('bg-white'); // 白色の背景色を削除
      label.classList.add('bg-customGreen6'); // 緑色の背景色を追加
    });

    // 選択されたラベルの背景色を変更
    const selectedLabel = document.querySelector(`label[for="${selectedRadio.id}"]`);
    if (selectedLabel) {
      selectedLabel.classList.remove('bg-customGreen6'); // 緑色の背景色を削除
      selectedLabel.classList.add('bg-white'); // 白色の背景を追加
    }
  }


  //次へボタンのクリック処理
  document.addEventListener('click', (event) => {

    if (event.target.dataset.action === 'next-question'){
      // 現在の質問で選択されている選択肢を取得
      const selectedAnswer = document.querySelector(`input[data-question-id="${currentQuestion}"]:checked`);

      if (!selectedAnswer) {
        // 選択されていない場合はエラーメッセージを表示して処理を終了
        document.getElementById(`error_message`).classList.remove('hidden');
        return;
      } else {
        // 選択されている場合は、エラーメッセージが表示されている場合は隠す
        document.getElementById(`error_message`).classList.add('hidden');
      }

      document.getElementById(`question_${currentQuestion}`).classList.add('hidden');
      currentQuestion++;
      document.getElementById(`question_${currentQuestion}`).classList.remove('hidden');
      const selectedRadio = document.querySelector(`input[data-question-id="${currentQuestion}"]:checked`);
      if (selectedRadio) {
        highlightSelectedOption(selectedRadio);
      }
      updateButtonVisibility();
    } else if (event.target.dataset.action === 'previous-question') {
      document.getElementById(`question_${currentQuestion}`).classList.add('hidden');
      currentQuestion--;
      document.getElementById(`question_${currentQuestion}`).classList.remove('hidden');
      const selectedRadio = document.querySelector(`input[data-question-id="${currentQuestion}"]:checked`);
      if (selectedRadio) {
        highlightSelectedOption(selectedRadio);
      }
      updateButtonVisibility();
    }

    if (event.target.id === 'submit-button') {
      const lastQuestionAnswerSelected = document.querySelector(`input[data-question-id="10"]:checked`);

      if (!lastQuestionAnswerSelected) {
          // エラーメッセージを表示する
          document.getElementById(`error_message`).classList.remove('hidden');
          event.preventDefault();
          return;
      } else {
          document.getElementById(`error_message`).classList.add('hidden');
      }
    }
  });

});
②日記の機能
3つのコンテンツを一括で保存できるようにForm Objectを使用しました。
詳しい実装方法については以下の記事の方に詳しくまとめたので、よかったら読んでみてください。
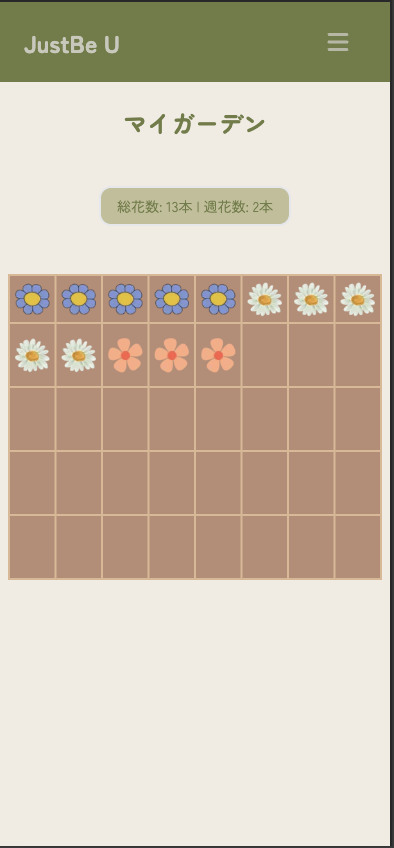
③マイガーデン(スタンプ機能)
スタンプ機能の仕組み
- トレーニングの記録:
自己受容トレーニングが行われると、その日付がシステムに記録されます。 - トレーニング回数の集計:
ユーザーのトレーニング回数は、self_esteem_trainings.countを用いて計算されます。この合計回数は、どのスタンプをユーザーのマイガーデンに追加するかを決定する際に重要な役割を果たしています。
3.スタンプの選別:
トレーニングの合計回数を基に、self.find_flowerメソッドを通じて、どの花のスタンプをユーザーのマイガーデンに押すかが選別されます。 - スタンプの保存:
選ばれた花のスタンプは、planted_flowers.create!(flower: flower_to_add, added_at: Time.current) if flower_to_addを使ってplanted_flowersテーブルに保存されます。 - トレーニング毎の処理:
自己受容トレーニングを行うたびに、上記の1から4の処理が行われます。これにより、ユーザーの成長がリアルタイムでマイガーデンに反映されます。
スタンプの表示方法
花のスタンプを表示する処理はgardens_controller.rbに記述されています。
ここでは、ユーザーに紐づくすべてのplanted_flowersから、花のスタンプのデータを日付の昇順で取得し、インスタンス変数@planted_flowersに代入します。ビューページでは、@planted_flowersに代入されたデータが一つずつ表示されます。例えば、自己受容トレーニングを5回行ったユーザーは、planted_flowersテーブルに5回分の花のスタンプの情報が保存され、それがビューページで順番に表示されます。
コード:
class SelfEsteemTrainingsController < ApplicationController
  before_action :set_token, only: :result

  def new; end

  def result

        <省略>

      # レスポンスが存在する場合、新しいトレーニングセッションを作成
      if @chat.present?
        current_user.add_training_and_flower
      else
        flash.now[:danger] = t('.fail')
        render :new
      end
    else
      redirect_to root_path, danger: t('.over_the_limit')
    end
  end

  private

  def set_token
    @api_key = Rails.application.credentials.dig(:openai, :api_key)
  end

  def text_params
    @query = params[:text]
  end
end
class User < ApplicationRecord
  devise :database_authenticatable, :registerable, :recoverable, :rememberable, :validatable
  has_many :planted_flowers, dependent: :destroy

  def add_training_and_flower
    ActiveRecord::Base.transaction do
      self_esteem_trainings.create!(trained_at: Time.current)
      flower_to_add = Flower.find_flower(self_esteem_trainings.count)
      planted_flowers.create!(flower: flower_to_add, added_at: Time.current) if flower_to_add
    end
  rescue ActiveRecord::RecordInvalid
    false
  end

  def own?(object)
    object.user_id == id
  end
end
class Flower < ApplicationRecord
  has_many :planted_flowers, dependent: :restrict_with_error
  has_one_attached :flower_image

  validates :name, presence: true, length: { maximum: 255 }
  validates :threshold, presence: true, numericality: { only_integer: true }
  validates :flower_image, presence: true, blob: { content_type: ['image/png']}

  def self.find_flower(total_trainings)
    return nil if total_trainings.zero?

    # flowersをthresholdの昇順で取得
    # 例)[花A: threshold 10, 花B: threshold 35, 花C: threshold 65, 花D: threshold 100, 花E: threshold 145, 花F: threshold 195]
    flowers = order(threshold: :asc)

    # total_trainings(トータルのトレーニング回数)がflower.threshold(各花が解禁されるためのトレーニング完了回数の閾値)以下であるかどうかを判断
    flowers.find { |flower| total_trainings <= flower.threshold }
  end
end
class GardensController < ApplicationController
  def show
    # ページングを適用して表示するレコードを取得
    @planted_flowers = current_user.planted_flowers.includes(:flower).order(added_at: :asc).page(params[:page])
  end
end
<% content_for( :title, t('.title'))%>
<div class="min-h-screen bg-customBeige">
  <div class="flex flex-col justify-center">
    <h1 class="text-customGreen5 text-2xl lg:text-4xl font-bold text-center my-6"><%= t('.title') %></h1>
    <div class="text-white mx-auto my-6">
      <h3 class="text-center text-sm text-customGreen5 bg-customGreen7 border-2 rounded-xl px-4 py-2">総花数: <%= @total_flowers_count %>本 | 週花数: <%= @weekly_flowers_count %>本</h3>
    </div>
  </div>
  <div class="container mx-auto px-2 py-4 md:py-8">
    <div class="flex items-center justify-center mt-2">
      <% counter = 0 %>
      <table class="border-collapse bg-customBrown">
        <% 5.times do |row|%>
          <tr>
            <% 8.times do |column| %>
              <% if @planted_flowers[counter] %>
                <td class="w-12 h-12 sm:p-2.5 border-2 border-customBrown2 box-border text-center sm:w-20 sm:h-20 md:w-22 md:h-22 lg:w-24 lg:h-24">
                  <div class="flex justify-center items-center px-1">
                    <%= image_tag @planted_flowers[counter].flower.flower_image.variant(resize: "50x50!", format: :webp), alt: @planted_flowers[counter].flower.name %>
                  </div>
                </td>
              <% else %>
                <td class="w-16 h-16 sm:p-2.5 border-2 border-customBrown2 box-border text-center sm:w-20 sm:h-20 md:w-22 md:h-22 lg:w-24 lg:h-24">
                  <div class="p-4"></div>
                </td>
              <% end %>
              <% counter += 1 %>
            <%end%>
          </tr>
        <%end%>
      </table>
    </div>
    <div class="flex items-center justify-center mt-4 mb-10">
      <%= paginate @planted_flowers, window: 2 %>
    </div>
  </div>
</div>
④自己受容トレーニング・自己発見トレーニング(AI機能)
OpenAI APIを使用しています。OpenAI APIを使用するにはapi_keyの取得が必要です。
また、gem ruby-openaiを使用することでOpenAI APIがrubyで簡単に使用できるようになります。
api_keyは以下から取得することができます。
https://openai.com/blog/openai-api
今回は自己受容トレーニングを例にとって実装の手順を説明していきます。
自己受容トレーニングは、ユーザーが自己否定的な思考をフォームに入力すると、OpenAI APIを通してAIが自己受容できるような文に変換してくれるという機能になっています。
具体的な実装手順:
-
まず取得した
api_keyをcredentials.ymlに保存します -
OpenAI::Client.new(access_token: @api_key)の部分で新しいクライアントを作成するためにcredentials.ymlに保存してあるapi_keyを使用して認証を行います -
クライアントを使ってチャット機能(
@client.chat)にアクセスします- parameters: { ... } の部分で、チャットをする際の詳細な設定しています。
-
modelでは使用するモデルを指定しています。今回はモデルにgpt-3.5-turboを採用しています。 -
messagesでは送るメッセージの内容を指定しています。今回roleはsystemとuserの2つを使用しています。systemではAIに何をするかの指示(例えば、受け取ったテキストを変換するような指示)を送っています。システム: メッセージは、アシスタントの動作を設定するのに役立ちます。たとえば、アシスタントの性格を変更したり、会話全体でアシスタントがどのように動作するかについて具体的な指示を提供したりできます。
userではユーザーからのメッセージ。今回はAIに処理してほしいテキスト(text_params)を送っていますユーザー メッセージは、アシスタントが応答するためのリクエストまたはコメントを提供します。
-
- parameters: { ... } の部分で、チャットをする際の詳細な設定しています。
-
OpenAIに、特定の指示とその指示に基づいて処理してほしいテキストを送り、AIからの返答を
responseに代入しています -
@chat = response.dig('choices', 0, 'message', 'content')の部分で OpenAI APIからの応答のcontentの部分をdigメソッドを使用して抜き出しています。このcontentの内容を@chatに代入しビューで結果を表示しています。
OpenAI APIからの応答例:
Received response from OpenAI: {
"id"=>"chatcmpl-8nMF9FbqoxV5gXwxSspIX7AzUdLNo",
"object"=>"chat.completion",
"created"=>1706774267,
"model"=>"gpt-3.5-turbo-0613",
"choices"=>[{"index"=>0, "message"=>{"role"=>"assistant", "content"=>"人前で話すと緊張してしまうことは、私の個性の一部です。この緊張は、私が大切なことを伝えようとする真剣さの表れです。私は他の方法で自信を持ちながら、自分の声を届けることができます。"},
"logprobs"=>nil,
"finish_reason"=>"stop"}],
"usage"=>{"prompt_tokens"=>78,
"completion_tokens"=>93, "total_tokens"=>171},
"system_fingerprint"=>nil
}
コード:
openai:
  api_key: xxxxxxxxxxxxxxxxxxxxxxxxxxx
class SelfEsteemTrainingsController < ApplicationController
  before_action :set_token, only: :result

  def new; end

  def result
    # 今日のトレーニング回数を取得
    today_trainings_count = current_user.self_esteem_trainings.where('trained_at >= ?', Time.zone.now.beginning_of_day).count

    if text_params.length > 50
      flash.now[:danger] = t('.text_limit')
      render :new
      return
    end

    if today_trainings_count < 2
      # OpenAIへのリクエストを行い、結果を取得
      additional_prompt = '入力された自己否定的な文を自己受容できるような文に変換して'
      Rails.logger.info 'Preparing to send request to OpenAI...'
      @client = OpenAI::Client.new(access_token: @api_key)
      response = @client.chat(
        parameters: {
          model: 'gpt-3.5-turbo',
          messages: [
            { role: 'system', content: additional_prompt },
            { role: 'user', content: text_params }
          ]
        }
      )
      Rails.logger.info "Received response from OpenAI: #{response.inspect}"
      @chat = response.dig('choices', 0, 'message', 'content') if response.present?

      # レスポンスが存在する場合、新しいトレーニングセッションを作成
      if @chat.present?
        current_user.add_training_and_flower
      else
        flash.now[:danger] = t('.fail')
        render :new
      end
    else
      redirect_to root_path, danger: t('.over_the_limit')
    end
  end

  private

  def set_token
    @api_key = Rails.application.credentials.dig(:openai, :api_key)
  end

  def text_params
    @query = params[:text]
  end
end
<%#<省略>%>

<div class="flex flex-col md:hidden">
    <div class="border border-customGreen2 bg-customGreen7 rounded-xl px-2 py-10">
        <p class="text-xs text-customGreen text-center tracking-wide leading-normal"><%= @chat %></p>
    </div>
    <div class="text-center">
        <%= image_tag 'rabbit.png', size:'80x100', class:'w-1/3 sm:w-1/5 mx-auto my-8'%>
    </div>
</div>

<%#<省略>%>
⑤励ましリクエスト・励ましメッセージ(画像生成)
Ruby on Railsのmini_magick ライブラリを使用して画像にテキストを合成して、励ましリクエストと励ましメッセージカードを作成しています。画像の保存にはActive Storageを使用しました。
励ましリクエストの実装を例にとって説明していきます。
具体的な流れ:
-
ユーザーからの入力の受け取り:
最初に、ユーザーが選択したテキストと画像の情報をencouragement_request_paramsを通じて受け取ります。この情報は、次の処理ステップで使用されます。 -
画像生成の準備:
受け取ったテキストと画像の情報は、ImageCreator.buildメソッドに引数として渡しています。このメソッドは、テキストを画像に合成するための主要な処理を担当しています。 -
画像合成の処理:
app/controllers/concerns/image_creator.rbにあるbuildメソッドが実行され、以下のような画像合成の処理が行われます。- prepare_text メソッド:
このメソッドでは、画像に挿入するテキストを適切に整形します。具体的には、テキストを一定の文字数ごとに分割し、指定された行数までのテキストを改行文字で連結する処理を行なっています。 - image = MiniMagick::Image.open(...): 指定されたIDを持つ画像ファイルを開く
- image.combine_options do |config| ... end: 画像に対して複数の設定(eg. フォント、テキストの色、配置位置、フォントサイズ、テキストの描画位置)を行うことができる。
- prepare_text メソッド:
-
生成された画像の取り扱い:
ImageCreator.buildメソッドから返された画像オブジェクトのパスをimage_path変数に代入します。 -
画像のデータベースへの保存:
変数image_pathを使用して生成した画像を@encouragement_requestの request_image にアタッチします。これにより、画像がActive Storageを使用してデータベースに保存されます。
コード
class EncouragementRequestsController < ApplicationController
  before_action :set_encouragement_request, only: %i[show edit update destroy status_update]
  skip_before_action :authenticate_user!, only: %i[index]
  def index
    if params[:message_id].present?
      @encouragement_message = EncouragementMessage.find(params[:message_id])
    end
    @encouragement_requests = EncouragementRequest.where(status: 'public_status').includes(:user).order(created_at: :desc).page(params[:page]).per(18)
  end

  def draft
    @encouragement_requests = current_user.encouragement_requests.where(status: 'draft').includes(:user).order(created_at: :desc).page(params[:page]).per(18)
  end

  def select_image; end

  def new
    @encouragement_request = EncouragementRequest.new
    # @encouragement_request.image_id = params[:image_id]
    @image_id = params[:image_id].to_i
  end

  def create
    @encouragement_request = current_user.encouragement_requests.build(encouragement_request_params)
    @image_id = @encouragement_request.background_id
    image = ImageCreator.build(@encouragement_request.text, @encouragement_request.background_id)
    image_path = image.path
    @encouragement_request.request_image.attach(io: File.open(image_path), filename: 'request_image.png', content_type: 'image/png')

    if @encouragement_request.save
      redirect_to encouragement_request_path(@encouragement_request), success: '画像を作成しました'
    else
      flash.now[:danger] = '画像の作成に失敗しました'
      render :new, status: :unprocessable_entity
    end
  end

  def show
    Rails.logger.info "Encouragement Request Image URL: #{url_for(@encouragement_request.request_image)}"
  end

  def edit; end

  def update
    @encouragement_request.update(encouragement_request_params)
    image = ImageCreator.build(@encouragement_request.text, @encouragement_request.background_id)
    image_path = image.path
    @encouragement_request.request_image.attach(io: File.open(image_path), filename: 'request_image.png', content_type: 'image/png')
    if @encouragement_request.save
      redirect_to encouragement_request_path(@encouragement_request), success: '画像を作成しました'
    else
      flash.now[:danger] = '画像の作成に失敗しました'
      render :edit, status: :unprocessable_entity
    end
  end

  def status_update
    if @encouragement_request.update(status: status_params)
      redirect_to encouragement_request_path(@encouragement_request), success: 'ステータスを変更にしました'
    else
      flash.now[:danger] = 'ステータスの変更に失敗しました'
      render :show, status: :unprocessable_entity
    end
  end

  def destroy
    @encouragement_request.destroy
    redirect_to encouragement_requests_path, success: '画像を削除しました'
  end

  private

  def set_encouragement_request
    @encouragement_request = current_user.encouragement_requests.find_by(id: params[:id])
  end

  def encouragement_request_params
    params.require(:encouragement_request).permit(:text, :request_image, :background_id, :status)
  end

  def status_params
    if params[:commit] == '公開する'
      'public_status'
    else
      'draft'
    end
  end
end
class ImageCreator
  require 'mini_magick'

  GRAVITY = 'center'.freeze
  FONT_SIZE = 25
  TEXT_POSITION = '0,0'.freeze
  FONT = './app/assets/fonts/MPLUS1p-Medium.ttf'.freeze
  INDENTION_COUNT = 20
  ROW_LIMIT = 10

  class << self
    def build(text, image_id)
      text = prepare_text(text)
      image = MiniMagick::Image.open("./app/assets/images/#{image_id}.png")
      image.combine_options do |config|
        config.font FONT
        config.fill 'black'
        config.gravity GRAVITY
        config.pointsize FONT_SIZE
        config.draw "text #{TEXT_POSITION} '#{text}'"
      end
    end

    private

    def prepare_text(text)
      text.to_s.scan(/.{1,#{INDENTION_COUNT}}/)[0...ROW_LIMIT].join("\n")
    end
  end
end
主な使用技術
バックエンド
- Ruby on Rails 7.0.8
- Ruby 3.2.2
- gem
- devise
- ruby-openai
- line-bot-api
- mini_magick
- kaminari
- ransack
- API
- LINE Messaging API
- OpenAI API
フロントエンド
- Tailwind CSS
- JavaScript
インフラ
- Heroku
- Amazon S3
RDS
- PostgreSQL
テスティング
- RSpec
- Capybara
- rubocop
画面遷移図
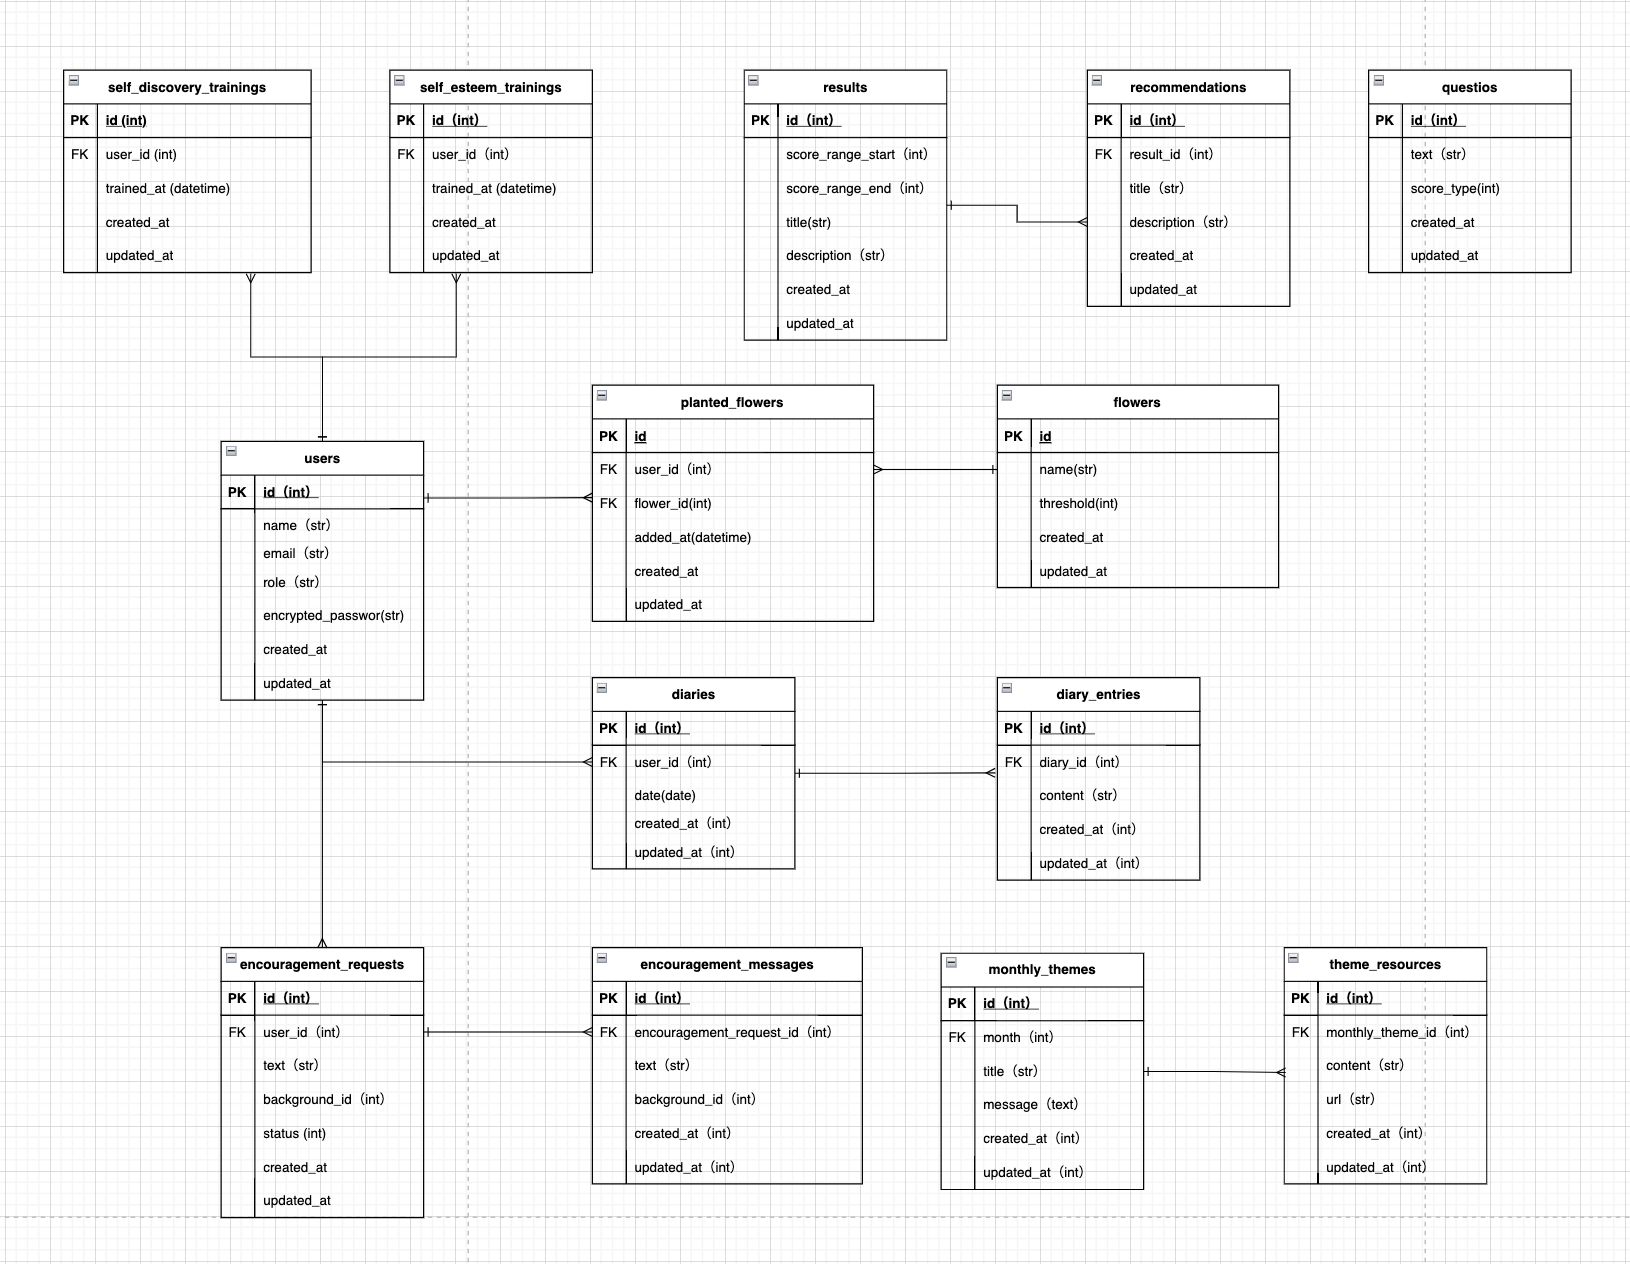
ER図
最後に
今回は初めて、設計から実装に至るまで一人で行い、一つのWebサービスを作り上げることができました。開発中には思い通りに進まないことも多々ありましたが、自分で実装した機能が画面上で動作するのを見た時はすごく感動したのを覚えています。今後も技術のキャッチアップに努め、よりユーザーフレンドリーなサービスを提供できるようにサービス改善に取り組んでいきます。この記事が、少しでも誰かの役に立てれば幸いです。
最後までご覧いただき、ありがとうございました!