概要
初心者向けMacフロントエンド向け最低限の環境構築を記した記事です。おまけで scss のビルド環境構築も書いておきます。
Command Line Tools のインストール
以下のコマンドをターミナルからたたいて Command Line Tools をインストール。
( ※ $ はユーザーのコマンドである印なのでコピーしない )
$ xcode-select --install
たたくとアラートで、
"xcode-select"コマンドを実行するには、コマンドライン・デベロッパ・ツールが必要です。ツールを今すぐインストールしますか?
と問われるので[インストール]を実行。
終わったら、以下のコマンドを打ってインストール先が表示されれば完了。
$ xcode-select -p
Homebrew のインストール(Mac用パッケージマネージャ)
以下のコマンドをたたく。
$ /usr/bin/ruby -e "$(curl -fsSL https://raw.githubusercontent.com/Homebrew/install/master/install)"
zsh のインストール(コマンドラインを見やすくするツール)
以下のコマンドをたたく。
$ brew install zsh
oh-my-zsh のインストール(zshのテーマ)
以下のコマンドをたたく。
$ curl -L https://github.com/robbyrussell/oh-my-zsh/raw/master/tools/install.sh | sh
途中で、デフォルトのシェルをzshにするか?、と言う旨のメッセージが出るので、パスワードを入れて更新してもらう。
終わったらターミナルを再起動する。
oh-my-zsh にはいろんなテーマがあります。とりあえずデフォルトでいいと思いますが、気になる方はぐぐってください。
nvm をインストール(Node.js用パッケージマネージャ)
以下のコマンドをたたく。
$ touch ~/.bash_profile
$ curl -o- https://raw.githubusercontent.com/creationix/nvm/v0.33.8/install.sh | bash
$ cat ~/.bash_profile >> ~/.zprofile
終わったらターミナルを再起動する。
nvmから推奨版バージョンのnode.jsをインストール
https://nodejs.org/ja/ を見に行って推奨版のバージョンを確認。
執筆時点では v8.9.4 だったのでそれをインストール。
$ nvm install v8.9.4
giboのインストール(.gitignoreの生成ツール)
以下のコマンドをたたく。
$ brew install gibo
これで大体完了。ここから先はプロジェクトによって別れる。
以下は scss での開発環境構築の例をあげる。
scss での開発環境構築の例
プロジェクトのディレクトリを作って移動する。
$ mkdir myproject
$ cd myproject
git init と .gitignoreファイルの生成。
$ git init
$ gibo macOS Sass Node >> .gitignore
続いて npm init をする。
いろいろ打つとこが出てくるが、とりあえずは全部 Enter 連打で大丈夫。
$ npm init
次に scss をビルドするための js を作成。
色々方法はあるけど今回は gulp を使用する。
$ npm install gulp gulp-sass -D
gulp-sass は node-sass のラッパー、さらにその中身は C で書かれた LibSass なので非常に高速。
( ※ Sass とよく一緒にでてくることの多い Compass は Ruby で動く上にもうメンテされないので使用しないこと )
ちなみに Sass には sass 形式と scss 形式があるが、 scss 形式の方がより CSS に近くメンテしやすいので、 scss 形式を使用する。
scss ファイルを置くための src/scss ディレクトリを作成。
( いずれ js などもビルドするかもしれないので src の下に明確に分けておく )
$ mkdir -p src/scss
scss をビルドする gulpfile.js を作成。
$ touch gulpfile.js
gulpfile.js を開いて以下をコピペする。
( ちなみに gulp-sass の公式サンプルには sass という名前のディレクトリに scss ファイルがある書き方をしているが、なんだか気持ち悪いのでそれは避けたい主義です )
'use strict';

const gulp = require('gulp');
const sass = require('gulp-sass');

gulp.task('scss', function () {
  return gulp.src('./src/scss/**/*.scss')
    .pipe(sass().on('error', sass.logError))
    .pipe(gulp.dest('./dust/css'));
});

gulp.task('scss:watch', function () {
  gulp.watch('./src/scss/**/*.scss', ['scss']);
});
次に package.json を開き script の部分に scss と scss:watch を以下のように追加。
{
  "name": "myproject",
  "version": "1.0.0",
  "description": "",
  "main": "index.js",
  "scripts": {
    "test": "echo \"Error: no test specified\" && exit 1",
    "scss": "gulp scss",
    "scss:watch": "gulp scss:watch"
  },
  "author": "",
  "license": "ISC",
  "devDependencies": {
    "gulp": "^3.9.1"
  }
}
試しに scss ファイルを作ってビルドしてみる。
$ echo ".hoge { transform: rotate(20deg); margin-top: 100px;\n    .piyo { width:100px; height:100px; background: yellow; }\n}" >> ./src/scss/hoge.scss
$ npm run scss

> myproject@1.0.0 scss /Users/user/git/myproject
> gulp scss

[15:00:00] Using gulpfile ~/git/myproject/gulpfile.js
[15:00:00] Starting 'scss'...
[15:00:00] Finished 'scss' after 50 ms
以上のように表示されたら成功。早速./dist/cssに生成されているので見てみる。
$ cat ./dist/css/hoge.css
.hoge {
  transform: rotate(20deg); }
  .hoge .piyo {
    width: 100px;
    height: 100px;
    background: yellow; }
ちゃんと CSS にビルドされている。
っとここでとりあえず今動いてるの node.js のバージョンを確認して .nvmrc に記載しておきます。これにより通常は .nvmrc のあるディレクトリにcdしただけで、もしくはnvm useで実働バージョンで実行できるようになり、何かしらバージョンの差異による不具合を予防することができます。
$ node -v
v8.9.4 # 当たり前ですがさっきインストールしたものが出てますね
$ echo "8.9.4" >> .nvmrc # .nvmrcにバージョンを記載
とりあえずこれで完了だけど、出力されたファイルはネストされているし、スペースも入ってるし、圧縮したい。(容量を最小限にしたい)
ブラウザの下位互換性のためにベンダープレフィックスを書くのも面倒なのでそこも自動でつけたい。
さらに sourcemaps ないのでブラウザでデバッグしにくいのでそれも出力したい。
なので gulp-sourcemaps gulp-clean-css gulp-autoprefixer をインストール。
npm install gulp-sourcemaps gulp-clean-css gulp-autoprefixer -D
そして再び gulpfile.js を開いて以下をコピペ。
'use strict';

const gulp = require('gulp');
const sass = require('gulp-sass');
const sourcemaps = require('gulp-sourcemaps');
const cleanCSS = require('gulp-clean-css');
const autoprefixer = require('gulp-autoprefixer');

gulp.task('scss', function () {
  return gulp.src('./src/scss/**/*.scss')
    .pipe(sourcemaps.init())
    .pipe(sass().on('error', sass.logError))
    .pipe(autoprefixer())
    .pipe(cleanCSS())
    .pipe(sourcemaps.write('./'))
    .pipe(gulp.dest('./dist/css'));
});

gulp.task('scss:watch', function () {
  gulp.watch('./src/scss/**/*.scss', ['scss']);
});
さらに package.js も編集。autoprefixer で使用するサポート対象のブラウザを追記する。
{
  "name": "myproject",
  "version": "1.0.0",
  "description": "",
  "main": "index.js",
  "scripts": {
    "test": "echo \"Error: no test specified\" && exit 1",
    "scss": "gulp scss",
    "scss:watch": "gulp scss:watch"
  },
  "author": "",
  "license": "ISC",
  "devDependencies": {
    "gulp": "^3.9.1",
    "gulp-autoprefixer": "^4.1.0",
    "gulp-clean-css": "^3.9.2",
    "gulp-sass": "^3.1.0",
    "gulp-sourcemaps": "^2.6.3"
  },
  "browserslist": [
    "last 2 version",
    "ie 9"
  ]
}
"browserslist"で autoprefixer のオプションではどこまでサポートするのか、もしくは直接ターゲットのブラウザを配列で指定することができます。
この'last 2 versions'とかいうのがどれぐらいサポートするかは、以下のサイトで調べられます。
http://browserl.ist/?q=last%202%20version
browserslist の書式は以下をご参照。
https://github.com/ai/browserslist
では再びビルドします。
$ npm run scss

> myproject@1.0.0 scss /Users/user/git/myproject
> gulp scss

[15:00:00] Using gulpfile ~/git/myproject/gulpfile.js
[15:00:00] Starting 'scss'...
[15:00:00] Finished 'scss' after 166 ms
さっきより3倍ぐらいビルドに時間がかかってますが、一瞬でした。
結果を確認。
$ cat ./dist/css/hoge.css
.hoge{-webkit-transform:rotate(20deg);-ms-transform:rotate(20deg);transform:rotate(20deg)}.hoge .piyo{color:#ff0}.hoge{-webkit-transform:rotate(20deg);-ms-transform:rotate(20deg);transform:rotate(20deg)}.hoge .piyo{width:100px;height:100px;background:#ff0}
/*# sourceMappingURL=hoge.css.map */
ちゃんと圧縮されて、ベンダープレフィックスがついて、なにやら map の位置が示されてますね。
そちらも確認。
$ cat ./dist/css/hoge.css.map
{"version":3,"sources":["hoge.scss"],"names":[],"mappings":"AAAA,MAAQ,kBAAA,cAAA,cAAA,cAAA,UAAA,cAAR,YAA0C,MAAA,KAC1C,MAAQ,kBAAA,cAAA,cAAA,cAAA,UAAA,cAAR,YAA0C,MAAA,MAAc,OAAA,MAAe,WAAA","file":"hoge.css","sourcesContent":[".hoge { transform: rotate(20deg); .piyo { color: yellow; } }\n.hoge { transform: rotate(20deg); .piyo { width:100px; height:100px; background: yellow; } }\n"]}%
ちゃんと作られているようです。
もし、他の人に map ファイルが見られたくない人は、mapを生成しないタスクを別で作って公開用のビルドはそちらでやってください。(なんか投げやり感...)
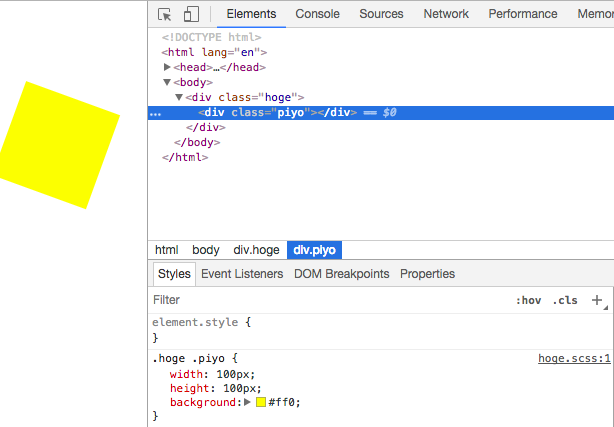
ついでにブラウザの開発者ツールでちゃんと scss を追えるか確認して見ます。
$ touch ./dist/hoge.html
html ファイルはデフォルトだとブラウザで開くことになっていると思うので、この機会に適当なエディターで開くように変更しておきましょう。(毎度右クリックから開くのは開発効率が悪いと思うので)
右クリック > 情報を見る > このアプリケーションで開く で変更することができます。
( ちなみに僕のオススメは Visual Studio Code です )
そして./dist/hoge.htmlに以下をコピペします。
<!DOCTYPE html>
<html lang="en">
<head>
    <meta charset="UTF-8">
    <meta name="viewport" content="width=device-width, initial-scale=1.0">
    <meta http-equiv="X-UA-Compatible" content="ie=edge">
    <title>hoge</title>
    <link rel="stylesheet" href="./css/hoge.css">
</head>
<body>
    <div class="hoge"><div class="piyo"></div></div>
</body>
</html>
ブラウザで開いて(ドラックアンドドロップでOK)開発者ツールを開いて確認します。
しっかりと scss ファイルでの行数が追えてますね。
以上で終了です。(おまけが長すぎて付録の方が大きい雑誌みたいですね。。。)
あと、あたりまえの様に git 使っていますが、その辺りの使い方はぐぐってくださいまし。
今回のプロジェクトは./dist/配下が公開ディレクトリになる想定です。 FTPなどであげる場合は./dist/配下のみをアップロードします。
実働するものをGithubに置いておきますね。
https://github.com/kokoyoshi/qiita-myproject
お疲れ様でした〜![]()
