前回(Part1)の記事はこちら
今回の記事から、デモ的にアプリケーション構築をしたいと思います。
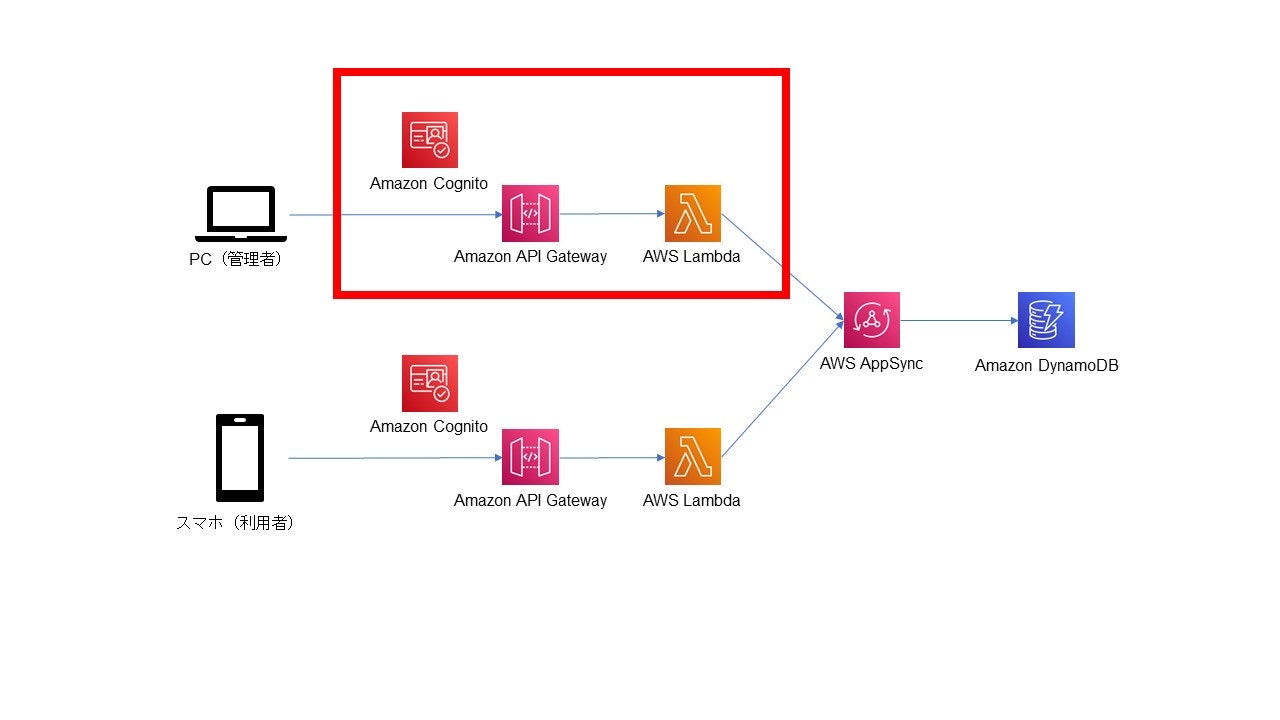
今回の対象範囲
本記事でやらないこと
- フロントエンドの実装
前提条件
- AWSのアカウントがあること
- Amplicy Cliをインストールしていること(筆者バージョン:11.0.2)
- 「amplify configure」コマンドを実行していること
Amplifyプロジェクトの作成
まずは、Amplifyのプロジェクトを作成します。
以下のコマンドを実施することで簡単にプロジェクトが作れます。
$ amplify init

Note: It is recommended to run this command from the root of your app directory
? Enter a name for the project userApp
The following configuration will be applied:

Project information
| Name: userApp
| Environment: dev
| Default editor: Visual Studio Code
| App type: javascript
| Javascript framework: none
| Source Directory Path: src
| Distribution Directory Path: dist
| Build Command: npm.cmd run-script build
| Start Command: npm.cmd run-script start

? Initialize the project with the above configuration? Yes
Using default provider  awscloudformation
? Select the authentication method you want to use: AWS profile

For more information on AWS Profiles, see:
https://docs.aws.amazon.com/cli/latest/userguide/cli-configure-profiles.html

? Please choose the profile you want to use [.aws/credentialsのprofile名]
Adding backend environment dev to AWS Amplify app: *****

~~~

Deployment state saved successfully.
√ Initialized provider successfully.
✅ Initialized your environment successfully.

Your project has been successfully initialized and connected to the cloud!
API GatewayとLambdaの追加
次に作成したプロジェクトにAPI GatewayとLambdaを追加します。
$ amplify add api
? Select from one of the below mentioned services: REST
√ Provide a friendly name for your resource to be used as a label for this category in the project: · itemsApi
√ Provide a path (e.g., /book/{isbn}): · /items
Only one option for [Choose a Lambda source]. Selecting [Create a new Lambda function].
? Provide an AWS Lambda function name: itemsLambda
? Choose the runtime that you want to use: NodeJS
? Choose the function template that you want to use: Hello World

Available advanced settings:
- Resource access permissions
- Scheduled recurring invocation
- Lambda layers configuration
- Environment variables configuration
- Secret values configuration

? Do you want to configure advanced settings? No
? Do you want to edit the local lambda function now? Yes
Successfully added resource itemsLambda locally.

~~~

✅ Succesfully added the Lambda function locally
√ Restrict API access? (Y/n) · no
√ Do you want to add another path? (y/N) · no
✅ Successfully added resource itemsApi locally
Cognitoの追加
また、ユーザー管理も行いたいので、併せてCognitoも追加します。
$ amplify add auth
Using service: Cognito, provided by: awscloudformation

 The current configured provider is Amazon Cognito.

 Do you want to use the default authentication and security configuration? Default configuration
 Warning: you will not be able to edit these selections.
 How do you want users to be able to sign in? Username
 Do you want to configure advanced settings? No, I am done.
✅ Successfully added auth resource リソース名 locally
AWSへの資材の反映
ここまで追加した資材(API Gateway/Lambda/Cognito)をAWS上の環境に反映します。
$ amplify push
以上で今回の対象範囲の構築が完了しました。
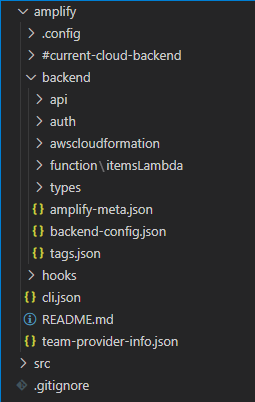
フォルダとしては以下のような形になっています。

backend配下のリソース内では、CloudFormationのテンプレートがありますので、Lambdaの環境変数を設定したい場合などはテンプレートを編集すればOKになります。(itemsLambda-cloudformation-template.jsonなど)
Amplifyを使えば手軽にAWSリソースを作成できるだけではなく、コードでのリソース管理もできるようになるので、一石二鳥ですね!
次回に続く。
