はじめに
ロボットを群管理して自律移動させることに着目しています。
そこで、いろいろ調べてみるとOpen-RMFが良さそうなので、これを使ってみます。
Open-RMFは開発途上のようですが、ROSやGazeboを作っているOpen Roboticsが開発していますので、今後の機能拡張や不具合対応のサポートも大丈夫そうです。
Open-RMFはGazebo上で動作するデモがあります。tinyRobotというロボットを使って、Gazebo上で動作させていますが、SLAMを使ったものを群制御したいと思っています。
Open-RMFにはFree Fleetという機能があり、これを使えば自身が作ったRobotを群制御できるということがわかりました。
そこで、Free Fleetを使いGazebo環境構築において、複数のTurtolbot3を動作させます。
ROSの資産も使いつつOpen-RMF(ROS 2)を使うことも想定して、Dockerは使わず、1台のPCでROS/ROS 2の混在環境で動作させます。
今回の投稿では、その環境構築でかなりハマってしまったので、その手順を備忘録として残します。
環境
・OS : Ubuntu20.04
・ROS Version : ROS → Noetic, ROS 2 → Foxy
Free Fleetデモ環境について
Ubuntu20.04での動作を考えていますのでROSのNoeticは確定しています。ROS 2ですが、Open-RMFではGalacticかFoxyかで悩みました。
サポート期間が少し長いFoxyを採用しました。
・Noeticのインストール:
http://wiki.ros.org/noetic/Installation/Ubuntu
・Foxyのインストール:
https://docs.ros.org/en/foxy/Installation/Ubuntu-Install-Debians.html
ただし、ROS/ROS 2混在の環境のため以下のような記述は無視しました。
echo "source /opt/ros/noetic/setup.bash" >> ~/.bashrc
私は、以下のように.bashrcにaliasを設定して、環境を切り替えるようにしています。
alias設定サンプル
alias noetic='source /opt/ros/noetic/setup.bash;export ROS_MASTER_URI=http://localhost:11311'
alias foxy='export ROS_LOG_DIR=~/.ros/ros2_log;source /opt/ros/foxy/setup.bash;export ROS_MASTER_URI=http://localhost:11311'
noetic
と入力すればROSの環境となります。
foxy
と入力すればROS 2の環境となります。
ROS/ROS 2混在環境だと~/.rosの同じフォルダにLogデータを書き込むので、どちらのデータか判らなくなってしまいます。そこで、LogデータはROSとROS 2で分けて書くように設定しています。
Free Fleet環境構築
今回の目標は、Free Fleetの「ROS 1 Multi Turtlebot3 Simulation」を動作させることです。
複数のTurtelbot3はNoetic(ROS)で動き、Free Fleet ManagerはFoxy(ROS 2)で動きます。
そこで、以下のURLを参考にインストールしていきます。
最初に、「Installation Instructions」のコンパイル環境をインストールします。
sudo apt update && sudo apt install \
  git wget qtbase5-dev qtchooser qt5-qmake qtbase5-dev-tools \
  python3-rosdep \
  python3-vcstool \
  python3-colcon-common-extensions \
  # maven default-jdk   # Uncomment to install dependencies for message generation
Server in ROS 2 環境構築手順
Free Fleetに入っているrmfを使うとノードがエラー落ちするので、本家のrmfをダウンロードしています。また、free_fleet_client_ros2はコンパイルエラーとなるため削除します。
(今回は、clientは使わないので問題ありません。)
mkdir -p ~/Work/open-rmf/free_fleet/ros2/src
cd ~/Work/open-rmf/free_fleet/ros2
wget https://raw.githubusercontent.com/open-rmf/rmf/release/21.09/rmf.repos
vcs import src < rmf.repos
cd src
git clone https://github.com/open-rmf/free_fleet -b main
rm -rf ./free_fleet/free_fleet_client_ros2
cd ..
source /opt/ros/foxy/setup.bash
rosdep install --from-paths src --ignore-src --rosdistro foxy -yr
chmod a+x ~/Work/open-rmf/free_fleet/ros2/src/free_fleet/ff_examples_ros2/scripts/*.py
colcon build --symlink-install
colcon buildするとROS 2パッケージはSKIPされますが、最初にSKIPするとERROR扱いになるようで、
colcon buildを再度実行するとERRORがなく終了します。
また、colcon buildの「symlink-install」オプションは、install時にsrcフォルダのlaunchファイルやパラメータファイルにシンボリックリンクしてくれます。ROSを使っている時の癖でsrcフォルダのファイルを変更して動作させてしまうので、修正が反映されていないことが頻発しました。
正式にはsrcファイルの変更後に、「colcon build」する必要があります。「symlink-install」を付けるとファイルの修正なら、修正してそのまま動作させることができます。
Turtlebot3 Fleet Serverが起動するかを確認します。
cd ~/Work/open-rmf/free_fleet/ros2
source install/setup.bash
ros2 launch ff_examples_ros2 turtlebot3_world_ff_server.launch.xml
Client in ROS 環境構築
https://github.com/open-rmf/free_fleet#ros-1-turtlebot3-simulation
上記の手順通り進めます。
turtlebot3のインストール手順は、公式を読めと書いてあります。
ひとまず、turtlebot3の環境をインストールします。
https://emanual.robotis.com/docs/en/platform/turtlebot3/quick-start/#pc-setup
1回のみ実行します。
sudo apt install ros-noetic-dwa-local-planner
mkdir -p ~/Work/open-rmf/free_fleet/ros1/src
cd ~/Work/open-rmf/free_fleet/ros1/src
git clone https://github.com/open-rmf/free_fleet -b main
git clone https://github.com/eclipse-cyclonedds/cyclonedds -b releases/0.7.x
cd ..
source /opt/ros/noetic/setup.bash
rosdep install --from-paths src --ignore-src --rosdistro noetic -yr
colcon build --symlink-install
複数ロボットの動作確認(ハマりポイント)
手順にあるように以下を実行します。
cd ~/Work/open-rmf/free_fleet/ros1
source install/setup.bash
export TURTLEBOT3_MODEL=burger; roslaunch ff_examples_ros1 multi_turtlebot3_ff.launch
エラーが出て動きません。
tfを見ると、odomが複数ロボットに対応していないようです。(odomが1つしかない。)
Webにも対策が載っています。
https://github.com/lkw303/turtlebot3/blob/noetic-devel-multi-fix/turtlebot3_description/urdf/turtlebot3_burger.gazebo.xacro#L142
上記を見るとNoeticは複数台対応していないようです。そこで、複数対応のものをインストールしていきます。
複数ロボットの動作確認(エラー対策)
Turtelbot3の複数対応環境のものを取得しコンパイルしていきます。
cd ~/Work/open-rmf/free_fleet/ros1/src
git clone https://github.com/lkw303/turtlebot3.git -b noetic-devel-multi-fix
git clone https://github.com/lkw303/turtlebot3_simulations.git -b noetic-devel-multi-fix
git clone https://github.com/ros/robot_state_publisher.git -b noetic-devel
エディタで以下を編集(好きなエディタで)
vi turtlebot3_simulations/turtlebot3_gazebo/launch/multi_turtlebot3.launch
3箇所を以下のように変更します。
(38,50,62行目のvalueの最後の"/"の削除も忘れずに。)
  37行目:  <!-- <param name="prefix_tf_with" value="$(arg first_tb3)/" /> -->
  38行目:  <param name="tf_prefix" value="$(arg first_tb3)" />

  49行目: <!-- <param name="prefix_tf_with" value="$(arg second_tb3)/" /> -->
  50行目: <param name="tf_prefix" value="$(arg second_tb3)" />

  61行目: <!-- <param name="prefix_tf_with" value="$(arg third_tb3)/" /> -->
  62行目: <param name="tf_prefix" value="$(arg third_tb3)" />
そして、コンパイルします。
コンパイルエラーが出たら、もう一度「colcon build --symlink-install」を実行します。
cd ..
rm -rf install log build
source /opt/ros/noetic/setup.bash
colcon build --symlink-install
Free Fleetの確認
Free Fleet経由でturtlebot3が制御できているかの確認をします。
cd ~/Work/open-rmf/free_fleet/ros2
source install/setup.bash
ros2 launch ff_examples_ros2 turtlebot3_world_ff_server.launch.xml
cd ~/Work/open-rmf/free_fleet/ros1
source install/setup.bash
export TURTLEBOT3_MODEL=burger; roslaunch ff_examples_ros1 multi_turtlebot3_ff.launch
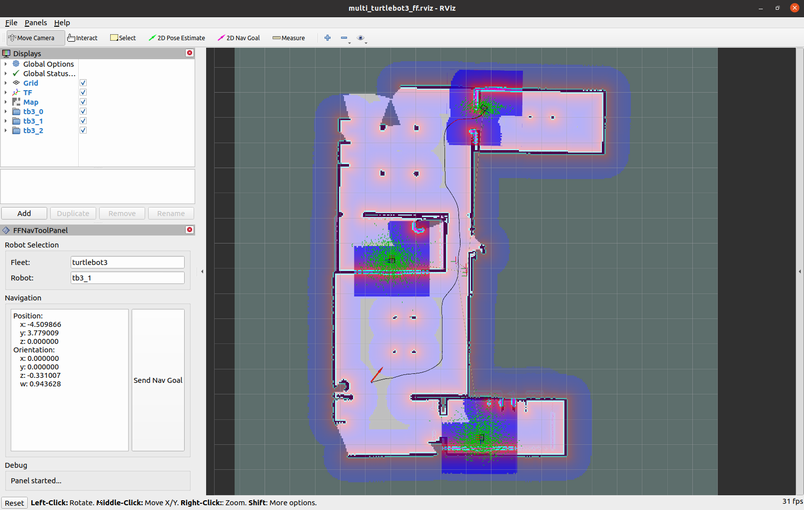
fleet名に"turtelbot3"として、robot名に'tb3_0'、'tb3_1'、'tb3_2'のいずれかを記載して、2D NavGoalを設定します。
「Send Nav Goal」ボタンを押下すると、指定したロボットが動き出します。
やっとスタートラインに立ちました。

Rvizだと何をしているかわからないので、以下のコマンドで確認できます。
cd ~/Work/open-rmf/free_fleet/ros2
source install/setup.bash
ros2 run ff_examples_ros2 send_destination_request.py -f turtlebot3 -r tb3_0 -x 1.725 -y -0.39 --yaw 0.0 -i 001
まとめ
Open-RMFのFlee Fleetを使ったTurtelbot3の複数台の移動指示まで確認できました。
最後になりますが、ROS/ROS 2混在も考慮してDDSでやり取りするのはよく考えられてますね。
参考文献