この記事はリンク情報システムの「TechConnect!2022年2月」のリレー記事です。
engineer.hanzomon のグループメンバによってリレーされます。
(リンク情報システムのFacebook・Twitterもヨロシクです!)
TechConnect!2022年2月のインデックスはこちら
1.はじめに
1972年3月24日に全米公開されるや当時の興行記録を塗り替える大ヒットを記録し、アカデミー賞3部門を制した不朽の名作『ゴッドファーザー』。
記念すべき公開50周年を迎え、特設ウェブサイトにてシリーズ三部作の特別上映やリマスターブルーレイセット発売が発表されるなど、映画ファンの間で大いに盛り上がっていますね。
しかも主人公マイケルの声を吹き替えているのは、かの名優、野沢那智!
あなたも映画史上最高傑作の真の完結編を目撃せよ!!
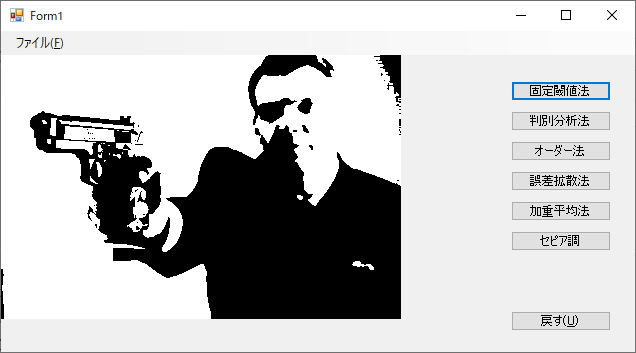
2.白黒画像への変換がうまくいかない
俺たちの……俺たちのドン・コルレオーネが帰ってくるっ! ヒューッ! ヒューッ!!
数十年前にTV放映されて以来、商品化されず幻と化していた野沢那智バージョンの吹替収録を知って感動に打ち震えていた私。
テンション上がりまくりな中でゴッドファーザーの映画ポスター風の壁紙を作ることを思い立ち、「よーし、パパ、記念壁紙つくっちゃうぞぉ」と呟きつつ作業に取りかかったのですが、そこで思わぬ結果を見ることに。
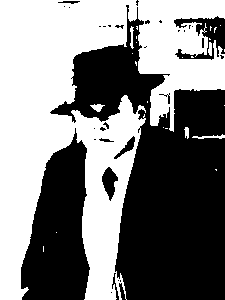

【左:期待していたイメージ、右:実際に出力された画像のイメージ】
モノクロビットマップで保存すると、何度やっても画像が黒つぶれしてしまう……ロールシャッハテストかな(おぼろげながら浮かんできたんです……暗がりに佇む男のイメージが……シルエットが浮かんできたんです)。
3.ディザリングを試してみる
ペイントでは高度な編集ができません。ここはC#で変換プログラムを組んでみましょう。
原因について調べていくうちに「2値化して、1bppの白黒画像を作成する」という記事にたどり着きました。
極端に言えば、画像によっては真っ白、あるいは真っ黒になってしまう恐れがあります。よって、画像によってしきい値を変更した方が良い結果が得られます。
なるほど、ピクセルの色の明るさが設定したしきい値を越えれば白くし、越えなければ黒くするという方法(固定閾値法)だと、黒い箇所と白い箇所が両極端になってしまい、その中間が表現されないということのようです。
これを解決する方法として紹介されている、ディザリング(Dithering)を試してみましょう。
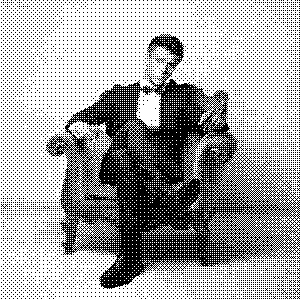
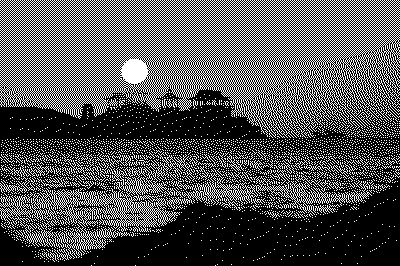
【オーダー法(オーダード・ディザリング)で変換した結果】
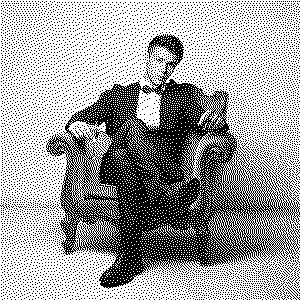
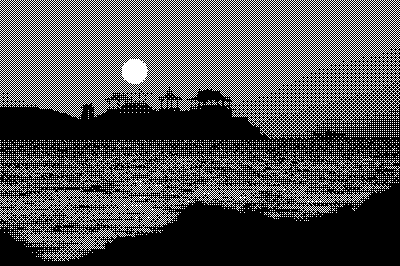
【誤差拡散法(フロイド-スタインバーグ・ディザリング)で変換した結果】
前者は格子状のパターンが表れているのが特徴です(漫画のトーンっぽい)。
後者は点描状のパターンが表れているのが特徴です(新聞のドットの荒い写真っぽい)。
モノクロビットマップとは思えないほどの見事な仕上がりですが、ちょっと期待したイメージとは違うかな……。
4.モノトーン化の後に変換してみる
別の方法を探ってみます。
ImageAttributes.SetThresholdメソッドを使ってしきい値を設定する方法も考えられます。この方法で画像を2値化するには、まず「画像をグレースケールに変換して表示する」のように画像をグレースケールにしてから、SetThresholdメソッドでしきい値をセットしたImageAttributesオブジェクトを使って画像を描画します
先にグレースケール(白から黒までの明暗)に画像を減色してから2値変換するとのこと。
「画像をグレースケールに変換して表示する」の記事を基に実装してみます。
「ほうほう、ColorMatrixクラスを使うっと」
「──えっ、行列部分の値を変えるだけでセピア調・半透明化・ネガポジ反転・ガンマ補正・コントラスト変更もできるのかっ」
「オオッ」「す、すごいぃぃぃ」と寄り道しまくった結果がこちら。


【左:オリジナル画像、中央:グレイスケール変換結果、右:セピア調変換結果】
NTSC加重平均法によるグレースケール画像の見事な出来に、期待が高まります。
成功間違いなしと普通は確信するよね……ところがどっこい、準備した壁紙を変換してみると、出力された結果はまたもや黒画像。なんでや!
5.判別分析法で算出した閾値でモノクロ化してみる
先に結論を書いてしまうと、2値化するのに結局は閾値が必要で、適切な閾値は画像ごとに異なるから、事前に減色しても効果があるとは限らないってことでした(そりゃそうだ)。
むぅぅと唸りながら次の手を考えます。
適切なしきい値を計算する方法としては、判別分析法(大津の二値化)などがあります。興味のある方は、調べてみてください。
判別分析法(discriminant analysis method)は大津の二値化とも言われ、分離度という値が最大となるしきい値を求め、自動的に二値化を行う手法とのこと。OpenCVにも組み込まれているメジャーなアルゴリズムのようです。
試行錯誤の末、huskworks53さんの記事「【C#】判別分析法を用いて画像2値化の閾値を算出してみる」の実装を組み込んだところ、ついに期待したイメージに近い変換結果を得ることに成功しました。
6.まとめ
今回のチャレンジにより、以下の知識を得ました。
- モノクロ画像への変換アルゴリズムはいっぱいあるよ!
- ただし、2値化するための適切な閾値は画像ごとに異なるよ!
- 中間色を表現するためにディザリングという手法もあるよ!
※変換ツールのソースコードを置いておくので、検証したい方はどうぞ。
サンプルコードの寄せ集めですが……先人の皆様に感謝!
| 概要 | |
|---|---|
| 開発環境 | Visual Studio 2019 |
| 開発言語 | C#, WindowsForm |
| 対応画像 | BMP・JPG・PNG |
| 使用方法 | ウィンドウズFormで新規プロジェクトを作成し、Form1_Load関数を作ったらソースコードをコピーする |
ソースコードを見る
using System;
using System.Collections.Generic;
using System.ComponentModel;
using System.Data;
using System.Drawing;
using System.Drawing.Imaging;
using System.Linq;
using System.Text;
using System.Threading.Tasks;
using System.Windows.Forms;
namespace WindowsFormsApp1
{
public partial class Form1 : Form
{
MenuStrip menuStrip1;
PictureBox pictureBox1;
Bitmap imageDefault = null;
Button[] buttonConvert;
Button buttonUndo;
int pictureBoxMaxWidth = 400;
int pictureBoxMaxHeight = 300;
public Form1()
{
InitializeComponent();
}
/// <summary>
/// フォームのLoadイベントハンドラ
/// </summary>
private void Form1_Load(object sender, EventArgs e)
{
//コントロールを作成する
this.menuStrip1 = new MenuStrip();
this.pictureBox1 = new PictureBox();
//レイアウトロジックを停止する
this.SuspendLayout();
this.menuStrip1.SuspendLayout();
// メニュー生成
//------------------------------------------------------------
//「ファイル(&F)」メニュー項目を作成する
ToolStripMenuItem fileMenuItem = new ToolStripMenuItem();
fileMenuItem.Text = "ファイル(&F)";
//MenuStripに追加する
this.menuStrip1.Items.Add(fileMenuItem);
//「開く(&O)...」メニュー項目を作成する
ToolStripMenuItem openMenuItem = new ToolStripMenuItem();
openMenuItem.Text = "開く(&O)...";
//ショートカットキー「Ctrl+O」を設定する
openMenuItem.ShortcutKeys = Keys.Control | Keys.O;
openMenuItem.ShowShortcutKeys = true;
//Clickイベントハンドラを追加する
openMenuItem.Click += OpenMenuItem_Click;
//「ファイル(&F)」のドロップダウンメニューに追加する
fileMenuItem.DropDownItems.Add(openMenuItem);
//「名前を付けて保存(&A)...」メニュー項目を作成する
ToolStripMenuItem saveAsMenuItem = new ToolStripMenuItem();
saveAsMenuItem.Text = "名前を付けて保存(&A)...";
//ショートカットキー「Ctrl+A」を設定する
saveAsMenuItem.ShortcutKeys = Keys.Control | Keys.A;
saveAsMenuItem.ShowShortcutKeys = true;
//Clickイベントハンドラを追加する
saveAsMenuItem.Click += SaveAsMenuItem_Click;
//「ファイル(&F)」のドロップダウンメニューに追加する
fileMenuItem.DropDownItems.Add(saveAsMenuItem);
//セパレータを追加する
fileMenuItem.DropDownItems.Add(new ToolStripSeparator());
//「終了(&X)」メニュー項目を作成する
ToolStripMenuItem exitMenuItem = new ToolStripMenuItem();
exitMenuItem.Text = "終了(&X)";
//ショートカットキー「Ctrl+X」を設定する
exitMenuItem.ShortcutKeys = Keys.Control | Keys.X;
exitMenuItem.ShowShortcutKeys = true;
//Clickイベントハンドラを追加する
exitMenuItem.Click += ExitMenuItem_Click;
//「ファイル(&F)」のドロップダウンメニューに追加する
fileMenuItem.DropDownItems.Add(exitMenuItem);
//フォームにMenuStripを追加する
this.Controls.Add(this.menuStrip1);
//フォームのメインメニューとする
this.MainMenuStrip = this.menuStrip1;
// ピクチャーボックス生成
//------------------------------------------------------------
this.pictureBox1.Width = this.pictureBoxMaxWidth;
this.pictureBox1.Height = this.pictureBoxMaxHeight;
this.pictureBox1.Location = new Point(
this.MainMenuStrip.Location.X,
this.MainMenuStrip.Location.Y + this.MainMenuStrip.Height);
this.Controls.Add(this.pictureBox1);
// ボタン生成
//------------------------------------------------------------
//ボタンコントロール配列の作成
this.buttonConvert = new Button[6];
string[] buttonLabels = new string[]{
"固定閾値法", "判別分析法",
"オーダー法", "誤差拡散法",
"加重平均法", "セピア調",};
for (int i = 0; i < buttonConvert.Length; i++)
{
this.buttonConvert[i] = new Button();
this.buttonConvert[i].Name = "btn" + i.ToString();
this.buttonConvert[i].Text = buttonLabels[i];
this.buttonConvert[i].Click += new System.EventHandler(ButtonConvert_Click);
//サイズと位置を設定
this.buttonConvert[i].Size = new System.Drawing.Size(100, 20);
this.buttonConvert[i].Location = new Point(
(this.Width - 30 - this.buttonConvert[i].Width),
(i+1)*30 + this.buttonConvert[i].Height);
//コントロールをフォームに追加
this.Controls.Add(this.buttonConvert[i]);
}
//戻すボタンの作成
this.buttonUndo = new Button();
this.buttonUndo.Name = "btnUndo";
this.buttonUndo.Text = "戻す(&U)";
this.buttonUndo.Size = new System.Drawing.Size(100, 20);
this.buttonUndo.Click += new System.EventHandler(ButtonUndo_Click);
this.buttonUndo.Location = new Point(
(this.Width - 30 - this.buttonUndo.Width),
(this.Height -60 - this.buttonUndo.Height));
this.Controls.Add(this.buttonUndo);
//レイアウトロジックを再開する
this.menuStrip1.ResumeLayout(false);
this.menuStrip1.PerformLayout();
this.ResumeLayout(false);
this.PerformLayout();
}
/// <summary>
/// 「開く(&O)...」メニュー項目のClickイベントハンドラ
/// </summary>
void OpenMenuItem_Click(object sender, EventArgs e)
{
using (OpenFileDialog openFileDialog = new OpenFileDialog())
{
openFileDialog.InitialDirectory = "c:\\";
openFileDialog.Filter = "bmp files (*.bmp)|*.bmp|All files (*.*)|*.*";
openFileDialog.FilterIndex = 2;
openFileDialog.RestoreDirectory = true;
if (openFileDialog.ShowDialog() == DialogResult.OK)
{
string filePath = openFileDialog.FileName;
//画像ファイルの読み込み
Image isrc = CreateImage(filePath);
//縮小サイズの計算(最大サイズに合わせて縮小)
double scale_x = ((double)isrc.Width / (double)pictureBoxMaxWidth);
double scale_y = ((double)isrc.Height / (double)pictureBoxMaxHeight);
double scale = (scale_x > scale_y) ? scale_x : scale_y;
//リサイズ画像の作成
Bitmap bmpResize = new Bitmap(isrc, (int)(isrc.Width / scale), (int)(isrc.Height / scale));
//リサイズ画像表示
if(pictureBox1.Image != null)
{
pictureBox1.Image.Dispose();
}
pictureBox1.Width = bmpResize.Width;
pictureBox1.Height = bmpResize.Height;
pictureBox1.Image = new Bitmap(pictureBox1.Width, pictureBox1.Height);
var g = Graphics.FromImage(pictureBox1.Image);
g.DrawImage(bmpResize, 0, 0, bmpResize.Width, bmpResize.Height);
//変換前画像をバックアップ
if (imageDefault != null)
{
imageDefault.Dispose();
}
imageDefault = new Bitmap(pictureBox1.Image);
}
}
}
/// <summary>
/// 指定したファイルをロックせずに、System.Drawing.Imageを作成する。
/// </summary>
public static System.Drawing.Image CreateImage(string filename)
{
System.IO.FileStream fs = new System.IO.FileStream(
filename,
System.IO.FileMode.Open,
System.IO.FileAccess.Read);
System.Drawing.Image img = System.Drawing.Image.FromStream(fs);
fs.Close();
return img;
}
/// <summary>
///「終了(&X)...」メニュー項目のClickイベントハンドラ
/// </summary>
void ExitMenuItem_Click(object sender, EventArgs e)
{
Application.Exit();
}
/// <summary>
///「名前を付けて保存(&A)...」メニュー項目のClickイベントハンドラ
/// </summary>
void SaveAsMenuItem_Click(object sender, EventArgs e)
{
using (SaveFileDialog saveFileDialog = new SaveFileDialog())
{
saveFileDialog.InitialDirectory = "c:\\";
saveFileDialog.Filter = "BMP files (*.bmp)|*.bmp|JPEG files (*.jpg)|*.jpg|PNG files (*.png)|*.png";
saveFileDialog.FilterIndex = 1;
saveFileDialog.RestoreDirectory = true;
if (saveFileDialog.ShowDialog() == DialogResult.OK)
{
string filePath = saveFileDialog.FileName;
if (pictureBox1.Image != null)
{
System.Drawing.Imaging.ImageFormat[] saveFormat = {
System.Drawing.Imaging.ImageFormat.Bmp,
System.Drawing.Imaging.ImageFormat.Jpeg,
System.Drawing.Imaging.ImageFormat.Png,
};
pictureBox1.Image.Save(filePath, saveFormat[saveFileDialog.FilterIndex-1]);
}
}
}
}
/// <summary>
///「戻す(&U)」ボタンのClickイベントハンドラ
/// </summary>
void ButtonUndo_Click(object sender, EventArgs e)
{
if (this.pictureBox1.Image == null)
{
return;
}
if (this.imageDefault == null)
{
return;
}
pictureBox1.Image.Dispose();
pictureBox1.Image = new Bitmap(imageDefault);
}
/// <summary>
/// 画像変換ボタンのClickイベントハンドラ
/// </summary>
void ButtonConvert_Click(object sender, System.EventArgs e)
{
Button btn = (Button)sender;
if(this.pictureBox1.Image == null)
{
return;
}
Bitmap bmpSrc = new Bitmap(this.pictureBox1.Image);
Bitmap bmpDst;
if (btn.Name.Equals("btn0"))
{
bmpDst = ToBinaryByFixed(bmpSrc);
}
else if (btn.Name.Equals("btn1"))
{
bmpDst = ToBinaryByOtsu(bmpSrc);
}
else if (btn.Name.Equals("btn2"))
{
bmpDst = ToBinaryByOrdered(bmpSrc);
}
else if (btn.Name.Equals("btn3"))
{
bmpDst = ToBinaryByDiff(bmpSrc);
}
else if (btn.Name.Equals("btn4"))
{
bmpDst = ToBinaryByNTSC(bmpSrc);
}
else if (btn.Name.Equals("btn5"))
{
bmpDst = ToBinaryBySepia(bmpSrc);
}
else
{
MessageBox.Show(btn.Name);
return;
}
this.pictureBox1.Image.Dispose();
this.pictureBox1.Image = bmpDst;
}
/// <summary>
/// 2値化画像に変換(固定閾値法)
/// </summary>
Bitmap ToBinaryByFixed(Bitmap bmpBase)
{
// Format1bppIndexed指定=閾値0.5を使用した2値化
//------------------------------------------------------------
//var rectangle = new Rectangle(0, 0, bmpBase.Width, bmpBase.Height);
//return bmpBase.Clone(rectangle, PixelFormat.Format1bppIndexed);
return Create1bppImage(bmpBase, 0.5f);
}
/// <summary>
/// 2値化画像に変換(判別分析法)
/// </summary>
Bitmap ToBinaryByOtsu(Bitmap bmpBase)
{
float th = GetThreshold(bmpBase);
// 指定の閾値を使用して2値化を行う
return Create1bppImage(bmpBase, th / 256);
}
/// <summary>
/// 2値化画像に変換(オーダー法)
/// </summary>
Bitmap ToBinaryByOrdered(Bitmap bmpBase)
{
// 配列ディザリングを使用して2値化を行う
return Create1bppImageWithOrderedDithering(bmpBase);
}
/// <summary>
/// 2値化画像に変換(差分法)
/// </summary>
Bitmap ToBinaryByDiff(Bitmap bmpBase)
{
// 誤差拡散法を使用して2値化を行う
return Create1bppImageWithErrorDiffusion(bmpBase, 0.5f);
}
/// <summary>
/// 2値化画像に変換(加重平均法)
/// </summary>
Bitmap ToBinaryByNTSC(Bitmap bmpBase)
{
return CreateGrayscaleImage(bmpBase);
}
/// <summary>
/// 2値化画像に変換(セピア調)
/// </summary>
Bitmap ToBinaryBySepia(Bitmap bmpBase)
{
return CreateSepiaImage(bmpBase);
}
/// <summary>
/// 判別分析法により閾値を求める
/// </summary>
int GetThreshold(Bitmap img)
{
BitmapData imgData = null;
try
{
byte[] buf = null;
// 変換する画像の1ピクセルあたりのバイト数を取得
PixelFormat pixelFormat = img.PixelFormat;
int pixelSize = Image.GetPixelFormatSize(pixelFormat) / 8;
// 変換する画像データをアンマネージ配列にコピー
imgData = img.LockBits(
new Rectangle(0, 0, img.Width, img.Height),
ImageLockMode.ReadWrite,
pixelFormat);
buf = new byte[imgData.Stride * imgData.Height];
System.Runtime.InteropServices.Marshal.Copy(imgData.Scan0, buf, 0, buf.Length);
// ヒストグラム算出
int[] hist = new int[256];
int sum = 0;
int cnt = 0;
for (int y = 0; y < imgData.Height; y++)
{
for (int x = 0; x < imgData.Width; x++)
{
// ピクセルで考えた場合の開始位置を計算する
int pos = y * imgData.Stride + x * pixelSize;
// ピクセルの輝度を算出
int gray = (int)(0.299 * buf[pos + 2] + 0.587 * buf[pos + 1] + 0.114 * buf[pos]);
hist[gray]++;
sum += gray;
cnt++;
}
}
// 全体の輝度の平均値
double ave = sum / cnt;
// 閾値算出
int sh = 0;
double sMax = 0;
for (int i = 0; i < 256; i++)
{
// クラス1とクラス2のピクセル数とピクセル値の合計値を算出
int n1 = 0;
int n2 = 0;
int sum1 = 0;
int sum2 = 0;
for (int j = 0; j < 256; j++)
{
if (j <= i)
{
n1 += hist[j];
sum1 += hist[j] * j;
}
else
{
n2 += hist[j];
sum2 += hist[j] * j;
}
}
// クラス1とクラス2のピクセル値の平均を計算
double ave1 = (sum1 == 0 ? 0 : sum1 / n1);
double ave2 = (sum2 == 0 ? 0 : sum2 / n2);
// クラス間分散の分子を計算
double s = n1 * n2 * Math.Pow((ave1 - ave2), 2);
// クラス間分散の分子が最大のとき、クラス間分散の分子と閾値を記録
if (s > sMax)
{
sh = i;
sMax = s;
}
}
return sh;
}
catch (Exception ex)
{
MessageBox.Show(ex.Message);
return 0;
}
finally
{
if (img != null && imgData != null)
{
img.UnlockBits(imgData);
}
}
}
/// <summary>
/// 指定された画像から1bppのイメージを作成する
/// </summary>
Bitmap Create1bppImage(Bitmap img, float th)
{
//1bppイメージを作成する
Bitmap newImg = new Bitmap(img.Width, img.Height,
PixelFormat.Format1bppIndexed);
//Bitmapをロックする
BitmapData bmpDate = newImg.LockBits(
new Rectangle(0, 0, newImg.Width, newImg.Height),
ImageLockMode.WriteOnly, newImg.PixelFormat);
//新しい画像のピクセルデータを作成する
byte[] pixels = new byte[bmpDate.Stride * bmpDate.Height];
for (int y = 0; y < bmpDate.Height; y++)
{
for (int x = 0; x < bmpDate.Width; x++)
{
//明るさが閾値以上の時は白くする
if (th <= img.GetPixel(x, y).GetBrightness())
{
//ピクセルデータの位置
int pos = (x >> 3) + bmpDate.Stride * y;
//白くする
pixels[pos] |= (byte)(0x80 >> (x & 0x7));
}
}
}
//作成したピクセルデータをコピーする
IntPtr ptr = bmpDate.Scan0;
System.Runtime.InteropServices.Marshal.Copy(pixels, 0, ptr, pixels.Length);
//ロックを解除する
newImg.UnlockBits(bmpDate);
return newImg;
}
/// <summary>
/// 配列ディザリング(Ordered Dithering)を使用して、
/// 指定された画像から1bppのイメージを作成する
/// </summary>
Bitmap Create1bppImageWithOrderedDithering(Bitmap img)
{
//しきい値マップを作成する
float[][] thresholdMap = new float[4][]
{
new float[4] {1f/17f, 9f/17f, 3f/17f, 11f/17f},
new float[4] {13f/17f, 5f/17f, 15f/17f, 7f/17f},
new float[4] {4f/17f, 12f/17f, 2f/17f, 10f/17f},
new float[4] {16f/17f, 8f/17f, 14f/17f, 6f/17f}
};
//1bppイメージを作成する
Bitmap newImg = new Bitmap(img.Width, img.Height,
PixelFormat.Format1bppIndexed);
//Bitmapをロックする
BitmapData bmpDate = newImg.LockBits(
new Rectangle(0, 0, newImg.Width, newImg.Height),
ImageLockMode.WriteOnly, newImg.PixelFormat);
//新しい画像のピクセルデータを作成する
byte[] pixels = new byte[bmpDate.Stride * bmpDate.Height];
for (int y = 0; y < bmpDate.Height; y++)
{
for (int x = 0; x < bmpDate.Width; x++)
{
//しきい値マップの値と比較する
if (thresholdMap[x % 4][y % 4] <=
img.GetPixel(x, y).GetBrightness())
{
//ピクセルデータの位置
int pos = (x >> 3) + bmpDate.Stride * y;
//白くする
pixels[pos] |= (byte)(0x80 >> (x & 0x7));
}
}
}
//作成したピクセルデータをコピーする
IntPtr ptr = bmpDate.Scan0;
System.Runtime.InteropServices.Marshal.Copy(pixels, 0, ptr, pixels.Length);
//ロックを解除する
newImg.UnlockBits(bmpDate);
return newImg;
}
/// <summary>
/// 誤差拡散法(Floyd-Steinberg Dithering)を使用して、
/// 指定された画像から1bppのイメージを作成する
/// </summary>
Bitmap Create1bppImageWithErrorDiffusion(Bitmap img, float th)
{
//1bppイメージを作成する
Bitmap newImg = new Bitmap(img.Width, img.Height,
PixelFormat.Format1bppIndexed);
//Bitmapをロックする
BitmapData bmpDate = newImg.LockBits(
new Rectangle(0, 0, newImg.Width, newImg.Height),
ImageLockMode.WriteOnly, newImg.PixelFormat);
//現在の行と次の行の誤差を記憶する配列
float[][] errors = new float[2][] {
new float[bmpDate.Width + 1],
new float[bmpDate.Width + 1]
};
//新しい画像のピクセルデータを作成する
byte[] pixels = new byte[bmpDate.Stride * bmpDate.Height];
for (int y = 0; y < bmpDate.Height; y++)
{
for (int x = 0; x < bmpDate.Width; x++)
{
//ピクセルの明るさに、誤差を加える
float err = img.GetPixel(x, y).GetBrightness() + errors[0][x];
//明るさが閾値以上の時は白くする
if (th <= err)
{
//ピクセルデータの位置
int pos = (x >> 3) + bmpDate.Stride * y;
//白くする
pixels[pos] |= (byte)(0x80 >> (x & 0x7));
//誤差を計算(黒くした時の誤差はerr-0なので、そのまま)
err -= 1f;
}
//誤差を振り分ける
errors[0][x + 1] += err * 7f / 16f;
if (x > 0)
{
errors[1][x - 1] += err * 3f / 16f;
}
errors[1][x] += err * 5f / 16f;
errors[1][x + 1] += err * 1f / 16f;
}
//誤差を記憶した配列を入れ替える
errors[0] = errors[1];
errors[1] = new float[errors[0].Length];
}
//作成したピクセルデータをコピーする
IntPtr ptr = bmpDate.Scan0;
System.Runtime.InteropServices.Marshal.Copy(pixels, 0, ptr, pixels.Length);
//ロックを解除する
newImg.UnlockBits(bmpDate);
return newImg;
}
/// <summary>
/// NTSC加重平均法を使用して、
/// 指定した画像からグレースケール画像を作成する
/// </summary>
Bitmap CreateGrayscaleImage(Bitmap img)
{
//グレースケールの描画先となるImageオブジェクトを作成
Bitmap newImg = new Bitmap(img.Width, img.Height);
//newImgのGraphicsオブジェクトを取得
Graphics gr = Graphics.FromImage(newImg);
//RGBの比率(YIQカラーモデル)
const float r = 0.298912f;
const float g = 0.586611f;
const float b = 0.114478f;
//ColorMatrixオブジェクトの作成
//各Pixel値[RGB]の輝度(明るさ)を計算して、256階調のグレー色に置き換える
System.Drawing.Imaging.ColorMatrix cm =
new System.Drawing.Imaging.ColorMatrix(
new float[][]{
new float[]{r, r, r, 0 ,0},
new float[]{g, g, g, 0, 0},
new float[]{b, b, b, 0, 0},
new float[]{0, 0, 0, 1, 0},
new float[]{0, 0, 0, 0, 1}
});
//ImageAttributesオブジェクトの作成
System.Drawing.Imaging.ImageAttributes ia =
new System.Drawing.Imaging.ImageAttributes();
//ColorMatrixを設定する
ia.SetColorMatrix(cm);
//ImageAttributesを使用してグレースケールを描画
gr.DrawImage(img,
new Rectangle(0, 0, img.Width, img.Height),
0, 0, img.Width, img.Height, GraphicsUnit.Pixel, ia);
//リソースを解放する
gr.Dispose();
return newImg;
}
/// <summary>
/// 指定した画像からセピア調の画像を作成する
/// </summary>
Bitmap CreateSepiaImage(Bitmap img)
{
//グレースケールの描画先となるImageオブジェクトを作成
Bitmap newImg = new Bitmap(img.Width, img.Height);
//newImgのGraphicsオブジェクトを取得
Graphics gr = Graphics.FromImage(newImg);
//ColorMatrixオブジェクトの作成
//輝度計算後、256階調のセピア色に置き換えるための行列を指定
System.Drawing.Imaging.ColorMatrix cm =
new System.Drawing.Imaging.ColorMatrix(
new float[][]{
new float[]{0.393F, 0.349F, 0.272F, 0, 0},
new float[]{0.769F, 0.686F, 0.534F, 0, 0},
new float[]{0.189F, 0.168F, 0.131F, 0, 0},
new float[]{0, 0, 0, 1, 0},
new float[]{0, 0, 0, 0, 1}
});
//ImageAttributesオブジェクトの作成
System.Drawing.Imaging.ImageAttributes ia =
new System.Drawing.Imaging.ImageAttributes();
//ColorMatrixを設定する
ia.SetColorMatrix(cm);
//ImageAttributesを使用してグレースケールを描画
gr.DrawImage(img,
new Rectangle(0, 0, img.Width, img.Height),
0, 0, img.Width, img.Height, GraphicsUnit.Pixel, ia);
//リソースを解放する
gr.Dispose();
return newImg;
}
}
}
7. 参考文献
-
DOBON.NET
- 「2値化して、1bppの白黒画像を作成する」 ──様々なディザリング手法の紹介
- 「画像をグレースケールに変換して表示する」──グレースケール変換・カラーバランス調整
-
HUSKING - kotteri
- 「【C#】判別分析法を用いて画像2値化の閾値を算出してみる」──大津の二値化の実装
-
Wikipedia
- 「レナ(画像データ)」──画像処理の分野で広く使用されている標準的なテスト画像
-
PHOTO METI
- 経済産業省が立ち上げた日本の美しい風景写真の公開サイト。「クリエイティブ・コモンズ(CC)」ライセンスで提供。
- 「兵庫県 日和山海岸(日の出)」──ディザリングの項で出てきた風景画像の出典
-
パブリックドメインQ:著作権フリー画像素材集
- 「ダンディーな外国人男性が持つ拳銃」他──男性画像の出典
