はじめに
この記事はAndroidレイアウトを理解し始めた(気がする)人による、まだ理解していない人への記事です。間違えていたり、分かりにくい場合はコメントで教えてね
Constraint Layoutとは?
Constraintは日本語で「制約」を意味します。
Constraint Layoutは、それぞれのViewに「制約」を与えることでViewの位置を決めるLayoutです。
ConstraintLayoutの前提
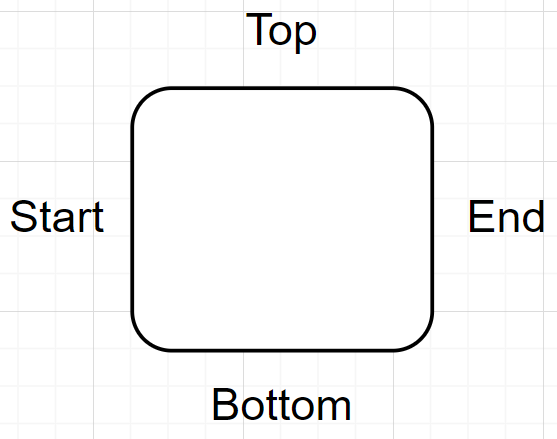
Constraint Layuoutでは(他のLayoutでもそうですが)、4辺を上下左右ではなくTop、Bottom、Start、Endと呼びます。これは画面の向きが変わったり、いろいろした時に向きがぐちゃぐちゃにならないようにするためです。
制約って何?
Constraint Layoutでの基本的な制約は、「View Aの左辺はViewBの右辺に合わせてね」のように表現されます。コードと画面を見てみましょう。
ここでは、ButtonAとButtonBをConstraintLayoutで表現しています。
<?xml version="1.0" encoding="utf-8"?>
<androidx.constraintlayout.widget.ConstraintLayout xmlns:android="http://schemas.android.com/apk/res/android"
    android:layout_width="match_parent"
    android:layout_height="match_parent"
    xmlns:app="http://schemas.android.com/apk/res-auto">
    <Button
        android:id="@+id/button_A"
        android:layout_width="wrap_content"
        android:layout_height="wrap_content"
        app:layout_constraintTop_toTopOf="parent"
        app:layout_constraintBottom_toBottomOf="parent"
        android:text="Button A">
    </Button>
    <Button
        android:id="@+id/button_B"
        android:layout_width="wrap_content"
        android:layout_height="wrap_content"

        app:layout_constraintStart_toEndOf="@+id/button_A"
        app:layout_constraintEnd_toEndOf="parent"
        app:layout_constraintTop_toTopOf="parent"
        app:layout_constraintBottom_toBottomOf="parent"
        android:text="Button B"
        >
    </Button>
</androidx.constraintlayout.widget.ConstraintLayout>
実際の制約
ButtonBには、
app:layout_constraintStart_toEndOf="@+id/button_A"
app:layout_constraintEnd_toEndOf="parent"
app:layout_constraintTop_toTopOf="parent"
app:layout_constraintBottom_toBottomOf="parent"
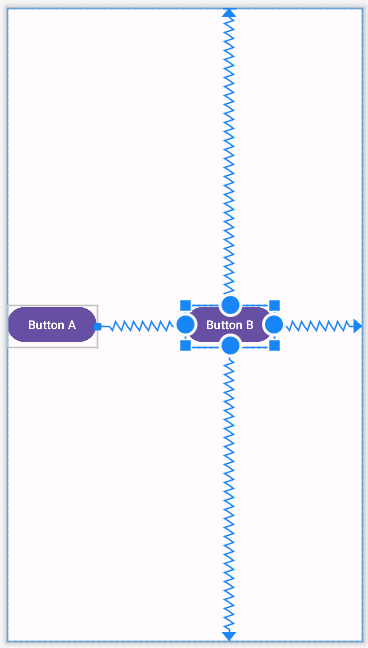
の4つの制約が与えられています。1つ目の制約は「自身のStartの辺をbutton_AのEndの辺に合わせてね」という意味、2つ目の制約は「自身のEndの辺を親のEndの辺に合わせてね」という意味です。画像を見ると、ButtonBの左(Start)の辺からButtonAの右(End)へ矢印が伸びています。
ButtonBは「StartをButtonAのEndに合わせろ!」「Endを親のEndに合わせろ!」という二つの制約に板挟みになった結果、どちらの制約もいい感じに実現する、真ん中あたりに落ち着きます。
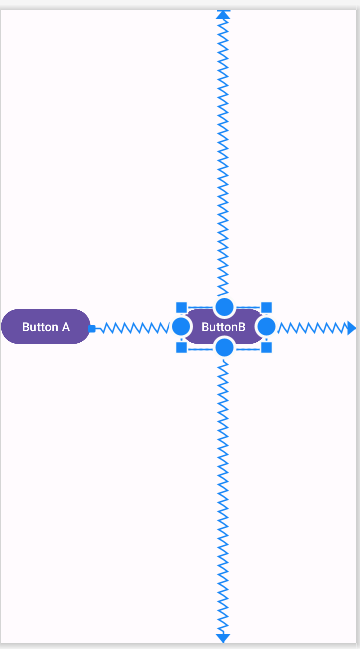
今の4つの制約から、2つ目の「Endを親のEndに合わせろ!」の制約を取り除くと、ButtonBは板挟みになることなく、普通にButtonAに寄って配置されます。右側にあった矢印が消えていますね。

Chainの設定
Constraint Layoutは、「ButtonAとButtonBをくっつけて、その2つごと少し左寄りで!」みたいなわがままも聞いてくれます。
先ほどはButtonBに「StartをButtonAのEndに合わせろ!」という制約があるだけでしたが、次はButtonAに「EndをButtonBのStartに合わせろ!」という制約を追加しましょう。要するに、合わせる辺がそれぞれ相互に制約を持たせます。
すると2つButtonはチェーンを構成します。チェーンには、そのチェーンの中身をどのように並べるかを指定することができます。

(AndroidDeveloperの図)
チェーンは水平方向垂直方向どちらにも作ることができます。
終わりに
本記事で紹介したものはConstraint Layoutの一端にすぎません。Android Developersを読むとめちゃくちゃ詳しく乗っているので読んでみてね。
参考資料