Una Shiled V2Sの測定データをWebhookで受け取るの続きです。
Sigfoxの開発ボードUna Shiled V2S(以下、Una Shield)には、ボッシュの温湿度気圧センサBME280と、NXPの加速度センサMMA8451が搭載されています。公開されているArduinoサンプルプログラムはBME280のセンシングデータをSigfoxネットワークに送信するところまでです。今回は、BME280とMMA8451のセンシングデータをSigfoxに送信して、そのデータをwebhookにて送信し、データを蓄積するところまでを考えてみます。
Una Shieldと、Arduino Uno(またはその互換ボード)と、USB電源を繋いでおいておくだけで自動的に温度、湿度、気圧、ボードの傾き(加速度センサ)をクラウドに送信することができます。Sigfoxネットワークの送信回数制限により1日に収集できる情報は140回までになりますが、それでも15分おきにこれらの情報を収集できるのは楽しいです。
1回に送信できる内容は12バイトまでです。そのため、温度、湿度、そして気圧をそのまま2バイト整数で、xyz方向の傾きを表す3次元加速度をそれぞれ10倍した後に2バイト整数にして、合計12バイトにします。
Arduino IDEへのBME280ライブラリとMMA8451ライブラリの導入
Adafruit社のAdafruit Unified Sensor Driver、Adafruit BME280 Library、およびAdafruit MMA8451 Accelerometer Driverのそれぞれで、「Clone or download」ボタンを押し「Download ZIP」でライブラリをダウンロードします。
Arduino IDEの「スケッチ」「ライブラリをインクルード」「.ZIP形式のライブラリをインクルード...」の順に選択して、上述の3つのZIPライブラリを順にインクルードします。
Arduinoスケッチの作成
次に「ファイル」「新規作成」を選び次のプログラムを入力します。
# include <Wire.h>
# include <SPI.h>
# include <Adafruit_Sensor.h>
# include <Adafruit_BME280.h>
# include <Adafruit_MMA8451.h>
# include <SIGFOX.h>

/*
# define BME_SCK 13
# define BME_MISO 12
# define BME_MOSI 11
# define BME_CS 10
*/

Adafruit_BME280 bme;
Adafruit_MMA8451 mma = Adafruit_MMA8451();

static const String device = "";
static const bool useEmulator = false;
static const bool echo = true;
static const Country country = COUNTRY_JP;
static UnaShieldV2S transceiver(country, useEmulator, device, echo);

void setup() {
  Serial.begin(9600);
  if (!bme.begin(0x76)) stop("BME280 is missing.");
  if (!mma.begin(0x1c)) stop("MMA8451 is missing.");
  mma.setRange(MMA8451_RANGE_2_G);
  if (!transceiver.begin()) stop("Unable to init SIGFOX module.");
}

void loop() {
  float Temp = bme.readTemperature();
  float Press = bme.readPressure() / 100.0F;
  float Humid = bme.readHumidity();
  sensors_event_t event;
  mma.getEvent(&event);
  float x = event.acceleration.x;
  float y = event.acceleration.y;
  float z = event.acceleration.z;
  static int counter = 0;

  word sTemp = Temp * 1.0;
  word sHumid = Humid * 1.0;
  word sPress = Press * 1.0;
  word sx = x * 10.0;
  word sy = y * 10.0;
  word sz = z * 10.0;

  Serial.print("Temp = ");  Serial.print(sTemp);  Serial.println(" degC");
  Serial.print("Humid = "); Serial.print(sHumid); Serial.println(" %");
  Serial.print("Press = "); Serial.print(sPress); Serial.println(" hPa");
  Serial.print("x = "); Serial.print(sx);  Serial.println(" x 10^(-1) m/s^2");
  Serial.print("y = "); Serial.print(sy);  Serial.println(" x 10^(-1) m/s^2");
  Serial.print("z = "); Serial.print(sz);  Serial.println(" x 10^(-1) m/s^2");

  // format:
  //  temp::int:16:little-endian humid::int:16:little-endian \
  //  press::int:16:little-endian x::int:16:little-endian \
  //  y::int:16:little-endian z::int:16:little-endian
  String msg = transceiver.toHex(sTemp)
             + transceiver.toHex(sHumid)
             + transceiver.toHex(sPress)
             + transceiver.toHex(sx)
             + transceiver.toHex(sy)
             + transceiver.toHex(sz) ;
  Serial.println(msg);
  if (!transceiver.sendMessage(msg))  Serial.println("Send failed.");
  counter++;
  Serial.println("Waiting 15 minutes...");  delay(900000);
}
/*
Temp = 25 degC
Humid = 35%
Press = 990 hPa
x = 8 x 10^(-1) m/s^2
y = 4 x 10^(-1) m/s^2
z = 97 x 10^(-1) m/s^2
19002300de03080004006100
 */
このプログラムをコンパイルしてArduino Uno+Una Shieldのボードに転送します。
Sigfox Backend Cloudでのwebhookの設定
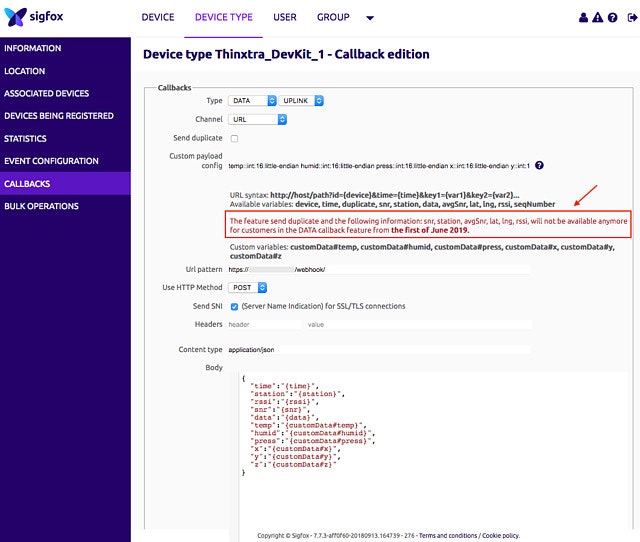
Sigfox Backend Cloudにログインし、上部の「DEVICE TYPE」、Name欄のUnabiz、左側の「CALLBACKS」、右側の「New」の順にクリックして、Custom payload欄に
temp::int:16:little-endian humid::int:16:little-endian press::int:16:little-endian x::int:16:little-endian y::int:16:little-endian z::int:16:little-endian
を入力します。そして、Body欄は
{
  "device": "{device}",
  "time":"{time}",
  "station":"{station}",
  "rssi":"{rssi}",
  "snr":"{snr}",
  "data":"{data}",
  "seq": "{seqNumber}",
  "temp":"{customData#temp}",
  "humid":"{customData#humid}",
  "press":"{customData#press}",
  "x":"{customData#x}",
  "y":"{customData#y}",
  "z":"{customData#z}"
}
とします。その他の設定やwebhook受け取り方はUna Shiled V2Sの測定データをWebhookで受け取ると同様です。
結果
Arduino Uno、Una Shileid、USB電源を接続したボードの情報が次のように収集されるはずです。
  device: xxxxxx
  time: xxxxxxxxxx
  station: 50E3
  rssi: -123.00
  snr: 9.48
  data: 11003600f003f4fff1ff5f00
  seq: 2791
  temp: 17
  humid: 54
  press: 1008
  x: -12
  y: -15
  z: 95
これは、気温がセ氏17度、相対湿度が54%、気圧が1008 hPaであることを示しています。また、x, y, z方向の加速度がそれぞれ-1.2 m/s^2, -1.5 m/s^2, 9.5 m/s^2であることを示していますが、重力加速度は9.8 m/s^2なので、ボードが少しだけ傾いていることがわかります。
おわりに
久しぶりにSigfox Backend Cloudにログインしたら「The feature send duplicate and the following information: snr, station, avgSnr, lat, lng, rssi, will not be available anymore for customers in the DATA callback feature from the first of June 2019.」のメッセージが赤で表示されていました。信号対雑音電力比(snr)や信号強度(rssi)が来年6月初旬から表示されなくなるそうです。
いまのところ、「Send duplicate」をオンにするとsnrやrssiやstationの異なるデータも表示され、3回の送信を異なる3基地局で受信していることがわかりましたが、これもなくなるそうです。
