はじめに
※本記事はStrapi Advent Calender 2020の17日目の投稿になります
StrapiはHeadlessCMSとして結構長く開発されていて、なかなか使い勝手が良いということで、弊社でもSIの中で実際に利用させて頂いております。
弊社は、主にSalesforce+Herokuの組合せでシステムを提供することが多く、StrapiをHeroku上で稼働しています。
そんなわけで、Herokuで動かすあたりの話をしてみたいと思います。
※ちなみに、公式ドキュメント : Deployment > Heroku も充実してますね。
環境について
(手元のバージョン情報など)
- Node.js: 12.18.2
- Postgres: 13.0
- Strapi: 3.3.4
- heroku cli: 7.4.73
ちなみに、Herokuでのサポート状況は、現状こんな感じです。
- Node.js:
10.x,12.x,14,x,15.x - Postgres:
12(default),11,10,9.6
1. Strapiの新規プロジェクトを作成
1-1. Strapi Appの作成
まずはローカルでStrapiアプリケーションを作成します。
$ strapi new try-strapi-334
Creating a new Strapi application at xxx

? Choose your installation type Custom (manual settings)
? Choose your default database client postgres
? Database name: try_strapi_334
? Host: 127.0.0.1
? Port: 5432
? Username:
? Password:
? Enable SSL connection: No
DBにはPostgresを指定して作成します。
後々Herokuのデプロイすることを考えると、Postgresにしておくのがベターだと思います。
1-2. Heroku向けに修正
Nodeバージョンの設定 (任意)
package.jsonで、Node.jsのバージョンをローカルに合わせておきます。
デフォルトでは以下のようになっています。herokuにデプロイすると、14.15.xが使われるようになります。
別に14系が使われても問題なく稼働できますが、ローカルと合わせておきたい場合には変更しておきます。
"engines": {
  "node": ">=10.16.0 <=14.x.x",
  "npm": ">=6.0.0"
}
↓
"engines": {
  "node": "12.18.x",
  "npm": ">=6.0.0"
}
pg のインストール
Strapiのドキュメントにも記載されていますが、pgをインストールしていないと、herokuにデプロイした場合に起動でエラーになることがあるようです。
$ npm install pg --save
DB接続設定 (と、pg-connection-string のインストール)
まず、pg-connection-stringをインストールしておきます。これはpostgresへの接続情報の文字列をパースして、host, port, database, user, passwordを抽出してくれるものです。
$ npm install pg-connection-string --save
Heroku Postgresを使う場合、接続情報はDATABASE_URLというHeroku環境変数にセットされます。
この環境変数にセットされている文字列を取得して、Postgresへの接続に利用します。
Herokuでは、Postgresへの接続情報が変更されることがあります。
参考: Connecting to Heroku Postgres Databases from Outside of Heroku > Credentials
そのため、DATABASE_URLに指定されてる文字列をパースして取得した情報で接続するよう/config/databasejsを修正します。
const parse = require('pg-connection-string').parse;
const config = parse(process.env.DATABASE_URL);

module.exports = ({ env }) => ({
  defaultConnection: 'default',
  connections: {
    default: {
      connector: 'bookshelf',
      settings: {
        client: 'postgres',
        host: config.host,
        port: config.port,
        database: config.database,
        username: config.user,
        password: config.password,
      },
      options: {
        ssl: false,
        debug: env.bool('DATABASE_DEBUG', false),
      },
    },
  },
});
※ DATABASE_DEBUG はついでです。デバッグモードの切替のために自分で追加します。
Procfileの追加
Herokuアプリにはプロセスタイプ(Web/Worker)を指定するためにProcfileをトップディレクトリ内に設置します。
内容はこんな感じです。 <process type>: <command> という具合にプロセスの種類と、起動時のコマンドを指定します。
web: npm run start
2. Herokuの新規プロジェクトを作成
※Herokuのアカウント作成やcliの設定は割愛します。(すみません)
2-1. Heroku Appを作成
$ heroku apps:create try-strapi-334
Creating ⬢ try-strapi-334... done
https://try-strapi-334.herokuapp.com/ | https://git.heroku.com/try-strapi-334.git
2-2. Heroku Postgresの設定
先ほど作成したアプリ名を指定して、Postgresをプロビジョニングします。
ここではhobby-devプランを利用します。(無償プラン)
$ heroku addons:create heroku-postgresql:hobby-dev -a try-strapi-334
Creating heroku-postgresql:hobby-dev on ⬢ try-strapi-334... free
Database has been created and is available
 ! This database is empty. If upgrading, you can transfer
 ! data from another database with pg:copy
Created postgresql-octagonal-79618 as DATABASE_URL
Use heroku addons:docs heroku-postgresql to view documentation
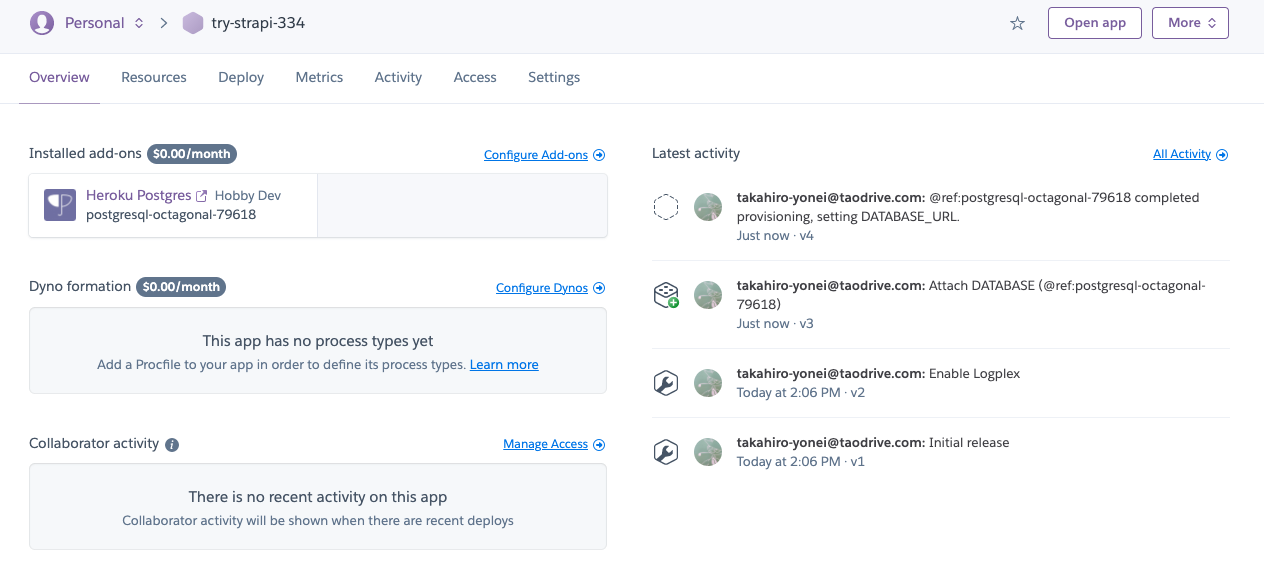
ここまでで、Herokuダッシュボードを見ると、このようになります。(きっと
2-3. Herokuへのデプロイ
herokuのリポジトリにgit pushできるよう設定します。
$ heroku git:remote -a try-strapi-334
set git remote heroku to https://git.heroku.com/try-strapi-334.git

$ git remote -v
heroku  https://git.heroku.com/try-strapi-334.git (fetch)
heroku  https://git.heroku.com/try-strapi-334.git (push)
(Herokuでビルドしている間は、数分程度お待ちください...)
$ git push heroku master

Enumerating objects: 27, done.
Counting objects: 100% (27/27), done.
Delta compression using up to 8 threads
Compressing objects: 100% (20/20), done.
Writing objects: 100% (27/27), 151.22 KiB | 7.96 MiB/s, done.
Total 27 (delta 0), reused 0 (delta 0)
remote: Compressing source files... done.
remote: Building source:
remote:
remote: -----> Node.js app detected
remote:
remote: -----> Creating runtime environment
remote:
remote:        NPM_CONFIG_LOGLEVEL=error
remote:        NODE_ENV=production
remote:        NODE_MODULES_CACHE=true
remote:        NODE_VERBOSE=false
remote:
remote: -----> Installing binaries
remote:        engines.node (package.json):  >=10.16.0 <=14.x.x
remote:        engines.npm (package.json):   >=6.0.0
remote:
remote:        Resolving node version >=10.16.0 <=14.x.x...
remote:        Downloading and installing node 14.15.2...
remote:        Bootstrapping npm >=6.0.0 (replacing 6.14.9)...
remote:        npm >=6.0.0 installed
remote:
remote: -----> Installing dependencies
remote:        Installing node modules
remote:
remote:        > @fortawesome/fontawesome-common-types@0.2.32 postinstall /tmp/build_68766d92/node_modules/@fortawesome/fontawesome-common-types
remote:        > node attribution.js
remote:
remote:        Font Awesome Free 0.2.32 by @fontawesome - https://fontawesome.com
remote:        License - https://fontawesome.com/license/free (Icons: CC BY 4.0, Fonts: SIL OFL 1.1, Code: MIT License)
remote:
remote:
remote:        > @fortawesome/free-solid-svg-icons@5.15.1 postinstall /tmp/build_68766d92/node_modules/@fortawesome/free-solid-svg-icons
remote:        > node attribution.js
remote:
remote:        Font Awesome Free 5.15.1 by @fontawesome - https://fontawesome.com
remote:        License - https://fontawesome.com/license/free (Icons: CC BY 4.0, Fonts: SIL OFL 1.1, Code: MIT License)
remote:
remote:
remote:        > @fortawesome/free-regular-svg-icons@5.15.1 postinstall /tmp/build_68766d92/node_modules/@fortawesome/free-regular-svg-icons
remote:        > node attribution.js
remote:
remote:        Font Awesome Free 5.15.1 by @fontawesome - https://fontawesome.com
remote:        License - https://fontawesome.com/license/free (Icons: CC BY 4.0, Fonts: SIL OFL 1.1, Code: MIT License)
remote:
remote:
remote:        > @fortawesome/fontawesome-svg-core@1.2.32 postinstall /tmp/build_68766d92/node_modules/@fortawesome/fontawesome-svg-core
remote:        > node attribution.js
remote:
remote:        Font Awesome Free 1.2.32 by @fontawesome - https://fontawesome.com
remote:        License - https://fontawesome.com/license/free (Icons: CC BY 4.0, Fonts: SIL OFL 1.1, Code: MIT License)
remote:
remote:
remote:        > @fortawesome/fontawesome-free@5.15.1 postinstall /tmp/build_68766d92/node_modules/@fortawesome/fontawesome-free
remote:        > node attribution.js
remote:
remote:        Font Awesome Free 5.15.1 by @fontawesome - https://fontawesome.com
remote:        License - https://fontawesome.com/license/free (Icons: CC BY 4.0, Fonts: SIL OFL 1.1, Code: MIT License)
remote:
remote:
remote:        > sharp@0.26.2 install /tmp/build_68766d92/node_modules/sharp
remote:        > (node install/libvips && node install/dll-copy && prebuild-install) || (node-gyp rebuild && node install/dll-copy)
remote:
remote:        info sharp Downloading https://github.com/lovell/sharp-libvips/releases/download/v8.10.0/libvips-8.10.0-linux-x64.tar.br
remote:
remote:        > core-js@3.8.1 postinstall /tmp/build_68766d92/node_modules/fbjs/node_modules/core-js
remote:        > node -e "try{require('./postinstall')}catch(e){}"
remote:
remote:
remote:        > fsevents@1.2.13 install /tmp/build_68766d92/node_modules/webpack-dev-server/node_modules/fsevents
remote:        > node install.js
remote:
remote:
remote:        Skipping 'fsevents' build as platform linux is not supported
remote:
remote:        > fsevents@1.2.13 install /tmp/build_68766d92/node_modules/watchpack-chokidar2/node_modules/fsevents
remote:        > node install.js
remote:
remote:
remote:        Skipping 'fsevents' build as platform linux is not supported
remote:
remote:        > @fortawesome/free-brands-svg-icons@5.15.1 postinstall /tmp/build_68766d92/node_modules/@fortawesome/free-brands-svg-icons
remote:        > node attribution.js
remote:
remote:        Font Awesome Free 5.15.1 by @fontawesome - https://fontawesome.com
remote:        License - https://fontawesome.com/license/free (Icons: CC BY 4.0, Fonts: SIL OFL 1.1, Code: MIT License)
remote:
remote:
remote:        > core-js@2.6.12 postinstall /tmp/build_68766d92/node_modules/core-js
remote:        > node -e "try{require('./postinstall')}catch(e){}"
remote:
remote:
remote:        > strapi@3.3.4 postinstall /tmp/build_68766d92/node_modules/strapi
remote:        > node lib/utils/success.js
remote:
remote:        added 1653 packages in 42.239s
remote:
remote: -----> Build
remote:        Running build
remote:
remote:        > try-strapi-334@0.1.0 build /tmp/build_68766d92
remote:        > strapi build
remote:
remote:        Building your admin UI with production configuration ...
remote:        ℹ Compiling Webpack
remote:        ✔ Webpack: Compiled successfully in 1.75m
remote:
remote: -----> Caching build
remote:        - node_modules
remote:
remote: -----> Pruning devDependencies
remote:        removed 14 packages and audited 1640 packages in 12.674s
remote:
remote:        95 packages are looking for funding
remote:          run `npm fund` for details
remote:
remote:        found 0 vulnerabilities
remote:
remote:
remote: -----> Build succeeded!
remote: -----> Discovering process types
remote:        Procfile declares types     -> (none)
remote:        Default types for buildpack -> web
remote:
remote: -----> Compressing...
remote:        Done: 142.1M
remote: -----> Launching...
remote:        Released v5
remote:        https://try-strapi-334.herokuapp.com/ deployed to Heroku
remote:
ここまで来るとダッシュボードにも情報が追加されます。
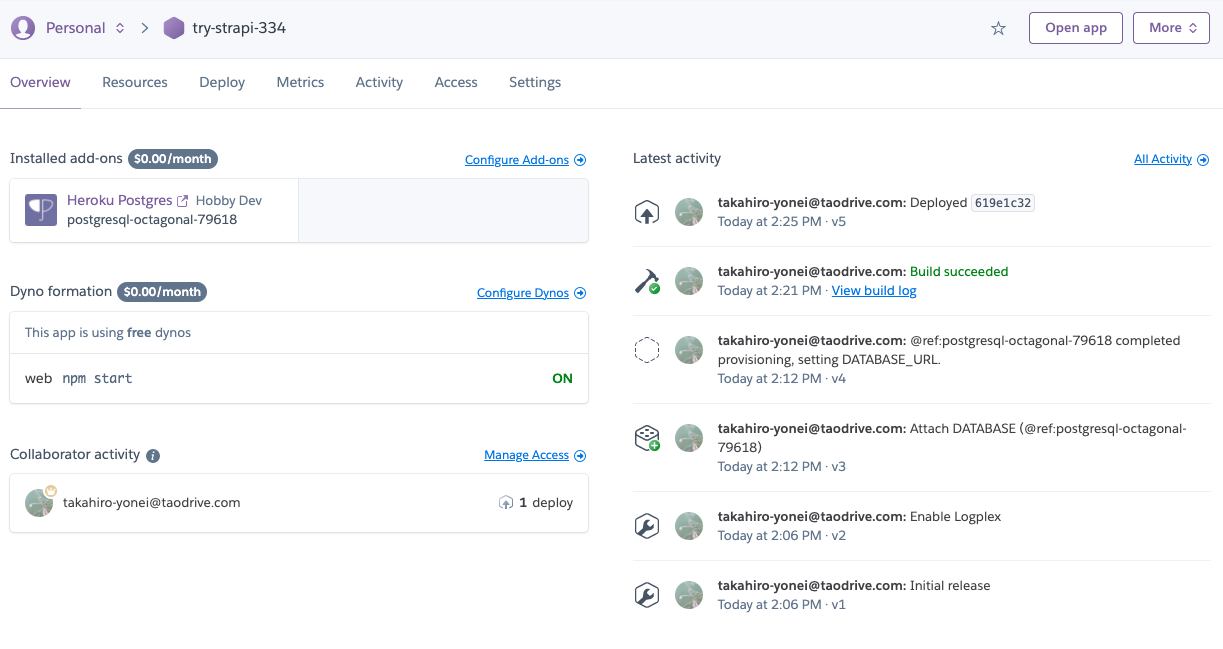
ここで、Open appボタンをクリックすると...いつもの画面が表示されます!(きっと

お疲れ様でした!
3. その他
3-1. 画像ファイルのアップロードについて
Herokuアプリが動いているDynoでは、静的ファイルを後から永続化することはできません。
※一時的に追加することはできますが、運が悪いと即消失します。
参考: Dyno > Ephemeral filesystem
Dynoは定期的に廃棄/新規作成するようになっております。その際には、Herokuのリポジトリにあるファイルもしくはgithubと繋がっていれば、そのリポジトリから新たに作成するような仕組みなので、ビルドした後に追加したファイルは、漏れなく廃棄されます。
そのため、画像ファイルなどはCloudinaryもしくはS3に格納することが推奨されています。
幸い、Strapiのupload pluginにはCloudinary/S3を使うためのプラグインがありますので、それを使いましょう。
(さらに)Herokuでは、cloudinaryのaddonもあります(無料プランで)。
3-2. Content Typeの編集について
3-1.でも触れましたが、Herokuではビルド後に静的ファイルを永続化することはできません。従って、ContentTypeを定義する際には
- ローカルでContentTypeを定義する
- 生成したファイルをgitリポジトリにコミットする
- Herokuにデプロイする
という流れになります。
3-3. Postgresのプランをstandard-0以上にした場合
Standardプラン以上にすると、Postgresの接続設定でSSLをONにしないと以下のようなエラーが出て接続できません。
※hobby-devプランやhobby-basicプランでは適用されません。
[2020-12-17T06:39:02.647Z] error error: no pg_hba.conf entry for host "xx.xx.xx.xx", user "xxxx", database "xxxx", SSL off
従って、Postgresのプランをstandard-xや、premium-x以上にした場合にはconfig/database.jsの設定もこんな感じに変わるかと思います。
DATABASE_SSLはHeroku環境変数として定義します。開発用などではhobby-devプラン or hobby-basicプランを使うことも多いでしょうから、そのアプリではDATABASE_SSLはfalseにしておいて、本番環境用のアプリなど、SSL ONが必須な場合にはDATABASE_SSLをtrueに設定しておけば良いと思います。
const parse = require('pg-connection-string').parse;
const config = parse(process.env.DATABASE_URL);

module.exports = ({ env }) => {

  return {
    defaultConnection: 'default',
    connections: {
      default: {
        connector: 'bookshelf',
        settings: {
          client: 'postgres',
          host: config.host,
          port: config.port,
          database: config.database,
          username: config.user,
          password: config.password,
          ...env.bool('DATABASE_SSL', false) && {
            ssl: { rejectUnauthorized: false },
          },
        },
        options: {
          debug: env.bool('DATABASE_DEBUG', false),
        },
      },
    }
  };
};
参考: Heroku Postgres > connecting in Node.js
おしまい
Herokuも良いものですw