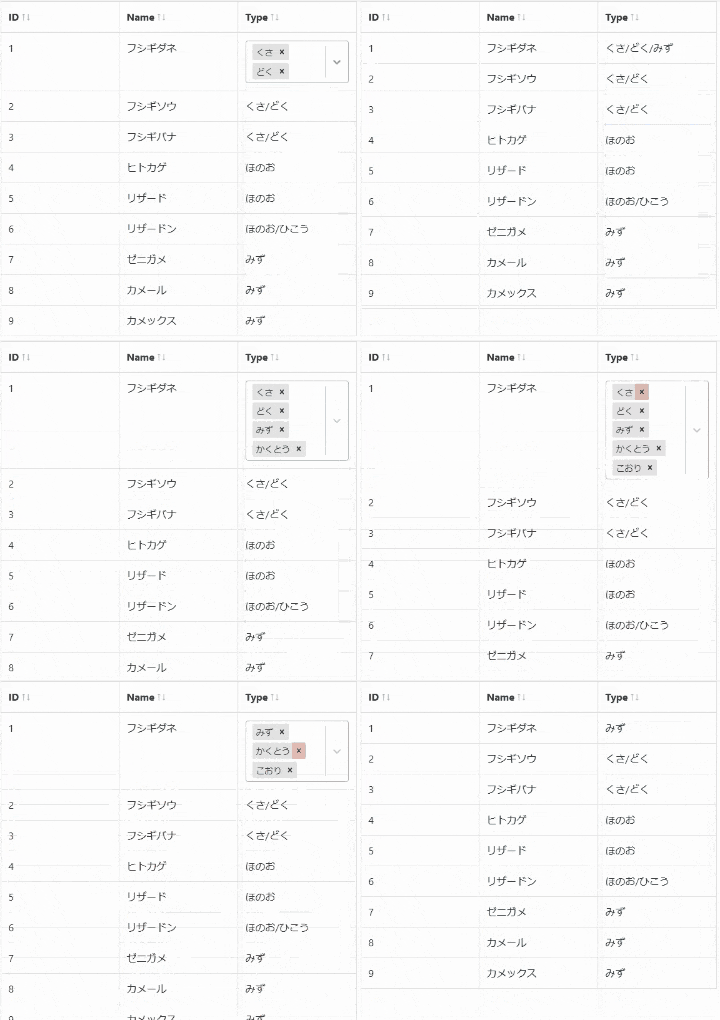
Reactでテーブルを書くためのパッケージ、react-bootstrap-table2を使ってみたので備忘録です。
react-bootstrap-table2 https://github.com/react-bootstrap-table/react-bootstrap-table2
テーブルの作成
データとカラム定義はそれぞれ配列として用意し、react-bootstrap-table2のpropsに渡すだけです。
このパッケージはその名の通りbootstrapを使用しています。あらかじめbootstrapを導入しておきます。
import React from 'react';
import BootstrapTable from "react-bootstrap-table-next";
import 'react-bootstrap-table-next/dist/react-bootstrap-table2.min.css';
import { Container } from 'reactstrap';

const data = [
  { id: 1, name: "フシギダネ", type: "くさ/どく" },
  { id: 2, name: "フシギソウ", type: "くさ/どく" },
  { id: 3, name: "フシギバナ", type: "くさ/どく" },
  { id: 4, name: "ヒトカゲ", type: "ほのお" },
  { id: 5, name: "リザード", type: "ほのお" },
  { id: 6, name: "リザードン", type: "ほのお/ひこう" },
  { id: 7, name: "ゼニガメ", type: "みず" },
  { id: 8, name: "カメール", type: "みず" },
  { id: 9, name: "カメックス", type: "みず" },
]

const columns = [
  { dataField: "id", text: "ID", sort: true, editable: false },
  { dataField: "name", text: "Name", sort: true, editable: false },
  { dataField: "type", text: "Type", sort: true, editable: false },
]

const App = () => {
  return (
    <Container style={{ width: "600px" }}>
      <BootstrapTable
        data={data}             // データ
        columns={columns}       // カラム定義
        keyField="id"           // キー
        bootstrap4={true}       // Bootstrap4を指定。デフォルトではBootstrap3
        bordered={true}         // 表のボーダー
      />
    </Container>
  );
}
export default App;
データ編集可能にする
編集機能も用意されているので使ってみます。
任意のセルをクリックすると編集モードに切り替わります。

カラム定義でeditableプロパティを有効にします。
これによりデフォルトでTextボックスによる編集が有効化されます。IDは編集されたくないのでそのままです。
また、今回データ例としているポケモンのタイプは選択肢から選ぶようにしたいと思うので、
editorプロパティで編集モードがSelectボックスになるように指定します。
最後にreact-bootstrap-table2要素のpropsとしてcellEditに
関連パッケージであるreact-bootstrap-table2-editorの関数を渡します。
blurToSaveをtrueにしておくことで編集後にコンポーネント外にフォーカスが移った場合にも変更が保存されるようになります。
// ommit
import cellEditFactory, { Type } from "react-bootstrap-table2-editor";

const data = [
  { id: 1, name: "フシギダネ", type: "くさ" },
  { id: 2, name: "フシギソウ", type: "くさ" },
  { id: 3, name: "フシギバナ", type: "くさ" },
  { id: 4, name: "ヒトカゲ", type: "ほのお" },
  { id: 5, name: "リザード", type:"ほのお" },
  { id: 6, name: "リザードン", type: "ほのお" },
  { id: 7, name: "ゼニガメ", type: "みず" },
  { id: 8, name: "カメール", type: "みず" },
  { id: 9, name: "カメックス", type: "みず" },
]

const types = [
  "くさ", "ほのお", "みず", "ひこう", "どく", "かくとう", "あく", "こおり", "むし", "でんき",
  "ノーマル", "ドラゴン", "フェアリー", "じめん", "いわ", "はがね", "エスパー", "ゴースト"
]

const columns = [
  { dataField: "id", text: "ID", sort: true, editable: false },
  { dataField: "name", text: "Name", sort: true, editable: true },
  {
    dataField: "type", text: "Type", sort: true, editable: true,
    editor: {
      type: Type.SELECT,
      getOptions: () => types.map((type) => { return { value: type, label: type } })
    }
  },
]

const App = () => {
  return (
    <Container style={{ width: "600px" }}>
      <BootstrapTable
        data={data}             // データ
        columns={columns}       // カラム定義
        keyField="id"           // キー
        bootstrap4={true}       // Bootstrap4を指定。デフォルトではBootstrap3
        bordered={true}         // 表のボーダー
        cellEdit={cellEditFactory({ mode: "click", blurToSave: true })}  // セルの編集を有効にする
      />
    </Container>
  );
}
export default App;
エディタをカスタマイズする
編集はできるようになりましたが、
ポケモンは一匹で複数のタイプを持つ場合が数多くあり、現状のSelectボックスでは機能が足りません。(下画像)

しかし調べた限り、react-bootstrap-table2には複数選択のSelectボックスにする機能がないようなので、
かわりにエディタのカスタマイズ機能を使って別のSelectボックスを表示するようにします。
Selectボックスにはreact-selectを使っていきます。
react-select https://github.com/jedwatson/react-select
まずは元データのタイプを配列にしておきます。
カラム定義のformatterプロパティで通常表示時のフォーマットを指定できるので、配列を文字列に変換して表示するようにします。
続いて、カラム定義のeditorRendererプロパティで、react-selectを使ったコンポーネントを指定します。
複数選択を有効にする場合、配列の更新となるためちょっと厄介で、実装これで合ってるのかはよくわかりません。
(とりあえず動いてる)
// ommit
import Select from "react-select";
import PropTypes from "prop-types";

const data = [
  { id: 1, name: "フシギダネ", type: ["くさ", "どく"] },
  { id: 2, name: "フシギソウ", type: ["くさ", "どく"] },
  { id: 3, name: "フシギバナ", type: ["くさ", "どく"] },
  { id: 4, name: "ヒトカゲ", type: ["ほのお"] },
  { id: 5, name: "リザード", type: ["ほのお"] },
  { id: 6, name: "リザードン", type: ["ほのお", "ひこう"] },
  { id: 7, name: "ゼニガメ", type: ["みず"] },
  { id: 8, name: "カメール", type: ["みず"] },
  { id: 9, name: "カメックス", type: ["みず"] },
]

const types = [
  "くさ", "ほのお", "みず", "ひこう", "どく", "かくとう", "あく", "こおり", "むし", "でんき",
  "ノーマル", "ドラゴン", "フェアリー", "じめん", "いわ", "はがね", "エスパー", "ゴースト"
]

const columns = [
  { dataField: "id", text: "ID", sort: true, editable: false },
  { dataField: "name", text: "Name", sort: true, editable: true },
  {
    dataField: "type", text: "Type", sort: true, editable: true,
    formatter: (cell, row) => {
      return row.type.join("/");
    },
    editorRenderer: (editorProps, value, row, column, rowIndex, columnIndex) => (
      <TypeSelect {...editorProps} value={value} row={row} options={types} />
    )
  },
]

const App = () => {
  return (
    <Container style={{ width: "600px" }}>
      <BootstrapTable
        data={data}             // データ
        columns={columns}       // カラム定義
        keyField="id"           // キー
        bootstrap4={true}       // Bootstrap4を指定。デフォルトではBootstrap3
        bordered={true}         // 表のボーダー
        cellEdit={cellEditFactory({ mode: "click", blurToSave: true })}  // セルの編集を有効にする
      />
    </Container>
  );
}
export default App;


class TypeSelect extends React.Component {
  constructor(props) {
    super(props);
    this.state = { value: this.props.row.type };
  }

  static propTypes = {
    value: PropTypes.array,
    onUpdate: PropTypes.func.isRequired
  }

  getValue() {
    return this.state.value;
  }

  // かならず一つはタイプを選択した状態にしたいので、
  // とりあえず配列が0にならないようにする。本来ならバリデーションで拾うべき。
  handleOnUpdate(event) {
    if (event) {
      console.log(event)
      this.setState({
        value: event.map(x => x.value)
      })
      return event.map(x => x.value);
    } else {
      return this.state.value;
    }
  }

  render() {
    const { value, onUpdate, ...rest } = this.props;
    return (
      <Select
        {...rest} isMulti isClearable={false}
        key="type" name="Type"
        onChange={(event) => { onUpdate(this.handleOnUpdate(event)) }}
        className="basic-single" classNamePrefix="select"
        defaultValue={this.props.row.type.map((type) => { return { value: type, label: type } })}
        options={this.props.options.map((option) => { return { value: option, label: option } })}
      />
    )
  }
}
と、上記のようにエディタのカスタマイズができたり、デザインの指定やバリデーションチェックの実装などもできるうえ、
関連パッケージを導入するとページネーションも楽に追加することができます。
比較的柔軟にやりたいことがやれるパッケージでした。
コンポーネントそのもののコードもまあまあ読みやすいままを保てる一方で、
カラム定義を弄りはじめると結構ごちゃごちゃしてきちゃうところが懸念点でしょうか。
参考
- React Select https://react-select.com/home
- react-bootstrap-table2 https://react-bootstrap-table.github.io/react-bootstrap-table2/
- react-bootstrap-table2 storybook https://react-bootstrap-table.github.io/react-bootstrap-table2/storybook/

