warmupDurationSecsを見てみるモチベーション
アプリケーションによっては起動直後に最大限のパフォーマンスを出せないケースがあると思います。
こういった問題を解消すべくkubernetes環境のアプリケーションではStartupProbeを使った暖気処理を行うケースも存在します。
一方で暖気処理をするのにも一工夫が必要な特性を持つアプリケーションも考えられます。
そういった場合、起動直後はゆるやかにトラフィックを流したいケースなどもあるのではないでしょうか。
istio v14系よりLoadBalancerSettingsにwarmupDurationSecsという項目が利用可能になっており、個人的に上記のようなケースを考え気になっていました。
Represents the warmup duration of Service. If set, the newly created endpoint of service remains in warmup mode starting from its creation time for the duration of this window and Istio progressively increases amount of traffic for that endpoint instead of sending proportional amount of traffic. This should be enabled for services that require warm up time to serve full production load with reasonable latency. Currently this is only supported for ROUND_ROBIN and LEAST_REQUEST load balancers.
似たような機能としてAWSのALBなどではスロースタートモードが存在します。
本記事ではwarmupDurationSecsの動作について見てみたのでその記録を記載します。
検証環境
本検証ではkindを利用したkubernetes環境にistioをインストール、テスト用のApplicationとしてはhttpbinを利用し、検証結果の可視化にはSplunkを利用しました。
- kind
- kubernetes(v1.21.10)
- istio(v16.0)
- httpbin・・・Sample Application
- curlimages/curl・・・テスト用Request送信元に利用
- Splunk Enterprise Free(ログ分析用、Splunk EnterPriseフリーライセンス版)
kindでkubernetesクラスタ構築
まず初めにkindをinstallしておきます
brew install kind
クラスター用のyamlを作成します
kind: Cluster
apiVersion: kind.x-k8s.io/v1alpha4
nodes:
- role: control-plane
- role: worker
- role: worker
クラスタを作成します
% K8S_NODE_IMAGE=v1.21.10
kind create cluster --name my-kind-cluster \
--image=kindest/node:${K8S_NODE_IMAGE} \
--config cluster.yaml

# 以下確認
% kubectl get node
NAME                            STATUS   ROLES                  AGE   VERSION
my-kind-cluster-control-plane   Ready    control-plane,master   80s   v1.21.10
my-kind-cluster-worker          Ready    <none>                 46s   v1.21.10
my-kind-cluster-worker2         Ready    <none>                 46s   v1.21.10
istio & istioctl を利用可能にする
ドキュメントに従いInstallしていきます。
% curl -L https://istio.io/downloadIstio | sh -
% cd istio-1.16.0
% export PATH=$PWD/bin:$PATH
% istioctl install --set profile=demo -y

# default namespaceでistioがinjectされるようにする
% kubectl label namespace default istio-injection=enabled
httpbinのDeploy
今回は各manifestはkustomizationで管理することにしました。
以下のmanifestを定義しApplyしていきます。
sample-appディレクトリを作成し、配下に以下のファイルを作成、kindクラスタにapplyしていきます。
httpbin.yaml
apiVersion: v1
kind: ServiceAccount
metadata:
  name: httpbin
---
apiVersion: v1
kind: Service
metadata:
  name: httpbin
  labels:
    app: httpbin
spec:
  ports:
  - name: http
    port: 8000
    targetPort: 80
  selector:
    app: httpbin
---
apiVersion: apps/v1
kind: Deployment
metadata:
  name: httpbin
spec:
  replicas: 1
  selector:
    matchLabels:
      app: httpbin
      version: v1
  template:
    metadata:
      labels:
        app: httpbin
        version: v1
    spec:
      serviceAccountName: httpbin
      containers:
      - image: docker.io/kennethreitz/httpbin
        imagePullPolicy: IfNotPresent
        name: httpbin
        command: ["gunicorn", "--access-logfile", "-", "-b", "0.0.0.0:80", "httpbin:app"]
        ports:
        - containerPort: 80
destination.yaml
apiVersion: networking.istio.io/v1alpha3
kind: DestinationRule
metadata:
  name: httpbin
spec:
  host: httpbin.default.svc.cluster.local
  trafficPolicy:
    loadBalancer:
      simple: ROUND_ROBIN
  subsets:
  - name: v1
    labels:
      version: v1
virtualservice.yaml
apiVersion: networking.istio.io/v1alpha3
kind: VirtualService
metadata:
  name: httpbin
spec:
  hosts:
  - httpbin.default.svc.cluster.local
  http:
  - route:
    - destination:
        host: httpbin.default.svc.cluster.local
        port:
          number: 8000
        subset: v1
    timeout: 10s
kustomization.yaml
resources:
  - httpbin.yaml
  - destinationrule.yaml
  - virtualservice.yaml
これらをDeployします
kubectl apply -k ./sample-app
動作確認
では本題の挙動を見ていきます。
warmupDurationSecs設定無し
まずは上記のmanifest通りwarmupDurationSecs無しの動作を見てみます。
以下動作確認の流れです。
- curlimagesを起動&シェルに入ってコマンドを発行(0.1秒間隔でhttpbninにRequestを送信)
% kubectl run --rm -it temp-curl --image=curlimages/curl --restart=Never -- sh
$ while true; do curl "http://httpbin.default.svc.cluster.local/status/200"; sleep 0.1; done
- 途中でreplica数を2に変更しApply。
- 一定期間経過後にcurl停止、httpbin側でログを出力
kubectl logs <httpbin(最初から起動していた方)pod名> -c httpbin -f > httpbin-1.log
kubectl logs <httpbin(replica数2にして起動した)pod名> -c httpbin -f > httpbin-2.log
- 上記のデータをそれぞれの別host名としてローカルのSplunkに食わせます。
- localのSplunk Enterprise Freeを起動し設定>データ入力を選択
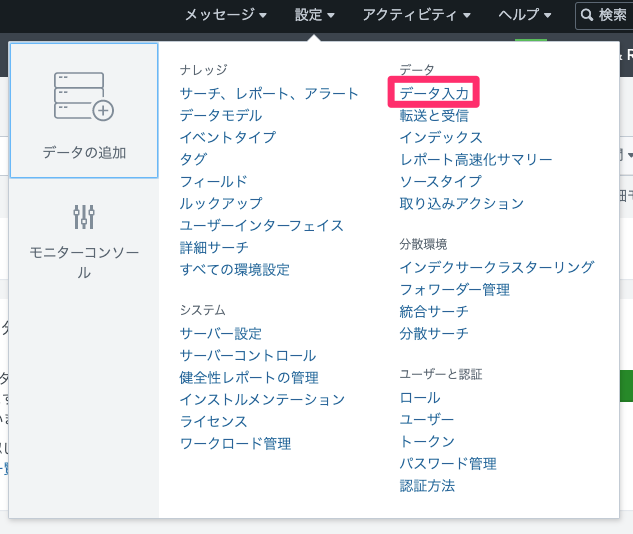
- ファイルとディレクトリから「新規追加」を選択します
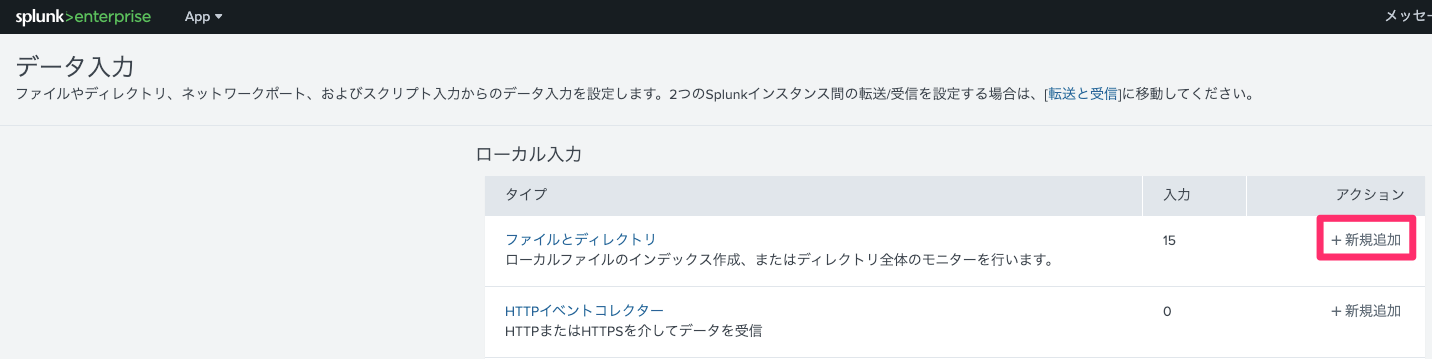
- 取得したログファイルを選択し、1回インデックスを作成を選択
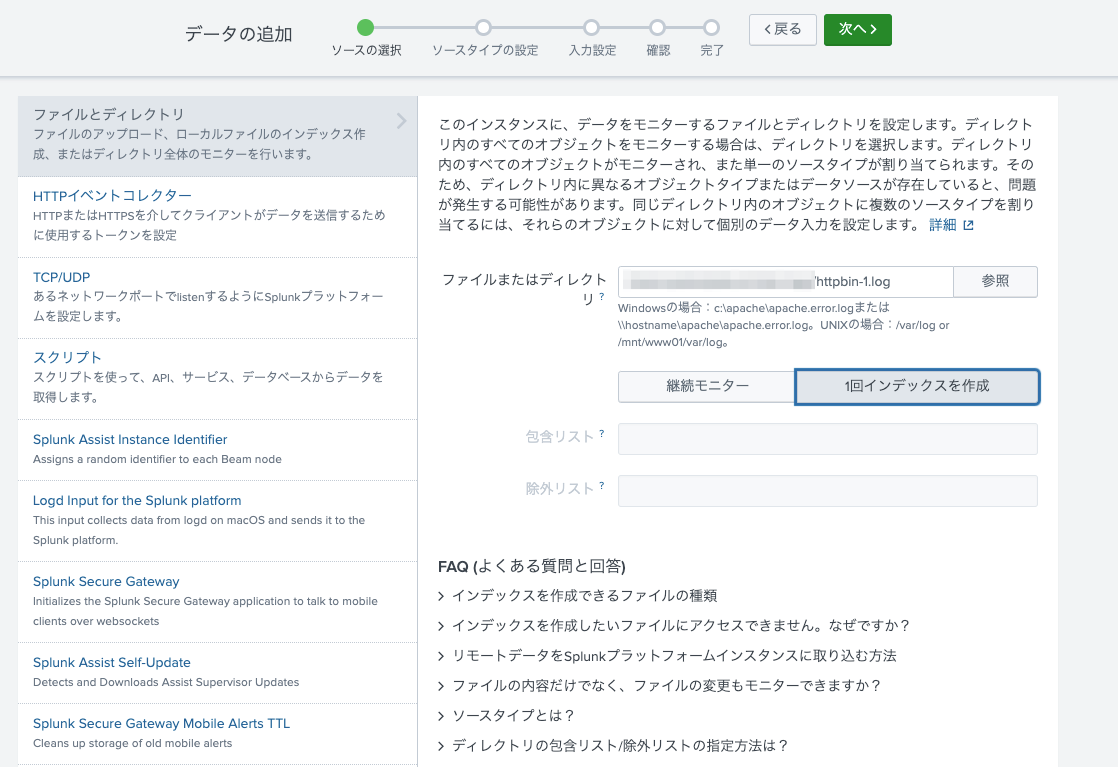
- 入力設定ではファイル毎に別ホスト名を設定しておくと後で確認が楽になります
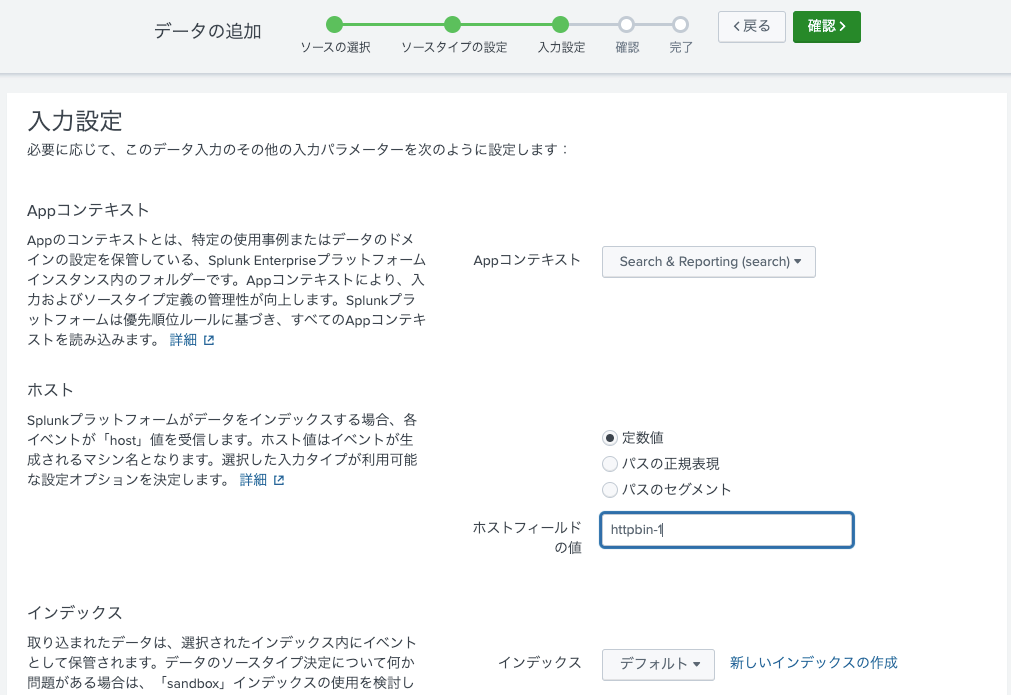
- これで以下のサーチ文で各Pod毎のログ量、つまりトラフィックを受けた量の分析が簡単にできます
- localのSplunk Enterprise Freeを起動し設定>データ入力を選択
index=main host="httpbin-*" | timechart span=1s count by host
結果
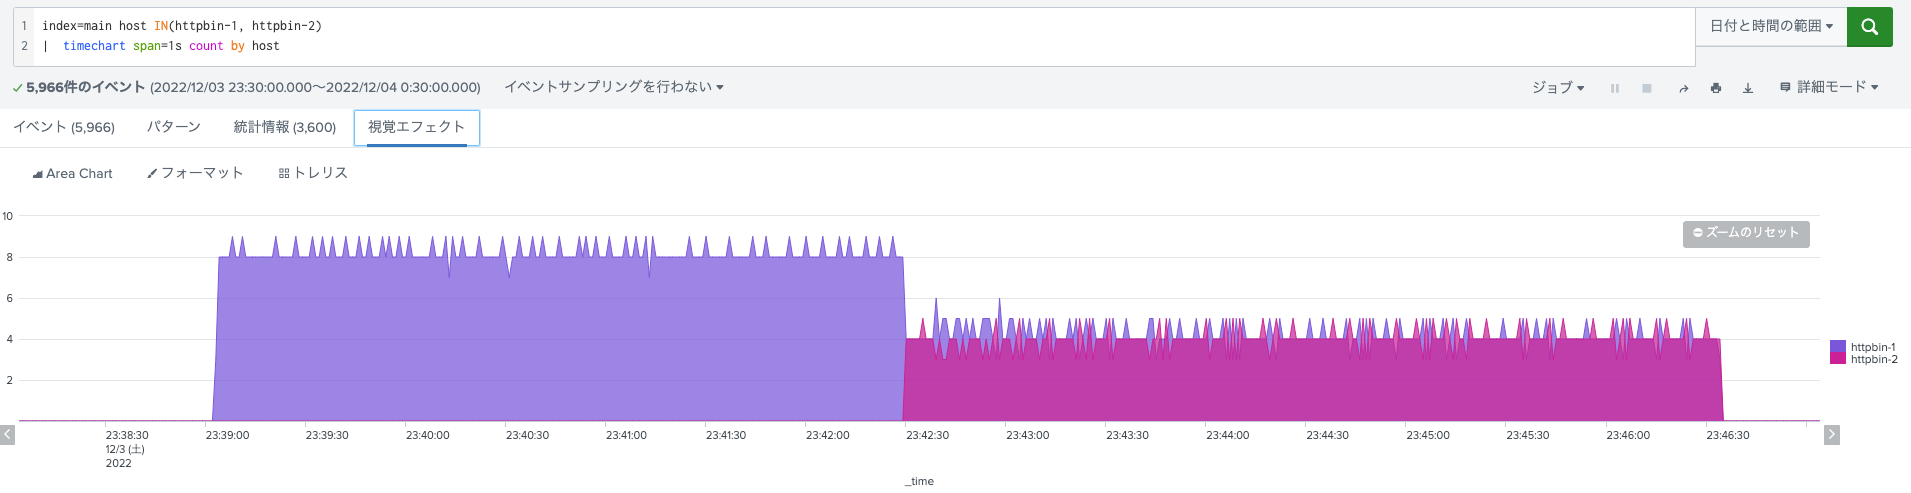
以下特にwarmupDurationSecsを設定しなかった場合の各コンテナでの秒間Request数です。
起動直後のPodもRound Robinで均一にRequestが割り振られていることが分かります。
warmupDurationSecs設定あり
今後はwarmupDurationSecsを設定して挙動を見ていきます。
destinationrule.yamlのloadBalancer設定を以下のように変更、また先ほどreplica数を2にしたhttpbinを再度replica数1に戻してapplyします。
# 中略
spec:
  host: httpbin.default.svc.cluster.local
  trafficPolicy:
    loadBalancer:
      simple: ROUND_ROBIN
      warmupDurationSecs: 100s
この状態で先ほど同様curl用podからcurl実行、途中でReplica数を2に変更してapplyしていきます。
また同様の手順でログを取得しSplunkにデータを入力します。
結果
warmupDurationSecsの設定が投入された状態での振り分け結果が以下となります。
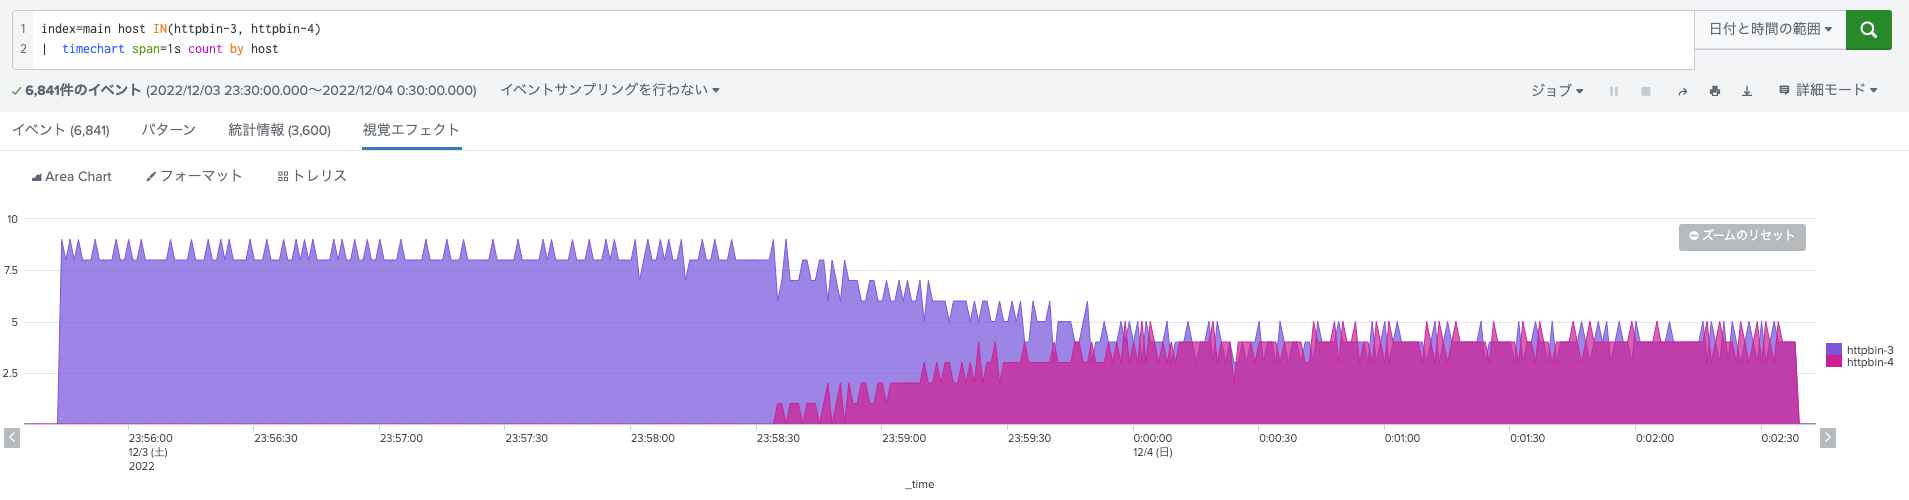
先ほどと比較し、起動直後は緩やかに新規追加PodへのRequestの割り当てが行われており、一定時間が経過した後に均等にトラフィックが割り振られるようになりました。
最後に
warmupDurationSecsの動きをローカル環境で確認してみました。
期待通りの動きをしていたので今後何らかの事情で暖気処理が必要なアプリケーションなどの1つの選択肢となり得るのではないかと思います。