はじめに
OAuthを用いて、Web APIのアクセス制御を行います。OAuthの情報は、基本的に以下にあります。この記事は、以下のサイトの情報を読み解いて、最小サンプルを作成してみました。
作成したいサンプルアプリケーションの要求は以下になります
- アクセストークンはOAuth2 authorization codeで取得できること
- Web APIはアクセストークンを用いてアクセス可能なこと
- Web APIはアクセストークンなしではエラーを返すこと
基本設定
Spring Boot, Spring Security, Spring Security OAuthの3つのライブラリを使用します。
必要なライブラリを使用するためにbuild.gradleに以下を記述します
build.gradle
dependencies {
    compile("org.springframework.boot:spring-boot-starter-web")
    compile("org.springframework.boot:spring-boot-starter-security")
    compile("org.springframework.security.oauth:spring-security-oauth2")
}
Applicationクラスや、APIを作成するクラスは、なるべく簡略化しています。単純にlocalhost:8080にアクセスすると"hello world"と返すだけです。
Application.java
@SpringBootApplication
public class Application {
    public static void main(String[] args) {
        SpringApplication.run(Application.class, args);
    }
}
APIController.java
@RestController
public class APIController {
    @RequestMapping("/")
    public String get() {
        return "hello world\n";
    }
}
ユーザーの設定
WebSecurityConfigurerAdapterを用いてユーザーの設定を行います。ここではユーザーを単純に一人追加しています。詳細の説明はここでは行いません。HttpSecurityについてはこの記事をご参照下さい。
configure(HttpSecurity http)では、全ての呼び出しに認証がいることと、OAuth ServerからのID/Password認証を設定しています。
SecurityConfig.java
@Configuration
@EnableWebSecurity
public class SecurityConfig extends WebSecurityConfigurerAdapter {
    @Override
    protected void configure(AuthenticationManagerBuilder auth) throws Exception {
        auth.inMemoryAuthentication()
                .withUser("user").password("password").roles("USER");
    }

    @Override
    protected void configure(HttpSecurity http) throws Exception {
        http.authorizeRequests().antMatchers("/**").authenticated()
                .and().httpBasic().realmName("OAuth Server");
    }
}
認可設定
アクセストークンをクライアントが取得するための設定を行います。認可設定は、AuthorizationServerConfigurerAdapterを継承したクラスで行います。
まず発行したアクセストークンを保存する場所を指定します。ここではメモリ上のトークンストアを指定しています。実際にはデータベースなどのストレージに保存されると思います。
次にアクセストークンを取得するクライアントの設定をします。設定している項目は以下です。
- クライアントID
- ロール
- リソースID
- 認可するスコープ
- 認証タイプ (ここでは認証コードを指定しています)
- デフォルトのリダイレクトURI
- クライアントシークレット
@Configuration
@EnableAuthorizationServer
public class OAuthAuthorizationConfig extends AuthorizationServerConfigurerAdapter {
    @Autowired
    private TokenStore tokenStore;

    @Bean
    public TokenStore tokenStore() {
        return new InMemoryTokenStore();
    }

    @Override
    public void configure(AuthorizationServerEndpointsConfigurer endpoints) throws Exception {
        endpoints.tokenStore(tokenStore());
    }

    @Override
    public void configure(ClientDetailsServiceConfigurer clients) throws Exception {
        clients.inMemory()
                .withClient("oauth_client")
                .authorities("USER")
                .resourceIds(OAuthResourceConfig.RESOURCE_ID)
                .scopes("read")
                .authorizedGrantTypes("authorization_code")
                .redirectUris("http://oauth-callback.com")
                .secret("oauth_client_secret");
    }
}
リソース設定
アクセストークンに対して、リソースアクセスの設定を行います。これには、ResourceServerConfigurerAdapterを使用します。
設定している内容は
- リソースID
- URIのパスに対してどのようなアクセス権が必要か(ここではreadスコープが必要と記述しています)
HTTP GETのみ指定しているので、GET以外のアクセスは全て認証エラーになります。
@Configuration
@EnableResourceServer
public class OAuthResourceConfig extends ResourceServerConfigurerAdapter {
    static final String RESOURCE_ID = "my_resource_id";

    @Override
    public void configure(ResourceServerSecurityConfigurer resources) throws Exception {
        resources.resourceId(RESOURCE_ID);
    }

    @Override
    public void configure(HttpSecurity http) throws Exception {
        http.authorizeRequests()
                .antMatchers(HttpMethod.GET, "/**").access("#oauth2.hasScope('read')");
    }
}
動作確認
これで実装完了です。最後に動作確認を行います。まず、認証コードの取得をブラウザで行います。
以下のようなURIを入力します。
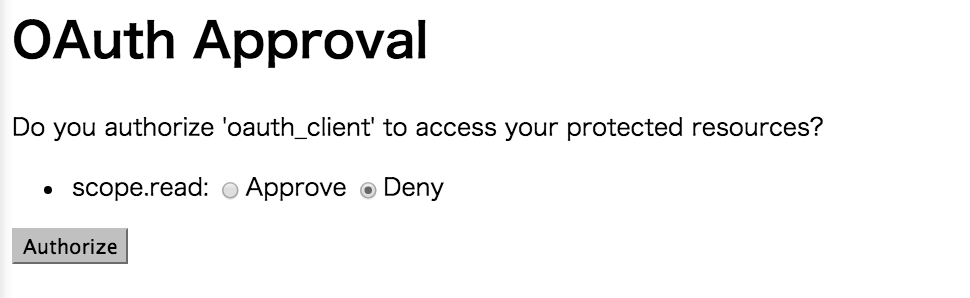
http://localhost:8080/oauth/authorize?response_type=code&client_id=oauth_client&redirect_url=http://oauchcallback.com&scope=read
アクセス権を与えるかどうかの確認ページが表示されます。このビューはSpring Security OAuthの中で実現されています。
以下のような認証コードが返ってきます
http://oauth-callback.com/?code=sVs0bm
取得した認証コードを用いて、POSTメッセージでアクセストークンを取得します。以下はPOST MANというChromeのExtensionを用いた例です。

最後に取得したアクセストークンを用いてリソースにアクセスするとhello worldとちゃんと返ってきました。
$curl -H "Authorization: Bearer ca29a1b6-89fc-4ded-a00f-6fd7f4bcf991" localhost:8080
hello world
アクセストークンが異なると以下のような認証エラーが返ってきます
{"error":"invalid_token","error_description":"Invalid access token: ca29a1b6-89fc-4ded-a00f-6fd7f4bcf99"}
アクセストークンを指定していないと以下のようなエラーが返ります
$ curl "localhost:8080"
{"error":"unauthorized","error_description":"Full authentication is required to access this resource"}